2 Exploring WebCenter Portal
This chapter describes how to get started in WebCenter Portal. It provides information about registering yourself (if necessary) and links to more detailed sections that cover, working in the Home portal, searching, saving favorites, and setting preferences. There is also a brief section about how to access help.
This chapter includes the following topics:
Permissions:
The tasks described in this chapter are available to any WebCenter Portal user minimally assigned the roleAuthenticated-User; that is, any user who is logged in.Notes:
-
If you are using Internet Explorer, turn off Compatibility Mode before trying to access WebCenter Portal. In Internet Explorer, from the Tools menu, select Compatibility View Settings. In the Compatibility View Settings dialog, deselect all the options, and click Close.
-
WebCenter Portal supports only single browser tab or window viewing. It will not function properly if you try to view WebCenter Portal in multiple browser tabs or windows simultaneously.
2.1 Registering Yourself with WebCenter Portal
Your system administrator may enable self-registration with WebCenter Portal. This allows you to create your own login credentials and enter the WebCenter Portal as an authenticated user. The privileges of authentication are many: your own view of the Home portal, access to other features based on your assigned user role, a broader range of available interactive features, to name a few.
Note:
Whether self-registration is available depends on how your system administrator configures the application.To register yourself as a WebCenter Portal user:
-
Open WebCenter Portal.
For example:
http://host:port/webcenterWhere
host:portrefers to the host name and port number of the system where WebCenter Portal is installed. By default, WebCenter Portal is installed on port 8888. -
On the login screen, click the Register link (Figure 2-1).
Note:
Your system administrator can customize the look and feel of the Login page, but the information depicted in Figure 2-1 is essentially the same whatever the customization.Figure 2-1 The Register Link on the Welcome Page
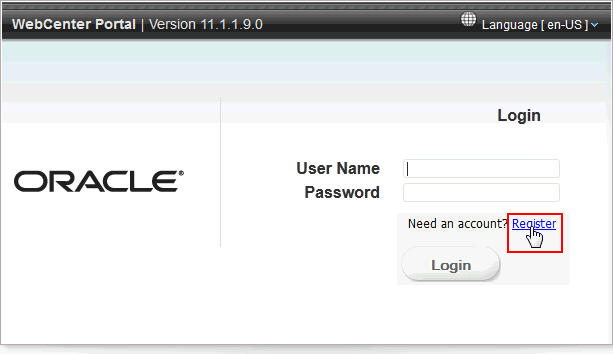
Description of ''Figure 2-1 The Register Link on the Welcome Page''
-
On the resulting Self-Registration page (Figure 2-2), enter your user information:
Fields marked with an asterisk require a value.
Tip:
Your system administrator can customize the Self-Registration page, so it may not appear as depicted in Figure 2-2.Figure 2-2 WebCenter Portal Self-Registration Page
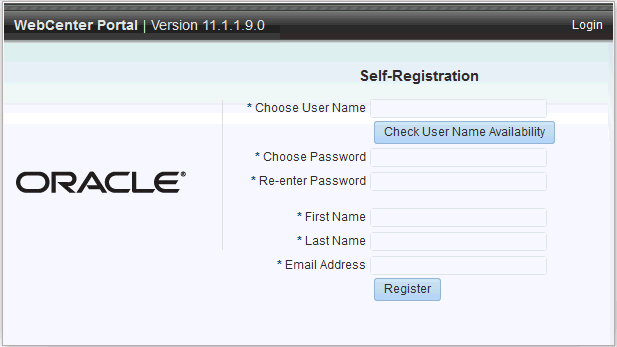
Description of ''Figure 2-2 WebCenter Portal Self-Registration Page''
Before you begin, you should know that the user name and password policy is set by the underlying identity store. Your system administrator may customize the Self-Registration page to include information that explains your organization's user name and password policy.
-
Enter your preferred user name in the Choose User Name field.
Note:
If your company uses email addresses as user names, enter your email address. -
Click the Check User Name Availability button to ensure the uniqueness of your chosen user name.
If the name you entered is in use, provide another user name and test that. Continue this cycle until the check assures you that your entry is unique.
-
Provide a password in the Choose Password field.
-
Reenter the password in the Re-enter Password field.
-
Enter your first name in the First Name field.
-
Enter your last name (that is, your surname) in the Last Name field.
-
Enter your company email address in the Email Address field.
Note:
You can create only one user account per email address.
-
-
Click the Register button.
If the data you entered is accepted, a log-in dialog opens, enabling you to log in to WebCenter Portal.
Note:
By default, if a user name with the same mail ID exists, when you click Register, a dialog opens informing you that the mail ID exists. The dialog includes a button for sending a message to the mail ID associated with the existing user name.Because you are not yet authenticated, your message is sent to a public mail box, provided your system administrator has configured public mail credentials.
Note that this default behavior may be overridden by customizations provided by your portal developers.
2.2 Working In the Home Portal
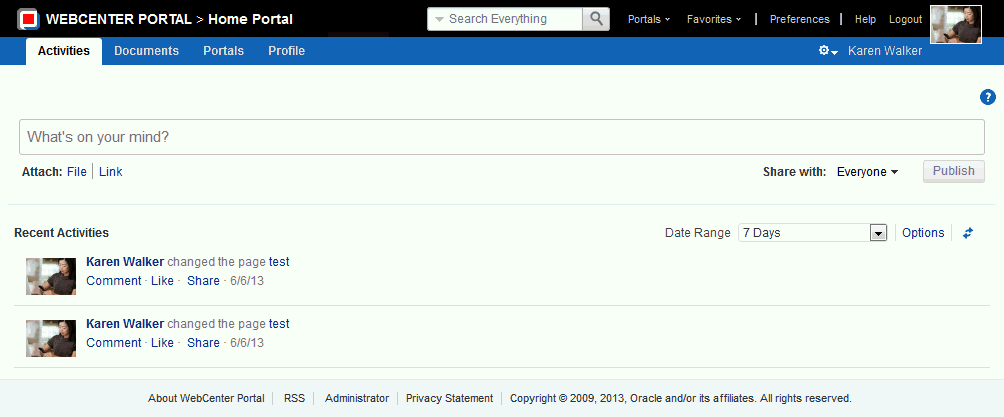
When you log in to WebCenter Portal, the default landing page is the Home portal (Figure 2-3). Your system administrator may have changed the landing page to a different portal or page.
For more information, see Chapter 8, "Working In the Home Portal."
2.3 Searching WebCenter Portal
WebCenter Portal provides global (application-wide) search (Figure 2-4). For information, see Chapter 3, "Searching for Information."
2.4 Saving Favorite Web Pages
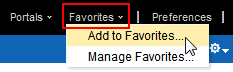
Use Favorites (Figure 2-5) to keep your own personal list of favorite web sites and pages to access from any browser you choose. For information, see Chapter 4, "Managing Your Favorites."
2.5 Setting Preferences
Your personal preferences, accessed through the Preferences link (Figure 2-6), provide easy configuration settings for tailoring the application to your particular working style. These include settings for your preferred application display language; your preferred application look and feel; your WebCenter Portal password; and the like. Additionally, WebCenter Portal preferences provide an accessibility setting to optimize the application user interface for use with a screen reader, such as JAWS. For information, see Chapter 5, "Setting Your Personal Preferences."

2.6 Working with Your Profile
Your profile is a collection of useful data about you. It can include contact information, a photo, your location within the company hierarchy, and so on. The social networking capabilities in WebCenter Portal enable you to view and manage your own profile and to view the profiles of others if they have made them available to you. For information about how to view and manage your profile, see Chapter 6, "Managing Your Profile."
2.7 Accessing WebCenter Portal Online Help
Wherever you see a Help link or a help icon, click it to access help.
The Help link (Figure 2-7) opens the application's main help page. From there, you can navigate to topics of interest.
Help icons ( ![]() ) open help topics that provide context-sensitive help (describing the user interface from which you launched help).
) open help topics that provide context-sensitive help (describing the user interface from which you launched help).