3 Upgrading the Fusion Middleware Infrastructure
This chapter describes the process of upgrading Fusion Midleware Infrastructure to the latest 12c (12.2.1.1) release from a 11g or a previous 12c release.
This chapter contains the following topics:
- Completing the Pre-Upgrade Tasks for Infrastructure (Required)
It is important to complete all the standard Oracle Fusion Middleware pre-upgrade tasks associated with your environment before upgrading from Oracle Fusion Middleware 11g Application Developer installation to Oracle Fusion Middleware 12c Infrastructure. Most pre-upgrade tasks are required for all Fusion Middleware components, while some are specific to Infrastructure. - Installing Fusion Middleware Infrastructure
Installing Fusion Middleware Infrastructure creates an Oracle home directory and lays supporting software to install other Fusion Middleware products. - Stopping Servers and Processes
Before running the Upgrade Assistant, shut down all Oracle Fusion Middleware Managed Servers, Administration Servers, and system components (such as OHS) that may be using the schemas or configurations you want to update. Failure to do so may result in an incomplete or failed upgrade. - Determining Which Schemas to Create
You must create the required schemas depending upon whether your 11g schemas were file-based or database-based. - Creating the Required Schemas with the RCU
If you are upgrading from 11g, you must create the required 12c schemas before you begin the upgrade. - Using the Schema Version Registry to Identify the Existing Schemas
When the schemas are created in your database, RCU creates and maintains a table calledschema_version_registry. This table contains schema information such as version number, component name and ID, date of creation and modification, and custom prefix. When you run the Upgrade Assistant. it identifies schemas for which an upgrade is available. You can upgrade multiple schemas in a single session of running the Upgrade Assistant. - About Upgrading Schemas using the Upgrade Assistant
The Upgrade Assistant provides two options for upgrading schemas: Individually Selected Schemas and All Schemas Used By a Domain. - Identifying Schemas that Can be Upgraded with the Upgrade Assistant
Review the list of available schemas before you begin the upgrade by querying the schema version registry. - Upgrading the Schemas with the Upgrade Assistant
Run the Upgrade Assistant to upgrade all the schemas in the existing domain to 12.2.1.1. Oracle recommends that you run the Upgrade Assistant as a non-SYSDBA user. - Reconfiguring the Domain with the Reconfiguration Wizard
The Reconfiguration Wizard reconfigures the domain while retaining the location of the domain. Use the Reconfiguration Wizard to upgrade your domain to the latest version. - Upgrading the Domain Component Configurations with the Upgrade Assistant
Follow the instructions in this section to upgrade any additional domain component configurations, such as OWSM policy metadata structure and adapter configurations, using the Upgrade Assistant. - Troubleshooting the Infrastructure Upgrade
If the Infrastructure upgrade fails, troubleshoot the cause using the log file and guidelines in this topic. - Performing the Post-Upgrade Tasks
After you upgrade Oracle Fusion Middleware 11g Application Developer to Oracle Fusion Middleware 12c Infrastructure, you must complete the post-upgrade tasks.
3.1 Completing the Pre-Upgrade Tasks for Infrastructure (Required)
It is important to complete all the standard Oracle Fusion Middleware pre-upgrade tasks associated with your environment before upgrading from Oracle Fusion Middleware 11g Application Developer installation to Oracle Fusion Middleware 12c Infrastructure. Most pre-upgrade tasks are required for all Fusion Middleware components, while some are specific to Infrastructure.
Caution:
In addition to completing the pre-upgrade tasks required for Infrastructure, you must also complete all of the applicable pre-upgrade tasks described in Oracle Fusion Middleware Pre-Upgrade Checklist.
You must back up your existing environment. If the upgrade fails for any reason, you will have to restart the upgrade process from the source backup.
For more information, see Backup and Recovery Strategies for Upgrade in Planning an Upgrade of Oracle Fusion Middleware.
For Infrastructure-specific pre-upgrade tasks, see the following:
- Maintaining Your Custom setDomainEnv Settings (Optional)
Every domain includes dynamically generated domain and server startup scripts, such assetDomainEnv. Oracle recommends that you do not modify these startup scripts, as any changes you make to them will be overwritten during subsequent domain upgrade operations. - Using No-Auth SSL Mode in OID Security Store
The SSL protocol provides transport layer security with authenticity, integrity, and confidentiality, for a connection between a client and server. The SSL authentication mode is controlled by the attributeorclsslauthenticationin the instance-specific configuration entry. By default, Oracle Internet Directory (OID) uses SSL No Authentication Mode (orclsslauthentication=1). - Removing the Server Instance Scope from OWSM Policy Sets
The Server Instance Scope in policy sets was not recommended in 11g (11.1.1.7.0) and is not supported in 12c. However, if you have policy sets that use the Server Instance Scope, they are disabled during the upgrade to 12c. Therefore, you must remove the Server Instance Scope from all the 11g policy sets before upgrading to 12c. - Cloning Predefined Documents and Migrating OWSM Policy Attachments
When upgrading, it is important to note that any predefined documents that have not been customized for your environment are replaced with read-only versions, and new, predefined, read-only documents are added. However, any existing predefined documents that have been customized and any user-created custom policies in the repository are not overwritten. - Running the Readiness Check
Oracle recommends that you run the Readiness Check before starting the upgrade process in order to ensure that your pre-upgrade environment is ready for upgrade.
3.1.1 Maintaining Your Custom setDomainEnv Settings (Optional)
Every domain includes dynamically generated domain and server startup scripts, such as setDomainEnv. Oracle recommends that you do not modify these startup scripts, as any changes you make to them will be overwritten during subsequent domain upgrade operations.
Caution:
Changes made to the setDomainEnv script - or any other startup script - before an upgrade are overwritten by the new, regenerated scripts during the domain reconfiguration process. Create a separate file to store your customized domain settings before you upgrade.
For example, if you want to customize server startup parameters that apply to all servers in a domain, you can create a file called setUserOverrides.cmd (Windows) or setUserOverrides.sh (UNIX) and configure it to add custom libraries to the WebLogic Server classpath, specify additional java command line options for running the servers, or specify additional environment variables, for instance. Any custom settings you add to this file are preserved during domain upgrade operation and are carried over to the remote servers when using the pack and unpack commands.
setUserOverrides file:
# add custom libraries to the WebLogic Server system claspath
  if [ "${POST_CLASSPATH}" != "" ] ; then
    POST_CLASSPATH="${POST_CLASSPATH}${CLASSPATHSEP}${HOME}/foo/fooBar.jar"
    export POST_CLASSPATH
  else
    POST_CLASSPATH="${HOME}/foo/fooBar.jar"
    export POST_CLASSPATH
  fi

# specify additional java command line options for servers
JAVA_OPTIONS="${JAVA_OPTIONS}  -Dcustom.property.key=custom.value"
If the setUserOverrides file exists during a server startup, the file is included in the startup sequence and any overrides contained within this file take effect. You must store the setUserOverrides file in the domain_home/bin directory.
Note:
If you are unable to create the setUserOverrides script before an upgrade, you need to reapply your settings as described in Re-apply Customizations to Startup Scripts.
3.1.2 Using No-Auth SSL Mode in OID Security Store
The SSL protocol provides transport layer security with authenticity, integrity, and confidentiality, for a connection between a client and server. The SSL authentication mode is controlled by the attribute orclsslauthentication in the instance-specific configuration entry. By default, Oracle Internet Directory (OID) uses SSL No Authentication Mode (orclsslauthentication=1).
If you are upgrading to 12c Infrastructure, and using OID as the security policy store with Oracle WebLogic Server, then you may need to modify the default SSL mode. In Oracle Internet Directory 11g, SSL interoperability mode is enabled by default. But Oracle Internet Directory is fully compliant with the JDK's SSL, provided SSL interoperability mode is disabled.
The default use of No-Auth SSL mode in Oracle Internet Directory (OID) is discouraged for production environments due to the susceptibility to Man-in-the-Middle (MITM) attacks.
However, if No-Auth SSL is required, and WebLogic Server is the client, the following system properties must be applied to the weblogic.properties file before you upgrade:
-
-Dweblogic.security.SSL.AllowAnonymousCipher=true
-
-Dweblogic.security.SSL.ignoreHostnameVerification=true
Note:
Setting these properties can make the WebLogic Server susceptible to MITM attacks, since anonymous cipher suites are enabled, and the client connections are without Hostname Verification checking.
Oracle strongly recommends that you to use either server or client/server SSL authentication when using OID with WebLogic Server 12c.
3.1.3 Removing the Server Instance Scope from OWSM Policy Sets
The Server Instance Scope in policy sets was not recommended in 11g (11.1.1.7.0) and is not supported in 12c. However, if you have policy sets that use the Server Instance Scope, they are disabled during the upgrade to 12c. Therefore, you must remove the Server Instance Scope from all the 11g policy sets before upgrading to 12c.
For instructions, see Editing a Policy Set in Security and Administrator's Guide for Web Services in the Oracle Fusion Middleware 11g Release 1 (11.1.1.7.0) documentation library.
3.1.4 Cloning Predefined Documents and Migrating OWSM Policy Attachments
When upgrading, it is important to note that any predefined documents that have not been customized for your environment are replaced with read-only versions, and new, predefined, read-only documents are added. However, any existing predefined documents that have been customized and any user-created custom policies in the repository are not overwritten.
To ensure that you always get all of the latest policies, Oracle recommends that you clone any predefined documents that you have modified and migrate any policy attachments. For details, see Upgrading the OWSM Repository in Securing Web Services and Managing Policies with Oracle Web Services Manager.
3.1.5 Running the Readiness Check
Oracle recommends that you run the Readiness Check before starting the upgrade process in order to ensure that your pre-upgrade environment is ready for upgrade.
- About Running a Pre-Upgrade Readiness Check with the Upgrade Assistant
You can run the Upgrade Assistant in -readiness mode to detect issues before you perform the actual upgrade. This can be done using the GUI or with silent upgrades using the response files. - Readiness Check Screens
This section describes the screens that are presented when running the Upgrade Assistant in -readiness mode.
3.1.5.1 About Running a Pre-Upgrade Readiness Check with the Upgrade Assistant
The Upgrade Assistant readiness check performs a read-only, pre-upgrade review of your existing Oracle Fusion Middleware schemas and Oracle WebLogic configurations.
The readiness check generates a formatted, time-stamped readiness report so you can address potential issues before you attempt the actual upgrade. If no issues are detected, you can begin the upgrade process. Oracle recommends that you read this report thoroughly before performing an upgrade.
For more information, see the Sample Readiness Report..
Note:
Alternatively, you can run the readiness check in -response mode to perform a silent readiness check using a response file. For more information on using a response file with the Upgrade Assistant, see Starting the Upgrade Assistant in Response File Mode.You can run the readiness check while your existing Oracle Fusion Middleware domain is online (while other users are actively using it), or offline.
Readiness checks can be run any number of times before any actual upgrades are attempted. However, do not run the readiness check after an upgrade has been performed, as the report will not provide valid results.
Note:
Oracle recommends that you run the readiness checks during off-peak hours to prevent possible performance degradation.
3.1.5.1.1 Starting the Upgrade Assistant in Readiness Mode
To perform a readiness check on your pre-upgrade environment, you will launch the Upgrade Assistant in -readiness mode as shown below:
-
Change directory to
$ORACLE_HOME/oracle_common/upgrade/binon UNIX operating systems or%ORACLE_HOME%/oracle_common/upgrade/binon Windows operating systems. -
Enter the following command to start the Upgrade Assistant.
On UNIX operating systems:
./ua -readinessOn Windows operating systems:
ua.bat -readinessProvide the required information in each of the Upgrade Assistant screens. The screens you see will vary depending on the upgrade options you select. The sections below describe the upgrade options and the information you will need to provide.
3.1.5.1.2 Performing the Readiness Check
When the Upgrade Assistant is started in -readiness mode, the following screens appear.
Alternatively, you can run the readiness check using a response file. For more information on using a response file with the Upgrade Assistant, see Starting the Upgrade Assistant in Response File Mode.
Note that these screens are a subset of the screens you will see.
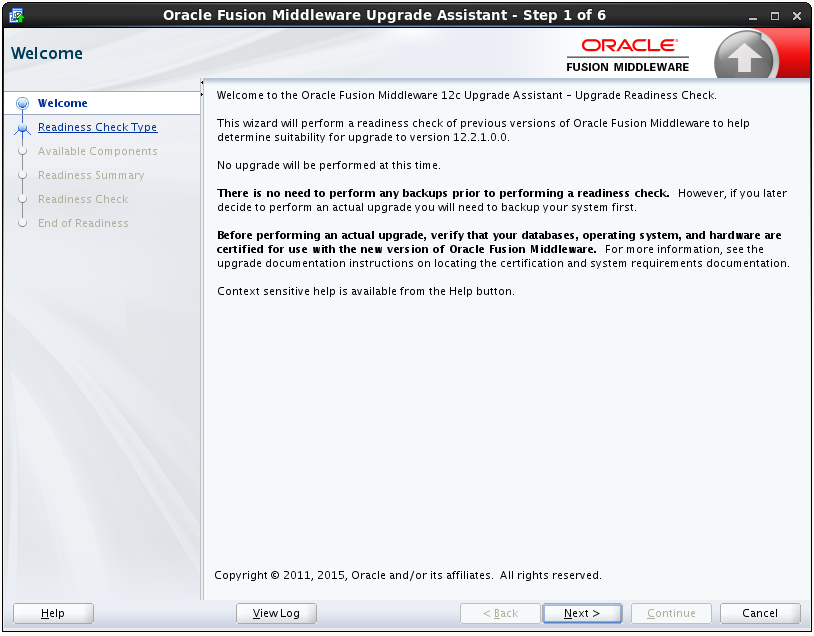
Table 3-1 Upgrade Assistant Screens: Readiness Check
| Screen | When Screen Appears | Description |
|---|---|---|
|
Always. |
This screen provides an overview of the readiness check. |
|
|
Readiness Check Type:
|
Always. |
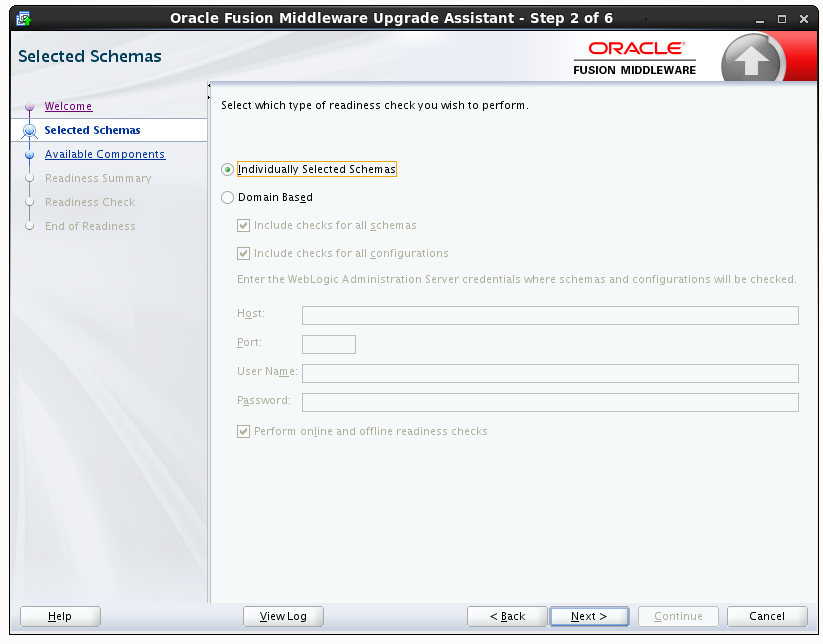
Readiness checks are only performed on schemas or component configurations that are at a supported upgrade starting point. There are two options to choose from. These options are described below:
|
|
When Individually Selected Schemas option is selected. |
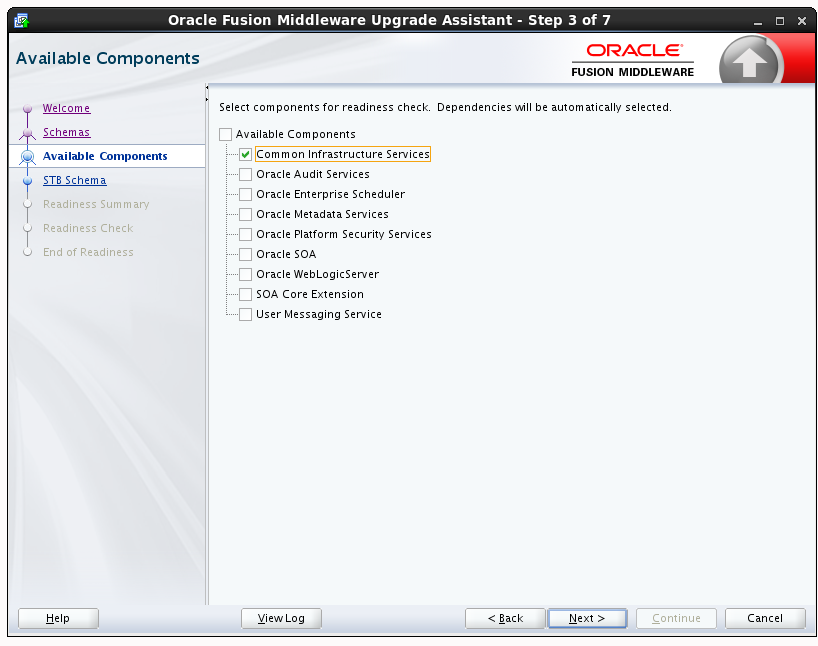
This screen lists the available components for which the schemas will be selected. If you select something here, readiness check will be performed on that component's schema. |
|
|
Always. |
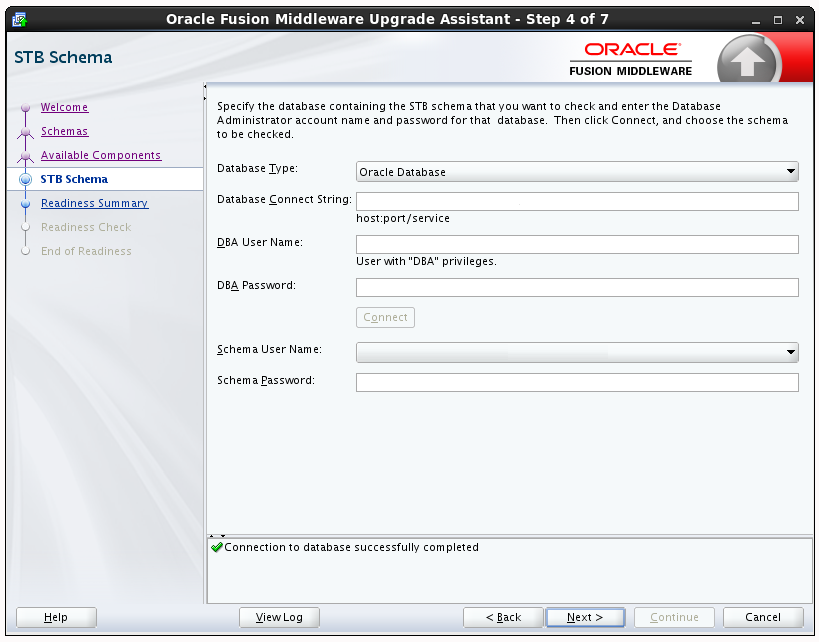
Use this screen to enter information required to connect to the selected schema and the database that hosts the schema. If the schema that is to be upgraded was created by RCU in a prior Fusion Middleware release then you will see a drop-down menu listing the possible schema names. |
|
|
Always. |
This screen provides a high-level overview of the readiness checks to be performed based on your selections. Click Save Response File if you plan to run the Upgrade Assistant again in —response (or silent) mode. |
|
|
Always. |
This screen displays the current status of the readiness check. Depending on what you have selected to check, the process can take several minutes. For a detailed report, click View Readiness Report. This button appears only after all the readiness checks are complete. Caution: To prevent performance degradation, consider running the readiness check during off-peak hours. |
|
|
If the readiness check completes successfully. |
You can now review the complete report. If the readiness check encounters an issue or error, review the log file to identify the issues, correct the issues, and then restart the readiness check. |
3.1.5.1.3 Understanding the Readiness Report
Now that you have completed the readiness checks for your domain, review the report to determine what actions - if any - need to be taken before the completion of a successful upgrade.
Each Readiness Report contains the following information:
| Report Information | Description | Required Action |
|---|---|---|
| Overall Readiness Status: SUCCESS or FAILURE | The top of the report indicates whether the Upgrade readiness check passed or completed with one or more errors. | If the report completed with one or more errors, search for FAIL and correct the failing issues before attempting to upgrade. You can re-run the readiness check as many times as necessary before an upgrade. |
|
Timestamp |
This is the date and time that the report was generated. |
No action required. |
|
Log file location |
This is the directory location of the generated log file. |
No action required. |
|
Readiness Report location |
This is the directory location of the generated readiness report. |
No action required. |
|
Names of components that were checked |
The names and versions of the components included in the check and status. |
If your domain includes components that cannot be upgraded to this release, such as SOA Core Extension, then do not attempt an upgrade. |
|
Names of schemas that were checked |
The names and current versions of the schemas included in the check and status. |
Review the version numbers of your schemas. If your domain includes schemas that cannot be upgraded to this release, then do not attempt an upgrade. |
|
Status: FAIL |
The individual readiness check test detected an issue. |
Do not upgrade until all FAILED issues have been resolved. |
|
Status: PASS |
The readiness check test detected no issues. |
If your readiness check report shows only the PASS status, then you can upgrade your environment. Note, however, that the Readiness Check cannot detect issues with externals such as hardware or connectivity during an upgrade. You should always monitor the progress of your upgrade. |
Upgrade readiness check completed with one or more errors.

This readiness check report was created on Tue May 30 11:15:52 EDT 2016
Log file is located at: /scratch/yourname/oracle/work/middleware_latest/oracle_common/upgrade/logs/ua2016-05-30-11-14-06AM.log
Readiness Check Report File: /scratch/yourname/oracle/work/middleware_latest/oracle_common/upgrade/logs/readiness2016-05-30-11-15-52AM.txt

Starting readiness check of components.

Oracle Metadata Services
   Starting readiness check of Oracle Metadata Services.
     Schema User Name: DEV11_MDS
     Database Type: Oracle Database
     Database Connect String: machinename@yourcompany.com
     VERSION Schema DEV11_MDS is currently at version 12.1.1.1.0.  Readiness checks will now be performed.
   Starting schema test:  TEST_REQUIRED_TABLES  Test that the schema contains all the required tables
   Completed schema test: TEST_REQUIRED_TABLES --> Test that the schema contains all the required tables +++ PASS
   Starting schema test:  TEST_REQUIRED_PROCEDURES  Test that the schema contains all the required stored procedures
     EXCEPTION     Schema is missing a required procedure: GETREPOSITORYFEATURES
   Completed schema test: TEST_REQUIRED_PROCEDURES --> Test that the schema contains all the required stored procedures +++ FAIL
   Starting schema test:  TEST_REQUIRED_VIEWS  Test that the schema contains all the required database views
   Completed schema test: TEST_REQUIRED_VIEWS --> Test that the schema contains all the required database views +++ PASS
   Starting index test for table MDS_ATTRIBUTES:  TEST_REQUIRED_INDEXES --> Test that the table contains all the required indexes
   Completed index test for table MDS_ATTRIBUTES: TEST_REQUIRED_INDEXES --> Test that the table contains all the required indexes +++ PASS
   Starting index test for table MDS_COMPONENTS:  TEST_REQUIRED_INDEXES --> Test that the table contains all the required indexes
   Completed index test for table MDS_COMPONENTS: TEST_REQUIRED_INDEXES --> Test that the table contains all the required indexes +++ PASS
   Starting index test for table MDS_DEPENDENCIES:  TEST_REQUIRED_INDEXES --> Test that the table contains all the required indexes
   Completed index test for table MDS_DEPENDENCIES: TEST_REQUIRED_INDEXES --> Test that the table contains all the required indexes +++ PASS
   Starting index test for table MDS_DEPL_LINEAGES:  TEST_REQUIRED_INDEXES --> Test that the table contains all the required indexes
   Completed index test for table MDS_DEPL_LINEAGES: TEST_REQUIRED_INDEXES --> Test that the table contains all the required indexes +++ PASS
   Starting index test for table MDS_LABELS:  TEST_REQUIRED_INDEXES --> Test that the table contains all the required indexes
   Completed index test for table MDS_LABELS: TEST_REQUIRED_INDEXES --> Test that the table contains all the required indexes +++ PASS
   Starting index test for table MDS_LARGE_ATTRIBUTES:  TEST_REQUIRED_INDEXES --> Test that the table contains all the required indexes
   Completed index test for table MDS_LARGE_ATTRIBUTES: TEST_REQUIRED_INDEXES --> Test that the table contains all the required indexes +++ PASS
   Starting index test for table MDS_METADATA_DOCS:  TEST_REQUIRED_INDEXES --> Test that the table contains all the required indexes
   Completed index test for table MDS_METADATA_DOCS: TEST_REQUIRED_INDEXES --> Test that the table contains all the required indexes +++ PASS
   Starting index test for table MDS_NAMESPACES:  TEST_REQUIRED_INDEXES --> Test that the table contains all the required indexes
   Completed index test for table MDS_NAMESPACES: TEST_REQUIRED_INDEXES --> Test that the table contains all the required indexes +++ PASS
   Starting index test for table MDS_PARTITIONS:  TEST_REQUIRED_INDEXES --> Test that the table contains all the required indexes
   Completed index test for table MDS_PARTITIONS: TEST_REQUIRED_INDEXES --> Test that the table contains all the required indexes +++ PASS
   Starting index test for table MDS_PATHS:  TEST_REQUIRED_INDEXES --> Test that the table contains all the required indexes
   Completed index test for table MDS_PATHS: TEST_REQUIRED_INDEXES --> Test that the table contains all the required indexes +++ PASS
   Starting index test for table MDS_PURGE_PATHS:  TEST_REQUIRED_INDEXES --> Test that the table contains all the required indexes
   Completed index test for table MDS_PURGE_PATHS: TEST_REQUIRED_INDEXES --> Test that the table contains all the required indexes +++ PASS
   Starting index test for table MDS_SANDBOXES:  TEST_REQUIRED_INDEXES --> Test that the table contains all the required indexes
   Completed index test for table MDS_SANDBOXES: TEST_REQUIRED_INDEXES --> Test that the table contains all the required indexes +++ PASS
   Starting index test for table MDS_STREAMED_DOCS:  TEST_REQUIRED_INDEXES --> Test that the table contains all the required indexes
   Completed index test for table MDS_STREAMED_DOCS: TEST_REQUIRED_INDEXES --> Test that the table contains all the required indexes +++ PASS
   Starting index test for table MDS_TRANSACTIONS:  TEST_REQUIRED_INDEXES --> Test that the table contains all the required indexes
   Completed index test for table MDS_TRANSACTIONS: TEST_REQUIRED_INDEXES --> Test that the table contains all the required indexes +++ PASS
   Starting index test for table MDS_TXN_LOCKS:  TEST_REQUIRED_INDEXES --> Test that the table contains all the required indexes
   Completed index test for table MDS_TXN_LOCKS: TEST_REQUIRED_INDEXES --> Test that the table contains all the required indexes +++ PASS
   Starting schema test:  TEST_REQUIRED_TRIGGERS  Test that the schema has all the required triggers
   Completed schema test: TEST_REQUIRED_TRIGGERS --> Test that the schema has all the required triggers +++ PASS
   Starting schema test:  TEST_MISSING_COLUMNS  Test that tables and views are not missing any required columns
   Completed schema test: TEST_MISSING_COLUMNS --> Test that tables and views are not missing any required columns +++ PASS
   Starting schema test:  TEST_UNEXPECTED_TABLES  Test that the schema does not contain any unexpected tables
   Completed schema test: TEST_UNEXPECTED_TABLES --> Test that the schema does not contain any unexpected tables +++ PASS
   Starting schema test:  TEST_UNEXPECTED_PROCEDURES  Test that the schema does not contain any unexpected stored procedures
   Completed schema test: TEST_UNEXPECTED_PROCEDURES --> Test that the schema does not contain any unexpected stored procedures +++ PASS
   Starting schema test:  TEST_UNEXPECTED_VIEWS  Test that the schema does not contain any unexpected views
   Completed schema test: TEST_UNEXPECTED_VIEWS --> Test that the schema does not contain any unexpected views +++ PASS
   Starting index test for table MDS_ATTRIBUTES:  TEST_UNEXPECTED_INDEXES --> Test that the table does not contain any unexpected indexes
   Completed index test for table MDS_ATTRIBUTES: TEST_UNEXPECTED_INDEXES --> Test that the table does not contain any unexpected indexes +++ PASS
   Starting index test for table MDS_COMPONENTS:  TEST_UNEXPECTED_INDEXES --> Test that the table does not contain any unexpected indexes
   Completed index test for table MDS_COMPONENTS: TEST_UNEXPECTED_INDEXES --> Test that the table does not contain any unexpected indexes +++ PASS
   Starting index test for table MDS_DEPENDENCIES:  TEST_UNEXPECTED_INDEXES --> Test that the table does not contain any unexpected indexes
   Completed index test for table MDS_DEPENDENCIES: TEST_UNEXPECTED_INDEXES --> Test that the table does not contain any unexpected indexes +++ PASS
   Starting index test for table MDS_DEPL_LINEAGES:  TEST_UNEXPECTED_INDEXES --> Test that the table does not contain any unexpected indexes
   Completed index test for table MDS_DEPL_LINEAGES: TEST_UNEXPECTED_INDEXES --> Test that the table does not contain any unexpected indexes +++ PASS
   Starting index test for table MDS_LABELS:  TEST_UNEXPECTED_INDEXES --> Test that the table does not contain any unexpected indexes
   Completed index test for table MDS_LABELS: TEST_UNEXPECTED_INDEXES --> Test that the table does not contain any unexpected indexes +++ PASS
   Starting index test for table MDS_LARGE_ATTRIBUTES:  TEST_UNEXPECTED_INDEXES --> Test that the table does not contain any unexpected indexes
   Completed index test for table MDS_LARGE_ATTRIBUTES: TEST_UNEXPECTED_INDEXES --> Test that the table does not contain any unexpected indexes +++ PASS
   Starting index test for table MDS_METADATA_DOCS:  TEST_UNEXPECTED_INDEXES --> Test that the table does not contain any unexpected indexes
   Completed index test for table MDS_METADATA_DOCS: TEST_UNEXPECTED_INDEXES --> Test that the table does not contain any unexpected indexes +++ PASS
   Starting index test for table MDS_NAMESPACES:  TEST_UNEXPECTED_INDEXES --> Test that the table does not contain any unexpected indexes
   Completed index test for table MDS_NAMESPACES: TEST_UNEXPECTED_INDEXES --> Test that the table does not contain any unexpected indexes +++ PASS
   Starting index test for table MDS_PARTITIONS:  TEST_UNEXPECTED_INDEXES --> Test that the table does not contain any unexpected indexes
   Completed index test for table MDS_PARTITIONS: TEST_UNEXPECTED_INDEXES --> Test that the table does not contain any unexpected indexes +++ PASS
   Starting index test for table MDS_PATHS:  TEST_UNEXPECTED_INDEXES --> Test that the table does not contain any unexpected indexes
   Completed index test for table MDS_PATHS: TEST_UNEXPECTED_INDEXES --> Test that the table does not contain any unexpected indexes +++ PASS
   Starting index test for table MDS_PURGE_PATHS:  TEST_UNEXPECTED_INDEXES --> Test that the table does not contain any unexpected indexes
   Completed index test for table MDS_PURGE_PATHS: TEST_UNEXPECTED_INDEXES --> Test that the table does not contain any unexpected indexes +++ PASS
   Starting index test for table MDS_SANDBOXES:  TEST_UNEXPECTED_INDEXES --> Test that the table does not contain any unexpected indexes
   Completed index test for table MDS_SANDBOXES: TEST_UNEXPECTED_INDEXES --> Test that the table does not contain any unexpected indexes +++ PASS
   Starting index test for table MDS_STREAMED_DOCS:  TEST_UNEXPECTED_INDEXES --> Test that the table does not contain any unexpected indexes
   Completed index test for table MDS_STREAMED_DOCS: TEST_UNEXPECTED_INDEXES --> Test that the table does not contain any unexpected indexes +++ PASS
   Starting index test for table MDS_TRANSACTIONS:  TEST_UNEXPECTED_INDEXES --> Test that the table does not contain any unexpected indexes
   Completed index test for table MDS_TRANSACTIONS: TEST_UNEXPECTED_INDEXES --> Test that the table does not contain any unexpected indexes +++ PASS
   Starting index test for table MDS_TXN_LOCKS:  TEST_UNEXPECTED_INDEXES --> Test that the table does not contain any unexpected indexes
   Completed index test for table MDS_TXN_LOCKS: TEST_UNEXPECTED_INDEXES --> Test that the table does not contain any unexpected indexes +++ PASS
   Starting schema test:  TEST_UNEXPECTED_TRIGGERS  Test that the schema does not contain any unexpected triggers
   Completed schema test: TEST_UNEXPECTED_TRIGGERS --> Test that the schema does not contain any unexpected triggers +++ PASS
   Starting schema test:  TEST_UNEXPECTED_COLUMNS  Test that tables and views do not contain any unexpected columns
   Completed schema test: TEST_UNEXPECTED_COLUMNS --> Test that tables and views do not contain any unexpected columns +++ PASS
   Starting datatype test for table MDS_ATTRIBUTES:  TEST_COLUMN_DATATYPES_V2 --> Test that all table columns have the proper datatypes
   Completed datatype test for table MDS_ATTRIBUTES: TEST_COLUMN_DATATYPES_V2 --> Test that all table columns have the proper datatypes +++ PASS
   Starting datatype test for table MDS_COMPONENTS:  TEST_COLUMN_DATATYPES_V2 --> Test that all table columns have the proper datatypes
   Completed datatype test for table MDS_COMPONENTS: TEST_COLUMN_DATATYPES_V2 --> Test that all table columns have the proper datatypes +++ PASS
   Starting datatype test for table MDS_DEPENDENCIES:  TEST_COLUMN_DATATYPES_V2 --> Test that all table columns have the proper datatypes
   Completed datatype test for table MDS_DEPENDENCIES: TEST_COLUMN_DATATYPES_V2 --> Test that all table columns have the proper datatypes +++ PASS
   Starting datatype test for table MDS_DEPL_LINEAGES:  TEST_COLUMN_DATATYPES_V2 --> Test that all table columns have the proper datatypes
   Completed datatype test for table MDS_DEPL_LINEAGES: TEST_COLUMN_DATATYPES_V2 --> Test that all table columns have the proper datatypes +++ PASS
   Starting datatype test for table MDS_LABELS:  TEST_COLUMN_DATATYPES_V2 --> Test that all table columns have the proper datatypes
   Completed datatype test for table MDS_LABELS: TEST_COLUMN_DATATYPES_V2 --> Test that all table columns have the proper datatypes +++ PASS
   Starting datatype test for table MDS_LARGE_ATTRIBUTES:  TEST_COLUMN_DATATYPES_V2 --> Test that all table columns have the proper datatypes
   Completed datatype test for table MDS_LARGE_ATTRIBUTES: TEST_COLUMN_DATATYPES_V2 --> Test that all table columns have the proper datatypes +++ PASS
   Starting datatype test for table MDS_METADATA_DOCS:  TEST_COLUMN_DATATYPES_V2 --> Test that all table columns have the proper datatypes
   Completed datatype test for table MDS_METADATA_DOCS: TEST_COLUMN_DATATYPES_V2 --> Test that all table columns have the proper datatypes +++ PASS
   Starting datatype test for table MDS_NAMESPACES:  TEST_COLUMN_DATATYPES_V2 --> Test that all table columns have the proper datatypes
   Completed datatype test for table MDS_NAMESPACES: TEST_COLUMN_DATATYPES_V2 --> Test that all table columns have the proper datatypes +++ PASS
   Starting datatype test for table MDS_PARTITIONS:  TEST_COLUMN_DATATYPES_V2 --> Test that all table columns have the proper datatypes
   Completed datatype test for table MDS_PARTITIONS: TEST_COLUMN_DATATYPES_V2 --> Test that all table columns have the proper datatypes +++ PASS
   Starting datatype test for table MDS_PATHS:  TEST_COLUMN_DATATYPES_V2 --> Test that all table columns have the proper datatypes
   Completed datatype test for table MDS_PATHS: TEST_COLUMN_DATATYPES_V2 --> Test that all table columns have the proper datatypes +++ PASS
   Starting datatype test for table MDS_PURGE_PATHS:  TEST_COLUMN_DATATYPES_V2 --> Test that all table columns have the proper datatypes
   Completed datatype test for table MDS_PURGE_PATHS: TEST_COLUMN_DATATYPES_V2 --> Test that all table columns have the proper datatypes +++ PASS
   Starting datatype test for table MDS_SANDBOXES:  TEST_COLUMN_DATATYPES_V2 --> Test that all table columns have the proper datatypes
   Completed datatype test for table MDS_SANDBOXES: TEST_COLUMN_DATATYPES_V2 --> Test that all table columns have the proper datatypes +++ PASS
   Starting datatype test for table MDS_STREAMED_DOCS:  TEST_COLUMN_DATATYPES_V2 --> Test that all table columns have the proper datatypes
   Completed datatype test for table MDS_STREAMED_DOCS: TEST_COLUMN_DATATYPES_V2 --> Test that all table columns have the proper datatypes +++ PASS
   Starting datatype test for table MDS_TRANSACTIONS:  TEST_COLUMN_DATATYPES_V2 --> Test that all table columns have the proper datatypes
   Completed datatype test for table MDS_TRANSACTIONS: TEST_COLUMN_DATATYPES_V2 --> Test that all table columns have the proper datatypes +++ PASS
   Starting datatype test for table MDS_TXN_LOCKS:  TEST_COLUMN_DATATYPES_V2 --> Test that all table columns have the proper datatypes
   Completed datatype test for table MDS_TXN_LOCKS: TEST_COLUMN_DATATYPES_V2 --> Test that all table columns have the proper datatypes +++ PASS
   Starting permissions test for table MDS_ATTRIBUTES:  TEST_TABLE_GRANTS --> Test that tables have the proper GRANT permissions
   Completed permissions test for table MDS_ATTRIBUTES: TEST_TABLE_GRANTS --> Test that tables have the proper GRANT permissions +++ PASS
   Starting permissions test for table MDS_COMPONENTS:  TEST_TABLE_GRANTS --> Test that tables have the proper GRANT permissions
   Completed permissions test for table MDS_COMPONENTS: TEST_TABLE_GRANTS --> Test that tables have the proper GRANT permissions +++ PASS
   Starting permissions test for table MDS_DEPENDENCIES:  TEST_TABLE_GRANTS --> Test that tables have the proper GRANT permissions
   Completed permissions test for table MDS_DEPENDENCIES: TEST_TABLE_GRANTS --> Test that tables have the proper GRANT permissions +++ PASS
   Starting permissions test for table MDS_DEPL_LINEAGES:  TEST_TABLE_GRANTS --> Test that tables have the proper GRANT permissions
   Completed permissions test for table MDS_DEPL_LINEAGES: TEST_TABLE_GRANTS --> Test that tables have the proper GRANT permissions +++ PASS
   Starting permissions test for table MDS_LABELS:  TEST_TABLE_GRANTS --> Test that tables have the proper GRANT permissions
   Completed permissions test for table MDS_LABELS: TEST_TABLE_GRANTS --> Test that tables have the proper GRANT permissions +++ PASS
   Starting permissions test for table MDS_LARGE_ATTRIBUTES:  TEST_TABLE_GRANTS --> Test that tables have the proper GRANT permissions
   Completed permissions test for table MDS_LARGE_ATTRIBUTES: TEST_TABLE_GRANTS --> Test that tables have the proper GRANT permissions +++ PASS
   Starting permissions test for table MDS_METADATA_DOCS:  TEST_TABLE_GRANTS --> Test that tables have the proper GRANT permissions
   Completed permissions test for table MDS_METADATA_DOCS: TEST_TABLE_GRANTS --> Test that tables have the proper GRANT permissions +++ PASS
   Starting permissions test for table MDS_NAMESPACES:  TEST_TABLE_GRANTS --> Test that tables have the proper GRANT permissions
   Completed permissions test for table MDS_NAMESPACES: TEST_TABLE_GRANTS --> Test that tables have the proper GRANT permissions +++ PASS
   Starting permissions test for table MDS_PARTITIONS:  TEST_TABLE_GRANTS --> Test that tables have the proper GRANT permissions
   Completed permissions test for table MDS_PARTITIONS: TEST_TABLE_GRANTS --> Test that tables have the proper GRANT permissions +++ PASS
   Starting permissions test for table MDS_PATHS:  TEST_TABLE_GRANTS --> Test that tables have the proper GRANT permissions
   Completed permissions test for table MDS_PATHS: TEST_TABLE_GRANTS --> Test that tables have the proper GRANT permissions +++ PASS
   Starting permissions test for table MDS_PURGE_PATHS:  TEST_TABLE_GRANTS --> Test that tables have the proper GRANT permissions
   Completed permissions test for table MDS_PURGE_PATHS: TEST_TABLE_GRANTS --> Test that tables have the proper GRANT permissions +++ PASS
   Starting permissions test for table MDS_SANDBOXES:  TEST_TABLE_GRANTS --> Test that tables have the proper GRANT permissions
   Completed permissions test for table MDS_SANDBOXES: TEST_TABLE_GRANTS --> Test that tables have the proper GRANT permissions +++ PASS
   Starting permissions test for table MDS_STREAMED_DOCS:  TEST_TABLE_GRANTS --> Test that tables have the proper GRANT permissions
   Completed permissions test for table MDS_STREAMED_DOCS: TEST_TABLE_GRANTS --> Test that tables have the proper GRANT permissions +++ PASS
   Starting permissions test for table MDS_TRANSACTIONS:  TEST_TABLE_GRANTS --> Test that tables have the proper GRANT permissions
   Completed permissions test for table MDS_TRANSACTIONS: TEST_TABLE_GRANTS --> Test that tables have the proper GRANT permissions +++ PASS
   Starting permissions test for table MDS_TXN_LOCKS:  TEST_TABLE_GRANTS --> Test that tables have the proper GRANT permissions
   Completed permissions test for table MDS_TXN_LOCKS: TEST_TABLE_GRANTS --> Test that tables have the proper GRANT permissions +++ PASS
   Starting permissions test:  TEST_DBA_TABLE_GRANTS  Test that DBA user has privilege to view all user tables
   Completed permissions test: TEST_DBA_TABLE_GRANTS --> Test that DBA user has privilege to view all user tables +++ PASS
   Starting schema test:  TEST_ENOUGH_TABLESPACE  Test that the schema tablespaces automatically extend if full
   Completed schema test: TEST_ENOUGH_TABLESPACE --> Test that the schema tablespaces automatically extend if full +++ PASS
   Starting schema test:  TEST_USER_TABLESPACE_QUOTA  Test that tablespace quota for this user is sufficient to perform the upgrade
   Completed schema test: TEST_USER_TABLESPACE_QUOTA --> Test that tablespace quota for this user is sufficient to perform the upgrade +++ PASS
   Starting schema test:  TEST_ONLINE_TABLESPACE  Test that schema tablespaces are online
   Completed schema test: TEST_ONLINE_TABLESPACE --> Test that schema tablespaces are online +++ PASS
   Starting schema test:  TEST_DATABASE_VERSION  Test that the database server version number is supported for upgrade
     INFO   Database product version: Oracle Database 11g Enterprise Edition Release 11.2.0.3.0 - 64bit Production
With the Partitioning, OLAP, Data Mining and Real Application Testing options
   Completed schema test: TEST_DATABASE_VERSION --> Test that the database server version number is supported for upgrade +++ PASS
   Finished readiness check of Oracle Metadata Services with status: FAILURE.

Common Infrastructure Services
   Starting readiness check of Common Infrastructure Services.
     Schema User Name: DEV1212_STB
     Database Type: Oracle Database
     Database Connect String: machinename@yourcompany.com
     VERSION Schema STB is currently at version 12.1.2.0.0.  Readiness checks will now be performed.
   Starting schema test:  TEST_REQUIRED_TABLES  Test that the schema contains all the required tables
   Completed schema test: TEST_REQUIRED_TABLES --> Test that the schema contains all the required tables +++ PASS
   Completed schema test: TEST_REQUIRED_TABLES --> Test that the schema contains all the required tables +++ PASS
   Starting schema test:  TEST_UNEXPECTED_TABLES  Test that the schema does not contain any unexpected tables
   Completed schema test: TEST_UNEXPECTED_TABLES --> Test that the schema does not contain any unexpected tables +++ PASS
   Starting schema test:  TEST_REQUIRED_VIEWS  Test that the schema contains all the required database views
   Completed schema test: TEST_REQUIRED_VIEWS --> Test that the schema contains all the required database views +++ PASS
   Starting schema test:  TEST_MISSING_COLUMNS  Test that tables and views are not missing any required columns
   Completed schema test: TEST_MISSING_COLUMNS --> Test that tables and views are not missing any required columns +++ PASS
   Starting schema test:  TEST_UNEXPECTED_COLUMNS  Test that tables and views do not contain any unexpected columns
   Completed schema test: TEST_UNEXPECTED_COLUMNS --> Test that tables and views do not contain any unexpected columns +++ PASS
   Starting schema test:  TEST_UNEXPECTED_PROCEDURES  Test that the schema does not contain any unexpected stored procedures
   Completed schema test: TEST_UNEXPECTED_PROCEDURES --> Test that the schema does not contain any unexpected stored procedures +++ PASS
   Starting permissions test:  TEST_DBA_TABLE_GRANTS  Test that DBA user has privilege to view all user tables
   Starting permissions test:  TEST_DBA_TABLE_GRANTS  Test that DBA user has privilege to view all user tables
   Completed permissions test: TEST_DBA_TABLE_GRANTS --> Test that DBA user has privilege to view all user tables +++ PASS
   Completed permissions test: TEST_DBA_TABLE_GRANTS --> Test that DBA user has privilege to view all user tables +++ PASS
   Starting permissions test for table COMPONENT_SCHEMA_INFO:  TEST_TABLE_GRANTS --> Test that tables have the proper GRANT permissions
   Completed permissions test for table TEST_TABLE_GRANTS: Test that tables have the proper GRANT permissions --> PASS +++ {3}
   Starting permissions test for table SERVICETABLE:  TEST_TABLE_GRANTS --> Test that tables have the proper GRANT permissions
   Completed permissions test for table TEST_TABLE_GRANTS: Test that tables have the proper GRANT permissions --> PASS +++ {3}
   Starting datatype test for table COMPONENT_SCHEMA_INFO:  TEST_COLUMN_DATATYPES_V2 --> Test that all table columns have the proper datatypes
   Completed datatype test for table COMPONENT_SCHEMA_INFO: TEST_COLUMN_DATATYPES_V2 --> Test that all table columns have the proper datatypes +++ PASS
   Starting datatype test for table SERVICETABLE:  TEST_COLUMN_DATATYPES_V2 --> Test that all table columns have the proper datatypes
   Completed datatype test for table SERVICETABLE: TEST_COLUMN_DATATYPES_V2 --> Test that all table columns have the proper datatypes +++ PASS
   Starting index test for table COMPONENT_SCHEMA_INFO:  TEST_REQUIRED_INDEXES --> Test that the table contains all the required indexes
   Completed index test for table COMPONENT_SCHEMA_INFO: TEST_REQUIRED_INDEXES --> Test that the table contains all the required indexes +++ PASS
   Starting index test for table COMPONENT_SCHEMA_INFO:  TEST_UNEXPECTED_INDEXES --> Test that the table does not contain any unexpected indexes
   Completed index test for table COMPONENT_SCHEMA_INFO: TEST_UNEXPECTED_INDEXES --> Test that the table does not contain any unexpected indexes +++ PASS
   Starting index test for table SERVICETABLE:  TEST_REQUIRED_INDEXES --> Test that the table contains all the required indexes
   Completed index test for table SERVICETABLE: TEST_REQUIRED_INDEXES --> Test that the table contains all the required indexes +++ PASS
   Starting index test for table SERVICETABLE:  TEST_UNEXPECTED_INDEXES --> Test that the table does not contain any unexpected indexes
   Completed index test for table SERVICETABLE: TEST_UNEXPECTED_INDEXES --> Test that the table does not contain any unexpected indexes +++ PASS
   Starting schema test:  TEST_UNEXPECTED_TRIGGERS  Test that the schema does not contain any unexpected triggers
   Completed schema test: TEST_UNEXPECTED_TRIGGERS --> Test that the schema does not contain any unexpected triggers +++ PASS
   Starting schema test:  TEST_ENOUGH_TABLESPACE  Test that the schema tablespaces automatically extend if full
   Starting schema test:  TEST_ENOUGH_TABLESPACE  Test that the schema tablespaces automatically extend if full
   Completed schema test: TEST_ENOUGH_TABLESPACE --> Test that the schema tablespaces automatically extend if full +++ PASS
   Completed schema test: TEST_ENOUGH_TABLESPACE --> Test that the schema tablespaces automatically extend if full +++ PASS
   Starting schema test:  TEST_ONLINE_TABLESPACE  Test that schema tablespaces are online
   Starting schema test:  TEST_ONLINE_TABLESPACE  Test that schema tablespaces are online
   Completed schema test: TEST_ONLINE_TABLESPACE --> Test that schema tablespaces are online +++ PASS
   Completed schema test: TEST_ONLINE_TABLESPACE --> Test that schema tablespaces are online +++ PASS
   Starting schema test:  TEST_USER_TABLESPACE_QUOTA  Test that tablespace quota for this user is sufficient to perform the upgrade
   Starting schema test:  TEST_USER_TABLESPACE_QUOTA  Test that tablespace quota for this user is sufficient to perform the upgrade
   Completed schema test: TEST_USER_TABLESPACE_QUOTA --> Test that tablespace quota for this user is sufficient to perform the upgrade +++ PASS
   Completed schema test: TEST_USER_TABLESPACE_QUOTA --> Test that tablespace quota for this user is sufficient to perform the upgrade +++ PASS
   Starting schema test:  TEST_DATABASE_VERSION  Test that the database server version number is supported for upgrade
   Starting schema test:  TEST_DATABASE_VERSION  Test that the database server version number is supported for upgrade
     INFO   Database product version: Oracle Database 11g Enterprise Edition Release 11.2.0.3.0 - 64bit Production
With the Partitioning, OLAP, Data Mining and Real Application Testing options
   Completed schema test: TEST_DATABASE_VERSION --> Test that the database server version number is supported for upgrade +++ PASS
   Completed schema test: TEST_DATABASE_VERSION --> Test that the database server version number is supported for upgrade +++ PASS
   Finished readiness check of Common Infrastructure Services with status: SUCCESS.

Finished readiness check of components.
3.1.5.2 Readiness Check Screens
This section describes the screens that are presented when running the Upgrade Assistant in -readiness mode.
The Upgrade Assistant can be run in -readiness mode before you perform the actual upgrade to detect any potential problems with the pre-upgrade environment.
- Welcome
- Readiness Check Type: Individually Selected Schemas
- Readiness Check Type: Domain Based
The Domain Based option is used to check all of the upgrade-eligible schemas and/or component configurations used by the domain. The Upgrade Assistant detects all of the schemas for you. You can check schemas and component configurations at the same time. Or, if you prefer, you can select one or the other. In either case, you must specify the Domain Directory that is to be reviewed. - Available Components
This screen appears if you select Individually Selected Schemas in the Schemas screen. - Schema Credentials
- Readiness Summary
- Readiness Check
- Log Viewer
- Readiness Success
- Sample Readiness Report
3.1.5.2.1 Welcome
The Upgrade Assistant Readiness Check performs a read-only, pre-upgrade review of your existing Oracle Fusion Middleware schemas and Oracle WebLogic component configurations.
The Readiness Check provides a formatted, time-stamped Readiness Report so you can address any issues before you attempt the actual upgrade. If no issues are detected, you can begin the upgrade process.
The Upgrade Assistant Readiness Check can be run with your existing 11g or 12c domain online or offline.
Note:
While readiness check ships with 12.2.1, it only checks supported pre-upgrade environments.The Readiness Check can be run any number of times before the actual upgrade is performed. However, do not run after the Readiness Check after an upgrade has been performed, as the report will not provide valid results.
Oracle recommends that you read this report thoroughly before performing an upgrade.
3.1.5.2.2 Readiness Check Type: Individually Selected Schemas
You have two options when running the readiness check:
-
Individually Selected Schemas
-
Domain Based
Select the Individually Selected Schemas option to limit the check to specific schemas. Click Next and you will be required to supply the schema credentials.
Readiness checks are performed on the schemas that you connect to. The readiness check report tells you whether a schems is supported for an upgrade, or where an upgrade is needed.
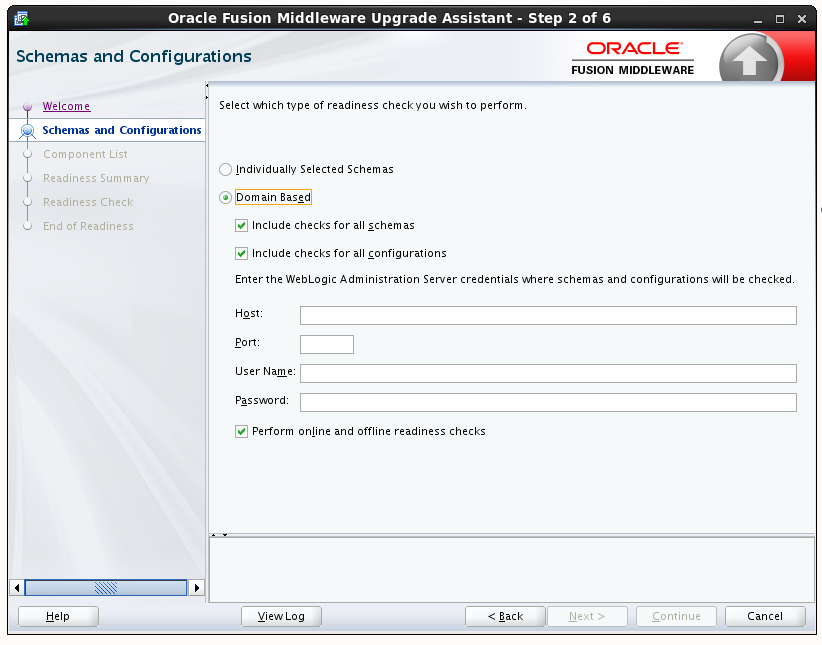
3.1.5.2.3 Readiness Check Type: Domain Based
The Domain Based option is used to check all of the upgrade-eligible schemas and/or component configurations used by the domain. The Upgrade Assistant detects all of the schemas for you. You can check schemas and component configurations at the same time. Or, if you prefer, you can select one or the other. In either case, you must specify the Domain Directory that is to be reviewed.
You have several options when checking the WebLogic Server domain.
You can select one - or more - of the following options each time you run the Domain Based Readiness Check:
-
Include checks for all schemas
Select this option to enable the Upgrade Assistant to discover and review all components that have a schema available to upgrade.
-
Include checks for all configurations
Select this option to review component configurations for a managed WebLogic Server domain.
You can perform domain configuration check even when the domain is online or offline.
-
Perform online and offline readiness checks.
Select this option to perform additional online readiness checks . This option will require your domain to be online. You must provide the domain's host name, port, user name, and password that you plan to check.If you do not select this option your domain can be offline. You must provide the domain location that you plan to check.
Figure 3-3 WebLogic Server Readiness Check Options
Description of "Figure 3-3 WebLogic Server Readiness Check Options"
3.1.5.2.4 Available Components
This screen appears if you select Individually Selected Schemas in the Schemas screen.
If you chose Individually Selected Schemas this screen lists the available components for which the schemas will be selected. If you select something here, readiness check will be performed on that component's schema. You must select one or more components from the list to perform readiness check on them.
3.1.5.2.5 Schema Credentials
Use this screen to enter information required to connect to the selected schema and the database that hosts the schema. If the schema that is to be reviewed was created by RCU in a prior Fusion Middleware release then you will see a drop-down menu listing the possible schema names as shown below.
Click Connect to connect to the database then select the schema to be reviewed. NOTE: Most schemas will have this information pre-populated. If, however, the Upgrade Assistant is unable to detect the connection details, then they must be entered manually as shown below.
If multiple components are selected, then the Schema Credential screens appear in dependency order.
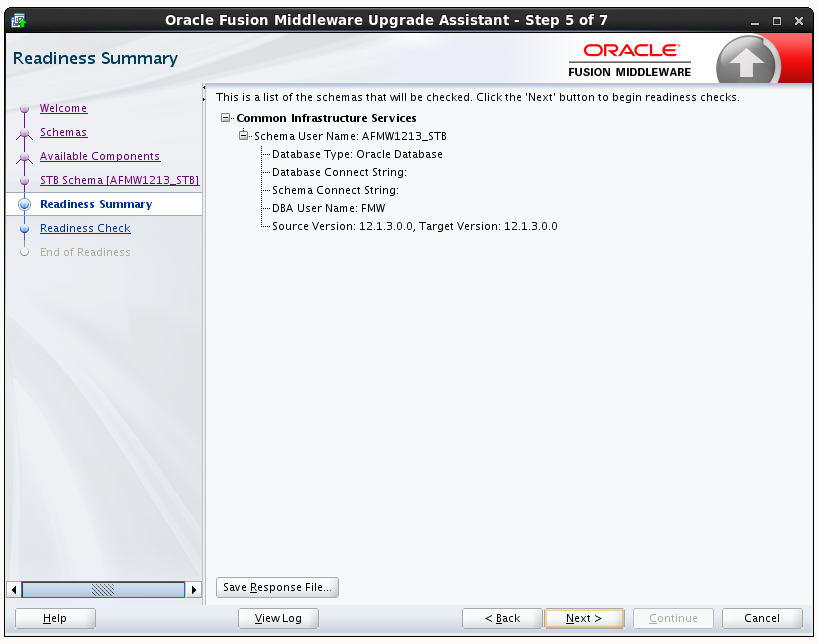
3.1.5.2.6 Readiness Summary
This screen provides a high-level overview of the readiness checks performed based on your selections.
For a detailed report, click View Log.
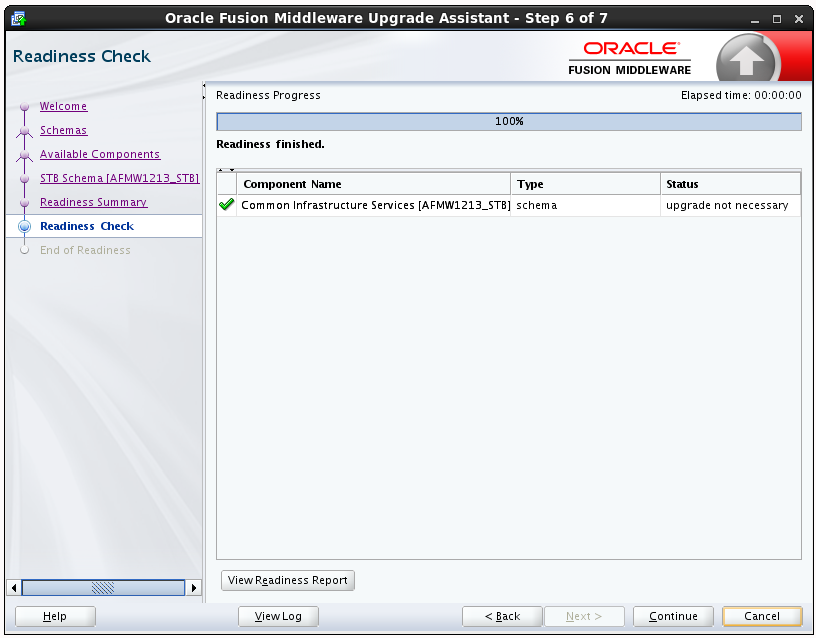
3.1.5.2.7 Readiness Check
This screen shows the overall progress and completion details of the running readiness check. If you are checking multiple components, then each gets component will have its own progress bar and will be checked in parallel. Once completed, click View Readiness Report to see the full text report.
CAUTION: If you are running the readiness check on your online production environment, Oracle recommends that you perform the check during off-peak hours to prevent performance degradation.
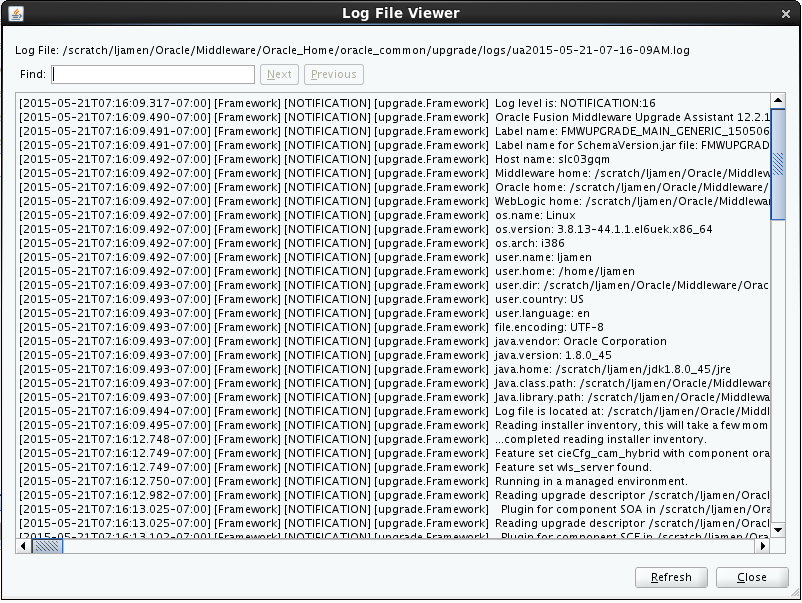
3.1.5.2.8 Log Viewer
Click View Log from any of the screens to see the latest logged information.
The log file is managed by the command line options you set. See Starting the Upgrade Assistant with Additional Parameters (Optional) for more information.
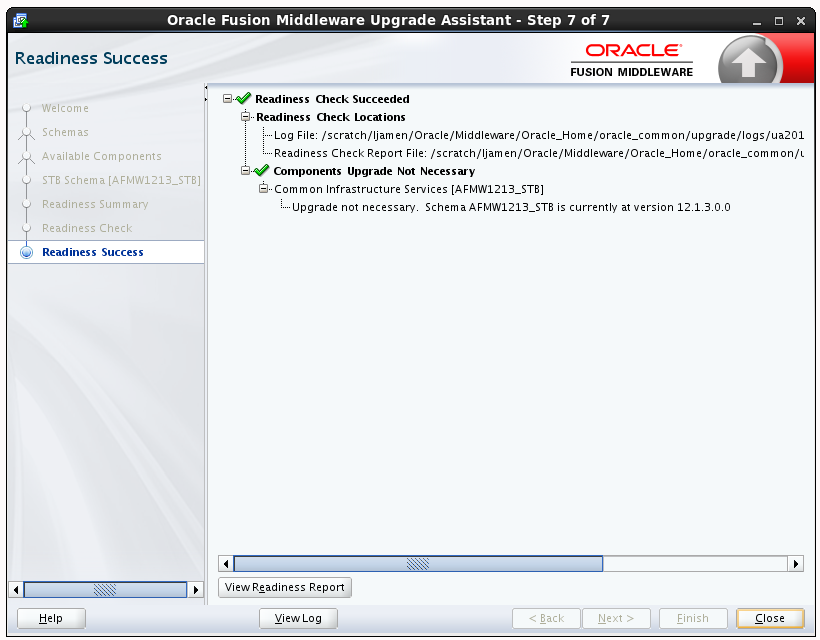
3.1.5.2.9 Readiness Success
Readiness success indicates that the readiness review was successfully completed.
Even with a successful completion of the review, you should still click View Readiness Report and review the Readiness Report before you perform the actual upgrade.
Figure 3-9 End of Readiness: Readiness Success
Description of "Figure 3-9 End of Readiness: Readiness Success "
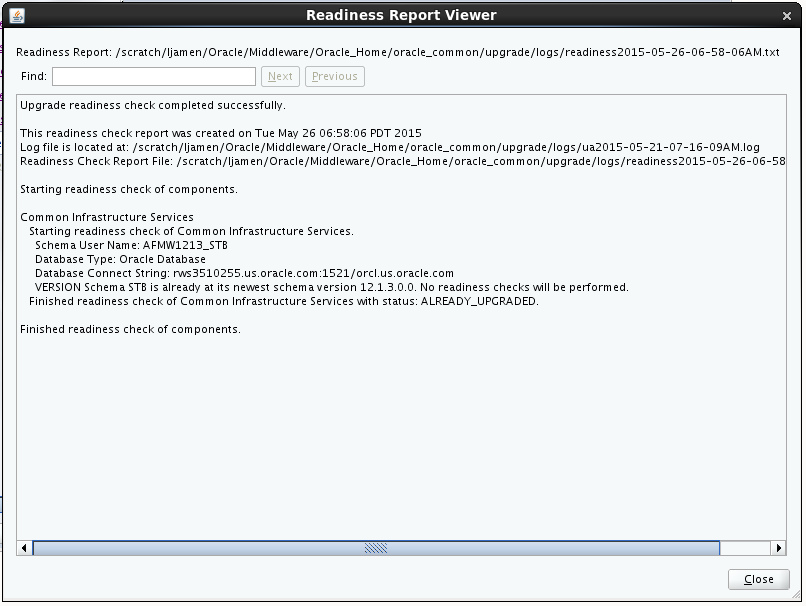
3.1.5.2.10 Sample Readiness Report
A formatted Readiness Report is prepared for you after running the check. Make sure that you review the report and correct any issues before you start the actual upgrade. Use the Find option to search for a particular word within the report (such as a schema name or command, for example.)
The report also indicates where the completed Readiness Check Report file is located.
3.2 Installing Fusion Middleware Infrastructure
Installing Fusion Middleware Infrastructure creates an Oracle home directory and lays supporting software to install other Fusion Middleware products.
3.3 Stopping Servers and Processes
Before running the Upgrade Assistant, shut down all Oracle Fusion Middleware Managed Servers, Administration Servers, and system components (such as OHS) that may be using the schemas or configurations you want to update. Failure to do so may result in an incomplete or failed upgrade.
If you are running the Node Manager, you should also stop the Node Manager. You can do this by closing the console window in which the Node Manager is running, or by using the stopNodeManager WLST command.
For instructions to stop an Oracle Fusion Middleware environment, see Stopping an Oracle Fusion Middleware Environment in Administering Oracle Fusion Middleware.
3.4 Determining Which Schemas to Create
You must create the required schemas depending upon whether your 11g schemas were file-based or database-based.
Consider the following scenarios:
-
If you did not use a database in 11g, then you must install and configure a supported database, and also create one or more of the database schemas as described in Database Schema Requirement for Infrastructure 12c.
-
If you were already using a database to host the schemas for your Application Developer 11g domain, then use the schema version registry to list the Oracle Fusion Middleware 11g schemas that are already available in your database, as described in Using the Schema Version Registry to Identify the Existing Schemas.
You need not create the schemas listed in the Schema Version Registry manually. Instead, you can later use the Upgrade Assistant to upgrade the 11g schemas during the upgrade process.
However, you must still create the required schemas, as described in Database Schema Requirement for Infrastructure 12c.
Note:
As of release 12c, the Service Table (_STB) schema is required for all Infrastructure installations. The Service Table schema must be upgraded each time the infrastructure is upgraded. You cannot use an older version schema with a new Infrastructure installation.
If you are upgrading from a previous 12c release, then you need not create the 12c schemas. you can directly upgrade them with the Upgrade Assistant.
3.5 Creating the Required Schemas with the RCU
If you are upgrading from 11g, you must create the required 12c schemas before you begin the upgrade.
Note:
This procedure assumes that you are a SYS or SYSDBA user with full database administrator privileges. If you are a user with limited database privileges, follow the procedure stated in Creating Schemas as a User With Limited Database Privileges. For in-depth information about using RCU, see Creating Schemas with the Repository Creation Utility.If you are upgrading from 11g release, then you must provide the same prefix while creating the 12c schemas.
3.6 Using the Schema Version Registry to Identify the Existing Schemas
When the schemas are created in your database, RCU creates and maintains a table called schema_version_registry. This table contains schema information such as version number, component name and ID, date of creation and modification, and custom prefix. When you run the Upgrade Assistant. it identifies schemas for which an upgrade is available. You can upgrade multiple schemas in a single session of running the Upgrade Assistant.
To determine which of your 11g or 12c schemas can be upgraded to 12.2.1.1, see Identifying Schemas that Can be Upgraded with the Upgrade Assistant in Upgrading with the Upgrade Assistant.
Alternatively, use the following command to query the schema_version_registry table to identify the existing schemas:
select * from schema_version_registry;
3.7 About Upgrading Schemas using the Upgrade Assistant
The Upgrade Assistant provides two options for upgrading schemas: Individually Selected Schemas and All Schemas Used By a Domain.
Individually Selected Schemas
This option enables you to choose which component schemas to upgrade. Select this option when you want to select individual schemas for upgrade and you do not want to upgrade all of the schemas used by the domain..
For example, if you want to make a trial run of Upgrade Assistant by creating schemas with RCU that are outside the domain, and then use Upgrade Assistant to upgrade them.
All Schemas Used By a Domain
This option allows the Upgrade Assistant to detect all of the available schemas within the specified domain and to include them in the upgrade. This is also known as a domain assisted schema upgrade.
3.8 Identifying Schemas that Can be Upgraded with the Upgrade Assistant
Review the list of available schemas before you begin the upgrade by querying the schema version registry.
This optional step can be used if you want to manually query the schema_version_registry table before you start the upgrade process. It is important to note that the Upgrade Assistant identifies all schemas that are available for an upgrade and allows you to select the individual schemas you want to upgrade or allow Upgrade Assistant to upgrade all of the schemas in the domain. In addition, when you run the Upgrade Assistant in —readiness mode, you will receive a report with all of the schemas and their current pre-upgrade versions.
If you are using an Oracle database, connect to the database as a user having Oracle DBA privileges, and run the following from SQL*Plus to get the current version numbers:
SET LINE 120
COLUMN MRC_NAME FORMAT A14
COLUMN COMP_ID FORMAT A20
COLUMN VERSION FORMAT A12
COLUMN STATUS FORMAT A9
COLUMN UPGRADED FORMAT A8
SELECT MRC_NAME, COMP_ID, OWNER, VERSION, STATUS, UPGRADED FROM SCHEMA_VERSION_REGISTRY ORDER BY MRC_NAME, COMP_ID ;
The following report is generated when saved to a SQL script, for example version.sql.
If the number in the "VERSION" is at 11.1.1.7.0 or higher, and the STATUS column is 'VALID', then the schema is supported for upgrade.
schema_version_registry table retains the schemas at their pre-upgrade version after the upgrade.
Tip:
Compare the information you collect from the schema version registry and the corresponding schemas to determine whether there are schemas in your domain that are not available for an upgrade yet.
Notes about the schemas that need to be upgraded
-
For most components, the only schema version starting points that are valid for upgrading are 11g Release 1 (1.1.1.7.0, 11.1.1.8.0, or 11.1.1.9.0) or 12c (12.1.2, 12.1.3, or 12.2.1.0). If your schemas are not at a supported version, then you must upgrade them before using the 12c (12.2.1.1) upgrade procedures.
Some components, such as Oracle Enterprise Data Quality and Oracle Golden Gate Veridata, support an upgrade from versions other than the standard Oracle Fusion Middleware supported versions.
Refer to your component-specific installation and upgrade documentation for additional information about the schemas that are required for your upgrade.
-
If you used an OID-based policy store in 11g, make sure that you create a new 12c (12.2.1.1) OPSS schema before you perform the upgrade. After the upgrade, the OPSS schema will still remain LDAP-based store.
-
You can only upgrade schemas for products that are available for upgrade in the Oracle Fusion Middleware 12c (12.2.1.1) release. Do not attempt to upgrade a domain that includes components that are not yet available for upgrade to 12c (12.2.1.1).
3.9 Upgrading the Schemas with the Upgrade Assistant
Run the Upgrade Assistant to upgrade all the schemas in the existing domain to 12.2.1.1. Oracle recommends that you run the Upgrade Assistant as a non-SYSDBA user.
3.10 Reconfiguring the Domain with the Reconfiguration Wizard
The Reconfiguration Wizard reconfigures the domain while retaining the location of the domain. Use the Reconfiguration Wizard to upgrade your domain to the latest version.
Important
If the source is a clustered environment, run the Reconfiguration Wizard on the primary node only. Use the pack/unpack utility to apply the changes to other cluster members in the domain as described in If Your Existing Environment is a Clustered Configuration....3.11 Upgrading the Domain Component Configurations with the Upgrade Assistant
Follow the instructions in this section to upgrade any additional domain component configurations, such as OWSM policy metadata structure and adapter configurations, using the Upgrade Assistant.
3.12 Troubleshooting the Infrastructure Upgrade
If the Infrastructure upgrade fails, troubleshoot the cause using the log file and guidelines in this topic.
Caution:
As with most Fusion Middleware errors, errors that are detected in the Examine phase can be fixed and the Upgrade Assistant can continue to run. Errors that occur during the Upgrade phase, however, must be corrected using the restored backup files and the upgrade process must be started from the beginning. Do not attempt to rerun an upgrade that errors during the Upgrade phase. The environment should be considered unstable and will need to be restored to its pre-upgrade state.
For more information, see General Troubleshooting Guidelines in Upgrading with the Upgrade Assistant.
- Authentication Failure — JSchException: Auth Fail
When Running the Upgrade Assistant to upgrade Weblogic Component Configurations, if you provide incorrect login credentials for a UMS server, you an exception in the Upgrade Assistant log files as shown in this topic. - Error while Copying User Messaging Service (UMS) Configuration Files
If the Upgrade Assistant fails to automatically copy the UMS configuration files, you must stop the upgrade and manually copy the configuration files before attempting to upgrade UMS. This process is required only if the Upgrade Assistant fails to automatically copy the configuration files or if you prefer to copy the configuration files manually.
3.12.1 Authentication Failure — JSchException: Auth Fail
When Running the Upgrade Assistant to upgrade Weblogic Component Configurations, if you provide incorrect login credentials for a UMS server, you an exception in the Upgrade Assistant log files as shown in this topic.
[upgrade.UCSUMS.UCSUMS_CONFIGURATION_PLUGIN] [tid: 110] [ecid:
88ab893d-a523-4a83-b5a6-f7b1cf8cb029-00000001,0] [[
com.jcraft.jsch.JSchException: Auth fail
The resolution to this error depends on when the error occurred:
If this error occurred during the Examine phase (before Upgrade phase): Verify that the username and password you entered are valid for all managed servers and directories and that the username provided has privileges for ssh. Once you have corrected the error, retry the connection.
If this error occurred during the Upgrade phase, your upgrade operation did not succeed and you need to restore your files from backup and start the upgrade again. Make sure that you use the correct server login credentials when prompted.
Caution:
Errors that occur during the Upgrade phase are non-reentrant, meaning you cannot simply correct the error and continue through the upgrade. Once you click Upgrade, if an error occurs then the environment must be restored from backup before you start the upgrade process again.3.12.2 Error while Copying User Messaging Service (UMS) Configuration Files
If the Upgrade Assistant fails to automatically copy the UMS configuration files, you must stop the upgrade and manually copy the configuration files before attempting to upgrade UMS. This process is required only if the Upgrade Assistant fails to automatically copy the configuration files or if you prefer to copy the configuration files manually.
This section describes the location of the UMS configuration files that are copied from the remote managed server nodes to the Admin server while upgrading UMS from 11g to 12c. Note that the Upgrade Assistant can automatically copy the remote configuration files, if all necessary prerequisites are met and the required login information is provided. For more information about using Upgrade Assistant to copy configuration files, see Oracle Fusion Middleware Upgrading with the Upgrade Assistant.
However, if the Upgrade Assistant cannot locate your files, then you must copy the configuration files from the remote managed server to the same location on the Administration server running the upgrade. The configuration files that must be copied include the UMS server configuration files (appconfig.xml), driver configuration files (driverconfig.xml), and the user preferences files (businessterms.xml). These files are located in the /applications folder for each managed server, as shown in Table 3-7.
After manually copying the configuration files from the managed server to the Administration server, you must start the Upgrade Assistant again using the procedures from Upgrading the Domain Component Configurations with the Upgrade Assistant
Table 3-7 Configuration File locations
| Configuration file | Location |
|---|---|
|
UMS Server |
$DOMAIN_HOME/config/fmwconfig/servers/MANAGED_SERVER_NAME/applications/usermessagingserver/configuration/appconfig.xml |
|
Driver Configuration ( |
$DOMAIN_HOME/config/fmwconfig/servers/MANAGED_SERVER_NAME/applications/usermessagingdriver-DRIVER_NAME/configuration/driverconfig.xml |
|
User Preferences ( |
$DOMAIN_HOME/config/fmwconfig/servers/MANAGED_SERVER_NAME/applications/usermessagingserver/configuration/businessterms.xml |
Note:
If there are multiple drivers deployed in a domain, then you must ensure that configuration files for all drivers are copied. This can be achieved by replacing the DRIVER_NAME with as many drivers deployed in that domain.
3.13 Performing the Post-Upgrade Tasks
After you upgrade Oracle Fusion Middleware 11g Application Developer to Oracle Fusion Middleware 12c Infrastructure, you must complete the post-upgrade tasks.
For post-upgrade tasks, see Tasks to Perform After Upgrade.
