49 Adding Lists of Information to a Portal
This chapter includes the following sections:
Permissions
To perform the tasks in this chapter, you must be a portal manager or member with Manage Security and Configuration or Manage Configuration permission in the portal.
-
To add and work with the Lists task flow, you need the permissions to
Edit Pages(to add the Lists task flow to a page), andEdit Task Flows. -
To create and manage lists, you need the portal-level permission
Customize Pages. -
To set advanced permissions, set one or more of the following lists permissions:
Create, Edit, and Delete ListsorCreate Lists,Edit Lists,Delete Lists,Edit List Data, andView Lists.
For more information about permissions, see About Roles and Permissions for a Portal.
49.1 Prerequisites for Working with Lists
For lists to be available in a portal, the portal manager or anyone with Manage Security and Configuration or Manage Configuration permission must perform the following tasks:
-
If not already enabled, enable the Lists tool, as described in Enabling and Disabling Tools and Services Available to a Portal.
-
Provide access for users to lists in any of the following ways:
-
Provide users with the pretty URL to the Lists page (see Pretty URLs for Pages in a Specified Portal).
-
Add a page link to the Lists page in the portal navigation (see Adding a Lists Page to a Portal).
-
Add the Lists task flow to a page in the portal (see Adding a Lists Task Flow to a Page).
When a list is created from the Lists page (or console), that list appears in the Resource Catalog. You can then add that task flow to a page in your portal (see Adding a Lists Task Flow to a Page.).
-
Note:
For information about working with lists, Working with the Lists Task Flow.
49.2 About Lists
Lists provide a means of creating, publishing, and managing lists of information. Lists are useful for tracking issues, capturing project milestones, publishing project assignments, and much more. The lists you create in WebCenter Portal can be widely varied in their complexity. For example, you can start with a list of team members, and then include columns for contact information, project role, and links to relevant documents, such as any plans or proposals associated with a listed team member.
The lists created in a portal are unique to that portal. A portal cannot consume the lists created in another portal.
Create and populate lists using the controls on the Lists page (or console) using the Lists viewer. Place populated lists on a page using the List Viewer task flow. Users must have appropriate permissions to perform actions on lists.
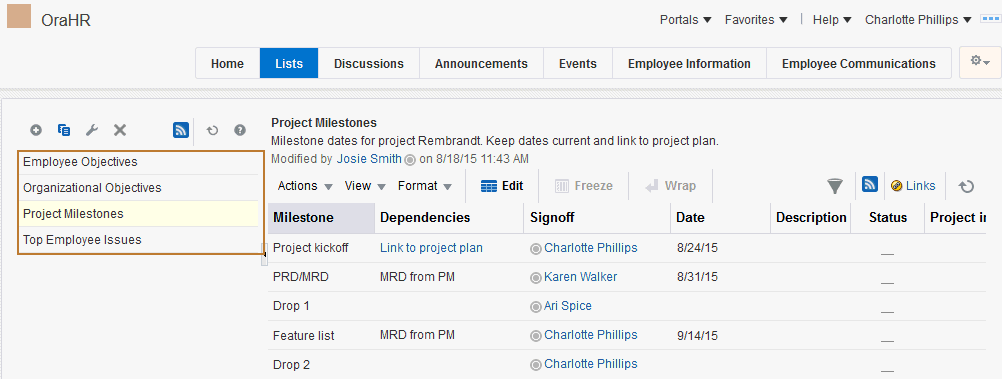
Use the controls on the Lists page to create and revise lists and list data and to view all of a portal's current lists (Figure 49-1).
On the Lists page, you can make use of templates for rapid creation of lists and other features for designing and revising list structure. If you prefer, you can create a list from scratch, adding, and configuring all of the columns yourself, or you can create a list from an Excel spreadsheet.
The List Viewer task flow (Figure 49-2) provides a means of placing a particular list on a page.
Figure 49-2 A List in the List Viewer Task Flow

Description of "Figure 49-2 A List in the List Viewer Task Flow"
The List Viewer provides easy access to all the features required for adding and revising list data, importing/exporting list data, filtering list data, obtaining a list RSS feed (if RSS is enabled in the portal), and linking to other WebCenter Portal assets from the list and from a list row (see Linking Information in WebCenter Portal in Using Oracle WebCenter Portal).
Additionally, the List Viewer provides access to customization features that enable you to control the look of a particular list instance and its data. For example, use customization to control color banding of rows or columns or to apply filters to list data. For more information, see About Customizing Lists.
Use the Lists page and the List Viewer to add and revise list data throughout the life of the list. Add and revise content directly on a list, or use the Export and Import features to send list data to an Excel file, revise it there, and then import it back into the original list in the portal (for more information, see Exporting a List and Importing a List from an Excel Spreadsheet).
The list is rendered within a List Viewer task flow. See Working with the Lists Task Flow for more information.
The Lists page is available in any portal where lists is enabled. If the Lists page (or console) is not shown by default when you navigate to a portal, refer to Adding a Lists Page to a Portal to expose the Lists page in the portal.
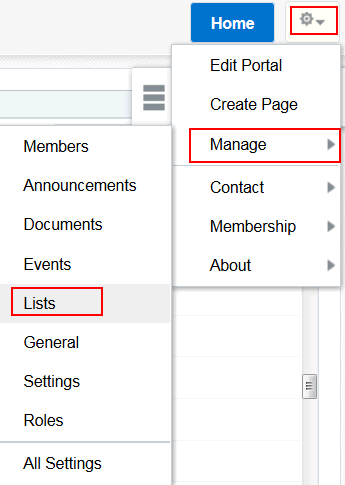
As a portal manager, you can also access the Lists page from Pages and Portals Actions menu: select Manage, then Lists (see Figure 49-3)
Figure 49-3 Lists Menu in Pages and Portals Actions Menu
Note:
Lists are not available in the Home portal.
Through tight integration with links, lists provides the opportunity to associate other WebCenter Portal items with an entire list or an individual list row. Linking enables you to associate documents, notes, and URLs with a list or a list row (see Linking Information in WebCenter Portal in Using Oracle WebCenter Portal).
Lists additionally provide RSS feeds for all lists, if RSS is enabled in the portal (see Enabling or Disabling RSS News Feeds for a Portal). See Obtaining List News Feeds in Using Oracle WebCenter Portal for using RSS in lists.
49.3 Adding a Lists Page to a Portal
To provide navigation to the Lists page in a portal, you can add a page link to the portal navigation, as described in Adding an Existing Page to the Portal Navigation.
Note:
The Lists page (or console) is not automatically exposed when the tool is enabled or when the portal is created. However, if the portal template exposes the Lists page, the portal will also automatically expose this page.
49.4 Adding a Lists Task Flow to a Page
For the steps to add a lists task flow to a page, see Adding a Component to a Page.
Tip:
The presence or location of a lists task flow in the resource catalog depends on how the resource catalog is configured. For example, in the default resource catalog, the Lists folder is included under the Social and Communication folder. The Lists folder contains the lists that have been created using the Lists task flow on the Lists page. If no lists have been created, the default resource catalog shows an empty folder
For more information about creating lists, editing the list structure, copying a list, and deleting a list, see Creating and Managing Lists in Using Oracle WebCenter Portal.
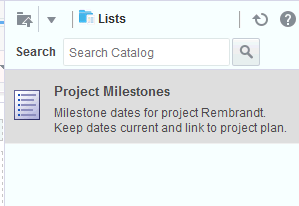
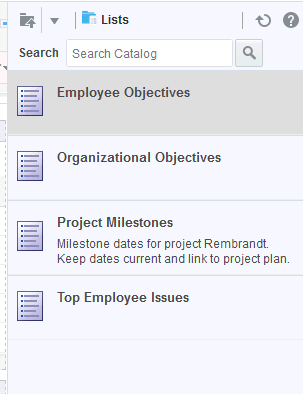
All of the lists created in a portal are available on the Lists page (or console) and through the portal's resource catalog (Figure 49-4).
Figure 49-4 Lists in the Resource Catalog
Description of "Figure 49-4 Lists in the Resource Catalog"
If the portal has only one list that has been created on the Lists page (or console), you will see only that one list in the portal's resource catalog (Figure 49-5).
49.5 Working with List Viewer Task Flow Properties
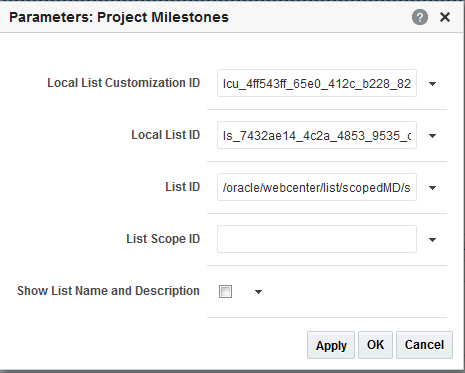
The List Viewer task flow has associated properties, which users with sufficient privileges can access through the task flow's View Actions menu. For example, select Parameters to display the Parameters dialog (Figure 49-6).
Figure 49-6 List Viewer Task Flow Parameters in the Component Properties Dialog
Description of "Figure 49-6 List Viewer Task Flow Parameters in the Component Properties Dialog"
See Also:
The following sections provide information about properties associated with the List Viewer task flow and describe the parameters that are unique to it:
49.5.1 Setting List Viewer Task Flow Properties
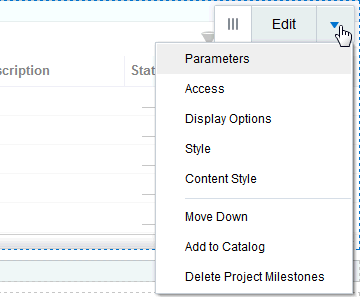
In the page editor, selecting any component exposes a View Actions menu (Figure 49-7), which provides access to the component’s properties: Parameters, Access, Display Options, Style, and Content Style.
Figure 49-7 View Actions Menu on a List Viewer Task Flow
To set the List Viewer task flow properties:
49.5.2 List Viewer Task Flow Parameters
Table 49-1 describes the parameters that are unique to the List Viewer task flow. Note that List Viewer task flow parameter values are set automatically and should not be changed.
Table 49-1 List Viewer Task Flow Parameters
| Parameter | Description |
|---|---|
|
|
A unique identifier for the list to show Either |
|
|
A unique identifier for the scope containing the list If no value is present, the current scope is used. This value is set automatically. Do not edit this value. |
|
|
A unique identifier within the scope for the list customization This value is set automatically. Do not edit this value. |
|
|
A unique identifier within the scope for the list to show Either |
|
|
A check box for specifying whether to display the list name and description If no value is present, the list name and description are not shown. Values include |
49.6 Working with the Lists Task Flow
This section describes how to use the Lists task flow in the portal manager role. It includes the following subsections:
See Working with Lists in Using Oracle WebCenter Portal for the following tasks:
-
Creating and Managing Lists describes how to create lists, edit the list structure (rename a list, add columns to a list, rearrange columns, and delete columns), copy a list, and delete a list.
-
Adding and Managing List Data describes how to add a specific data type to a list, edit list data, delete list rows, and refresh list data.
-
Sending a Link to a List to Other Users describes how to send a link of a specific list to other users.
49.6.1 About Customizing Lists
You can perform user customizations on your own view of a list instance, or you as the portal manager or application specialist can perform application customizations on a list instance, affecting everyone's view. User personalizations involve changes made in page view mode; while application customizations involve changes made in the page editor. Everyone can perform user personalizations of their own view of a list; but page edit privileges are always required for application-level list customizations.
Note:
User and application customizations apply to a list rendered in a List Viewer task flow. They do not apply to lists rendered on the Lists page.
A second instance of a list is not affected by the customizations you make to the first instance. For example, imagine that you have placed the Issues list on both the Sales page and the What's New page. If you sort the list by the Number column on the Sales page, the Issues list is not automatically sorted by Number on the What's New page.
While application customizations affect everyone's view of a list instance, user customizations are layered over them. For example, you may perform an application customization on a list containing columns A, B, and C, so that column C is first in list column order (C, A, B). A user can then perform a user customization on the list so that column A is first in list column order in their personal view of the same list instance (A, C, B).
Note:
In the page editor, you can perform application customizations. In page view mode, you see user customizations layered over application customizations. If the same property is set at both the application and user levels, the user value takes precedence in your own view. For user-level customizations, see Customizing Lists in Using Oracle WebCenter Portal.
This section includes the following topic:
49.6.1.1 Performing Application-Level Customizations on a List
You can perform user-level or application level customizations on a list. WebCenter Portal users or portal participants can perform these customizations to manage their personal view of lists. An application specialist or portal manager can perform the same customizations from the page editor to affect the view of all users.
Note:
Some user and application customizations apply to a list rendered in a List Viewer task flow. They do not apply to lists rendered on the Lists page.
To perform application-level customizations on a list:
49.6.2 Exporting a List and Importing a List from an Excel Spreadsheet
Lists provides a means of exporting and importing lists. If you can view the list, you can export it to Microsoft Excel 1997 - 2003 and 2007 formats and revise list data in Excel. If you have sufficient privileges to edit the list, you can import the revised list back into WebCenter Portal.
Tip:
You can also create a list by importing an Excel spreadsheet. For more information, see Creating Lists in Using Oracle WebCenter Portal.
This section describes how to export and import lists and provides information about additional software that may be of use in this process. It includes the following subsections:
49.6.2.1 About Exporting and Importing Lists
Use list export and import options to add and revise list rows in a Microsoft Excel spreadsheet. List structure and links for the list and list rows are unaffected by export and import. When exporting a list, only the list data is exported, not the list structure nor the links. When a list is imported, new links and modified links will not be affected by the import.
After you export a list, if other changes are made to list data in WebCenter Portal, they are overwritten when you import the list. Before content is overwritten, a confirmation dialog provides you with an opportunity to stop the import and preserve WebCenter Portal changes.
Importing a spreadsheet cannot be used to modify list structure. However, you can import any spreadsheet to a list that has the same columns. A warning is raised if the spreadsheet was not created from an export of the list, but you can dismiss this warning and proceed if desired. You can also export a list without rows to a spreadsheet, add rows in Excel, and then import it.
You must take care when you export a list not to revise the list structure in Excel nor in WebCenter Portal. You cannot import an exported list if the list structure is changed in WebCenter Portal after export. You can add and remove list rows in the spreadsheet; such changes are reflected in the list on import.
Adding and removing list columns in the spreadsheet does not affect the list structure. Consequently, when you import a spreadsheet with columns that were removed through Excel, the import succeeds. The columns continue to appear in the imported list; though the deleted column data does not.
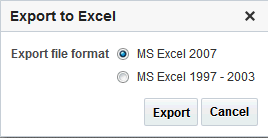
When you export a list from WebCenter Portal, you are prompted for the Excel format (1997 - 2003 and 2007 formats are offered). To import a spreadsheet, the same formats are accepted.
49.6.2.2 Exporting a List to a Spreadsheet
When you can view a list, you can export the list to a Microsoft Excel file. Exporting enables you to use your Excel skills to easily add to and revise list data. Controls for exporting lists are available in both the List Viewer task flow and on the Lists page.
To export a list:
49.6.2.3 Importing an Exported List
After you have created or revised list data and saved it in an Excel format, you can import it using controls available in both the List Viewer task flow and on the Lists page. To import list data, you must have, minimally, Edit permission on the page that contains the list.
To import an exported list:
