Using LDAP with BI Publisher

You can use BI Publisher with an LDAP provider for authentication only or for both authentication and authorization.

Note:

By default, BI Publisher allows every LDAP user to log in to the system even when no BI Publisher-specific roles are assigned to the user. Users cannot perform any functions that require roles, such as creating reports or data models; however if a user is assigned a role that is assigned permissions on catalog objects (such as traverse and open) the user can perform those tasks.

To prevent users from logging in to BI Publisher unless they have a BI Publisher role assigned, see Disabling Users Without BI Publisher-Specific Roles from Logging In.

Configuring BI Publisher to Use an LDAP Provider for Authentication Only

Configure BI Publisher to use an LDAP provider for authentication in conjunction with another security model for authorization.

  1. On the Administration page, under Security Center, click Security Configuration.
  2. Create a Local Superuser.

    Enter a Superuser Name and Password and select Enable Local Superuser check box. Enabling a local superuser ensures that you can access the Administration page of BI Publisher in case of security model configuration errors.

  3. Scroll down to the Authentication region. Select the Use LDAP check box.
  4. Enter the following:
    • URL

      For example: ldap://example.com:389/

      If you are using LDAP over SSL, then note the following:

      • the protocol is ldaps

      • the default port is 636

      An example URL would be: ldaps://example.com:636/

    • Administrator Username and Password for the LDAP server

      The Administrator user entered here must also be a member of the XMLP_ADMIN group.

    • Distinguished Name for Users

      For example: cn=Users,dc=example,dc=com

      The distinguished name values are case-sensitive and must match the settings in the LDAP server.

    • JNDI Context Factory Class

      The default value is com.sun.jndi.ldap.LdapCtxFactory

    • Attribute used for Login Username

      Enter the attribute that supplies the value for the Login user name. This is also known as the Relative Distinguished Name (RDN). This value defaults to cn.

    • Attribute used for user matching with authorization system - enter the attribute that supplies the value to match users to the authorization system. For example, orcleguid.

  5. Click Apply.
  6. Restart the BI Publisher server.

Configuring BI Publisher to Use an LDAP Provider for Authentication and Authorization

BI Publisher can be integrated with the LDAP provider to manage users and report access.

Create the users and roles within the LDAP server, then configure the BI Publisher server to access the LDAP server.

In the BI Publisher security center module, assign folders to those roles. When users log in to the server, they have access to those folders and reports assigned to the LDAP roles.

Integrating the BI Publisher server with Oracle LDAP consists of three main tasks:

  1. Set up users and roles in the LDAP provider
  2. Configure BI Publisher to recognize the LDAP server
  3. Assign catalog permissions and data access to roles

For information on supported LDAP servers, see System Requirements and Certification for the most up-to-date information on supported hardware and software.

Setting Up Users and Roles in the LDAP Provider

This procedure must be performed in the LDAP provider. See the documentation for the provider for details on how to perform these tasks.

To set up users and roles:

  1. In the Domain root node of the LDAP provider, create the roles that are described in the table below to integrate with BI Publisher. See Understanding BI Publisher Users, Roles, and Permissions for full descriptions of the required functional roles.
    BI Publisher System Group Description

    XMLP_ADMIN

    The administrator role for the BI Publisher server. You must assign the Administrator account used to access your LDAP server the XMLP_ADMIN group.

    XMLP_DEVELOPER

    Allows users to create and edit reports and data models.

    XMLP_SCHEDULER

    Allows users to schedule reports.

    XMLP_TEMPLATE_DESIGNER

    Allows users to connect to the BI Publisher server from the Template Builder for Word and to upload and download templates. Allows users to design layouts using the BI Publisher Layout Editor.

  2. Create other functional roles as required by your implementation (for example: HR Manager, Warehouse Clerk, or Sales Manager), and assign the appropriate BI Publisher functional roles.
  3. Assign roles to users.

    Note:

    Ensure that you assign the Administrator account the XMLP_ADMIN role.

Configuring the BI Publisher Server to Recognize the LDAP Server

To configure the BI Publisher server to recognize the LDAP server, update the Security properties in the BI Publisher Administration page.

Note:

Ensure that you understand your site's LDAP server configuration before entering values for the BI Publisher settings.

To configure the BI Publisher Server for the LDAP Server:

  1. On the Administration page, under Security Center, click Security Configuration.
  2. Create a Local Superuser.

    Enter a Superuser Name and Password and select Enable Local Superuser check box. Enabling a local superuser ensures that you can access the Administration page of BI Publisher in case of security model configuration errors.

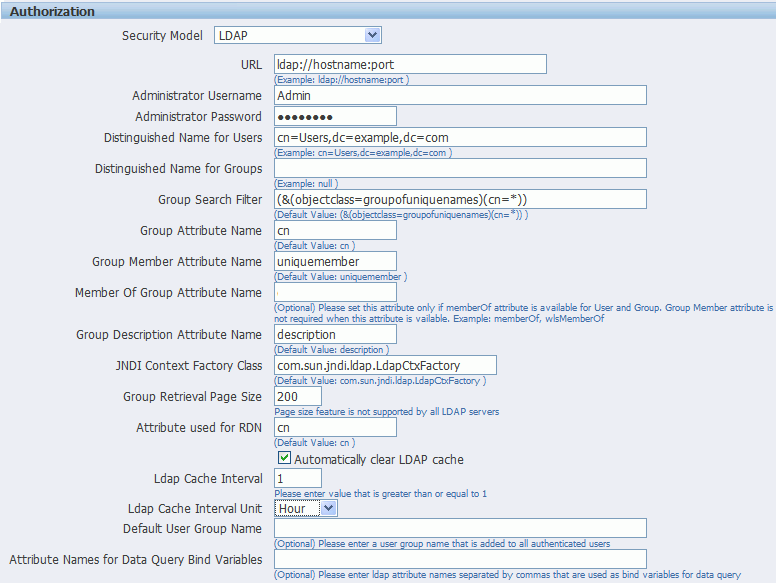
  3. Scroll down to the Authorization region. Select LDAP for the Security Model.
  4. Enter the following:
    • URL

      For example: ldap://example.com:389/

      If you are using LDAP over SSL, then note the following:

      • the protocol is "ldaps"

      • the default port is 636

      For example: ldaps://example.com:636/

    • Administrator Username and Password for the LDAP server

      The Administrator user entered here must also be a member of the XMLP_ADMIN group.

    • Distinguished Name for Users

      For example: cn=Users,dc=example,dc=com

      The distinguished name values are case-sensitive and must match the settings in the LDAP server.

    • Distinguished Name for Groups

      For example: cn=Groups,dc=us,dc=oracle,dc=com

      The default value is cn=OracleDefaultDomain,cn=OracleDBSecurity,cn=Products,cn=OracleContext,dc=example,dc=com

    • Group Search Filter

      The default value is (&(objectclass=groupofuniquenames)(cn=*))

    • Group Attribute Name

      The default value is cn

    • Group Member Attribute Name

      The default value is uniquemember

    • Member of Group Attribute Name

      (Optional) Set this attribute only if memberOf attribute is available for User and Group. Group Member Attribute is not required when this attribute is available. Example: memberOf or wlsMemberOf

    • Group Description Attribute Name

      The default value is description

    • JNDI Context Factory Class

      The default value is com.sun.jndi.ldap.LdapCtxFactory

    • Group Retrieval Page Size

      Setting this value enables support of the LDAPv3 control extension for simple paging of search results. By default, the BI Publisher server does not use pagination. This value determines the number of results to return on a page (for example, 200). Your LDAP server must support control type 1.2.840.113556.1.4.319 to support this feature, such as Oracle Internet Directory 10.1.4. Ensure that you check your LDAP server documentation for support of this control type before entering a value.

      For more information about LDAP pagination and the required control type, see the article: RFC 2696 - LDAP Control Extension for Simple Paged Results Manipulation (http://www.faqs.org/rfcs/rfc2696.html).

    • Attribute used for Login Username

      Enter the attribute that supplies the value for the Login user name. This is also known as the Relative Distinguished Name (RDN). This value defaults to cn.

    • Automatically clear LDAP cache - to schedule the automatic refresh of the LDAP cache the LDAP cache per a designated interval, select this box. After you select this box the following additional fields become enabled:

      • Enter an integer for Ldap Cache Interval. For example, to clear the LDAP cache once a day, enter 1.

      • Select the appropriate Ldap Cache Interval Unit: Day, Hour, or Minute.

    • Default User Group Name

      (Optional) Use this option if your site has the requirement to allow all authenticated users access to a set of folders, reports, or other catalog objects. The user group name that you enter here is added to all authenticated users. Any catalog or data source permissions that you assign to this default user group are granted to all users.

    • Attribute Names for Data Query Bind Variables

      (Optional) Use this property to set attribute values to be used as bind variables in a data query. Enter LDAP attribute names separated by a commas for example: memberOf, primaryGroupID,mail

      See Creating Bind Variables from LDAP User Attribute Values in Data Modeling Guide for Oracle Business Intelligence Publisher.

  5. Click Apply. Restart the BI Publisher server.

The figure below shows a sample of the LDAP security model entry fields from the Security Configuration page.

If you are configuring BI Publisher to use LDAP over SSL, then you must also configure Java keystore to add the server certificate to JVM. See Configuring BI Publisher for Secure Socket Layer (SSL) Communication.

Assigning Data Access and Catalog Permissions to Roles

Assign data access and catalog permissions to roles in the Administration page.

To assign data access and catalog permissions to roles:

  1. Log in to BI Publisher as a user assigned the XMLP_ADMIN role in the LDAP provider.
  2. On the Administration page, click Roles and Permissions.

    You see the roles that you created in the LDAP provider to which you assigned the XMLP_ roles. Note the following:

    • The XMLP_X roles are not shown because these are controlled through the LDAP interface.

    • The Users tab is no longer available under the Security Center because users are now managed through your LDAP interface.

    • Roles are not updatable in the BI Publisher interface, except for adding data sources.

  3. Click Add Data Sources to add BI Publisher data sources to the role. A role must be assigned access to a data source to run reports from that data source or to build data models from the data source. For more information see Granting Data Access.
  4. Grant catalog permissions to roles. See About Catalog Permissions and Granting Catalog Permissions for details on granting catalog permissions to roles.

Users can now log in using their LDAP username/password.

Disabling Users Without BI Publisher-Specific Roles from Logging In

To disable users without BI Publisher-specific roles from logging in to the BI Publisher server, set a configuration property in the xmlp-server-config.xml file.

The xmlp-server-config.xml file is located at:

$DOMAIN_HOME/bidata/components/bipublisher/repository/Admin/Configuration/xmlp-server-config.xml

In the xmlp-server-config.xml file, add the following property and setting:

<property name="REQUIRE_XMLP_ROLE_FOR_LOGIN" value="true"/>