4 Managing Employees for CRM
This chapter contains the following topics:
4.1 Managing CRM Employees
This section provides an overview of employee information for CRM, and discusses how to:
-
Enter basic employee information.
-
Enter additional phone and email information for employees.
-
Set up service provider information.
-
Assign partners to employees.
-
Enter attachments for employees.
-
Review parent child relationships.
-
Set processing options for the Employee Detail program (P90CA040).
-
Set processing options for the Employee Processing Options program (P90CA043).
4.1.1 Understanding Employee Information for CRM
Before you can add an employee to the sales force or to a provider group, you must enter the employees into the system. Each sales or support employee must have a record in the F0101 table and the F0111 table.
The method that you use to enter employees depends upon the JD Edwards EnterpriseOne systems that the organization uses. If the organization uses Oracle's JD Edwards EnterpriseOne Human Capital Management (HCM), the system creates address book records during the HCM employee entry process. If you do not use JD Edwards EnterpriseOne Human Capital Management, you can enter employees into the system using Oracle's JD Edwards EnterpriseOne Address Book system.
Alternatively, you can enter employees using the Employee Detail program (P90CA040). This program enables you to enter and maintain all CRM-related employee information from one entry point. When you add employees using this program, the system creates the necessary address book records. Regardless of which method you use to enter employees, you can use the Employee Detail program to maintain all CRM-related employee information.
After you enter employees into the system, they can participate on sales teams associated with customers, opportunities, quotes, and sales orders. They can be added to provider groups, which are responsible for managing service requests or cases. Provider groups are also used to determine case escalation paths.
The employees in the organization might work frequently with members of other organizations with which you have partnerships. Some of the employees might be responsible for maintaining those partner relationships. Using the Employee Detail program, you can associate employees with multiple partners so that you can review partner relationships by employee.
Employees can be commissioned or non-commissioned. You can access employee commission information from the Employee Detail program entry point.
After you set up basic information about the employee, you can then enter additional employee information, such as:
-
Additional phone and email information.
-
Service provider information.
-
Partner relationships.
-
Attachments.
Before you enter or maintain CRM-related employee information, you must set the processing options for the Employee Detail program (P90CA040) and the Employee Processing Options program (P90CA043). The Employee Processing Options program can be accessed using the Interactive Versions program (fast path IV). This program is not located on a menu.
4.1.1.1 Reviewing CRM Information for Employees
In addition to entering employee information, you can use the Employee Detail program to review CRM-related employee information. This table lists the type of information that you can review, along with the description and location of the information:
| Type of Information | Description and Location |
|---|---|
| Provider Group | You can review all of the provider groups that an employee is associated with. Provider group information is located on the Service tab of the Employee - Manage {Employee Name} form. |
| Cases | You can review all of the cases that an employee is associated with. You can use this information to search for cases associated with an employee:
Case information is located on the Service tab of the Employee - Manage {Employee Name} form. |
| Opportunities | You can review all of the active opportunities for which the employee is a member of the sales team. The opportunity information that you can review includes:
Opportunity information is located on the Sales tab of the Employee - Manage {Employee Name} form. |
| Pipeline | You can review the potential revenue associated with an employee by viewing the employee's pipeline. Pipeline information is located on the Sales tab of the Employee - Manage {Employee Name} form. |
| Customers | You can review all of the customers with which an employee is associated. If the employee is a member of a customer's sales team, the system displays that customer. Customer information is located on the Customer and Partner tab of the Employee - Manage {Employee Name} form. |
| Parent Child Hierarchy | You can review the parent child relationships for employees within the organization. The system displays, in hierarchical detail, the organizational structure of the selected employees. |
When you review CRM-related information for employees, some forms enable you to click the Expand Hierarchy or Collapse Hierarchy buttons to view information for the selected employee as well as the employee's subordinates.
For example, Jane Ryan has 12 employees who report to her. When you review customer information for Jane, you initially see only those customers whose sales teams include Jane. If you click the Expand Hierarchy button, the system displays all customers whose sales teams include Jane or one of her subordinates. If you click the Collapse Hierarchy button, the system removes information about the subordinates, and displays only Jane's information.
4.1.1.2 Related Links
The Employee Detail program provides you with links to programs in other JD Edwards EnterpriseOne product areas that contain employee information. You can use these links to access, review, and edit these types of information:
-
Note:
Documentation about entering and maintaining the preceding information resides in the product-specific implementation guides that are associated with each product area.
|
See Also:
|
4.1.2 Forms Used to Enter Employees for CRM
| Form Name | FormID | Navigation | Usage |
|---|---|---|---|
| Search For Employees | W90CA040F | CRM Foundation Daily Processing (G90C01), Employee.
Periodic Sales Force Automation Processing (G90CA02), Employee. |
Select existing employees for revision, or access the Add New Employee form. |
| Employee Parent Child Relationships | W90CA040D | Click the Parent Child Hierarchy link on the Search for Employees form. | Review parent child relationships. |
| Add Employee | W90CA048A | Click Add on the Search for Employees form. | Enter basic employee information. |
| Employee - Manage {Employee Name} | W90CA040A | Select an employee from the Search for Employees form. | Review and maintain employee information. |
| Employee Attachments for {Name} | W90CA047A | Select the Attachments tab on the Employee - Manage {Employee Name} form. | Enter attachments for an employee. |
4.1.3 Entering Basic Employee Information
Access the Add Employee form.
- Search Type
-
Verify that the system populates this field with an E. Values for this field are stored in UDC (01/ST), and are used to specify the kind of address book record the system creates.
- Business Unit
-
Enter the business unit to which the employee belongs.
- Department
-
Enter the name of the department in which the employee works.
- Industry Classification
-
Enter the industry code associated with the employee.
This code is part of a numerical system that is used in to classifies goods and services. This code can be in the format of these systems of classification:
-
Standard Industrial Classification or North American Industry Classification System.
These systems are used by the United States, and codes associated with these systems are between four and six digits.
-
Harmonized System.
The international method of classifying goods. More than fifty countries use this code. It can be up to 10 digits.
-
Standard Industrial Trade Classification.
A numerical code system developed by the United Nations to classify goods used in international trade. International organizations use this code. It can be up to six digits.
Note:
This code is not used in the sales force alignment process. You must add the employee to an industry grouping, not an industry classification, to automatically assign the employee to a sales team. -
- Employee Y/N
-
Select this option to specify that the record you are creating is for an employee. This field is informational only.
- HCM Records Exist
-
Displays whether Human Capital Management (HCM) records exist for this employee. The system populates this field for employees who were entered using the JD Edwards EnterpriseOne HCM system.
- Ignore Service Escalation
-
Select this option if you do not want the employee to be included in the escalation process for service requests. You can use this option to temporarily remove an employee from the escalation process while they are on vacation or away from the office for a significant period of time.
- Preferred Contact Method
-
Enter the desired contact method for the employee. Examples include:
E: Email
F: Fax
C: Phone
W: Address
P: Pager
4.1.4 Entering Additional Phone and Email Information for Employees
Access the Employee - Manage {Employee Name} form. Select the Employee link and then click the Phone and E-mail tab.
Figure 4-1 Employee - Manage {Employee Name} form: Employee tab: Phones and E-mail link

Description of ''Figure 4-1 Employee - Manage {Employee Name} form: Employee tab: Phones and E-mail link''
4.1.5 Setting Up Service Provider Information
Access the Employee - Manage {Employee Name} form. Select the Employee tab and then click the Service Provider link.
Figure 4-2 Employee - Manage {Employee Name} form: Employee tab: Service Provider link
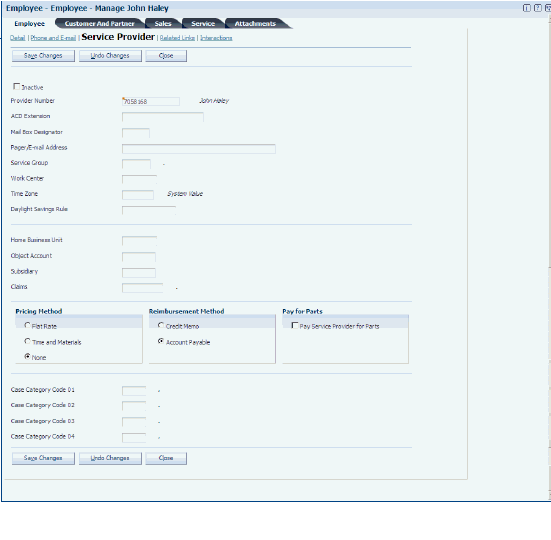
Description of ''Figure 4-2 Employee - Manage {Employee Name} form: Employee tab: Service Provider link''
- ACD Extension
-
Enter the ACD phone extension to which incoming service calls that are associated with this employee should be routed.
- Mail Box Designator
-
Enter the type of employee mailbox that the system uses to deliver messages associated with service calls.
- Service Group
-
Enter the name of the service group to which the employee belongs. Service groups enable you to separate employees into groups using information such as region, type of service provided, or billing arrangements.
- Work Center
-
Enter the business unit, or work center, to which the employee belongs.
Business unit security might prevent you from viewing information about business units for which you have no authority.
- Daylight Savings Rule
-
Enter the daylight savings rule that is associated with the location in which the employee works. You use daylight savings rules to adjust time for a geographic or political locale.
- Pricing Method
-
Enter a value that specifies the method that is used when charging customers for services provided by the employee. Values are:
F: One flat rate. Charges for parts are already included in the flat rate.
T: Actual labor hours. Charges for parts are based on actual parts used.
Blank: The service provider is an internal service provider and should not be paid.
Enter a blank value only when you are defining the method of pricing for a service provider.
- Reimbursement Method
-
Specify how the system reimburses the service provider for a claim or how a claim is paid by a supplier.
For example, dealers can request payment for a claim through the standard accounts payable process, or they can request credits to their accounts receivable accounts.
- Pay Service Provider for Parts
-
Enter a value that specifies whether the service provider should be paid for parts used during a repair. Values are:
Y or 1: Pay.
N or 0: Do not pay.
4.1.6 Assigning Partners to Employees
Access the Employee - Manage {Employee Name} form, Customer and Partner tab. Click the Partner link.
To assign partners to employees:
-
Click the Assign Partners button.
-
On Link Partners, search for and select the partners that you want to attach to the employee, and then click Select.
The selected partners appear in the detail area of the form.
-
To remove a partner, click the Remove button.
4.1.7 Reviewing Parent Child Relationships
Access the Employee Parent Child Relationships form.
You use the Extended Search link to locate a single employee and navigate directly to that employee in the hierarchy view. When you have selected a single employee, you can click the Up One Level button to show the employee's immediate supervisor in the tree and the All records button to show all top level employees in the tree.
4.1.8 Setting Processing Options for the Employee Detail Program (P90CA040)
Processing options enable you to specify the default processing for programs and reports.
4.1.8.1 Display
These processing options specify how information is displayed on the employee entry forms.
- 1. Tax ID (For Future Use)
-
Specify whether the employee's tax ID is displayed on the employee forms. Values are:
Blank: Display. (Default)
1: Hide.
2: Disable.
4.1.8.2 Versions
These processing options specify which versions of associated programs the system uses when processing CRM employee information.
- 1. Address Book (P01012) Version, 2. Customer Master (P03013) Version, 3. Supplier Master (P04012) Version, 4. Contact Information (P90CA070) Version, 5. Employee Detail Processing (P90CA043) Version, and 6. Opportunities (P90CB020) Version
-
Enter the version of the program that you want the system to use when processing CRM employee information. If you leave this option blank, the system uses ZJDE0001.
4.1.9 Setting Processing Options for the Employee Processing Options Program (P90CA043)
Processing options enable you to specify the default processing for programs and reports.
4.1.9.1 Defaults
These processing options are used to specify default information about employees in the organization.
- 1. Search Type
-
Specify the default search type that appears when you enter an employee into the system. The default value is E.
- 2. Organizational Structure Type
-
Specify the default organizational structure that appears when you enter an employee into the system.
- 3. Employee Phone Number Type
-
Specify which type of phone number to display for the employee. The system retrieves the first phone number of this type from the F0115 table.
- 4. Relation Type
-
Specify the default value for the Relation Type field when you enter an employee. Typically, you enter the employee's assistant as the related person. This value is used to update the F01112 table for the assistant.
- 5. Assistant Phone Number Type
-
Specify the default value that appears in the Assistant Phone Number Type field when you enter an employee. This value is used to update the Assistant Phone Number Type in the Contact Phone Number table (F0115).
4.1.9.2 Versions
These processing options are used to specify program versions when entering employees.
- 1. Address Book MBF (P0100041) Version
-
Specify the version of the Address Book MBF (P010004) to use when entering employees. If you leave this processing option blank, the system uses version ZJDE0001.
- 2. Who's Who MBF (P0100087) Version
-
Specify the version of the Who's Who MBF (P0100087) to use when entering employees. If you leave this processing option blank, the system uses version ZJDE0001.