| Sun Fire V890 Server Service Manual |
| Sun Fire V890 Server Service Manual |
| C H A P T E R 4 |
|
Removing and Installing Storage Devices |
This chapter describes how to remove and install storage devices. For a list of part numbers for field-replaceable units (FRUs) and optional equipment, see Illustrated Parts Breakdown.
The following tasks are covered in this chapter:
The system's disk drive hot-plug feature lets you remove a disk drive without shutting down the operating system or turning off the system power. For more information about disk drives, refer to the Sun Fire V890 Server Owner's Guide. For more information about hot-plugging, see:
|
Note - PCI and disk hot-plug operations are not supported when the system ok prompt is displayed. You can only perform these hot-plug operations while the operating system is running. |
|
Note - You need a system console in order to perform disk hot-plug operations. For more information, see About Setting Up a Console. |
1. Unlock and open the front door.
2. Identify the disk drive to be removed.
For information about disk status LEDs, see About Disk Drive LEDs.
3. If you are performing a hot-plug operation, prepare the system for disk removal.
The hot-plug removal procedure involves software commands for preparing the system prior to removing the disk drive. See About Hot-Pluggable and Hot-Swappable Components.
4. If you are not performing a hot-plug operation, halt the operating system and power off the system.
See How to Power Off the System.
5. Attach an antistatic wrist strap to a metal surface inside the system chassis.
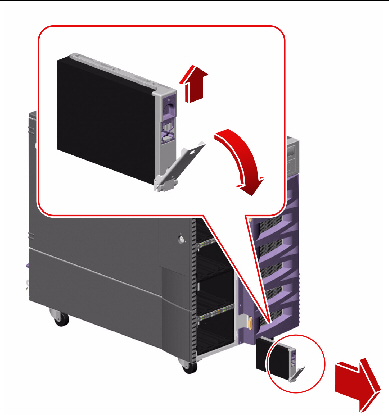
6. Using your thumb and forefinger, push the drive latch upward to release the drive handle.
Swing the handle away from the drive until you feel the drive connector disengage from the backplane. Do not use excessive force.

|
Caution - If you are hot-plugging the disk drive, after disconnecting it from the backplane, allow 30 seconds or so for the drive to spin down completely before removing it from the system. |
7. Holding the drive by the handle, carefully slide it out of the drive bay.
8. Place the drive on an antistatic mat.
9. If you are performing a hot-plug operation, complete the software part of the removal procedure.
See About Hot-Pluggable and Hot-Swappable Components.
To reassemble the system, complete this task:
The system's disk drive hot-plug feature lets you install a disk drive without shutting down the operating system or turning off the system power. For more information about disk drives, refer to the Sun Fire V890 Server Owner's Guide. For more information about hot-plugging, see:
|
Note - PCI and disk hot-plug operations are not supported when the system ok prompt is displayed. You can only perform these hot-plug operations while the operating system is running. |
|
Note - You need a system console in order to perform disk hot-plug operations. For additional details, see About Setting Up a Console. |
1. If you are performing a hot-plug operation, prepare the system to receive the new disk drive.
The hot-plug installation procedure involves software commands for preparing the system prior to installing the disk drive. See About Hot-Pluggable and Hot-Swappable Components.
2. If you are not performing a hot-plug operation, halt the operating system and power off the system.
See How to Power Off the System.
3. Unlock and open the front door, if it is not open already.
4. Attach the antistatic wrist strap to a metal surface inside the system chassis.
5. Release the drive handle on the disk drive to be installed.
Use your thumb and forefinger to pinch the drive latch upward to open it.
6. Align the disk drive with its drive bay.
Orient the drive so that the drive handle's hinge faces the bottom of the drive bay.
7. Holding the drive by its handle, fit the drive into the guide rails at the top and bottom of the drive bay.
8. Slide the drive into the bay until it barely contacts the backplane.
9. Press carefully on the center of the drive and watch as the handle begins to close.
The drive handle begins to close as the drive engages its backplane connector.
10. Press the handle toward the drive until the latch closes, securing the drive in place.
11. Close the front door and lock it, if necessary.
12. If you are performing a hot-plug installation, complete the software part of the installation procedure.
See About Hot-Pluggable and Hot-Swappable Components.
|
Note - If you are installing more than one disk drive as part of a hot-plug procedure, make sure that the Activity LED on the drive you just installed is lit steadily (that is, not flashing) before installing another disk drive. For more information about disk drive LEDs, see About Disk Drive LEDs. |
If you installed this part as a new option while the system was powered off, you need to perform a reconfiguration boot. A reconfiguration boot is required in order for the operating system to recognize the new device. See:
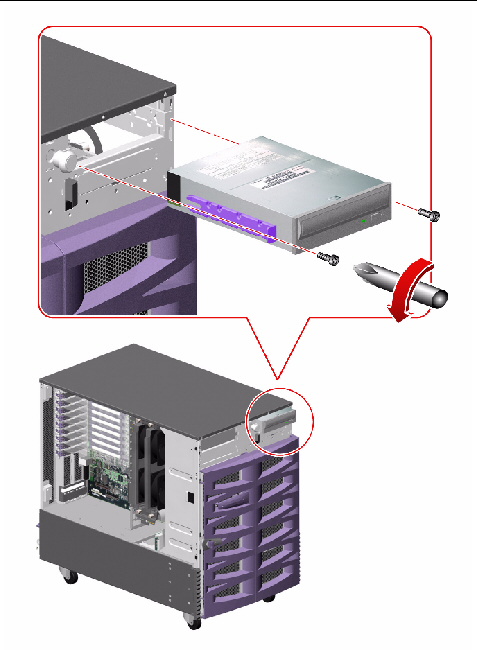
1. Remove the removable media bezel from the front of the system.
Remove the two Phillips screws securing the bezel to the front of the system.
2. Remove the cables connected to the back of the DVD-ROM drive.
3. Remove the two Phillips screws securing the DVD-ROM drive to the chassis.
4. Pull the DVD-ROM drive from the system.
The DVD-ROM drive slides out on guides located on its sides.
To replace the DVD-ROM drive, complete this task:
To reassemble the system, complete this task:
If you are not replacing this part right away, you need to perform a reconfiguration boot in order for the operating system to recognize the configuration change. See:
1. Remove the removable media bezel from the front of the system.
Remove the two Phillips screws securing the bezel to the front of the system.
2. Install the plastic guide rails onto the DVD-ROM drive.
If you are replacing a faulty DVD-ROM drive, transfer the guide rails to the new drive.
3. Align the DVD-ROM drive with the guides in the DVD-ROM drive slot.
4. Slide the drive into the slot.
5. Insert and tighten the two Phillips screws that secure the DVD-ROM drive to the chassis.
6. Connect the DVD-ROM drive cables to the back of the device.
7. Replace the removable media bezel.
Replace the two Phillips screws that secure the bezel to the system chassis.
To reassemble the system, complete this task:
1. Remove the removable media bezel from the front of the system.
Remove the two Phillips screws securing the bezel to the front of the system.
2. Remove the cables connected to the back of the device.
3. Remove the two Phillips screws securing the device to the chassis.
4. Pull the device from the system.
The device slides out on guides located on its sides.
5. If you are not immediately replacing the device, complete the following steps:
a. Install a metal filler panel into the device's slot.
b. Replace the removable media bezel.
Replace the two Phillips screws that secure the bezel to the system chassis.
c. Install a plastic filler panel into the device's slot in the removable media bezel.
To replace a tape drive, complete this task:
To reassemble the system, complete this task:
If you are not replacing this part right away, you need to perform a reconfiguration boot in order for the operating system to recognize the configuration change. See:
The Sun Fire V890 server does not come with a tape drive. If you are installing a SCSI tape drive for the first time, you must order and install the following components:
To install the SCSI host adapter card, complete this task:
|
Note - The SCSI host adapter card must be installed in PCI slot 0. |
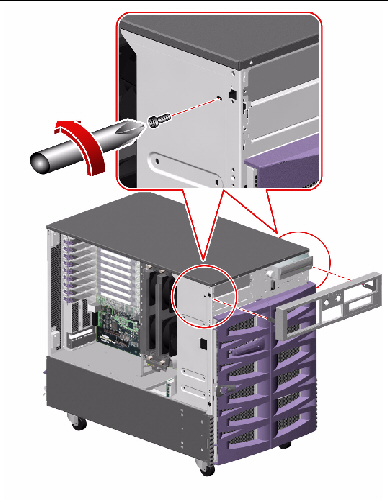
1. Remove the removable media bezel from the front of the system.
Remove the two Phillips screws securing the bezel to the front of the system.
2. If there is a metal filler panel in the slot, remove it.
Using a flathead screwdriver, carefully pry the metal filler panel from the slot.
3. If you are installing a full-height device into the left-side bay, remove the divider shelf from the bay.
4. Install the plastic guide rails onto the device.
If you are replacing a faulty device, transfer the guide rails to the new device. If you are installing a device for the first time, the guide rails and screws are shipped in the accessory kit that is shipped with your system.
5. Align the device with the guides in the empty slot.
6. Slide the device into the slot.
7. Insert and tighten the two Phillips screws that secure the device to the system.
8. Connect the appropriate plug (P2 or P3) of the Ultra Wide SCSI data cable (Sun part number 530-3302) to the back of the tape drive.
For proper plug connections, see Cable Routing.
9. Route the SCSI data cable and connect the cable to the SCSI adapter card (Sun part number X6758A).
Route the cable over the I/O fan tray brackets and down the PCI fan block bracket to the middle routing lance. Use tie wraps to secure the cable to the PCI fan block bracket.
|
Note - Because of the size of the SCSI connector, the SCSI host adapter card must be installed in PCI slot 0. |
10. Connect plug P1 of the cable to the 68-pin SCSI connector on the SCSI host adapter card.
11. If you are installing a device into an empty slot, remove that slot's plastic filler panel from the removable media bezel.
12. Replace the removable media bezel.
Replace the two Phillips screws that secure the bezel to the system chassis.
To reassemble the system, complete this task:
If you installed this part as a new option, you need to perform a reconfiguration boot in order for the operating system to recognize the new device. See:
| Sun Fire V890 Server Service Manual | 817-3957-12 |
Copyright © 2005, Sun Microsystems, Inc. All Rights Reserved.