Part II End-User Information
This part includes end-user information.
Chapter 2 Introduction to the Traditional Chinese Solaris Software
This chapter describes the design of the Traditional Chinese Solaris software, and the locales supported in the Traditional Chinese Solaris system. The chapter discusses the following topics:
Design of the Traditional Chinese Solaris Operating System
The Traditional Chinese localization of the internationalized release of CDE provides two work environments: a user environment and a developer environment. Each environment is localized to handle the linguistic and cultural conventions that are unique to the Traditional Chinese language.
-
The user environment has desktop tools and a window manager (dtwm) that are customized to communicate in the language of a particular locale.
-
The development environment provides internationalized versions of Xlib and Motif that programmers use to develop localized applications. For further information, see the International Language Environments Guide.
Traditional Chinese Locales
The Traditional Chinese Solaris product includes the following locales:
-
C — ASCII English environment
-
zh_TW — Traditional Chinese environment in extended UNIX Code (EUC) that supports the CNS 11643–1992 standard
-
zh_TW.BIG5 — Traditional Chinese environment in BIG5 code
-
zh_HK.BIG5HK — Traditional Chinese environment in BIG5-HKSCS code that supports the Hong Kong Supplementary Character Set (HKSCS), which is a supplementary character set of the BIG5 and ISO 10646 coding schemes
-
zh_HK.UTF-8 — Traditional Chinese (Hong Kong) environment in Unicode 3.2
-
zh_TW.EUC — Symbolic links to the zh_TW locale
-
zh_TW.UTF-8 — Traditional Chinese environment in Unicode 3.2
How to Set the Locale at Login
-
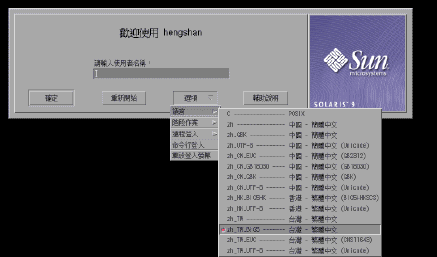
Choose Language from the options menu on the login screen.
-
Select the desired locale for your CDE session.
Your choices are the C, zh_TW, zh_TW.BIG5, zh_TW.UTF-8, zh_HK.BIG5HK, or the zh_HK.UTF-8 locale.
Chapter 3 Traditional Chinese Localization of CDE
The following sections provide information on the Traditional Chinese localization of the Traditional Chinese Common Desktop Environment (CDE) for windowed applications.
Traditional Chinese Graphical User Interface
The Traditional Chinese CDE Motif graphical user interface is similar in layout and design to the U.S. release of CDE. Traditional Chinese CDE supports multibyte characters and Traditional Chinese messages with Motif objects. Differences in character width and proportional spacing cause minor differences in the exact layout of some Motif objects.
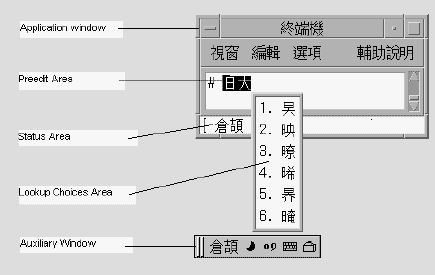
All application windows that can take Traditional Chinese input include a status area associated with their input window to show the current conversion mode. With an input conversion mode on, as Traditional Chinese is being typed its entry point becomes a highlighted (reverse video) preedit area until the input is converted to Traditional Chinese or special characters and committed. Some input modes also provide conversion choices among several Traditional Chinese characters on menus.
Traditional Chinese Input/Output
To accommodate the diversity of Traditional Chinese, the Solaris software provides several different input methods for entering Traditional Chinese characters. With these methods you can enter ASCII/English characters, Traditional Chinese radicals, and Traditional Chinese characters using an ASCII keyboard or a Traditional Chinese keyboard.
Your Traditional Chinese input is stored temporarily as an intermediate representation. You then use the conversion manager program to transform the representation into a displayed character string.
The Localized CDE Desktop
The following desktop tools are available in this release. All of the tools can handle Traditional Chinese input and output.
Address Manager – Carries out remote operations and finds information about the systems and users on your network. This application can speed up such tasks as sending email, logging in remotely, and setting appointments on someone else's calendar.
Application Manager – Manages the tools and other software applications available on your system.
Audio Tool – Records, plays, and saves audio files in AU, AIFF, and WAV format.
Calculator – Mimics the function of a hand-held calculator.
Calendar Manager – Manages appointments and To Do lists. You can use this application to set and distribute appointment reminders.
Clock – Displays the current time in analog or digital format. You can control the display of local time with this application.
Console – Starts a dtterm terminal emulator as your workspace console window.
File Manager – Displays the files and folders on your system. You can move, copy, open, and delete files and folders with this application. You can also use the application to view the contents of your floppy diskettes and CD-ROMs.
Find Files – Enables you to search your system for files or folders that match specific search criteria. Your criteria might include, for example, the name, location, or the size of a file or folder you want to find.
Front Panel – Controls for access to applications and utilities and utilities on the system. The Front Panel is a centrally-located window that occupies all workspaces.
Help – Displays searchable help information for CDE.
Icon Editor – Enables you to create new icons or modify existing icons.
Image Viewer – Enables you to view, print, and save the contents of file types such as GIF, TIFF, JPEG, and PostScript. You can use the Snapshot function of this application to capture a picture of a window or another part of your screen. The picture is saved as a raster file in bitmap format.
Mailer – Handles the distribution, receipt of your electronic mail messages.
Performance Meter – Monitors various aspects of system performance.
Print Manager – Enables you to submit, view, and cancel print jobs. This application is the graphical front-end to the print command. It supports drag-and-drop file transfer operations.
Process Manager – Display the processes that are currently running on your workstation. The application enables to perform actions on the active processes.
Text Editor – Enables you to create and edit text files. The application is used in CDE tools such as the Mailer composition window.
Style Manager – Enables you to customize some of the visual elements and system device behaviors of your workspace environment, such as: colors and fonts, keyboard, mouse, window, and session start-up behaviors.
Terminal – Acts as an ASCII character terminal that you can use to enter UNIX® commands at a system shell prompt.
Chapter 4 Entering Traditional Chinese Text
This chapter provides procedures and other information that you can use to enter Traditional Chinese text. The chapter discusses the following topics:
Character Input Overview
This chapter describes the Traditional Chinese Solaris input modes that you can use to enter the following kinds of characters.
-
ASCII/English characters
-
Traditional Chinese characters
-
Special symbols
You can type all of these characters in the input areas of the following application windows:
-
In terminal emulation (TTY) windows, such as Terminal windows
-
In text entry areas, such as those found in the Text Editor and Mailer applications
-
In dialog boxes, such as the new folder name box in the File Manager application
-
In other special use subwindows, such as pop-ups
Character Sets
The Traditional Chinese Operating System conforms to the CNS 11643 standard, updated in late 1992, and the BIG5 character sets.
The BIG5 character sets are part of the CNS 11643-1992 standard. The BIG5 standard includes 13,461 characters defined by five major Taiwanese computer vendors (including the Institute of Information Industry) in May, 1984. Although BIG5 is not the national standard, it is more widely used than the CNS 11634-1992.
Traditional Chinese Solaris software provides code conversion between Chinese code conventions and three levels of support:
-
User commands support file transfers for existing files in different codes.
-
Library functions support application development for existing codes.
-
STREAMS modules support existing TTY devices using different codes.
Input Window Areas
In the Traditional Chinese operating system, application subwindows contain two areas that are used to enter Traditional Chinese characters. A lookup choice window and an auxiliary window are also available in Chinese input mode.
-
Preedit area – The text entry area that holds your character formations before you commit them.
Note –When you commit characters, the characters are put in the text block that is assembled for the application.
-
Status area – The area at the lower left of the application subwindow that displays the current conversion mode and the active keyboard. Later sections in this chapter discuss keyboard switching and using the available conversion modes.
-
Lookup choice window – A popup window that displays Hanja or special character lookup choices which are available for the conversion of characters or radicals in the preedit area.
-
Auxiliary window – This window contains a palette of icons that provide you the following functions and utilities to simplify text entry and to manage input methods:
-
Input method switching
-
Chinese full-width/half-width character mode switching
-
Chinese/English punctuation mode switching
-
Input method properties setting
-
Input method selection
-
Lookup tables for BIG5, EUC_TW, BIG5 HKSCS, and Unicode characters sets
-
Virtual keyboard
The input method auxiliary windows support all the UTF-8 locales and the following Traditional Chinese locales:
-
zh_TW/zh_TW.EUC
-
zh_TW.BIG5
-
zh_TW.UTF-8
-
zh_HK.BIG5HK
-
zh_HK.UTF-8
Two kinds of input methods are supported:
-
Methods based on a code table, such as TsangChieh
-
Methods developed by a vendor, such as NewChuYin or NeiMa
-
Using Traditional Chinese Input Methods
This section provides procedures that you can use to select and switch between different input methods.
How to Select an Input Method
-
In the typing area, press Control-spacebar to turn on Traditional Chinese conversion.
An auxiliary window appears.

-
Select the desired input method through one of the following actions:
-
In the status area of the application subwindow, use the function keys to switch input methods: the F2 key for the first input method, the F3 key for the second input method, and so on.
Tip –You can also press Control-Escape repeatedly until you reach the desired input method.
-
Use the input method panel.
-
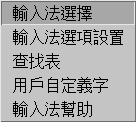
a. Click the utilities button in the auxiliary window.

The utilities menu appears.
-
b. Click the input method selection item from the utilities menu.
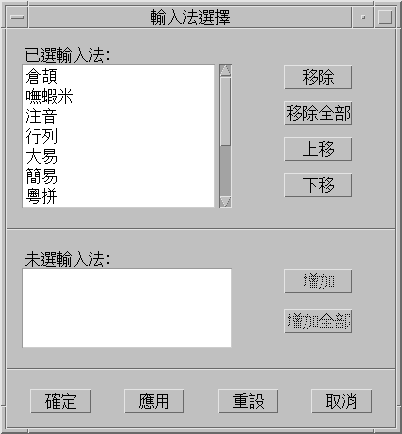
The input method selection panel appears.
-
c. Select the input method you want to use from the input selection panel.
After you select an input method, click OK or Apply to activate the setting. The first input method you select is the default input method.
Note –When you press Control-spacebar to activate Chinese input, the default input method is selected.
Note –If you change input methods, you can press Control-Escape to return to the default input method.
-
-
How Access Input Method Help
Help pages display in the default browser, such as Netscape NavigatorTM.
How to Switch Between Half_width and Full_width Character Mode
-
In the status area of an application subwindow, type Shift-spacebar to switch between half_width character mode and full_width character mode.
-
In the auxiliary window, click the half_width/full_width button.
Switch between half_width character mode and full_width character mode through one of the following actions.
The input method system is in full_width character mode when this button appears in the auxiliary window:

The input method system is in half_width character mode when this button appears in the auxiliary window:

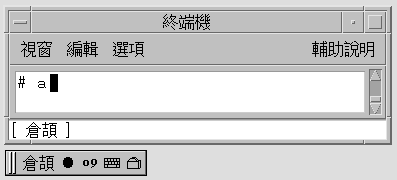
When the system is in full_width mode, the full_width character of the input key is committed. For example, when you input an a in full_width mode, the full_width a is committed.
How Switch Between Chinese and English Punctuation Modes
-
In the status area of an application subwindow, type Control- to switch between Chinese punctuation mode and English punctuation mode.
-
In the auxiliary window, click the Chinese/English punctuation button.
Switch between Chinese punctuation mode and English punctuation mode through one of the following actions.
The input method system is in Chinese punctuation mode when this button appears in the auxiliary window:

The input method system is in English punctuation mode when this button appears in the auxiliary window:

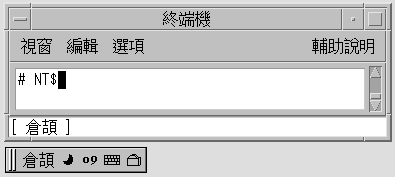
When you type a function key in Chinese punctuation mode, the corresponding Chinese punctuation character is committed to the application. For example, when you type the $ key in Chinese punctuation mode, the Traditional Chinese currency symbol character NT$ is committed to the application.
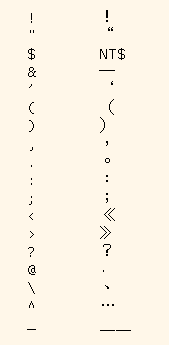
The punctuation key includes the characters: , . / > :;’”\$!^_-
The map between English keys and Chinese punctuation is shown in the following illustration.
Setting Input Method Options
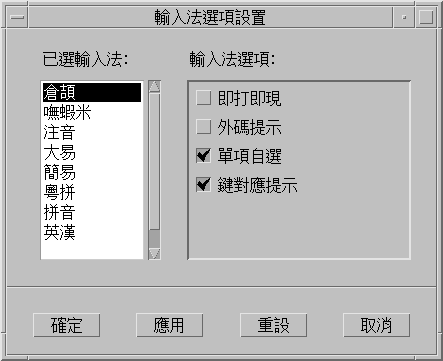
Four code table input options are available for the input method you select.
-
Display candidates key by key – This option causes the input method to search a dictionary table when you press a valid key. Candidates for selection then display in the lookup window.
If this option is not active, the character mapped to the key you press appears in the preedit area. When you press the spacebar, the input method engine searches the dictionary table and displays the available candidates for the character in the preedit area.
-
Display external codes – This option displays the external codes of the candidates you enter display in a lookup window.
-
Automatically commit if only one candidate – This option commits the external code of a character when only one candidate is available. If this option is not selected, the external code of a character appears in a lookup window even when only one candidate is available.
-
Display keymap character for every external code – This option displays the character mapped to a valid key in the preedit area when you press the key.
How to Select an Input Method Option
You can use this procedure to make selections in the input method options panel.
-
Click the input method selection item from the utilities menu.
The input method selection panel appears.
-
Select an input method from the selection panel.
The input method options panel appears.
-
Select an input method option.
-
Click OK or Apply to activate the selection.
Input Method Utilities
After you make your input method selections, you can use the information and the procedures in this section to take the following actions:
-
Activate lookup table selection
-
Select a virtual keyboard
-
Create user defined characters
Lookup Table
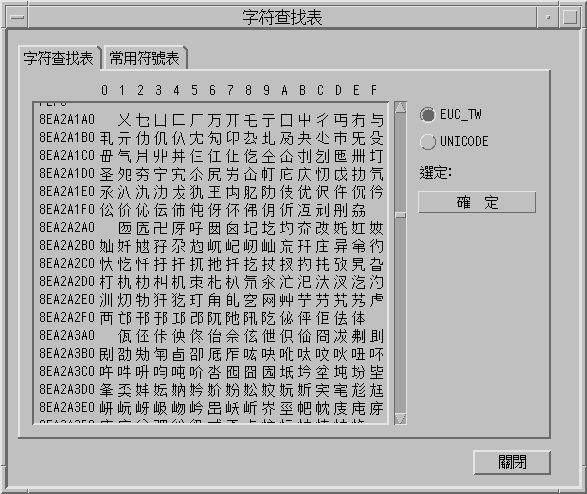
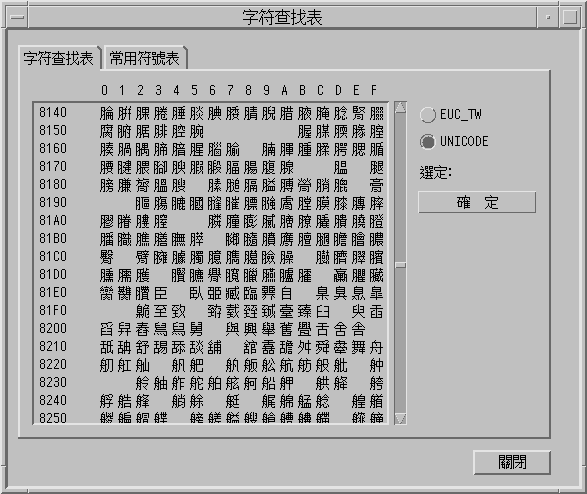
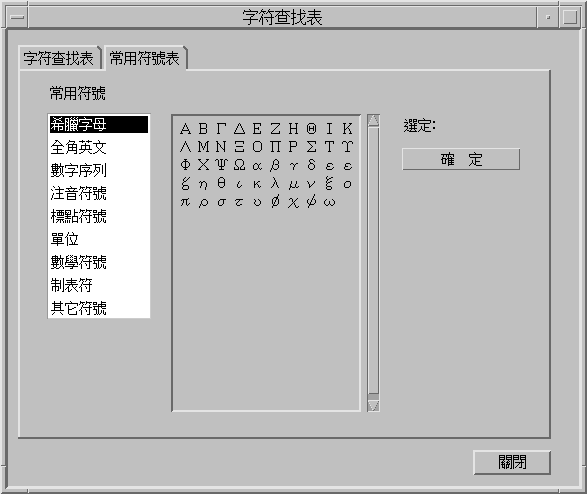
From a lookup table, you can search for and select the Chinese characters you want to input. Three kinds of lookup tables are available:
-
Lookup table with native encoding, such as EUC_TW in the zh_TW/zh_TW.EUC locale, or BIG5 encoding in the zh_TW.BIG5 locale
-
Lookup table with UNICODE encoding
-
Lookup table for special characters, such as Greek letters or Mathematical symbols
How to Activate Lookup Table Selection
-
Click the lookup item from the selection menu.
When you activate the lookup option, the characters that are available for a string you type in the preedit area display for selection in a lookup choice window.
How to Search and Select Lookup Choices
-
Type a string you want to convert in the preedit area.
The lookup choice window appears.
You can use the following keys to search through the characters and radicals that are available for your string.
- Period (.)
-
Moves forward to the next page of choices
- Comma (,)
-
Moves backward through the choices
-
Type the number or letter of the label of the lookup choice you want to select.
Your choice is substituted for the string in the preedit area.
Virtual Keyboards
You can use virtual keyboards as lookup utilities to simplify the input of certain special symbols. You can also use virtual keyboards to display the keymap of input methods, such as TsangChieh.
The Traditional Chinese system supports several virtual keyboards.
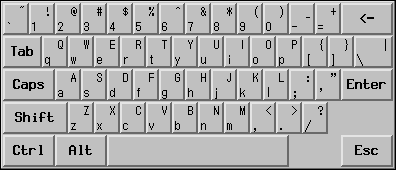
PC Keyboard
The following figure shows the PC virtual keyboard.
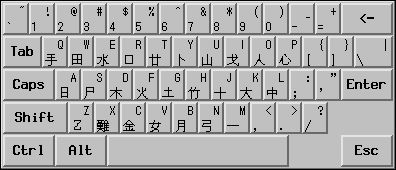
TsangChieh Keyboard
The TsangChieh keyboard displays the keymap of TsangChieh input method that is based on Chinese radicals.
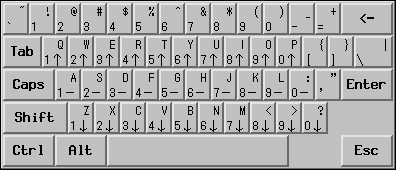
Array Keyboard
The following figure shows the Array virtual keyboard.
DaYi Keyboard
The following figure shows the DaYi virtual keyboard.
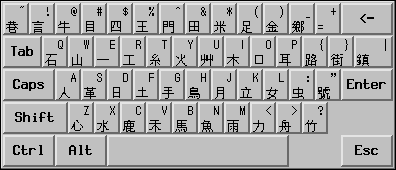
Boshiamy Keyboard
The following figure shows the Boshiamy virtual keyboard.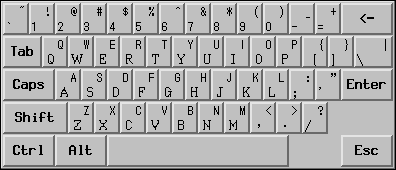
ChienI Keyboard
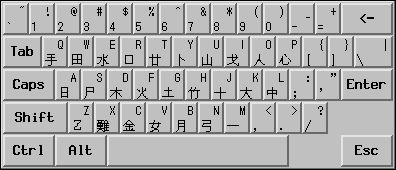
How to Select a Virtual Keyboard
Click the virtual keyboard button in the auxiliary window.
The virtual keyboard for the active input method appears.
User-Defined Characters (UDC)
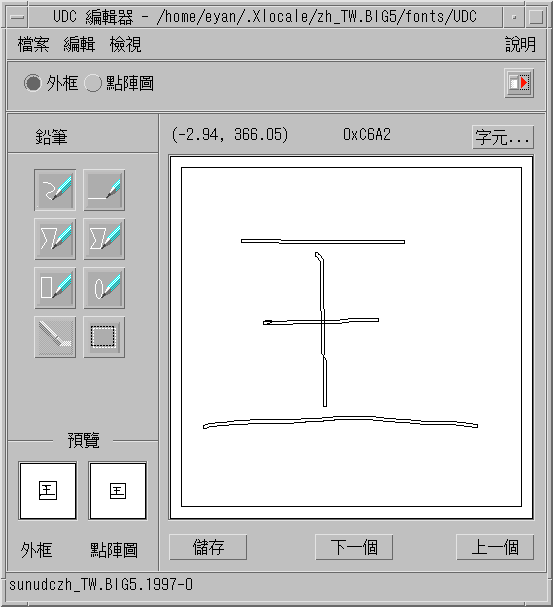
The user-defined character (UDC) editor tool enables you to draw and save new characters. Once you ascribe a character to an input method, the character can be displayed in an application.
How to Activate the UDC Tool
ASCII Character Input
Applications start in ASCII mode. You can toggle ASCII mode on or off by pressing Control-spacebar or the Chinese/English key on a Chinese keyboard. For example, you can use ASCII mode to type the echo command shown in the following figure.
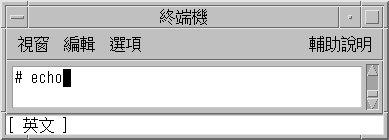
When you turn on the ASCII input mode, the following indicator appears in the status area.

When you turn off ASCII input mode, an indicator for the default input mode appears.
Array Input Mode
In the array input mode, 260 radicals that compose Chinese characters are assigned to the keys in ten columns of three rows in the array virtual keyboard. To use the array input mode effectively, you need to memorize only ten basic keystrokes. All radicals are naturally allocated on the keyboard by the basic keystrokes.
How to Type Array Text
-
Select the Array input mode.
Follow the steps in the procedure How to Select an Input Method to select the input mode.
Array appears in the status window.
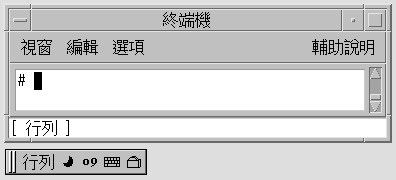
-
Type the x key and press the spacebar.
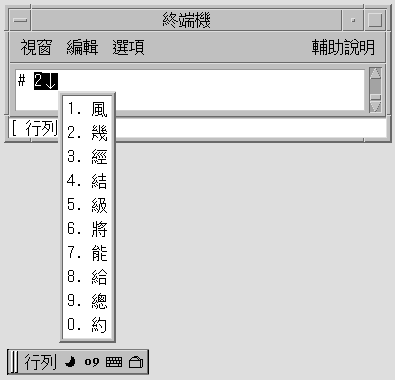
The array input converter finds several matching characters that display in a lookup choice window.
-
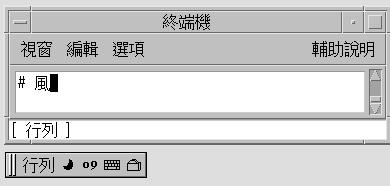
Type the 1 key to commit the first character.
The radicals are converted and the corresponding character appears.
Boshiamy Input Mode
Boshiamy input mode works with the radicals that you use to compose Chinese characters. The radicals in this mode are easy to memorize by the shape, the sound, or the meaning. You can memorize the following rules to help you quickly enter Chinese characters:
-
Cut off long
-
Patch up short
How to Type Boshiamy Text
-
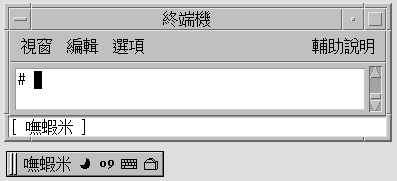
Select the Boshiamy input mode.
Follow the steps in the procedure How to Select an Input Method to select the input mode.
Boshiamy appears in the status window.
-
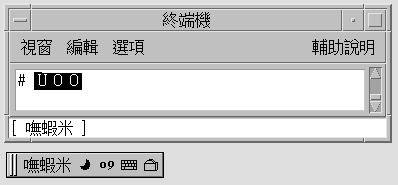
Type the set of radicals uoo.
-
Press the spacebar to commit the corresponding Chinese character.
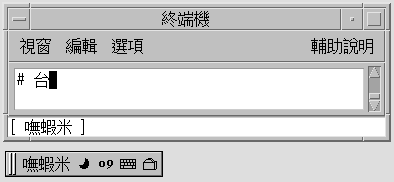
DaYi Input Mode
Similar to the TsangChieh input mode, DaYi conversion works with the radicals that compose Chinese characters. The keystroke sequence of the DaYi input mode follows the Chinese writing sequence. You need to memorized only a few rules to use this input mode.
How to Type DaYi Text
-
Select the input method.
Follow the steps in the procedure How to Select an Input Method to select the input method.
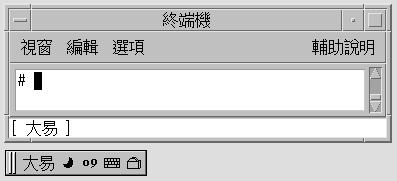
DaYi appears in the status window.
-
Type the set of radicals: ;o.
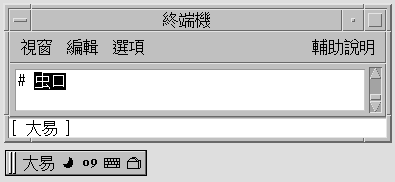
-
Press the spacebar to commit the corresponding Chinese character.
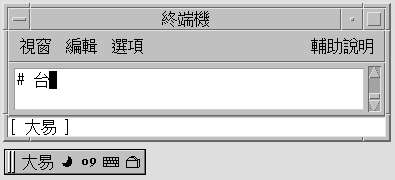
New ChuYin Input Method
This section describes the features in the New ChuYin input method. The section also explains how to use some of the features in the following Traditional Chinese locales: zh_TW.EUC, zh_TW.BIG5, zh_TW.UTF8, zh_HK.BIG5HK, and zh_HK.UTF-8.
The New ChuYin input method provides support for the following features:
-
Phrase input
-
Storing and recalling user-defined phrases
-
Using only consonants to input simplified ChuYin
-
Editing the preedit string
-
Adjusting the frequency of phrase lookup and single Chinese character lookup
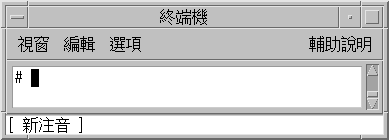
How to Type New ChuYin Text
Select the input method.
Follow the steps in the procedure How to Select an Input Method to select the input method.
New ChuYin appears in the status window.
How to Enter a Single Character
This procedure describes how to enter the following character:

-
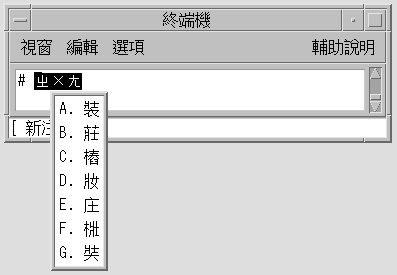
Using the New ChuYin input method, type the key sequence 5j.
The lookup table appears for the characters highlighted in the preedit area.
-
Type tone 4.
The preedit area and the lookup table change.
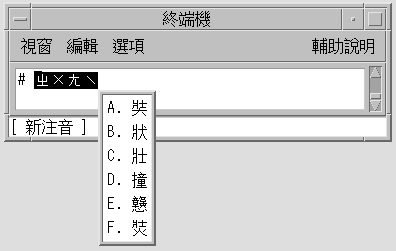
Note –The first candidate is committed when you press the spacebar. If you type another tone value, the choices for that tone appear. For example, when you type tone 1 for a Chinese character, the choices for tone 1 appear.
-
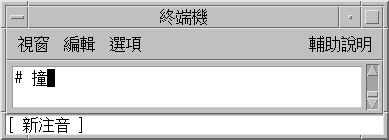
Press Shift-D to commit the fourth candidate.
The committed character appears.
How to Type Stored Words and Phrases
New ChuYin input method provides intelligent word and phrase input functions. When you type ChuYin key sequences, the input method automatically locates the related words and phrases in a system dictionary.
For example, this procedure describes how to enter the following phrase:

-
Using the New ChuYin input method, type the key sequence m06fm06
The lookup table appears for the characters that are highlighted in the preedit area.
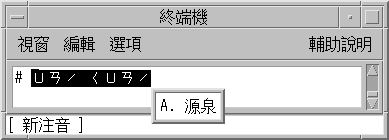
-
Press the spacebar or type Shift-A to commit the selection.
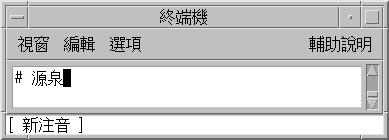
How to Define New Phrases
You can define single phrases with up to 8 Chinese characters.
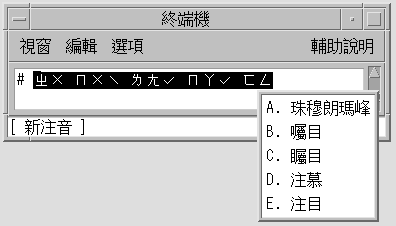
For example, this procedure describes how to define the following new phrase:

-
Using the New ChuYin input method, type the key sequence 5jaj4x;3a83z/.
The new ChuYin input method automatically adds spaces between each syllable.
The first Chinese character is not shown in the lookup window.
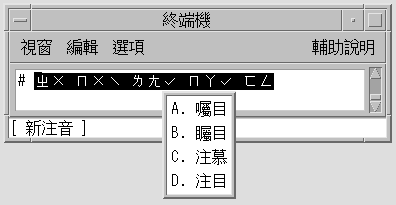
-
Press the Return key to change to the single character group.
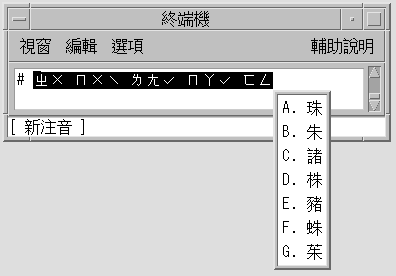
-
Press the spacebar to select the first character.
The first character is inserted into the preedit string. The second character does not appear in the lookup window.
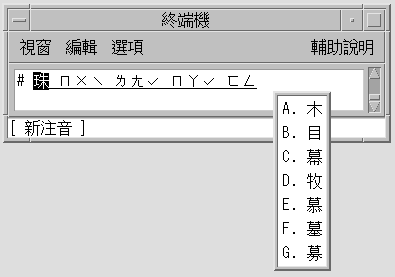
-
Press the ] key to go to next page, which contains the second Chinese character.
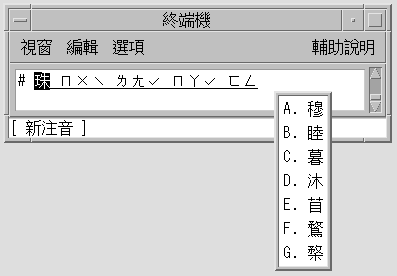
-
Press the spacebar to select the second Chinese character.
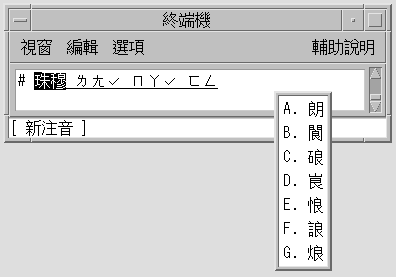
-
Repeat the previous steps to input the third, fourth, and fifth Chinese characters.
The phrase is committed automatically after the last Chinese character is selected.
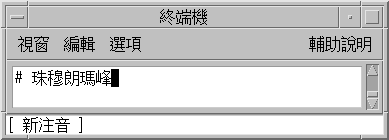
The new phrase is saved.
When you type the string 5jaj4x;3a83z/ now, the new phrase appears for selection in the lookup window.
How to Change the Sequence of Frequently Used Chinese Characters and Phrases
The New ChuYin input method automatically recalls the most recently selected list items. The items appear at the top of a list of phrases and characters for easy selection.
-
Using the New ChuYin input method, type the key sequence gfu.
Note the sequence of the choices that appear.
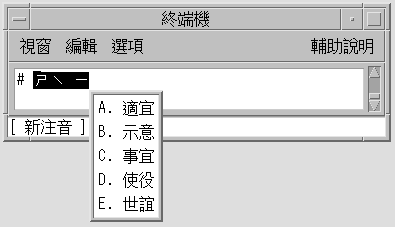
-
Select the third item, C, from the list of lookup choices.
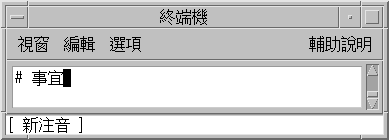
-
Type the gfu key sequence again.
The selection you made for gfu in the previous step now appears as the first choice in the list.
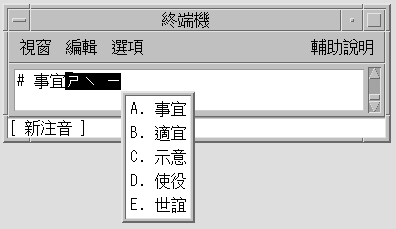
How to Display Input Phrases by Typing a Consonant
You can enter a complete phrase with a single Chinese consonant.
For example, this procedure describes how to input the following phrase:

-
Using the New ChuYin input method, type the consonant of the Chinese character g1e1.
The complete phrase appears in the lookup window.
How to Edit the Preedit String
-
Using the New ChuYin input method, press the Shift key with the A, B, C, D, E, F, or G key to select the preedit string.
-
Press an edit key.
The following table shows the definitions of the edit keys.
- [a-z, 0-9, ,./;'-]
-
ChuYin keystroke
- Home
-
Moves to the start of the preedit line
- End
-
Moves to the end of the preedit line
- Right
-
Moves the caret in the preedit line to the right.
- Delete
-
Deletes the PinYin character following the caret on the preedit line.
- Backspace
-
Deletes the PinYin character preceding the caret on the preedit line.
Using Page Scroll Keys
The selections related to a ChuYin preedit string can be split to two groups, one group for phrases and the other group for single Chinese characters. The phrase candidates are at the top of the list. You can uses the keys defined in the following table scroll through the available candidates.
Table 4–1 Page Scroll Key Definitions|
Key |
Definition |
|---|---|
|
[ |
Scrolls to previous page |
|
] |
Scrolls to next page |
|
Return |
More to another group |
How to Switch Between PinYin and ChuYin Mode
You can toggle back and forth between PinYin mode and ChuYin mode with a keystroke.
Using the New ChuYin input method, press Alt-1 to switch between ChuYin mode and PinYin mode.
In PinYin mode, the PinYin phonetics are same as the keystroke.
ChuYin Input Mode
ChuYin is another common input mode. This mode applies the Chinese phonetic symbols to the phonetics of Mandarin Chinese. When a typed sequence of phonetics uniquely matches a Chinese character, the phonetics are automatically converted and the character is displayed. However, if more than one character matches a sequence of phonetics, a lookup selection area appears that shows you the available choices. Several pages of lookup choices are available for some phonetic sequences.
How to Type ChuYin Text
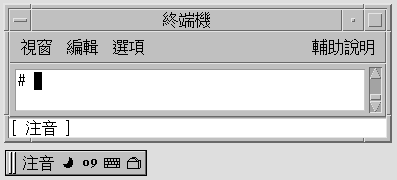
The following example uses ChuYin mode to enter Chinese characters that represent the statement, “Taipei's weather is very hot.”
-
Select the input method.
Follow the steps in the procedure How to Select an Input Method to select the input method.
ChuYin appears in the status window.
-
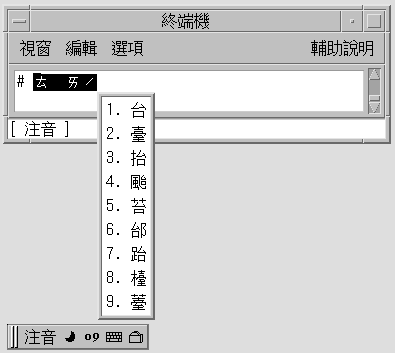
Type w96.
The ChuYin input converter finds several matching characters and displays a lookup choice window.
-
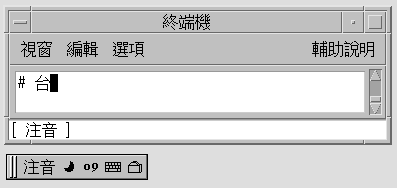
Press the spacebar or 1 to select the appropriate character.
The radicals are converted and the correct character appears.
Telecode Input Mode
Telecode conversion uses the old four-digit codes used by the Taiwan Telephone & Telegraph Bureau. The four-digit codes uniquely identify 16356 Chinese characters. The codes are organized into two planes: plane 1, numbered from 0000 to 8045 and plane 2, numbered from .0000 to.8489.
How to Type Telecode Input
This section contains instructions on how to use the Telecode input mode to input Chinese characters
-
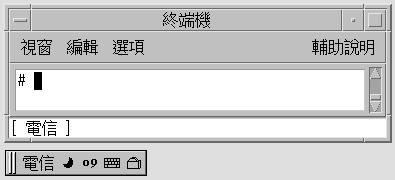
Select the input method.
Follow the steps in the procedure How to Select an Input Method to select the input method.
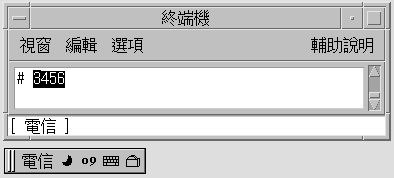
Telecode appears in the status area.
-
Type the first three digits of the code 3456.
-
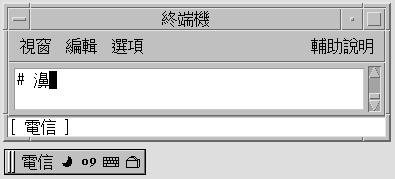
Press the spacebar.
The Telecode input converter finds a single matching character.
TsangChieh Input Mode
TsangChieh is the default input mode that you use to type Chinese and other non-ASCII characters when ASCII mode is toggled off. TsangChieh conversion works with the radicals that compose Chinese characters. Each Chinese character has a keystroke sequence that is made up of the radicals that compose a character. A TsangChieh keystroke sequence often defines a single Chinese character. When a sequence defines more than one character, you are presented with different input choices.
You can also use the TsangChieh conversion mode to type the characters in the Chinese National Standard 11643. To type characters in this mode, press the Z key then the three-letter code assigned to the character by the standard.
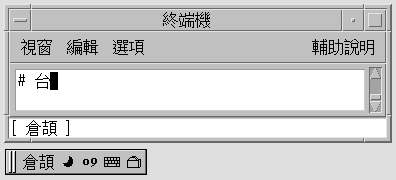
How to Type in the TsangChieh Mode
To type Chinese characters in the TsangChieh input mode, type the Chinese radicals that make up the Chinese character. If you do not have a Taiwan Chinese keyboard that shows the radicals on the keycaps, refer to a picture of the Chinese keyboard to see how the Chinese radicals map to your keyboard.
-
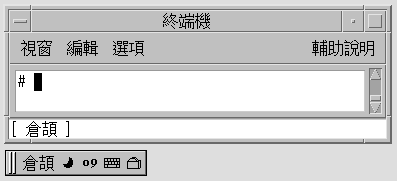
Select the input method.
Follow the steps in the procedure How to Select an Input Method to select the input method.
TsangChieh appears in the status area.
-
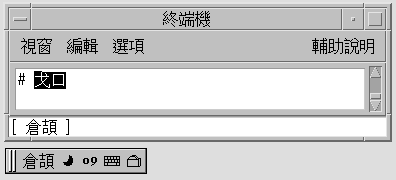
Type ir.
The radicals appear highlighted in the preedit area.
-
Press the spacebar to commit the corresponding character.
ChienI Input Mode
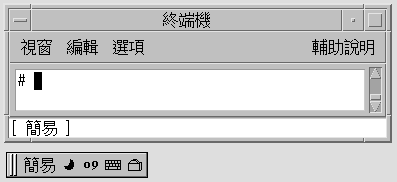
The ChienI input mode is a simplification of the TsangChieh mode. In the ChienI mode, you enter only the first and last keystrokes of a TsangChieh sequence for a Chinese character. Lookup selections then appear for the keystrokes you enter.
Typing ChienI Input
-
Select the input mode.
Follow the steps in the procedure How to Select an Input Method to select the input mode.
ChienI appears in the status area.
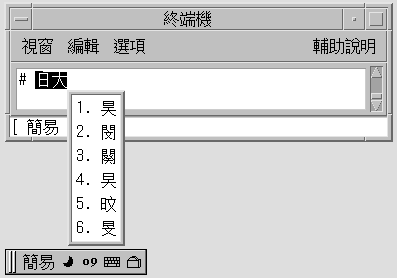
-
Type the key sequence ak.
The ChienI input converter finds several matching characters and displays a lookup choice window.
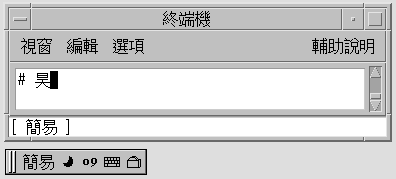
-
Press 1 to select the appropriate character.
The radical is converted and the correct character appears.
NeiMa Input Method
In the NeiMa input method, you use a four-digit or an eight-digit hexadecimal internal code to enter Chinese characters or symbols. You can use the following input methods in the Traditional Chinese locales.
-
EUC_TW NeiMa input method in the zh_TW.EUC locale
-
BIG5 NeiMa input method in the zh_TW.BIG5 locale
-
BIG5+HKSCS input method in the zh_HK.BIG5HK locale
How to Input NeiMa Text
This section contains instructions on how to use the BIG5 internal codes to input Chinese characters and symbols.
-
Select the input method.
Follow the steps in the procedure How to Select an Input Method to select the input mode.
BIG5 NeiMa code input method appears in the status area.
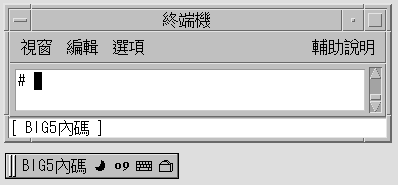
-
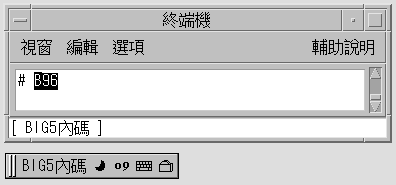
Type the first three keys of a four-key sequence that represent a character. In this example, type the b96 keys of the sequence b968.
-
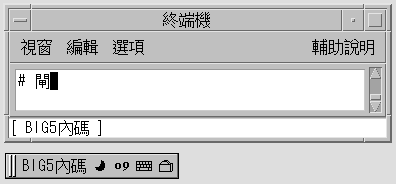
Type the fourth key. In this example, type the 8 key.
The character is automatically committed in the preedit area.
English_Chinese Input Method
You can use the English_Chinese input method in both zh_TW.EUC and zh_TW.BIG5 locales. With this method, you type English words of up to 15 keystrokes that are mapped to Chinese phrases. For each keystroke, a lookup window displays characters that match your input. To select a character, you type the number that corresponds to your lookup choice. For more information, see How to Search and Select Lookup Choices.
How to Type English_Chinese Characters
The following procedure shows you how to use this input method to enter the Traditional Chinese phrase for the English word, “hello”.
-
Follow the steps in the procedure How to Select an Input Method to select the input mode.
English_Chinese conversion mode appears in the status area.
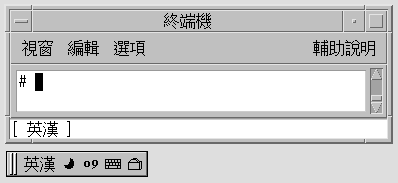
-
Type the key sequence hello.
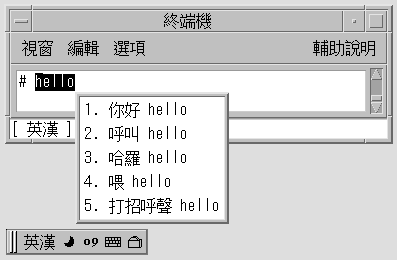
-
Type the 4 key to select the corresponding Traditional Chinese phrase.
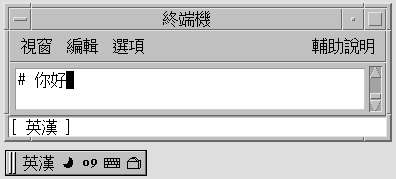
Code Table Input Method Interface
The current Solaris operating system provides a code table input method interface that enables Chinese users to add new input methods into their system.
Creating a Code Table
A code table is a plain text dictionary file that contains a list Chinese characters, words, and phrases that are mapped to input keystrokes. When you type the specified keystrokes, the associated characters, words, and phrases appear for selection.
The code table file contains the following sections:
-
[Description] This section describes the following attributes of the code table.
-
Name: Code table name
-
Encode: UTF-8, GB, GB2312, GBK, or BIG5 encoding used the code table
-
WildChar: Wild character used for input codes
-
UsedCodes: Valid characters for input
-
MaxCodes: Maximum number of input codes for one item
-
-
[Comment]
-
[Key_Prompt] This section specifies the prompt string of an input key. The prompt string appears in the preedit area of the application subwindow.
-
[Function_Key] This section specifies the key definitions of certain function keys.
-
PageUp: Scroll up a list of selection items
-
PageDown: Scroll down a list of selection items
-
BackSpace: Delete an input code
-
ClearAll: Clears all the input areas, such as preedit area and the lookup area
-
-
[Phrase] This section specifies the input codes and the corresponding phrases. The Chinese phrases must be separated by spaces. The format of each line is keystroke_sequence word1 word2 word3 ...
-
[Single] This section specifies the input codes and the corresponding Chinese characters. The format of each line is keystroke_sequence Characterlist. The Characterlist characters are not separated by spaces.
-
[Options] This section specifies the options of the code table input method that you can turn on or off in the following entries.
-
HelpInfo_Mode: Display help information
-
KeyByKey_Mode: Display lookup candidates key by key or only when the spacebar is pressed.
-
KeyPrompt_Mode: Display the prompt string of the input key in the preedit area.
-
AutoSelect_Mode: Commit the lookup choice automatically when only a single candidate is available.
-
SelectKey_Mode: Select numbers, uppercase letters, or lowercase letters.
-
The following example shows a code table file.
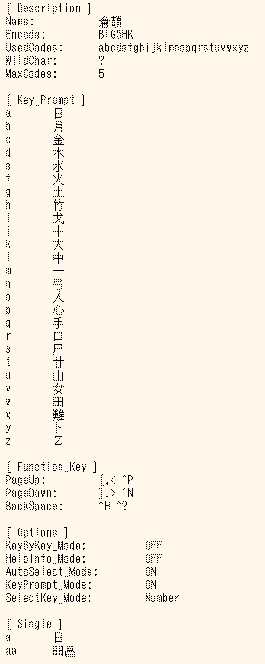
How to Create a New Code Table Input Method
-
Create and edit the code table source file.
Prepare the code table source file to define the mapping of characters, words, or phrases to input keystrokes.
-
Convert the source code table file to binary format.
Use the txt2bin utility to convert the code table text file to binary file.
# /usr/lib/im/locale/zh_TW/common/txt2bin source_codetable_file
binary_codetable_file
Note –You can find the txt2bin and bin2txt are utilities in the directory: /usr/lib/im/locale/zh_TW/common/
-
Add the code table to the input method specification file, /usr/lib/im/locale/zh_TW/sysime.cfg.
For example, if your new code table binary file is called newim.data, add the entry newim to the input method specification file, sysime.cfg.
-
Restart the htt input method server by typing the following commands as root.
# /etc/init.d/IIim stop
# /etc/init.d/IIim start
The new input method is ready to use when you log in to the system.
Chapter 5 Localized Applications
This chapter describes the applications and code conversion utilities that you use in the Traditional Chinese operating system. The chapter discusses the following topics:
Using the mailx Utility With Traditional Chinese Characters
The encoding variable in .mailrc does not affect Mailer behavior, but it does set mailx function. To send email in formats other than 7-bit ASCII, such as 8-bit Traditional Chinese characters, you must use /usr/SUNWale/bin/mailx. The encoding variable in .mailrc sets encoding formats for mailx.
International transmission conventions require header information to contain only ASCII characters. Traditional Chinese characters should not be used in the header (including the Subject line) with Mailer or with mailx.
Note –
The /bin/mailx application has not been localized and cannot send or receive Traditional Chinese characters.
Using talk With Traditional Chinese Characters
To use Traditional Chinese characters with talk, the /usr/SUNWale/bin/talk application is required because /bin/talk is not localized.
xtobdf Utility
Traditional Chinese Solaris software provides the following BDF font generator:
xtobdf – Converts an X server font to a BDF font.
runb5 Utility
The runb5 utility permits terminal-based BIG5 applications to run under the Solaris TTY window environment.
sdtconvtool Utility
The sdtconvtool graphic user interface utility enables file conversion between various codesets. The sdtconvtool functionality is similar to iconv.
The following procedure describes how to convert a file. In this example, a file encoded in UTF-8 is converted to BIG5 encoding.
How to Convert a File Using stdconvtool
-
In the source codeset field of the stdconvtool panel, select the codeset of the file to be converted.
Scroll through the pull-down list and select the codeset of the file to be converted. In this example, select UTF-8.
-
In the source file path field, type the path in the path of the file to be converted.
Alternatively, you can click the Browse button and select the name of the file to be converted. In this example, type or select the /tmp/en_US.UTF-8 file.
Note –You can use the Clear button to the right of the Browse button to remove a path you enter.
-
In the target codeset field, select the codeset to which the file will be converted.
In this example, select BIG5.
-
In the target path field, type the path for the converted file.
In this example, type or select /tmp/BIG5.all.txt.
-
Press the start conversion button to begin the conversion process.
Note –The Clear All Fields button erases both the source file and target file path names.
iconv Command
The iconv command converts the characters or sequences of characters in a file from one codeset to another. The command then writes the results to standard output. The Traditional Chinese Solaris software includes special filters for the iconv command.
If no conversion exists for a particular character, the character is converted to the underscore “_” in the target codeset. The following options are supported:
-
-f from-code — Symbol of the input codeset
-
-t to-code — Symbol of the output codeset
The following table lists the codeset conversion modules that are supported in Traditional Chinese Solaris software.
Table 5–1 Codeset Conversion Modules|
Source Code |
Symbol |
Target Code |
Symbol |
|---|---|---|---|
|
CNS 11643 |
zh_TW-euc |
BIG5 |
zh_TW-big5 |
|
CNS 11643 |
zh_TW-euc |
ISO 2022-7 |
zh_TW-iso2022-7 |
|
BIG5 |
zh_TW-big5 |
CNS 11643 |
zh_TW-euc |
|
BIG5 |
zh_TW-big5 |
ISO 2022-7 |
zh_TW-iso2022-7 |
|
ISO 2022-7 |
zh_TW-iso2022-7 |
CNS 11643 |
zh_TW-euc |
|
ISO 2022-7 |
zh_TW-iso2022-7 |
BIG5 |
zh_TW-big5 |
|
CNS 11643 |
zh_TW-euc |
ISO 2022-CN-EXT |
zh_TW-iso2022-CN-EXT |
|
ISO 2022-CN-EXT |
zh_TW-iso2022-CN-EXT |
CNS 11643 |
zh_TW-euc |
|
BIG5 |
zh_TW-big5 |
ISO 2022-CN |
zh_TW-iso2022-CN-EXT |
|
ISO 2022-CN |
zh_TW-iso2022-CN |
BIG5 |
zh_TW-big5 |
|
UTF-8 |
UTF-8 |
CNS 11643 |
zh_TW-euc |
|
CNS 11643 |
zh_TW-euc |
UTF-8 |
UTF-8 |
|
UTF-8 |
UTF-8 |
BIG5 |
zh_TW-big5 |
|
BIG5 |
zh_TW-big5 |
UTF-8 |
UTF-8 |
|
UTF-8 |
UTF-8 |
ISO 2022-7 |
zh_TW-iso2022-7 |
|
ISO 2022-7 |
zh_TW-iso2022-7 |
UTF-8 |
UTF-8 |
|
IBM Cp937 |
zh_TW-cp937 |
UTF-8 |
UTF-8 |
|
UTF-8 |
UTF-8 |
IBM Cp937 |
zh_TW-cp937 |
|
BIG5+ |
zh_TW-big5p |
UTF-8 |
UTF-8 |
|
BIG5+HKSCS |
zh_TW-big5hk |
UTF8 |
UTF8 |
|
CNS 11643 |
zh_TW-euc |
UTF8 |
UTF8 |
|
UTF-8 |
UTF-8 |
BIG5+ |
zh_TW-big5p |
|
UTF-8 |
UTF-8 |
BIG5+HKSCS |
zh_HK-big5hk |
|
BIG5HK |
zh_HK-big5hk |
UTF-8 |
UTF-8 |
In the following example, an EUC mail file is converted to BIG5:
system% iconv -f zh_TW-euc -t zh_TW-big5 mail.euc > mail.big5 |
For further information, see the iconv(3C) and the iconv_TW(5) man pages. These utilities can be used for converting files for printing.
Chapter 6 Traditional Chinese Solaris Printing Facilities
This chapter Traditional Chinese Solaris Operating System supports the printing of Traditional Chinese output to the following types of printers:
-
Line printer with built-in Traditional Chinese fonts
-
PostScript-based printer with built-in scalable fonts
-
Any PostScript-based printer for bitmap printing
Note –
Review the manufacturer's documentation on installing the printer before you use the information in this chapter in this chapter.
Line Printer Support
For the Traditional Chinese Solaris Operating System to run a line printer, the printer must recognize one or both of the supported code sets, EUC and UTF-8.
Using the EUC to BIG5 Filter
A printer that does not support EUC needs filters that convert EUC files for printing. Use the commands in this section to print EUC files to non-EUC printers.
The following commands install the printer lp1 on port ttya. The commands signal the print service that lp1 accepts only BIG5 format files. See the lpadmin(1M) man page for more information.
# lpadmin -p lp1 -v /dev/ttya -I Big5 # accept lp1 # enable lp1 |
You can use an lpfilter command as shown in the following example to print files with formats that are not supported by the printer. The command signals the print service that a converter called filter-name is available through the filter description file named in pathname.
# lpfilter -f filter-name -F pathname |
The following example shows the output of pathname for a converter called euctobig5. The pathname filter converts the default input type to BIG5 with the euctobig5 converter.
Input types: simple Output types: BIG5 Command: euctobig5 |
To print an EUC format file, use a command line such as the following.
system% lp -d lp1 EUC-filename |
To print a BIG5 format file, use a command line such as the following.
system% lp -d lp1 -T BIG5 Big5-filename |
Using Configuration Files for Printing With an Epson Dot Matrix Printer
Traditional Chinese Solaris software provides configurable files that allow users to configure the available built-in font ranges according to their own equipment. Traditional Chinese Solaris software provides a configuration file that defines the built-in fonts in the Epson dot matrix printers.
Modify the configuration file according to your printing equipment before using it:
-
Modify /usr/lib/lp/files/cns.epson.conf if you are working with a zh_TW file.
-
Modify /usr/lib/lp/files/big5.epson.conf if you are working with a zh_TW.BIG5 file.
Printing a CNS File to an Epson Dot Matrix Printer
For instance, the following configuration file, /usr/lib/lp/files/cns.epson.conf, is used for setting up an Epson LQ-1070C+ Chinese dot matrix printer. In the example, the Epson LQ-1070C+ is composed of built-in Traditional Chinese fonts for CNS 11643 plane 1 and plane 2. You can specify available fonts in different planes and in different directories.
# @(#)cns.epson.conf 1.5 96/04/10 SMI; ALE # CNS Print Filter Configuration File for Epson Dot Matrix Printers # ACCEPT CODE RANGE: PLANE 1: 0x2121 - 0x234e 0x2421 - 0x2570 0x4421 - 0x7d4b PLANE 2: 0x2121 - 0x7244 FONT FILES: PLANE 1: /usr/openwin/lib/locale/zh_TW/X11/fonts/75dpi/mingL1-24.pcf.Z PLANE 2: /usr/openwin/lib/locale/zh_TW/X11/fonts/75dpi/mingL2-24.pcf.Z PLANE 3: /usr/openwin/lib/locale/zh_TW/X11/fonts/75dpi/mingL3-24.pcf.Z PLANE 4: /usr/openwin/lib/locale/zh_TW/X11/fonts/75dpi/mingL4-24.pcf.Z PLANE 5: /usr/openwin/lib/locale/zh_TW/X11/fonts/75dpi/mingL5-24.pcf.Z PLANE 6: /usr/openwin/lib/locale/zh_TW/X11/fonts/75dpi/mingL6-24.pcf.Z PLANE 7: /usr/openwin/lib/locale/zh_TW/X11/fonts/75dpi/mingL7-24.pcf.Z PLANE 8: /usr/openwin/lib/locale/zh_TW/X11/fonts/75dpi/sungNotdef-24.pcf.Z PLANE 9: /usr/openwin/lib/locale/zh_TW/X11/fonts/75dpi/sungNotdef-24.pcf.Z PLANE 10: /usr/openwin/lib/locale/zh_TW/X11/fonts/75dpi/sungNotdef-24.pcf.Z PLANE 11: /usr/openwin/lib/locale/zh_TW/X11/fonts/75dpi/sungNotdef-24.pcf.Z PLANE 12: /usr/openwin/lib/locale/zh_TW/X11/fonts/75dpi/sungNotdef-24.pcf.Z PLANE 13: /usr/openwin/lib/locale/zh_TW/X11/fonts/75dpi/sungNotdef-24.pcf.Z PLANE 14: /usr/openwin/lib/locale/zh_TW/X11/fonts/75dpi/sungNotdef-24.pcf.Z PLANE 15: /usr/openwin/lib/locale/zh_TW/X11/fonts/75dpi/sungNotdef-24.pcf.Z PLANE 16: /usr/openwin/lib/locale/zh_TW/X11/fonts/75dpi/sungNotdef-24.pcf.Z |
An lpfilter command line such as the following can be used to print files whose format is not supported by the printer:
# lpfilter -f filter-name -F filename |
The above command tells LP that a converter called filter-name (for example cns.epson.filter) is available through the filter description file named filename.
If you are installing an Epson dot matrix printer, the content of the filter description file, cns.epson.fd, should be as follows:
Input types: simple Output types: EUC Command: cns.epson.filter |
This filter takes the default input and converts it to a dot matrix data stream by with the cns.epson.filter.
For example, the following command line tells the printer service that printer lp2 accepts only files of EUC format. The command line also installs printer lp2 on the bidirectional parallel port /dev/bpp0. See the lpadmin(1M) man page for more information.
# lpadmin -p lp2 -v /dev/bpp0 -I EUC # accept lp2 # enable lp2 |
To print a file that contains Chinese characters in EUC format to an Epson dot-matrix printer, use the following command.
system% lp -d lp2 EUC-filename |
Printing a BIG5 File to an Epson Dot Matrix Printer
Traditional Chinese Solaris software provides a configuration file that defines for zh_TW.BIG5 files the built-in fonts in the Epson dot matrix printers. Modify the configuration file according to your printing equipment before using it. The contents of the /usr/lib/lp/files/big5.epson.conf configuration file can be as follows:
# @(#)big5.epson.conf 1.6 96/05/06 SMI; ALE # # Big5 Print Filter Configuration File for Epson Dot Matrix Printers # ACCEPT CODE RANGE: PLANE 1: 0xA140 - 0xA3E0 0xA440 - 0xC6A1 0xC940 - 0xF9D5 FONT FILES: PLANE 1: /usr/openwin/lib/locale/zh_TW.BIG5/X11/fonts/75dpi/mingL1B5-24.pcf.Z |
You can use an lpfilter command line such as the following to print files of a format that is not supported by the printer.
# lpfilter -f filter-name -F filename |
The above command tells LP that a converter called filter-name is available through the filter description file named filename.
The following is an example of a filter description file called big5.epson.fd for a an Epson dot matrix printer that references a converted called big5.epson.filter.
Input types: simple Output types: BIG5 Command: big5.epson.filter |
This filter takes the default type file input and converts it to a dot matrix data stream by using the big5.epson.filter.
For example, the following command sequence installs the printer lp2 on the bidirectional parallel port /dev/bpp0. The commands also tell the LP printer service that printer lp2 accepts only zh_TW.BIG5 format files. See the lpadmin(1M) man page for more information.
# lpadmin -p lp2 -v /dev/bpp0 -I BIG5 # accept lp2 # enable lp2 |
To print a file that contains Chinese characters in zh_TW.BIG5 format to an Epson dot-matrix printer, use the following command:
system% lp -d lp2 BIG5-filename |
Laser Printer Support
An application must have the mp utility to print EUC, BIG5, BIG5HK or UTF-8 files to a PostScript-based printer.
Using the mp Utility
The mputility supports all Asian locales. As a printing filter, mp generates a properly formatted version of the file content in PostScript format. Depending on the locale's system font configuration for mp, the Postscript output file contains glyph images from a scalable or a bitmap system font. The mp print filter is enhanced in the current Solaris release to print files of a certain type for each locale. See the mp(1) man page for more information.
Table 6–1 Files Printed With mp in Each Locale|
File Printed |
Locale |
|---|---|
|
EUC |
zh_TW |
|
BIG5 |
zh_TW.BIG5 |
|
BIG5HK |
zh_HK.BIG5HK |
|
UTF-8 |
zh_TW.UTF-8 zh_HK.UTF-8 |
You can use a command line such as the following to print a file with Traditional Chinese characters. The file might also include ASCII/English characters.
system% mp filename | ld -d printer |
Using mp as an Xprt (X Print Server) Client
Using mp as an Xprt client enables mp to print the output of any printer connected to a network supported by an Xprt print service. As an Xprt client, mp supports PostScript and many versions of PCL.
The Xprt client attempts a connection to an Xprt server based on the following rules:
-
When the -D printer_name@machine[:dispNum] or -P printer_name@machine[:dispNum] options are used with the mp command, mp attempts to connect to an Xprt print service on machine[:dispNum] with printer_name.
If the above attempted connection to machine[:dispNum] fails or if the argument given to -D or -P is just printer_name, then the mp command checks the XPSERVERLIST for Xprt servers that support the printer_name argument. For example:
system% setenv XPSERVERLIST "machine1[:dispNum1] machine2[:dispNum2] \
machine3[:dispNum3]"
-
If no server is found using above rules, mp checks for an XPDISPLAY environment variable set to machine[:dispNum]. For example:
system% setenv XPDISPLAY "machine[:dispNum]"
-
If the XPDISPLAY variable is not set or if the variable is invalid, mp tries to connect to the default display :2100. If the default display value is also invalid, mp exits with an error message.
The /usr/lib/lp/locale/C/mp directory contains .xpr print page sample layout files for Xprt client. The sample files are for 300 dpi printers. If the target printer has a different dpi value, the dpi value of the sample files is automatically converted to the resolution of the target printer.
- © 2010, Oracle Corporation and/or its affiliates

