| Skip Navigation Links | |
| Exit Print View | |

|
Sun Blade X6275 M2 Server Module Service Manual |
About This Documentation (PDF and HTML)
Server Module and Components Overview
About the Sun Blade 6000 Modular System Chassis
Powering On and Off the Server Module
Preparation Procedures for Service and Operation
Preparing the Server for Service
Preparing the Server for Operation
Component Removal and Installation Procedures
Removing and Installing Flash Modules
Removing and Installing the Energy Storage Modules
Removing and Installing the Service Processor Board
Removing and Installing USB Flash Drives
Removing and Installing a CPU and Heatsink Assembly
How to Remove a CPU and Heatsink Assembly
How to Replace the Motherboard Assembly
Diagnostic and Maintenance Information and Procedures
Diagnosing Server Module Hardware Faults
BIOS Power-On Self-Test (POST) Codes
Server Module Maintenance Procedures and Information
Note - This component is a field-replaceable unit (FRU).
Before You Begin
See How to Remove a CPU and Heatsink Assembly.
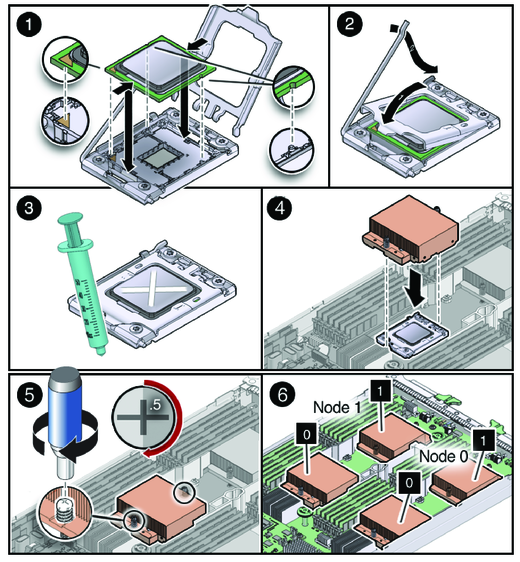
See frame [1] in the following illustration.

See frame [1] of the illustration in Step 3.
 | Caution - Do not press down on the CPU. Irreparable damage to the CPU or motherboard might occur from excessive downward pressure. Do not forcibly seat the CPU into the socket. Excessive downward pressure might damage the socket pins. |
See frame [1] of the illustration in Step 3.
When properly aligned, the CPU sits flat in the CPU socket and has minimal side-to-side movement.
See frame [2] of the illustration in Step 3.
This action secures the CPU in the socket.
See frame [3] of the illustration in Step 3.
See frame [4] of the illustration in Step 3.
 | Caution - Possible thermal damage. Avoid moving the heatsink after it has contacted the top of the CPU. Too much movement could disturb the layer of thermal compound, causing voids, and leading to ineffective heat dissipation and component damage. |
See frame [5] of the illustration in Step 3.
Refer to the Oracle Integrated Lights Out Manager (ILOM ) 3.0 Supplement for the Sun Blade X6275 M2 Server Module.