31 Work with Speed Receipts
This chapter contains these topics:
31.1 Working with Speed Receipts
From Accounts Receivable (G03), choose Automatic Receipts Processing
From Automatic Receipts Processing (G0313), choose Speed Receipts Entry
As an alternative to the complex method of entering manual receipts, you can use a speed method to quickly enter high-volume, simple receipts. For example, you might have several receipts that you need to apply directly to invoices. The speed receipts entry method enables you to reduce the number of keystrokes associated with each transaction, which decreases the amount of data entry time.
When working with speed receipts, you can:
-
Enter each receipt directly.
-
Select open items for a customer. Based on the information you specify, the system automatically loads the open items for application.
Because Speed Receipts Entry is designed for efficiency, you can only enter the following types of receipts:
-
Receipts that are directly associated with an invoice or a group of invoices
-
Receipts that are directly associated with a statement number
-
Unapplied receipts
-
Chargebacks
Unlike manual receipts, speed receipts are stored in the Batch A/R Cash Application table (F0312). They remain in this temporary worktable until you process them. When you process them, the system updates the records in the A/R Ledger table (F0311).
The following shows some of the advantages and disadvantages of the speed receipts entry method.
| Advantages | Disadvantages |
|---|---|
|
|
31.1.1 What You Should Know About
31.2 Setting Up Header Information
To simplify entering receipts, you can set up default header information for a receipt. For example, you can specify the G/L bank account to debit when you post the receipt.
When you set up header information, you can:
-
Enter default values that apply to all detail lines of a receipt
-
Enter a default value in any column header field that is blank to avoid entering identical information in each associated detail line
-
Designate a column header field as unused during entry
Setting up header information is the first task in the speed receipts entry process. After you do this, you enter the detail for the receipt.
31.2.1 Example: Header Information
The following example shows the default information that the system needs to apply receipts to company 100 and debit bank account 100.1110.BEAR with a G/L date of 9/29/17.
Figure 31-2 Speed Receipts Entry (Header) screen
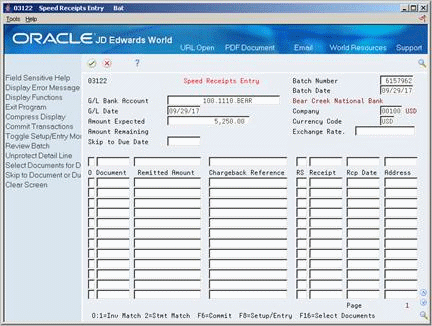
Description of ''Figure 31-2 Speed Receipts Entry (Header) screen''
-
To specify default values, complete any of the following optional fields:
-
G/L Bank Account
-
G/L Date
-
Amount Expected
-
Company
-
Currency Code
-
Exchange Rate
-
-
To specify default column values, complete the blank fields above the corresponding columns.
-
To designate a column as unused, specify a slash (/) in the blank field above the appropriate column.
31.3 Selecting Open Items for Application
As an alternative to entering receipt information directly, you can select open items in a customer's account and automatically load them in the detail lines. You can specify the criteria that the system uses to load the open items. For example, you might want to specify a range of invoices with a specific invoice date.
Selecting open items for payment is an optional task in the speed receipts entry process. You can select open items before or after setting up the necessary header information for a receipt.
31.3.1 Before You Begin
-
The following task assumes that you have specified the receipt number and receipt date as column overrides when setting up header information.
To select open items for application
On Speed Receipts Entry
-
Set up the necessary header information (optional).
-
Choose the Select Documents function.
Figure 31-3 Document Selection Window screen
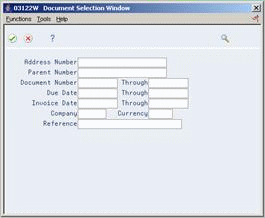
Description of ''Figure 31-3 Document Selection Window screen''
-
On Document Selection Window, complete one of the following fields:
-
Address Number
-
Parent Number
-
-
To limit the information displayed, complete any of the following fields:
-
Document Number/Through
-
Due Date/Through
-
Invoice Date/Through
-
Company
-
Currency
-
Reference
-
31.3.2 What You Should Know About
| Topic | Description |
|---|---|
| Skip to Due Date field | Unlike most Skip to fields in the Accounts Receivable system, the Skip to field on Speed Receipts Entry acts as a Skip-to Document field or Skip to Due Date field, depending on the selection criteria you specify. If you select a range of documents, the documents appear in order of the document number. If you select a date range, the documents appear by due date. If you specify both or neither a document or due date, the documents appear in the order you set in a processing option.
When you specify a skip to due date, the system summarizes the information displayed. This minimizes the time it takes to access and display the selected documents. |
| Removing unwanted items | You can use the Compress Display function to remove unwanted items in the detail of a receipt. The system:
You can then select additional open items to be loaded on Speed Receipts Entry following the marked items. You can use this function as many times as necessary prior to committing the transactions to the Batch A/R Cash Application table. |
| Reviewing the detail of a document | To review the detail of a document, such as the document type or the discount available, choose the Customer Ledger Detail Information option next to the appropriate document.
If the transaction is summarized, you cannot review the detail. |
31.4 Applying Receipts to Invoices
When you receive a payment from a customer, regardless of the amount, you can quickly apply the receipt directly to an invoice or a group of invoices. Applying receipts to open invoices is the most common method of receipt entry.
31.4.1 Example: Invoice Match Receipt
The following example shows receipt number 6275, which was received for the amount of the invoice (1,500). It is being applied to invoice 615 for customer number 3005.
Figure 31-4 Speed Receipts Entry (Receipt 6275) screen
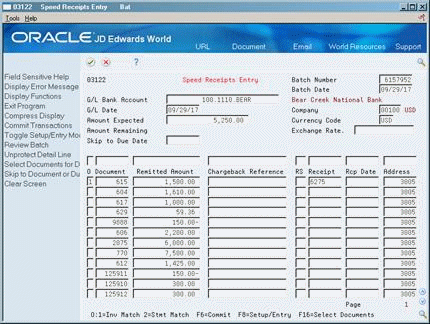
Description of ''Figure 31-4 Speed Receipts Entry (Receipt 6275) screen''
31.4.2 Before You Begin
-
The following task assumes that you have specified the receipt number and receipt date as column overrides when setting up header information.
On Speed Receipts Entry
-
Set up the necessary header information.
-
Select the necessary open items for application (optional).
-
Toggle to entry mode (F8).
-
Specify 1 (invoice match) in the following field:
-
Option
-
-
To override default information, complete the following fields for each document that matches an invoice:
-
Document Number
-
Remitted Amount
-
-
To update the detail lines, press Enter.
-
Choose the Commit function (F6) to update the Batch A/R Cash Application table.
31.4.3 What You Should Know About
31.5 Applying Receipts to Statements
In addition to applying receipts to invoices, you can apply a receipt to a statement number.
When you apply a receipt to a statement, the system applies the amount of the receipt to the oldest open invoice or group of invoices on the statement. This is similar to entering balance forward receipts.
31.5.1 Example: Statement Match Receipt
The following example shows a receipt for 1,000.00 applied to statement number 8.
Figure 31-5 Speed Receipts Entry (Statement Match) screen

Description of ''Figure 31-5 Speed Receipts Entry (Statement Match) screen''
31.5.2 Before You Begin
-
The following task assumes that you have specified the receipt number and receipt date as column overrides when setting up header information.
To apply receipts to statements
On Speed Receipts Entry
-
Set up the necessary header information.
-
Select the necessary open items for application (optional).
-
Toggle to entry mode (F8).
-
On a blank line, specify 2 (statement match) in the following field:
-
Option
-
-
Specify the statement number in the following field:
-
Document Number
-
-
Complete the following field:
-
Remitted Amount
-
-
To update the detail lines, press Enter.
-
Choose the Commit function (F6) to update the Batch A/R Cash Application table.
31.6 Entering Unapplied Receipts
You can apply a receipt to a customer's account balance instead of matching it to a specific invoice or group of invoices. To do this, enter an unapplied receipt. For example, you might not know which invoices to match a receipt to during entry. This method enables you to enter the amount of the receipt into the system immediately and match it to invoices at a later time.
If you do not specify a document number, the system handles it like an unapplied receipt.
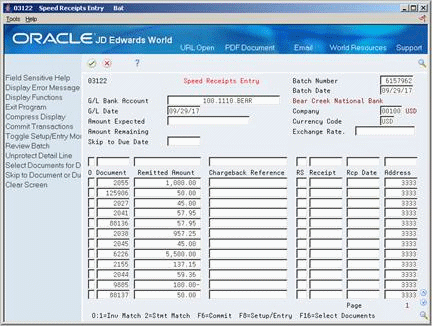
The following example shows a receipt for 5250.00 from customer number 3005. In this example, the invoice number to apply the receipt against is unknown.
31.6.1 Example: Unapplied Receipt
Figure 31-6 Speed Receipts Entry (Unapplied) screen
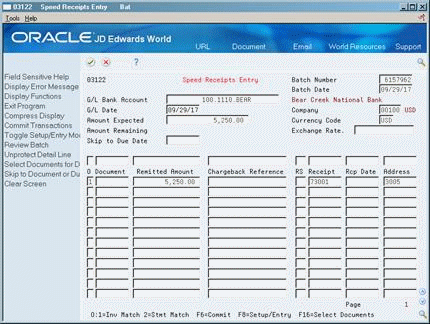
Description of ''Figure 31-6 Speed Receipts Entry (Unapplied) screen''
31.6.2 Before You Begin
-
The following task assumes that you have specified the receipt number and receipt date as column overrides when setting up header information.
On Speed Receipts Entry
-
Set up the necessary header information.
-
Toggle to entry mode.
-
On a blank line, specify 1 or 2 in the following field:
-
Option
-
-
Complete the following fields:
-
Remitted Amount
-
Address Number
-
-
To update the detail lines, press Enter.
-
Choose Commit to update the Batch A/R Cash Application table.
31.6.3 What You Should Know About
31.7 Entering Chargebacks
Depending on whether you are entering a chargeback for an open invoice or an amount not associated with an invoice, you can:
-
Enter a receipt with a chargeback
-
Enter a stand-alone chargeback
The following describes the two types of chargebacks and how the system handles them.
| Method | Description |
|---|---|
| Receipt with a chargeback | When applying a receipt to an invoice, you can enter a chargeback for an amount left open on the invoice. For example, you might want to charge back an incorrect or expired discount amount. You must identify a customer reference number to indicate that the document is a chargeback.
When you enter a receipt with a chargeback, the system:
|
| Stand-alone chargeback | You can enter a stand-alone chargeback for an amount that is not associated with a specific invoice. For example, you might enter a stand-alone chargeback for an amount that was previously written off and should not have been, or when you do not know the number of the original invoice.
When you enter a stand-alone chargeback, the system:
|
31.7.1 Example: Receipt with a Chargeback
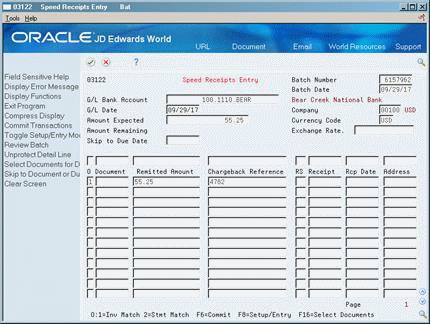
The following example shows a receipt for 900. The invoice amount was 957.25. When the receipt is processed and updated, the system will create a chargeback for the difference, 57.25. In the Chargeback Reference field, the receipt number is entered for future reference.
Figure 31-7 Speed Receipts Entry (Chargeback) screen
Description of ''Figure 31-7 Speed Receipts Entry (Chargeback) screen''
31.7.2 Example: Stand-Alone Chargeback
The following example shows a chargeback that is not associated with an invoice. In this example, the invoice has been paid so no invoice exists to which you can attach the chargeback.
Figure 31-8 Speed Receipts Entry (Stand-Alone Chargeback) screen
Description of ''Figure 31-8 Speed Receipts Entry (Stand-Alone Chargeback) screen''
31.7.3 Before You Begin
-
The following tasks assume that you have specified the receipt number and receipt date as column overrides when setting up header information.
To enter a receipt with a chargeback
On Speed Receipts Entry
-
Set up the necessary header information.
-
Select the necessary open items for application (optional).
-
Toggle to entry mode (F8).
-
On a blank line, specify 1 or 2 in the following field:
-
Option
-
-
To indicate this is a chargeback, complete the following fields:
-
Chargeback Reference
-
Reason Code (optional)
-
-
To override default information, complete the following fields:
-
Document Number
-
Remitted Amount
-
-
To update the detail lines, press Enter.
-
Choose the Commit function (F6) to update the Batch A/R Cash Application table.
31.7.4 What You Should Know About
| Topic | Description |
|---|---|
| Invoice match chargebacks | The system stores the original invoice information on the chargeback record if you enter that information when you create the chargeback. |
To enter a stand-alone chargeback
On Speed Receipts Entry
-
Set up the necessary header information.
-
Select the necessary open items for application (optional).
-
Toggle to entry mode (F8).
-
On a blank line, specify 1 or 2 in the following field:
-
Option
-
-
To indicate this is a chargeback, complete the following fields:
-
Chargeback Reference
-
Reason Code (optional)
-
Address Number
-
-
Specify a negative amount in the following field:
-
Remitted Amount
-
-
To update the detail lines, press Enter.
-
Choose the Commit function (F6) to update the Batch A/R Cash Application table.
31.7.5 What You Should Know About
| Topic | Description |
|---|---|
| Applying a receipt using the chargeback reference | To quickly apply a receipt to a chargeback, specify one of the following in the Option field and a number in the Chargeback Reference field:
The system matches the receipt to the chargeback based on the chargeback reference you specify when creating the chargeback. |
31.7.6 Processing Options
See Section 105.2, "Speed Cash Receipts Entry (P03122)" for more information.