18 Extended Invoice Text
This chapter contains these topics:
The Extended Invoice Text screen lets you set up and work with free-form text for an invoice such as billing information, payment terms, and so on. The screen makes unlimited lines available for the text, which can be printed on the invoice. When text exists for an invoice, the Manual Billing Entry screen displays and highlights the word Text to the right of the Invoice Number field. The information is stored in the Extended Invoice Text file (F1516).
A processing option for the Print Invoices program controls whether the system prints the text on the invoice.
For an overview of the billing process, see Chapter 16, "Manual Billing Process" in this guide.
From the Real Estate Management System menu (G15), choose Manual Billing.
From the Manual Billing menu (G1512), choose Manual Billing Entry. From the Manual Billing Entry screen, Choose 'Text' from the function key exit or press F6.
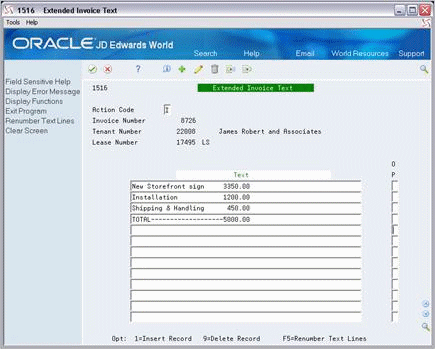
18.1 Add and Change Invoice Text
You can use the Add action or Change action to add and change text.
When you add and change text, note the following:
-
To insert a blank line for text, type 1 in the OP (Option) field of the text line to precede the new line and press Enter. The system lets you use option 1 with either I (Inquire) or C in the Action Code field.
-
When you enter text on the Log Text Information screen, the system assigns a sequence number to each line of text. Because of these numbers, which are not visible to the user, the system might give you an error when you try to insert a new line.
To bypass the error, press Field Exit to blank out the OP field and press F5. The system renumbers the sequence to let you insert the new line.
Note:
JD Edwards World recommends that you always press F5 after you have entered new lines of text. This updates the numbering sequence of the lines in case you want to insert more lines in the future.18.2 Display Invoice Text
To display the text for the log line identified on the screen, choose Inquire in the Action Code field and then press Enter.
18.3 Delete Extended Text
There are two methods that you can use to delete extended text:
-
To delete all the text for a log line, choose Delete in the Action Code field and then press Enter.
-
To selectively delete lines of text, choose Change in the Action Code field, type 9 in the option field of one or more text lines, and then press Enter.