5 Lease Information
This chapter contains these topics:
The Lease Information screen lets you set up and work with information for a lease. To create a large number of leases more effectively, you can copy standard information into a lease as you add it.
The screen is available in two formats: Lease Unit Details and Lease Log Details. With both formats, you use the upper part of the screen for tenant information. The first format displays the facility and date information in the lower part of the screen. The second format displays the terms and conditions such as critical dates, security deposits, lease options, text descriptions, and so on. These conditions are in the form of log lines. This information is kept in the following files: Tenant/Lease Master (F1501), Log Standards Master (F1503), and Log Standards Extension Master (F1504).
The screen has processing options that control how the system displays and processes the information.
From the Real Estate Management System menu (G15), choose Tenant and Lease Information.
From the Tenant and Lease Information menu (G1511), choose Lease Information.
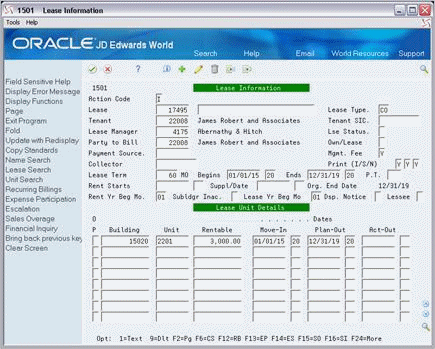
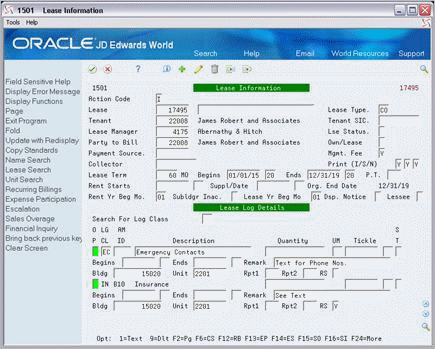
Figure 5-2 Lease Information (Alternate) screen
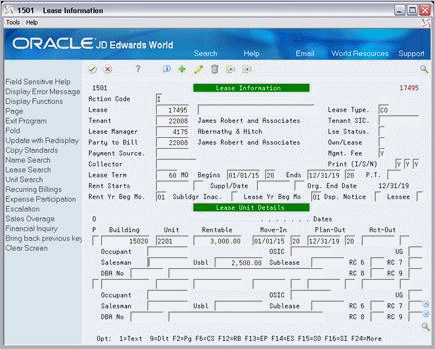
Description of "Figure 5-2 Lease Information (Alternate) screen"
A processing option controls whether the DBA Number field displays in the fold area. When the field is absent, the fold area has the following format:
Figure 5-3 Lease Information (DBA Number Absent) screen
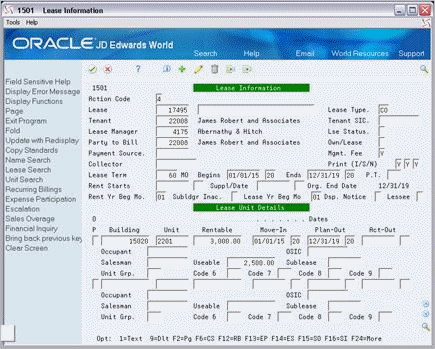
Description of "Figure 5-3 Lease Information (DBA Number Absent) screen"
You use F2 to toggle between Lease Unit Details and Lease Log Details in the lower part of the screen.
Figure 5-4 Lease Information (Details) screen
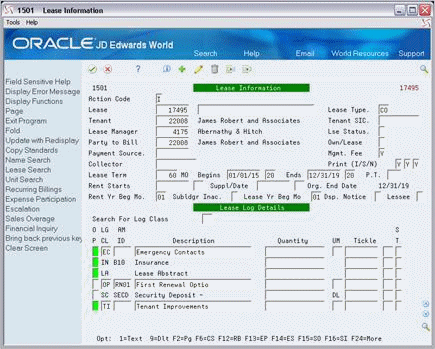
Description of "Figure 5-4 Lease Information (Details) screen"
Fold:
Figure 5-5 Lease Information (Fold) screen
Description of "Figure 5-5 Lease Information (Fold) screen"
5.1 Add a Lease
To add a lease, type A in the Action Code field, type the appropriate information for the lease, and press Enter or F5. Note the following:
-
The following information is required for adding a lease:
Lease type Beginning date
Tenant number Ending date
-
Depending on the lease type and status, you might not be required to enter beginning and ending dates.
-
If you add a line of information in the Lease Unit Details part of the screen, you must enter the building number. A processing option controls whether you must enter the unit number.
-
After you add a lease, the number for the new lease appears in the upper right corner of the screen.
5.2 Add a Lease and Tenant
To add a new tenant at the same time you add a lease
-
Type the appropriate information for the lease, except leave the Tenant field blank.
-
Press Enter.
The system highlights the Tenant field and gives you an error.
-
Press Enter a second time.
The Address Book Addition window appears.
-
Type the appropriate information for the new tenant.
-
Press Enter.
The Address Book Addition window closes, and the system adds the tenant to the Address Book Master file (F0101) at the same time it adds the lease to the Tenant/Lease Master file.
5.3 Inquire on a Lease
To display the information in a lease, choose Inquire, type the number of the lease in the Lease field, and then press Enter.
5.4 Change Lease Information
To change the information in a lease that you have displayed, choose Change, type the new information, and then press Enter or F5.
You can set the processing options so that the system automatically assigns the beginning and ending dates of the lease to the Move-In and Plan-Out fields respectively. In order for this to work when you change the beginning and ending dates, you must also blank out the Move-In and Plan-Out fields before you press Enter or F5.
5.5 Delete Lease Information
There are two methods that you can use to delete the information you have displayed:
-
To delete the lease, choose Delete and then press Enter.
All account transactions for a lease must be closed before you can delete it.
-
To delete a detail line or log line, chose Change, type 9 in the OP (Option) field for that line, and then press Enter or F5.
All account transactions related to a unit in the lease must be closed before you can delete the detail line for the unit. Also, if extended text exists for a log line, the OP (Option) field for that line is highlighted. In this case, JD Edwards World recommends that you first delete the text information before you delete the line. This prevents the wrong text from appearing for a duplicate log line.
5.6 Copy Standard Log Information
You can copy standard log information to reduce the entry time and the possibility of errors. To do this, you can use either an automatic method or a manual method. A processing option controls whether the system automatically copies the information.
-
If the processing option is set to automatically copy the information, the system copies a model of standard lines into a lease when you first add it. After you have typed the necessary lease information, press Enter or F5 and the screen displays the log information. This gives you a chance to verify and make more changes to the information. To add the lease, you then must press Enter or F5 a second time.
-
When you add a lease, you can manually copy a model of the standards into the lease. You use this method if the processing option is not set to automatically copy the information or if no log line within the model has a Y in the RS field. To do this, type A in the Action Code field, type the appropriate information, and press F6. Then press Enter or F5.
-
You can manually copy a model of the standards into an existing lease you have displayed. To do this, choose Copy Standards or press F6, use the change action, and then press Enter or F5. The system uses the lease type to select standard log lines. Before you can copy a model of the standards, you must set up the model for the specific lease type. To do this, use the Log Standards Information screen (P1503).
5.7 Add a Sublease
To add a sublease to a lease that you have displayed
-
Type A in the action code field.
-
Type SB in the Lease Type field to specify a sublease.
-
Type the beginning date in the Begins field and the ending date in the Ends field.
-
Make any other changes to the information that are different from the primary lease.
-
Press Enter.
Note the following:
-
The lease to which a sublease relates is called the primary lease.
-
You can assign a lease number to a sublease when you add it to a lease, or the system automatically assigns a number through the Next Number facility.
-
The date range of the sublease must be within the date range of the primary lease.
-
The system automatically supplies the beginning date of a sublease to the Sublease field for the primary lease. That field is in the fold area of the Lease Unit Details format.
-
You can have more than one sublease for the same lease as long as their terms do not overlap. For example, if a primary lease begins in March 2009 and ends in December 2010, you could add a sublease that begins in June 2009 and ends in December 2009. You could then add a second sublease that begins in January 2010 and ends in December 2010.
5.8 Processing Options
5.9 Guidelines
-
The tenants, buildings, and units must first be set up before you can add a lease. If the lease manager, party to bill, and payment source are different from the tenant and you intend to include them in the lease, that information must also be set up.
-
If you leave the Lease field blank, the system automatically assigns the number through the Next Number facility.
-
If you enter building and unit numbers in the fold area of a log line, the log information can be automatically assigned to the unit. This occurs only if the log class is defined for units. On the Unit Information screen, the LE (Lease Edit) field for that log line displays the code Y (Yes).
-
The following are true about the OP (Option) field:
-
Option 1 (Text) is valid only when the screen displays the Lease Log Details format. If extended text exists for a log line, the field for that log line is highlighted.
-
Option 3 (DBA Master) is valid only when the screen displays the Lease Unit Details format.
-
-
After the system has created A/R invoices or A/P vouchers for a lease, do not change the Lessee field.