6 Log Text Information
This chapter contains these topics:
The Log Text Information screen lets you set up and work with the extended text for a log line. This screen makes unlimited lines available for free-form text information. With the use of a function key, you can also copy text from existing log lines into the one with which you are working.
This information is stored in the Log Standards Extension Master file (F1504).
On any of the following screens, type 1 in the OP (Option) field next to a log line and press Enter.
Critical Date Review Log Standards Information
Floor Information Property/Building Information
Lease Information Unit Information
If extended text exists for a log line, the OP field for that log line is highlighted.
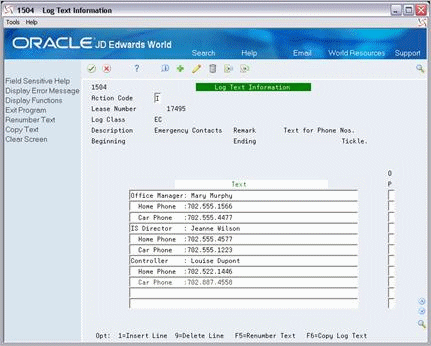
6.1 Add and Change Text
You can use either Add action or the Change action to add and change text. To do so, type the information in the Text column, use either the Add action or the Change action and press Enter.
When you add and change text, note the following:
-
To insert a blank line for text, type 1 in the OP (Option) field of the text line to precede the new line, use the Change Action, enter the desired text, and press Enter.
-
When you enter text on the Log Text Information screen, the system automatically assigns a sequence number to each line of text. Because of these numbers, which are not visible to the user, the system might give you an error when you try to insert a new line.
-
To bypass the error, blank out the OP field and press F5 to renumber the text sequence line numbers.
Note:
JD Edwards World recommends that you always press F5 after you have entered new lines of text. This updates the numbering sequence of the lines in case you want to insert more lines in the future.
-
6.2 Display Log Text
To display the text for the log line identified on the screen, type I in the Action Code field and press Enter.
6.3 Delete Text
There are two methods you can use to delete extended text:
-
To delete all the text for a log line, type D in the Action Code field and press Enter.
-
To selectively delete lines of text, type C (Change) in the Action Code field, type 9 in the option field of one or more text lines, and press Enter.
6.4 Copy Log Text
To copy extended text to the log line identified on the screen
-
Select Copy Text or press F6 to display the Log Text Copy window, which lets you display a list of log lines from which you can copy text.
-
Display a list of log lines in the window. To do this, note the following:
-
If the log lines are related to a lease, type the lease number in the Lease field and press Enter.
-
If the log lines are related to a property or building, type the associated business unit in the Prop/Build field and press Enter.
-
If the log lines are related to a floor, type the following information and press Enter:
-
The floor number in the Flr field.
-
The grouping code in the Code field.
-
The grouping value in the Value field. The system automatically supplies the value when the grouping code is FLOR.
-
-
If the log line is related to a unit, type the associated business unit in the Prop/Build field, type the unit number in the Unit field, and press Enter.
-
-
Type 4 in the one-character option field to the left of the log line from which you want to copy text.
-
Press Enter.
The Log Text Copy window closes and the text for the log line you selected appears on the Log Text Information screen.
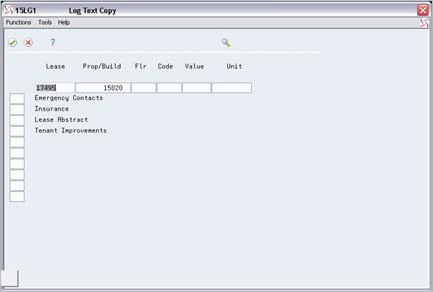
To copy text from more than one log line that you have displayed in the Log Text Copy window, type 4 in option field for each log line before you press Enter.
6.5 Copy Log Text Line by Line
To copy one line of extended text to the log line identified on the screen
-
Press F6 to display the Log Text Copy window.
-
Display a list of log lines in the window. To do this, see Section 6.4, "Copy Log Text" in this chapter.
-
Type 1 (View Text) in the one-character option field to the left of the log line from which you want to copy text.
-
Press Enter to display the Log Text Line-by-Line Copy window with the associated text lines.
Figure 6-3 Log Text Line-by-Line Copy screen
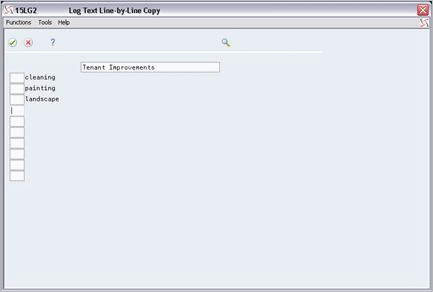
Description of "Figure 6-3 Log Text Line-by-Line Copy screen"
-
Type 4 in the one-character option field to the left of the text line you want to copy.
-
Press Enter.
The Log Text Line-by-Line Copy window closes.
-
Press F3 (Exit).
The Log Text Copy window closes and the line of text you selected appears on the Log Text Information screen.
To copy more than one text line you have displayed in the Log Text Line-by-Line Copy window, type 4 in the option field for each line before you press Enter.
6.6 Guidelines
-
When you access the Log Text Information screen from the Critical Date Review screen, you can only view extended text for the log line. You cannot change the information.
-
The fields in the upper part of the screen depend on the screen and log line from which you access the Log Text Information screen.
-
The Lease Number field appears only when you access the screen from either the Lease Information screen or the Critical Date Review screen. The field displays a number only if the log line you have selected for text is related to a lease.
-
The Prop/Building field appears only when you access the screen from the Property/Building Revisions screen.
-
The Floor Number field appears only when you access the screen from the Floor Information screen.
-
The Unit Number field only appears when you access the screen from the Unit Information screen.
-
The Log Text Type field appears only when you access the screen from the Log Standards Revisions screen. The field displays the word STANDARD.
-