4 Get Started with Enterprise Manager Cloud Control
Installation and discovery steps in Cloud Control are documented in dedicated Cloud Control user guides, as cross-referenced here. This section shows how to customize and work with those instructions in an Oracle Fusion Applications context.
The following topics are discussed:
4.1 Reasons to Use Cloud Control for Oracle Fusion Applications
Enterprise Manager Cloud Control makes possible to monitor and administer the entire Oracle Fusion Applications environment, including product families, Oracle Fusion Middleware components across all Oracle WebLogic servers, and the Oracle database(s). It includes and supersedes the multiple native tools that have been used in earlier versions of Oracle Fusion Applications.
For more information on accessing the individual native tools, see Use Other Oracle Fusion Applications Administration Tools
Cloud Control makes possible to:
-
View the overall status of Oracle Fusion Applications managed targets
-
Monitor and manage instances, product families, and products
-
Monitor databases, mid-tier elements such as WebLogic server domains, and Identity Management and Business Intelligence components
-
Run diagnostics during discovery
-
Add additional Oracle Fusion Applications instances as managed targets
-
Scale out an instance, product or Fusion Application within a cluster
4.1.1 Related Documentation
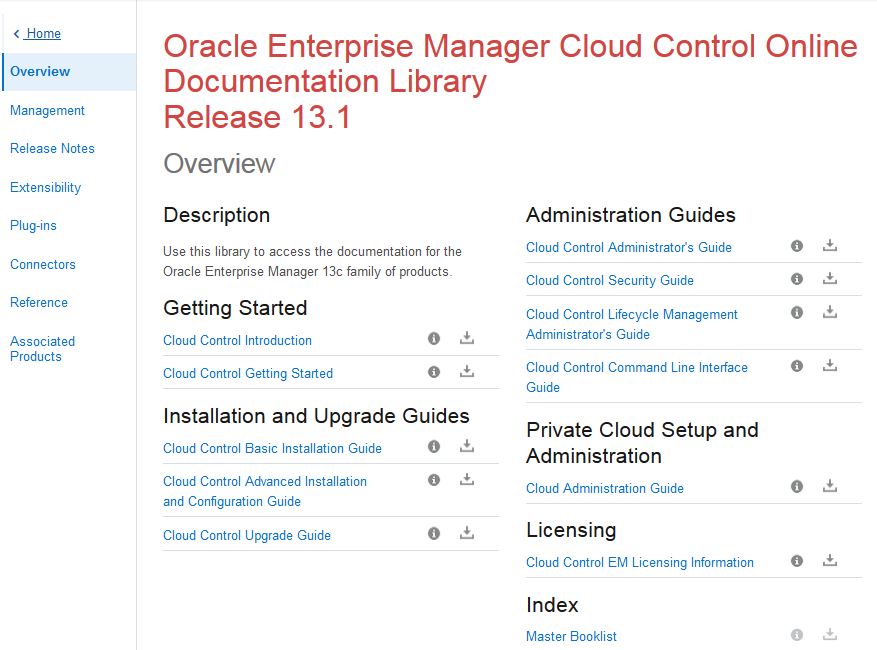
To access the Oracle Enterprise Manager Cloud Control documentation, go to
Oracle Enterprise Manager Cloud Control Online Documentation Library Release 13.1.
Consider that:
-
Installation instructions are organized by Cloud Control version.
-
Not all guides, nor all section in the guides, will be relevant to Oracle Fusion Applications administrators.
4.1.2 Review Enterprise Manager Cloud Control Components
Enterprise Manager Cloud Control consists of the following three primary components:
-
The Oracle Management Agent
The Management Agent is an integral software component that makes possible to convert an unmanaged host to a managed host in the Enterprise Manager system. The Management Agent works in conjunction with the plug-ins to monitor the targets running on that managed host.
With the first Oracle Management Service (OMS) installed, by default a Management Agent called the Central Agent is received. The Central Agent is used for monitoring only the first OMS host, the first OMS, and the other targets running on the first OMS host. To monitor other hosts and the targets running on those hosts, a separate Standalone Management Agent must be installed on each of those hosts.
-
The Oracle Management Service (OMS)
Oracle Management Service (OMS) is a Web-based application that orchestrates with the Management Agents and the plug-ins to discover targets, monitor and manage them, and store the collected information in a repository for future reference and analysis. The OMS also renders the user interface for Enterprise Manager Cloud Control.
The OMS is deployed to the middleware home, which is the parent directory that contains Oracle WebLogic Server, OMS, plug-ins, Java Development Kit (JDK), Oracle WT directory, Oracle Common, and other relevant configuration files and directories. While installing the OMS, the Enterprise Manager Cloud Control Installation Wizard automatically installs Oracle WebLogic Server and JDK, and therefore, a WebLogic Server admin console is available by default.
-
The Oracle Management Repository (Management Repository/ OMR)
The Oracle Management Repository (Management Repository) is a storage location where all the information collected by the Management Agent gets stored. It consists of objects such as database jobs, packages, procedures, views, and tablespaces.
The OMS uploads the monitoring data it receives from the Management Agents to the Management Repository. The Management Repository then organizes the data so that it can be retrieved by the OMS and displayed in the Enterprise Manager Cloud Control console. Since data is stored in the Management Repository, it can be shared between any number of administrators accessing the Enterprise Manager Cloud Control.
At the time of installation, the Enterprise Manager Cloud Control Installation Wizard configures the Management Repository in the existing, certified database. The wizard, however, does not install a new database.
Figure 4-2 Enterprise Manager Cloud Control Architecture
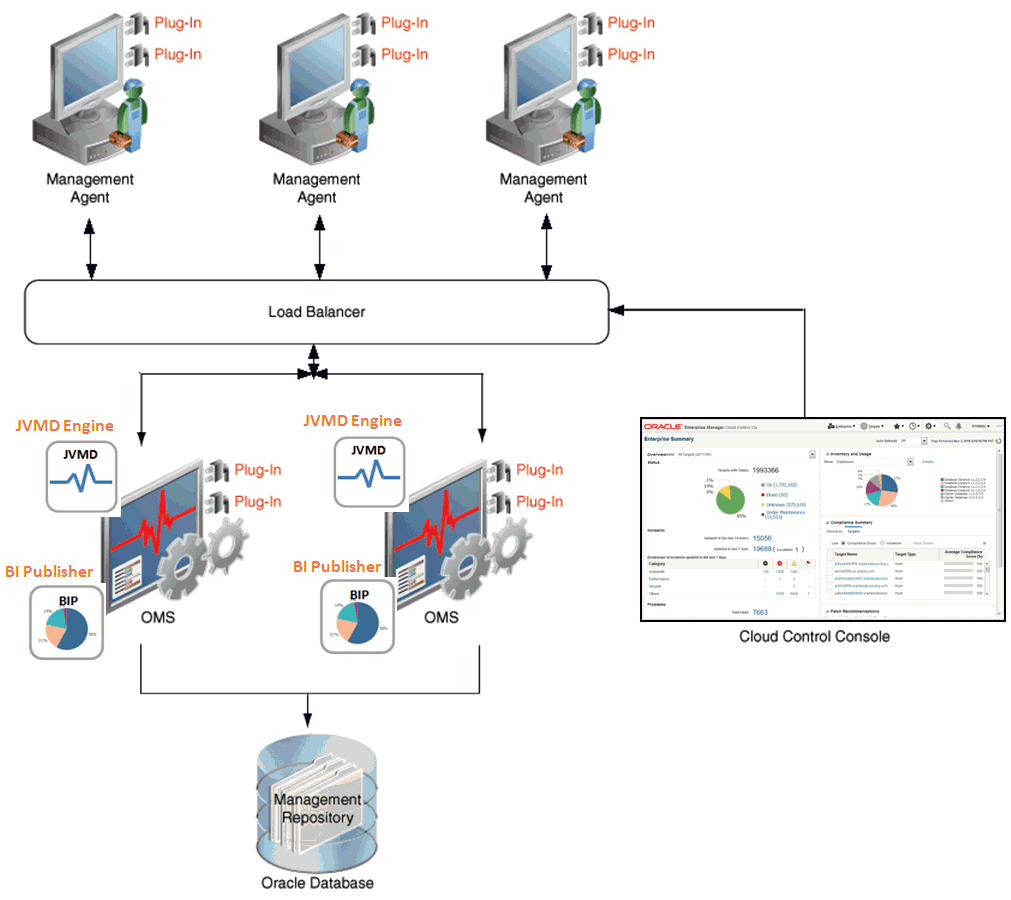
Description of "Figure 4-2 Enterprise Manager Cloud Control Architecture"
In Figure 4-2 the load balancer and the multiple Oracle Management Service (OMS) instances are depicted only to indicate how a sample Enterprise Manager Cloud Control architecture would look in a large organization. They are not a prerequisite or a requirement for an Enterprise Manager system installation. If a load balancer does not exist, then the Management Agents communicate directly with the OMS instances.
4.1.3 Plan the Cloud Control Implementation
An enterprise-wide management system such as Cloud Control, as well as Oracle Fusion Applications, is used because an enterprise is large enough to support it, so planning for sufficient resources and inevitable growth are important parts of the process.
Use the Oracle Fusion Applications Installation Workbook and Plan the Topology and Provisioning of the Installation in the Oracle Fusion Applications Installation Guide to help integrate the efforts and to derive the data needed to run the Cloud Control Installation Wizard.
As an implementation starting point:
-
Appoint a Cloud Control owner
This person should have a vision of the entire IT enterprise, knowing the key technical people and business stakeholders for each system being monitored. This person should be very familiar with the Fusion Applications instances and installation plans.
-
Plan for both the initial phase and longer-term growth
Decide what will be monitored, how it will be administered, and by whom. Phase the rollout, and use milestones to track progress.
-
Consider having a test site
A non-production site is used to experiment with metrics extensions, patch updates, and so on.
4.1.3.1 Sizing Considerations for a Cloud Control Site
Table 4-1 gives a snapshot of sizing considerations for the three facets of a Cloud Control installation. The subsequent paragraphs discuss sizing the Repository in more detail.
Table 4-1 Snapshot of Cloud Control Components and Supporting Infrastructure
| Component | Infrastructure | Notes |
|---|---|---|
|
Oracle Management Repository (OMR) |
Instance, storage, RAC, Data Guard |
The Oracle Management Servers (OMS) require rapid data exchange with the OMR. OMR performance is sensitive to the underlying CPU, memory, and storage capability and capacity of the OMR server. Use RAC for the OMR, even if it is just a single-node cluster, to allow for scaling. |
|
Oracle Management Servers (OMS) |
Firewalls, load balancer(s), shared storage |
As Cloud Control's view of the enterprise grows, so will the amount of data uploaded by agents, and the resulting storage needs in the OMR. Consider: - Network latency between OMS and the OMR - Firewalls between OMS and agents - Load balancers fronting OMS(s). |
|
Oracle Management Agents |
Communications to/from OMS, proxy monitoring (off-host targets) |
Agents can reside anywhere on the network, so only requirement is that agent can access OMS upload port and OMS can access agent URL. |
Sizing the Repository
Repository size is based on:
-
Number of discovered targets
See Table 4-2.
-
Amount of retained historical data
By default, OMS applies retention periods for weekly, monthly, and yearly metric data rollups, and retains state information for six months, and configuration data for one year.
-
Number of administration tasks defined and used
Each administration task involves configuration and state information overhead estimated around 1KB per task. Tasks can include Cloud Control jobs, patching and provisioning jobs, and templates.
When running the Cloud Control Installation Wizard (Advanced mode), select the desired deployment size, as shown in Table 4-2.
Table 4-2 Deployment Size
| Deployment Size | Targets Count | Management Agents Count | Concurrent User Session Count |
|---|---|---|---|
|
Small |
Up to 999 |
Up to 99 |
Up to 10 |
|
Medium |
Between 1000 and 9999 |
Between 100 and 999 |
Between 10 and 24 |
|
Large |
10,000 or more |
1000 or more |
Between 25 and 50 |
4.2 Install Enterprise Manager Cloud Control
Enterprise Manager Cloud Control can be used to administer a wide range of applications and targets in the business environment; it is not limited to Oracle Fusion Applications components. However, this guide augments the existing Cloud Control documentation to help with specific Oracle Fusion Applications requirements. It assumes that Enterprise Manager Cloud Control is being installed for the first time, using the appropriate Oracle Fusion Applications Management Pack plug-in for Cloud Control.
Installation Procedure
For the installation procedure, the tasks that must be followed are detailed in other Oracle guides. Where appropriate, there are links to these guides.
-
Check the documentation and release notes
In general, follow the installation instructions in the Enterprise Manager Cloud Control Basic Installation Guide, particularly section Installing an Enterprise Manager System for a Production Site (Advanced Configuration). This guide provides step-by-step instructions for installing a production system in the Advanced mode.
-
Check hardware and software compliance with prerequisites
Generic prerequisites for Cloud Control are listed in the Enterprise Manager Cloud Control Basic Installation Guide. Oracle Fusion Applications must have been installed and configured.
-
Prepare the database for the OMR
-
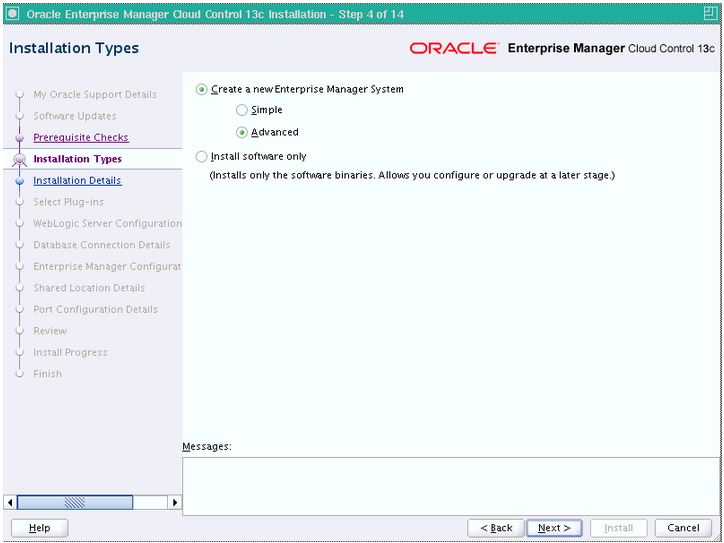
Run the installer and choose Advanced installation
The Advanced option is required in order to be able to select the Oracle Fusion Applications plug-in that integrates Cloud Control with Fusion Applications. See Run the Installer and Choose Advanced Configuration.
-
Execute any post-installation steps
After installing an Enterprise Manager System , perform the post-installation tasks listed in the Enterprise Manager Cloud Control Basic Installation Guide, section Performing Post-installation Tasks After Installing an Enterprise Manager System.
4.2.1 Prepare the Oracle Database for the OMR
The Enterprise Manager Prerequisite Kit utility (EM Prerequisite Kit) is a command line utility that runs repository-related prerequisite checks in the environment to ensure that all the repository requirements for installing or upgrading an Enterprise Manager system have been met.
The kit not only runs the prerequisite checks but also takes corrective actions automatically, to the extent possible, when a prerequisite check fails. The kit also takes post-requisite steps automatically to revert the corrective actions taken and ensure that the system is back to how it was before installing or upgrading the Enterprise Manager system.
The EM Prerequisite Kit is run internally by the Enterprise Manager Installation Wizard while installing or upgrading an Enterprise Manager system. In addition, the kit can be executed beforehand to ensure that the environment meets all the repository-related requirements. This helps in detecting and fixing repository-related issues beforehand, thus enabling a much smoother installation or upgrade experience.
Refer to the Enterprise Manager Cloud Control Basic Installation Guide section Installing Oracle Enterprise Manager Cloud Control 13c Release 1. This section describes how to install a new Enterprise Manager system while utilizing an existing, certified Oracle Database to store Oracle Management Repository (Management Repository). In the Prerequisites for Installing an Enterprise Manager System section, database requirements are listed and contains the link to Appendix C, which indicates how to install the OMR using templates.
4.2.2 Run the Installer and Choose Advanced Configuration
To install Enterprise Manager Cloud Control in a production environment, use the Advanced installation type. For the installation steps, see Installing an Enterprise Manager System for a Production Site (Advanced Configuration) in the Oracle Enterprise Manager Cloud Control Basic Installation Guide.
Take in consideration that:
-
Once launched, the installation process runs for about one hour.
-
Choose Advanced when prompted for installation type. This option will subsequently make possible to select the Oracle Fusion Applications Management Pack (or plug-in) for Cloud Control, a required step that is only available in the Advanced mode.
-
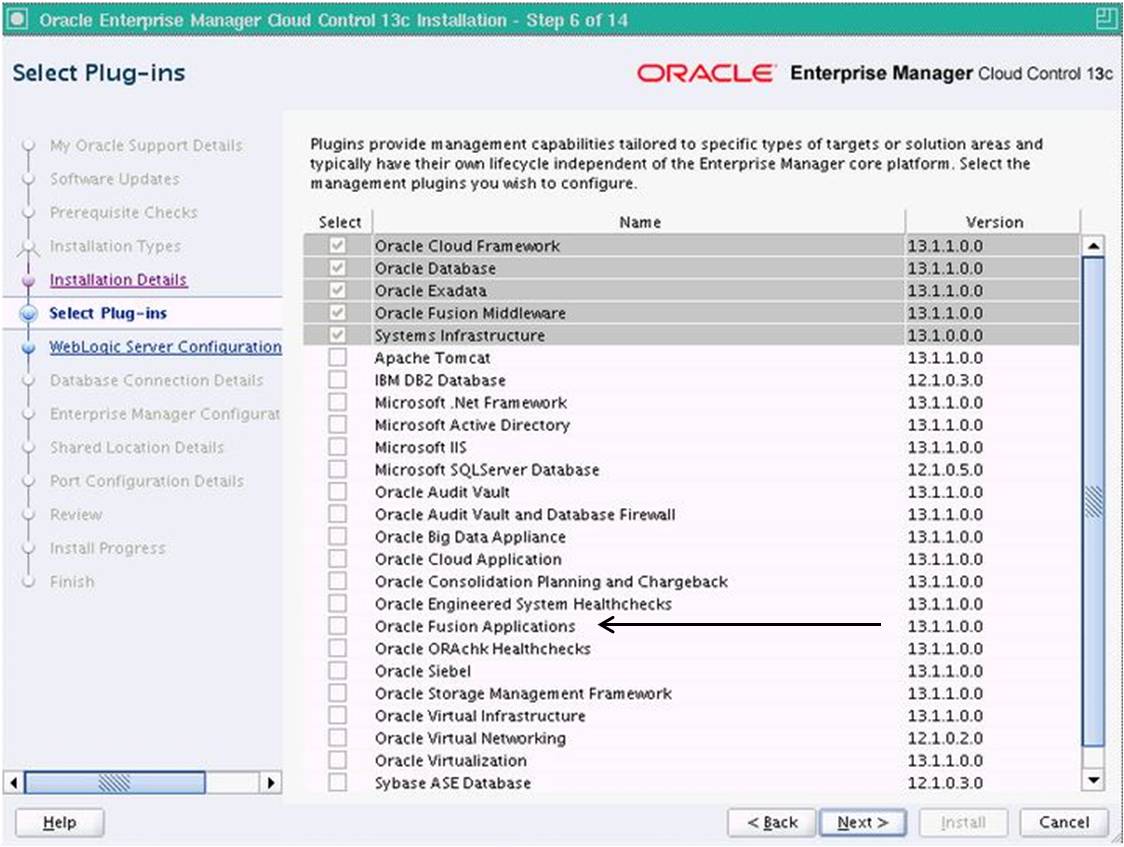
When the Select Plug-In screen is displayed, accept four default choices (Oracle Database, Oracle Exadata, Oracle Fusion Middleware and Systems Infrastructure). Also select Oracle Fusion Applications.
4.2.3 Start and Stop Cloud Control Components Using EMCTL
While Cloud Control can be used as a graphical interface for starting and stopping many of the Oracle Fusion Applications components, the Oracle Managed Service (OMS) and agents of Cloud Control itself are started and stopped with a command-line tool called EMCTL.
Each Oracle Management Server (OMS) in Cloud Control consists of a number of components, all of which can be started or stopped from the OMS home using the Enterprise Manager Control (EMCTL) command-line tool. This tool makes possible to quickly start and stop Cloud Control management servers and agents. It must be invoked from the appropriate directory to control the desired component.
EMCTL Directories and Commands
The emctl utility is located in the <OMS_ORACLE_HOME>/bin directory. For example, if the OMS has been configured in /u01/em12c/oms, then the emctl for that instance of OMS is found under /u01/em12c/oms/bin directory.
<OMS_ORACLE_HOJME>/bin/emctl
<AGENT_INST_HOME>/bin/emctl
Sample commands are:
emctl start oms|agent
emctl stop oms|agent [-all] [-force]
emctl status oms|agent [-detail]
Table 4-3 EMCTL Options
| Option | Notes |
|---|---|
|
|
|
|
|
Shows whether the OMS is started or stopped |
Log Files for the OMS and Central Agent
Log files for the OMS are located here:
gc_inst/em/EMCG_OMS1/sysman/log
gc_inst/user_projects/domains/GCDomain/servers/EMGC_OMS1/sysman/log
gc_inst/user_projects/domains/GCDomain/servers/EMGC_OMS1/logs
Log files for the central agent (installed on the OMS server) are located here:
agent_base_directory>/agent_inst/sysman/log
4.3 Discover and Add Fusion Applications Targets to Cloud Control
When Cloud Control is installed, it is mandatory to go through a discovery process to identify the hosts and components on which the Oracle Fusion Applications resides, and to deploy agents that will monitor and communicate with the Oracle Management Server component of Cloud Control. The discovery process in general is outlined in the Oracle Enterprise Manager Cloud Control Administrator's Guide, in section Discovering, Promoting, and Adding Targets. It is recommended to choose the option “Discovering and Adding All Target Types Using the Guided Discovery Process".
There are three methods available for discovering targets.
-
Autodiscovery Process
This enables a Management Agent running on the host to run a Cloud Control job that scans for unmanaged hosts. The benefit of this process is that as new components are added to the infrastructure, they can be found and brought under management on a regularly-scheduled basis. However, as changes in targets are not frequent with a complex installation such as Oracle Fusion Applications, it is not recommended to set up Automatic Discovery for Fusion Applications targets.
-
Guided Discovery Process
In general, this is the recommended process for Fusion Applications targets. The discovery wizard goes through the process and most of the specifications required are filled by default. It will be possible to explicitly select the targets to be added. The benefit is in eliminating the need to consume resources on the Management Agent to perform discovery when it is not required.
In the Oracle Enterprise Manager Cloud Control Administrator's Guide, the discovery description includes an explicit step for “promotion" of targets. However, discovery and promotion are handled in a singe step during the Guided Process for Oracle Fusion Applications targets. No promotion step is explicitly performed.
-
Fully Manual/Specifying Target Monitoring Properties
This makes possible to manually specify all details required to discover the target. This is generally used when auto- or guided discovery methods have failed to discover the needed target.
Be aware that the Guided Discovery option is a subset of the “Manual" menu choice in Cloud Control. Choosing either “guided discovery" or the “fully manual" option is a two-step selection.
4.3.1 Understand the Order to Discover Oracle Fusion Applications Targets
The discovery of host servers and targets in an Oracle Fusion Applications environment is done in phases. Also, the enterprise may have multiple Fusion Applications environments—one for development, one for testing, and one for production, for example. Each environment should also be discovered in phases.
It is mandatory to:
1) Discover the host machine and Cloud Control will deploy an agent to it. (See Discover Hosts: General Notes.)
2) Add the environment targets that reside on those hosts.
The recommended order is as follows:
-
Database
Discover the host of the transaction database. Then Add the transaction database target(s) using guided discovery. See Discover Databases: General Notes.
-
Identity Management
Discover the Identity Management database and component host(s). Then add the Identity Management domain targets. See Discover Identity Management: General Notes.
-
Middleware Targets and BIDomain (Business Intelligence)
Discover the hosts and then add the targets for middleware components such as WebLogic Server domains, OHS, and Business Intelligence instances and domains, using the guided process. See Discover the Oracle Fusion Applications Components.
-
Fusion Applications product domains
First run diagnostic prechecks, then discover the hosts and add the targets of all functional Fusion Applications product domains, such as CommonDomain, CRMDomain, FinancialDomain, and HCMDomain. See Discover the Oracle Fusion Applications Components.
4.3.1.1 Discover Hosts: General Notes
The general process of discovering hosts in Cloud Control is described below.
-
From the Setup menu, select Add Target and then select Add Targets Manually.
-
Select Add Host Targets and click Add Host.
-
Click Add. Then enter the fully qualified host name and the platform of the host on which the agent will be installed. Alternatively, click Load from File to add host names stored in a file.
The wizard creates a session name of its own with the HOST_SYSMAN_<Time Stamp> suffix which can be changed to suit the preferences. This name is merely to associate the "add host" session status in the management repository for later troubleshooting if needed.
-
For each host added to the list, perform the following:
-
For Installation Base Directory
-
Enter the absolute path to the agent base directory where the software binary, security, and inventory files of the Management Agent will be copied.
-
If the entered path does not exist, the application creates the specified directory.
-
-
For Instance Director
-
Accept the default location or enter the absolute path to a directory of choice, where all management-agent-related configuration files will be stored.
-
Add or select host credentials that will be used to install the agent.
-
-
-
After performing these steps for each host, click Next and then, Finish.
4.3.2 Discover Databases: General Notes
Once the host for the transaction database(s) has been discovered, use these notes to assist with adding Fusion Applications database targets.
-
Click Setup.
-
Add Target.
-
Add Targets Manually and to invoke the wizard.
-
Select Add Targets Using Guided Process.
-
Select Oracle Database, Listener, and Automatic Storage Management in Target Types.
-
Then click Add Using Guided Process.
If there are multiple databases on the same host, it is possible to select multiples. Entering a password for each will be needed.
4.3.3 Discover Identity Management: General Notes
Adding Identity Management to Cloud Control involves discovering the machine that hosts the Identity Management components, then adding the databases and finally adding the middle tier components of Identity Management.
-
Database
The Identity Management database is discovered in the same way as the transactional database, using the Guided Process.
-
Ports
The listen ports for Identity Management domain will be needed. If the Identity Management Provisioning Wizard was used to configure the environment, the AdminServer of IDMDomain uses port 7001 on the machine where the domain was configured. It is also possible to use Fusion Middleware Control in the Identity Management environment to obtain/check the listen port.
-
To find the Middleware targets for Identity Management
-
Click Targets then, Middleware.
-
Then click Add and then, Oracle Fusion Middleware WebLogic Domain in the Table tab.
-
Enter the Administration server host, port, username, password, unique domain identifier, and agent when prompted.
-
The wizard discovers all the necessary Middleware component targets and provides a confirmation. There are more than 50 targets found.
-
Click Close to assign the agents.
-
Then click Add Targets.
-
4.3.4 Discover the Oracle Fusion Applications Components
Discovering the Fusion Instance includes the middleware components and the Oracle Fusion Applications, including all the WLS domains. It is recommended to run preliminary diagnostic tests, then discover the instance. Later, if desired, it is also possible to discover Business Intelligence or other affiliated components.
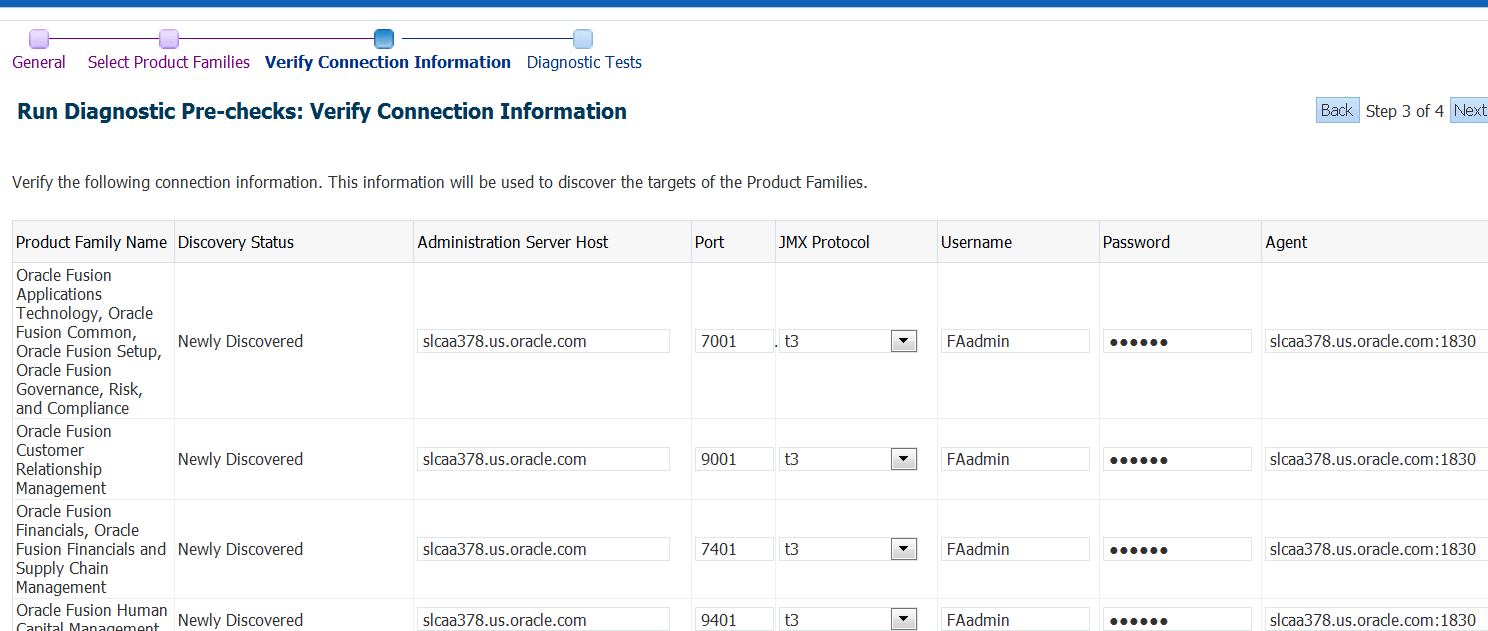
4.3.4.1 Run Diagnostic Pre-Checks
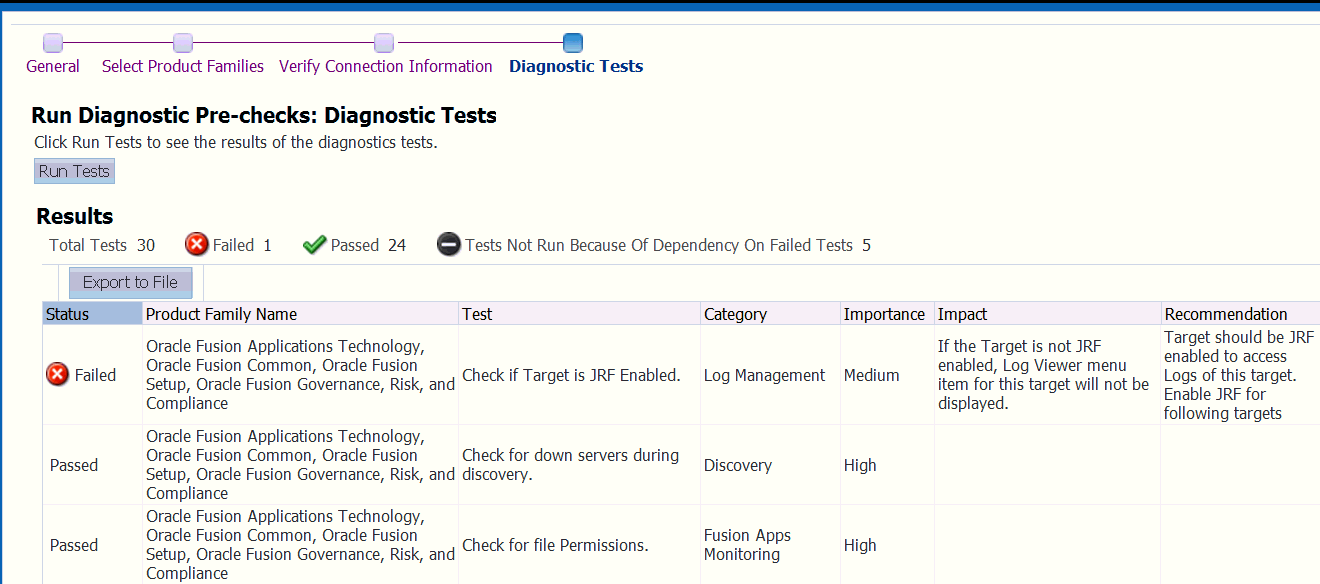
Diagnostic pre-checks identify tasks or steps that might cause Discovery to fail. It can also be used to ensure the configuration and setup for logs, support workbench, and IDM management are correct. Examples of pre-checks include validating that permissions are set correctly, validating jmx connections, and ensuring the availability of all relevant servers.
To start diagnostic pre-checks:
4.3.4.2 Discover the Fusion Instance
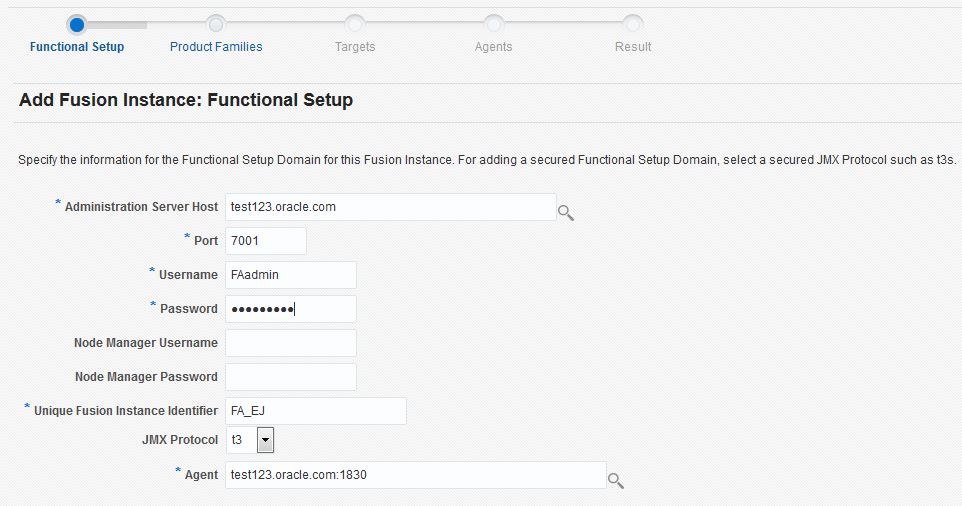
The wizard requests for the host, port, and credentials for the Admin Server in the Common Domain, and then Cloud Control finds the Product Families that belong to the given instance. To launch this Discovery process:
-
Open EMCC and select Targets.
-
Select Fusion Applications and click the Add drop-down menu.
-
Choose Fusion Instance.
The Discovery Wizard opens the Functional Setup page, where the host, port, credentials, and unique instance name are entered for the Fusion Applications instance.
-
Click Close to continue.
Cloud Control will discover the relevant product families.
-
Verify the discovered list of Product Families that results and click Next.
The Targets window opens to confirm the product family hosts and credentials.
-
Verify the targets and click Close.
The Agents window is displayed. Agents are deployed to the targets and displayed. There is the option on the Agents page to assign global properties for all targets in the instance. (Sample properties include cost center, department, lifecycle status, location, etc.)
-
Click Finish to complete adding the Fusion Instance.
A Results page will be displayed.
-
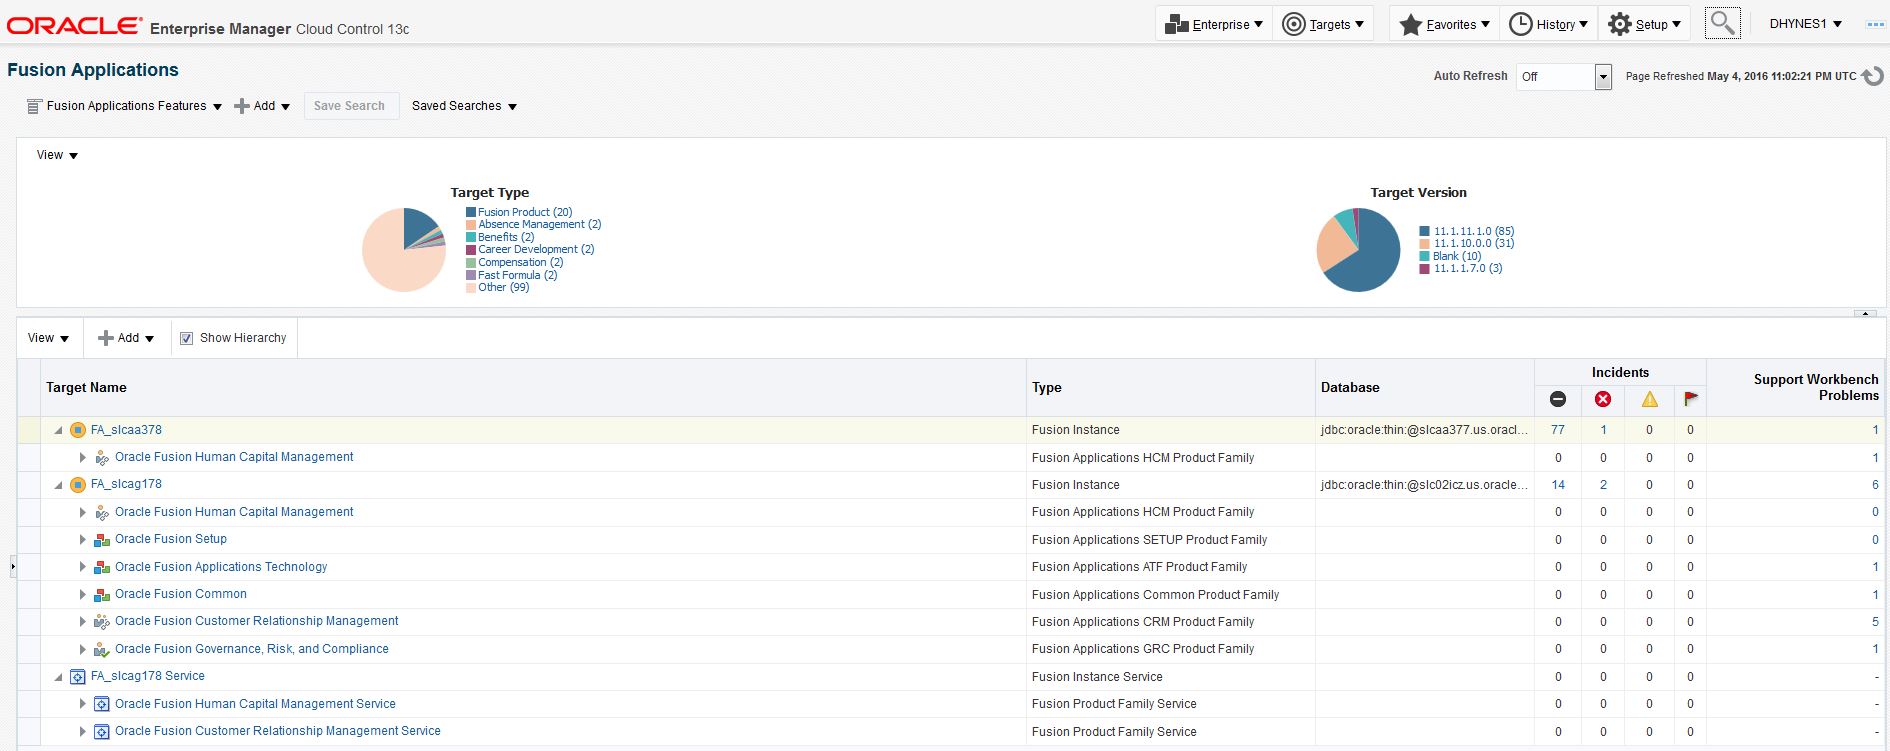
Select Targets and then Fusion Applications to see a list of all Fusion Applications instances that have been discovered, or-- if there is only one instance-- all of its associated targets.
-
Note that it is possible to perform a discovery process for Business Intelligence components, Oracle HTTP server (OHS), or Oracle Webchat, separately.
4.3.5 Add and Remove Targets Later
As theOracle Fusion Applications environment matures, it may be scaled with additional targets or need a target from the Cloud Control management system to be deleted.
4.3.5.1 Add Subsequent Targets and Refreshing an Instance
There are three reasons for refreshing an instance to ensure the new components are added as targets within a Fusion Instance already being managed by Enterprise Manager Cloud Control.
-
Add a new product family that is part of an already managed Fusion Instance as an additional target
-
Add new instances within a product Family
-
Add an Oracle WebLogic Server domain that is already being managed by Cloud Control as new targets
To re-discover Oracle Fusion Applications environment:
4.3.5.2 Remove Oracle Fusion Applications Targets
To re-discover the Oracle Fusion Applications environment:
- From the Targets menu, choose Fusion Applications.
- From the table, choose the Fusion Instance, Product Family, or Product you want to remove.
- From the Fusion Instance, Product Family, or Product menu, choose Target Setup then select, Remove Target.
- In the Remove Target page, choose Yes to remove the target.
4.3.6 Use Target Credentials
Cloud Control provides a central credential store that:
-
Manages user names, passwords, certificates, and keys for targets.
-
Avoids the need to repeatedly type passwords.
-
Supports both private and shared credentials.
Managing target credentials is described in Configuring and Using Target Credentials and Guidelines for Managing Target Credentials in the Oracle Enterprise Manager Cloud Control Security Guide.
4.4 Log In to Cloud Control
To log in to the Cloud Control user interface, perform the following steps:
Monitor an Oracle Fusion Applications Environment describes how to access and work with the Oracle Fusion Applications targets that have been discovered.
4.5 Create Target Groups in Cloud Control
It can be beneficial to group Fusion Applications targets for easier administration in Cloud Control. For example, some enterprises may want to group all Fusion Applications databases for handling by the database team. They can create a database group of targets and define who will manage that group.
Groups can be created manually, or dynamic groups that use global properties can be created to define, for example, that any time a database is added to the environment, it is added to the group. Each target can be assigned specific global properties such as location, line of business, or department.
See the Oracle Enterprise Manager Cloud Control Administrator's Guide section Managing Groups for details.
4.6 The Fusion Instance Overview Page and Sections in Cloud Control
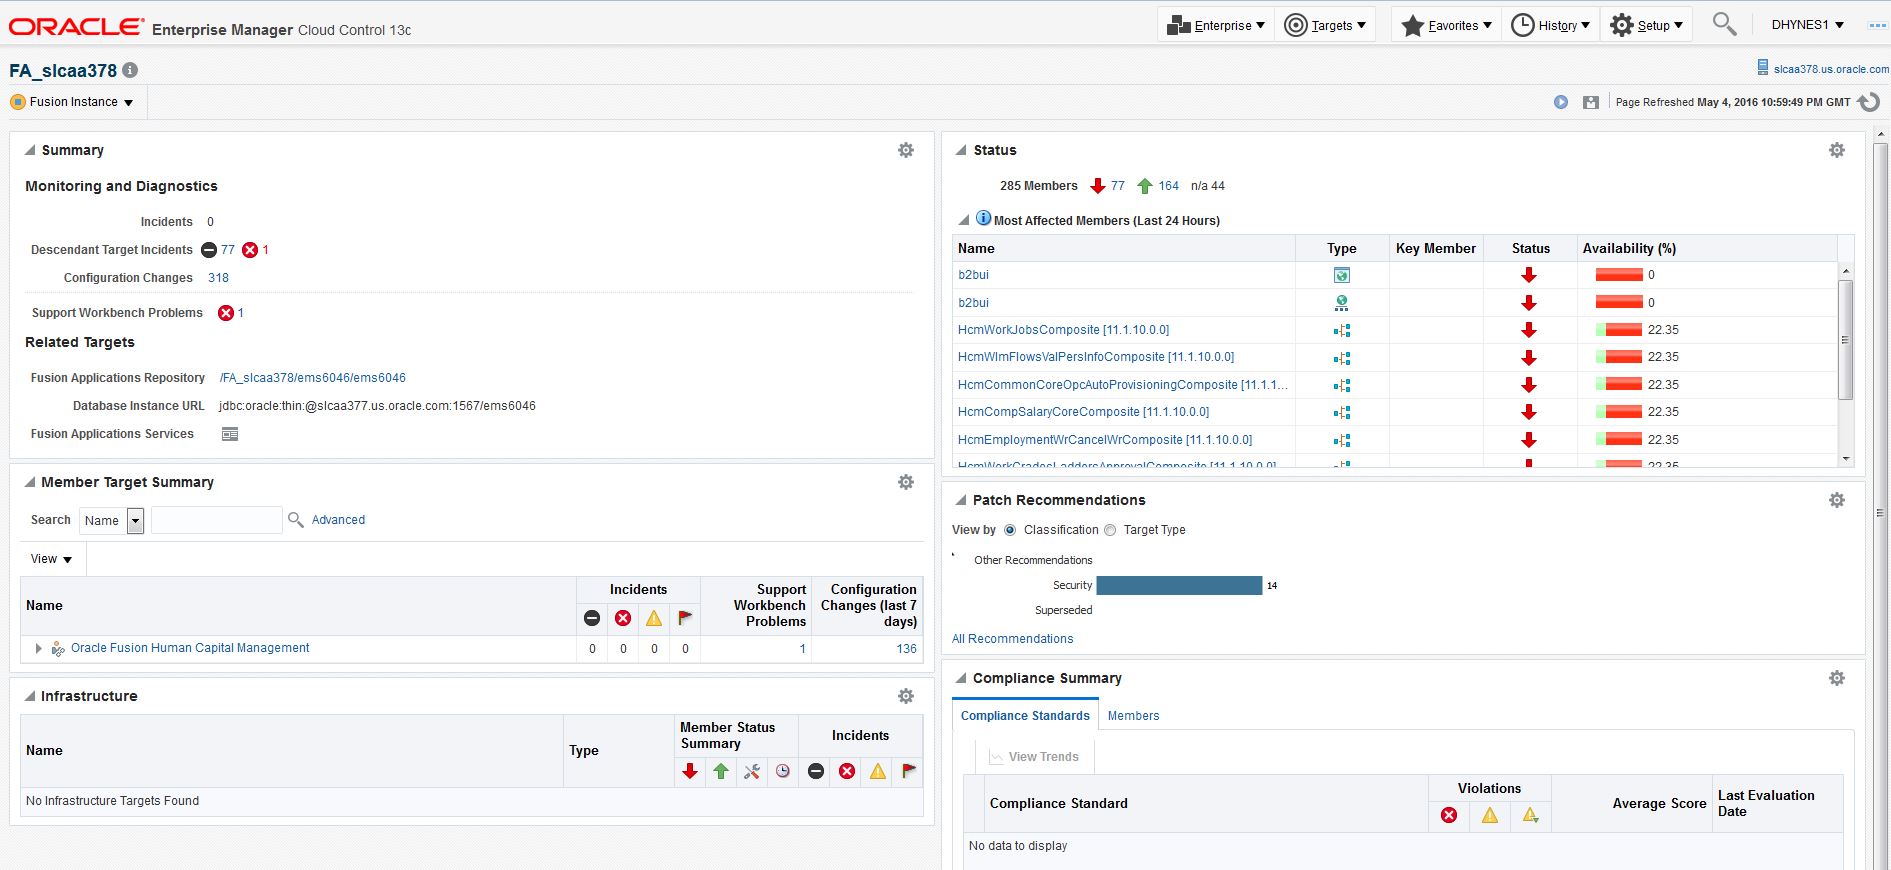
With the Fusion Instance home page is possible to monitor a whole instance at a glance, including diagnostic values, a summary of member targets, the status of members and top long running job requests. The Fusion Instance menu provides several administrative options for managing all the product families, as shown below.
Figure 4-9 The Fusion Instance Overview Page in Cloud Control
To display the Cloud Control Fusion Instance overview page:
-
From the Targets menu, choose Fusion Applications.
The Fusion Applications list page is displayed.
Figure 4-10 Fusion Applications List Page
-
In the table on the Fusion Applications page, click the Fusion Instance whose overview page need to be displayed.
The Fusion Instance page is displayed.
The Fusion Instance overview page displays the following sections:
4.6.1 Summary Section
The Summary section displays an overview of the Fusion instance as a whole, including diagnostic and database information.
4.6.1.1 Monitoring and Diagnostics Region
-
Incidents at the instance level
-
Incidents that have occurred in descendant targets
-
Any configuration changes that have occurred over the last seven days
-
Any support workbench problems
Incidents are listed by severity, namely fatal, critical, warning and escalation levels.
4.6.2 Member Target Summary Section
The Member Target Summary section displays an overview of the member targets of the Fusion instance, including product families and products. The type of information displayed in this sub-section is similar to that displayed in the Cloud Control Fusion Applications overview page.
4.6.3 Status Section
The Status section displays status information regarding the members of the Fusion instance. The numbers at the top of the Status section indicate how many members of the instance are up, down or unavailable. A number or status can be clicked for more information.
The table in the Status section displays members that have been affected the most within the last 24 hours. This includes Oracle WebLogic Servers, application deployments, clustered application deployments, Fusion Java EE applications, and so on. The table displays the status and percent availability for each member. It is possible to click individual member items for more information.
4.6.4 Infrastructure Section
The Infrastructure section shows the status of the Oracle Fusion Middleware targets on which Fusion Applications runs, including Oracle WebLogic Servers and clusters. The Member Status Summary indicates the number of targets that are running or down.
The Incidents column shows major incidents that have occurred in the infrastructure targets, including descendant targets. Incidents are listed by severity, namely fatal, critical, warning and escalation levels.
4.6.5 Compliance Summary Section
The Compliance Summary section indicates the extent to which targets are in compliance with any standards defined for the organization. Compliance evaluation is the process of testing the compliance standard rules within a compliance standard against a target and recording any violations in the Oracle Management Repository.
Compliance standards are sets of rules that require all components to be configured according to organization policy. Compliance standards can include checks, such as verifying that all servers run securely using SSL, or that files do not include unhashed passwords. The compliance standards provided by Oracle can be used, such as the Security Configuration for Oracle Database, or it is also possible to create a unique standard.
Violations are categorized as errors, warnings, and minor warnings. Average compliance scores are listed for each component, as well as the date of the most recent compliance evaluation.
Click Trend Overview to visually determine whether the targets are adhering to or distancing themselves from the compliance best practices.
