Skip Headers

Oracle9i Warehouse Builder User's Guide
Release 2 (v9.0.2)

Part Number A95949-01
Go To Documentation Library
Home
Go To Product List
Solution Area
Go To Table Of Contents
Contents
Go To Index
Index

Go to previous page Go to next page

12
Metadata Reporting Using Warehouse Builder Browser

Metadata reporting allows you to examine the data stored in your Warehouse Builder repository. The Warehouse Builder Browser integrates with Oracle Portal and makes it possible to add metadata reporting functionality to Oracle Portal. There are five Warehouse Builder portlets that you can add to customize your Warehouse Builder Browser. The Warehouse Builder Browser uses Warehouse Builder Public Views to create pre-built reports on all repository objects and relationships between objects. You can also use the Public Views to create your own custom reports. You can access these reports from the Warehouse Builder client which opens Oracle Portal, or directly through Oracle Portal without using the client.

This chapter includes the following topics:

Accessing Reports from the Warehouse Builder Client

You can view a report on an item using the Warehouse Builder clients if Oracle Portal is installed. You must set up your Warehouse Builder Preferences to view reports.

Setting up Browser Preferences

To set Browser Preferences:

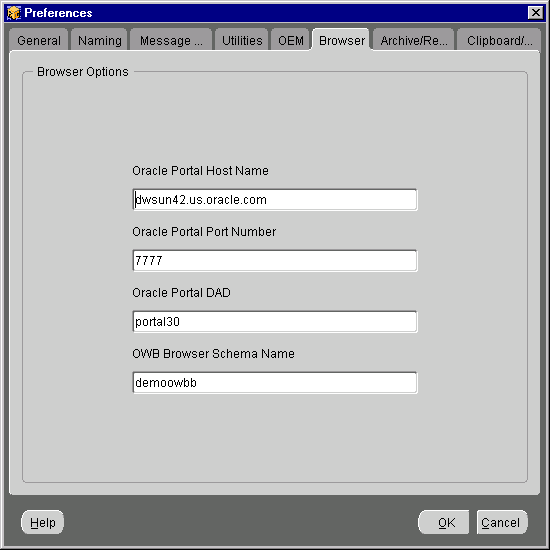
  1. From the Project menu, select Preferences.

    The Preferences window for the project displays.

Figure 12-1 Warehouse Builder Preferences

Text description of brwsr_op.gif follows.

Text description of the illustration brwsr_op.gif

  1. Click the Browser tab of the Preferences window.

  2. Specify the following information:

    • Oracle Portal Host Name

    • Oracle Portal Port Number

    • Oracle Portal DAD

    • Warehouse Builder Browser Schema Name

  3. Click OK.

Opening the Reports

To open reports from within the Warehouse Builder client:

  1. Open a project in Warehouse Builder and select an object to run a report on. You can select a module, or you can open the Module Editor and select any object in the module.

  2. From the View menu, select Reports.

    The Oracle Portal site you defined in the Preferences window opens and displays the logon.

  3. Enter your Internet Application Server (IAS) Single Sign-On user name and password the first time you run a report during this session.

    The Warehouse Builder Browser displays a list of reports available for the selected object.
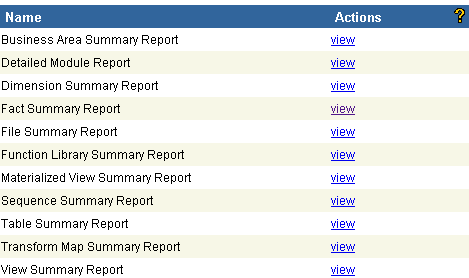
Figure 12-2 Available Warehouse Builder Reports

Text description of listofre.gif follows.

Text description of the illustration listofre.gif

  1. Click the view link for a report.

    The report displays in a separate window. Figure 12-3 shows an example of the Table Summary Report.
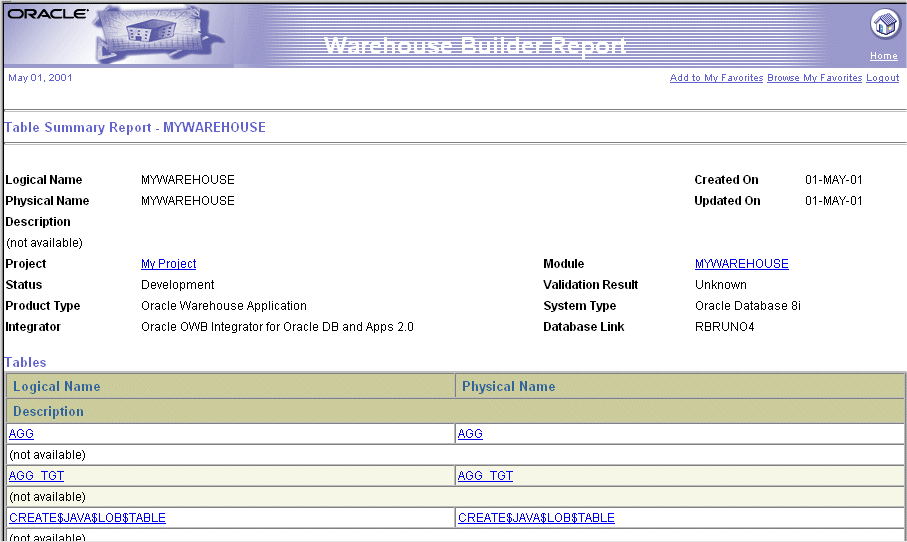
Figure 12-3 Warehouse Builder Report

Text description of tabsumre.gif follows.

Text description of the illustration tabsumre.gif

To print the report, select the print operation from the browser menu or toolbar.

Accessing Reports from the Warehouse Builder Browser

You can view reports from the Warehouse Builder Browser without installing Warehouse Builder. You start by launching Oracle Portal. From there you can select the Warehouse Builder Browser portlets.

Starting the Warehouse Builder Browser

To start the Warehouse Builder Browser:

  1. Open your Internet browser and set the URL to your Oracle Portal address.

  2. Click Login.

    The Warehouse Builder Browser uses a standard Oracle Portal login screen. This is not specific to the Warehouse Builder Browser.
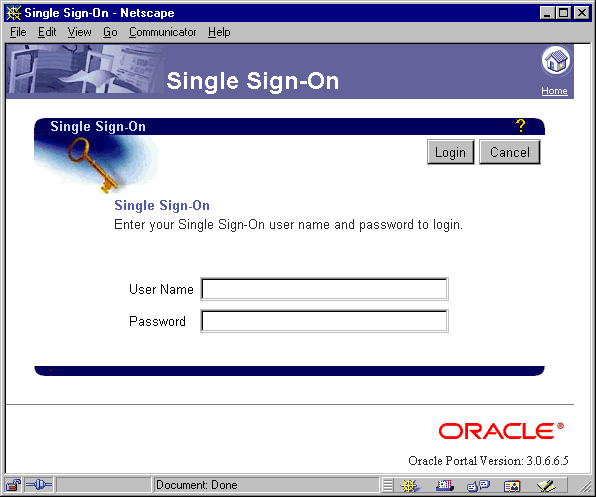
Figure 12-4 Single Sign-On Page

Text description of signon.gif follows.

Text description of the illustration signon.gif

  1. Log on to Oracle Portal using a user name and password that has access privileges to the Warehouse Builder Browser portlets. The Internet Application Server (IAS) Administrator is responsible for providing user accounts. Each user has their own user name and password.

    Your default Oracle Portal page displays. To display the Warehouse Builder Browser portlets, you must add them to your Oracle Portal home page. Use the Edit Page option to add portlets.
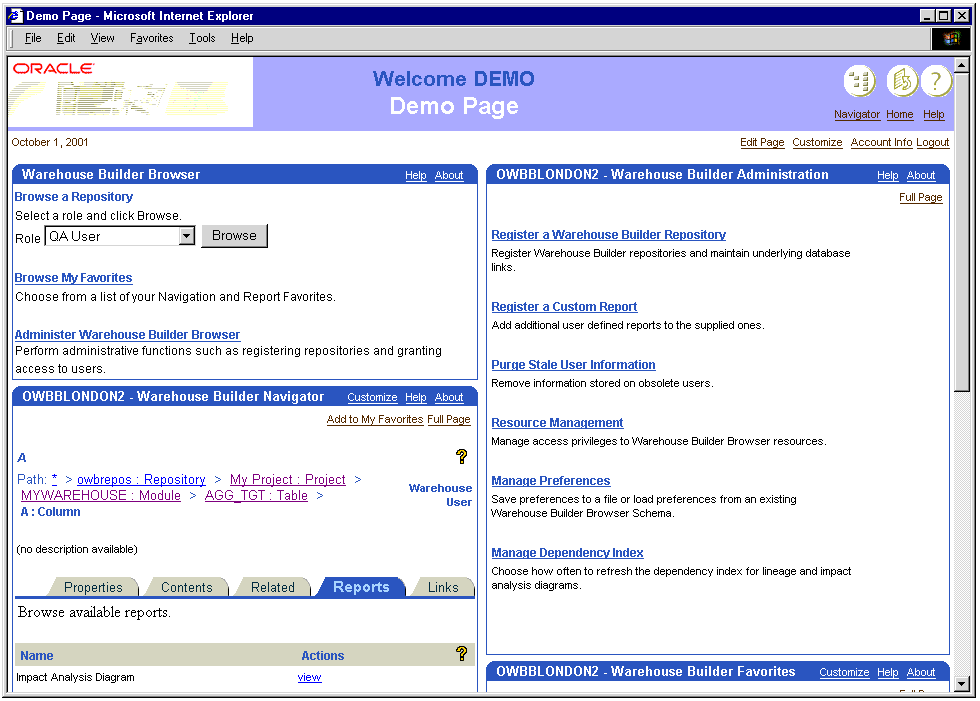
Figure 12-5 Oracle Portal Home Page with Warehouse Builder Portlets

Text description of 12meta22.gif follows

Text description of the illustration 12meta22.gif

Adding Portlets to the Warehouse Builder Browser

Warehouse Builder Browser portlets can be added to Oracle Portal after they have been installed on the machine running Oracle Portal. For more information about these portlets, see "Available Warehouse Builder Browser Portlets" . To install and configure the Warehouse Builder Browser Portlets, see the Warehouse Builder Installation and Configuration Guides. For information about customizing Oracle Portal pages, see the Oracle Portal documentation.

To add a portlet to a page:

  1. From the Oracle Portal page, select the Edit Page link from the upper-right corner of the page.

    The Edit Page displays the contents of the Oracle Portal page.
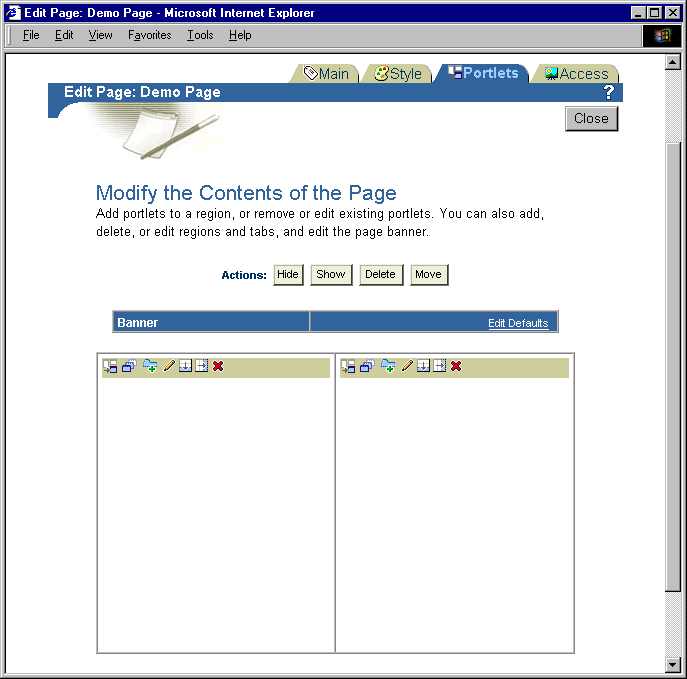
Figure 12-6 Oracle Portal Edit Page

Text description of editpage.gif follows.

Text description of the illustration editpage.gif

  1. Select the Add Portlets icon.

    The Add Portlets page displays a list of available portlets on the left side, and a list of selected portlets on the right side. See "Available Warehouse Builder Browser Portlets" for more details.
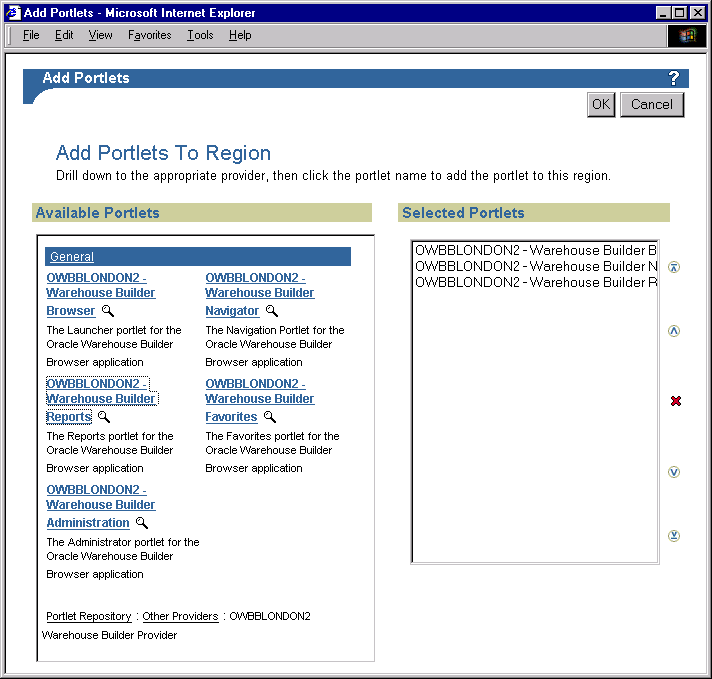
Figure 12-7 Add Portlets Page

Text description of addport.gif follows.

Text description of the illustration addport.gif

  1. Select the portlets to add to the Oracle Portal home page.

    The portlets you have added display in the right column. You can organize them by using the arrow buttons and delete them by using the X button.

  2. Click OK when you are done.

    The Edit Page displays the Warehouse Builder portlets that you added.
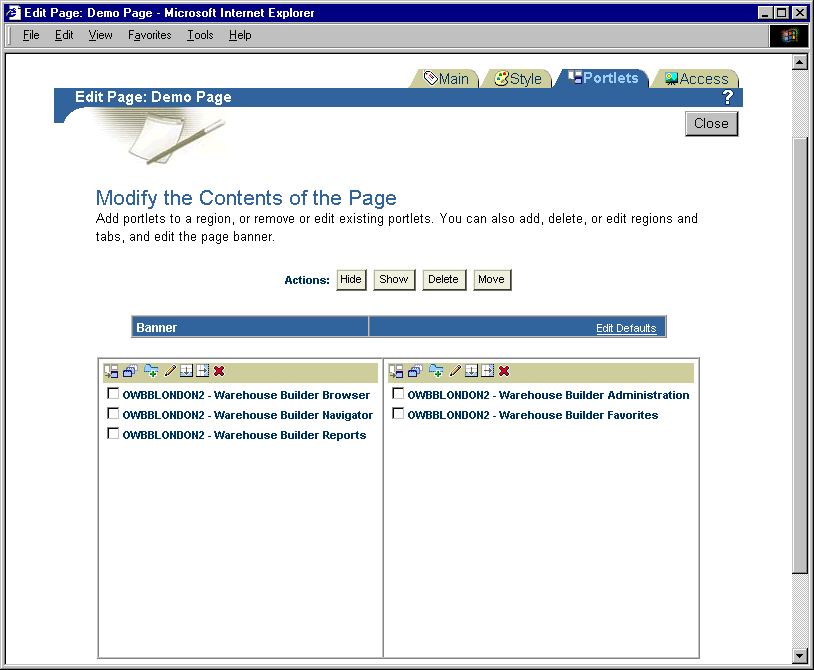
Figure 12-8 Edit Page

Text description of editpaga.gif follows.

Text description of the illustration editpaga.gif

Available Warehouse Builder Browser Portlets

You can add the following Warehouse Builder portlets to Oracle Portal. You can also add more than one of each portlet. For example, you can add two Reports portlets with each running a report on a different repository.

Launcher Portlet

The Launcher Portlet provides access to the following actions from your Oracle Portal home page:
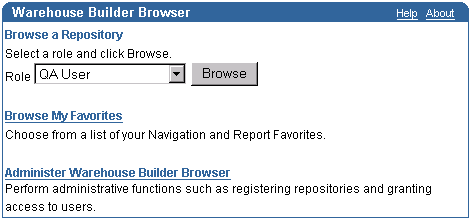
Figure 12-9 Launcher Portlet

Text description of laun_por.gif follows.

Text description of the illustration laun_por.gif

Administration Portlet

The Administration Portlet provides access to the following Administration features from your Oracle Portal home page:
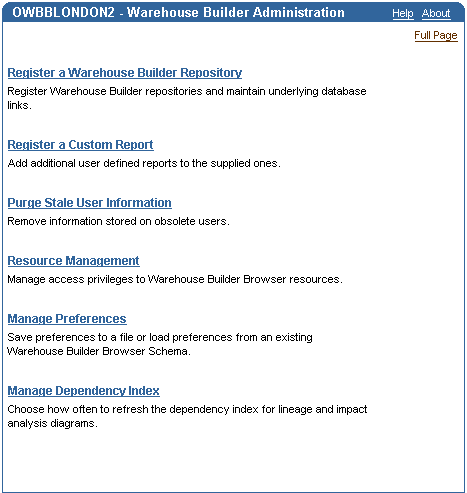
Figure 12-10 Administration Portlet

Text description of admn_por.gif follows.

Text description of the illustration admn_por.gif

Favorites Portlet

The Favorites Portlet provides access to your favorite Navigator pages and Reports from your Oracle Portal home page. This portlet does not contain any default favorites. You select Navigator pages and Reports as favorites using the Add to My Favorites links on the Warehouse Builder Navigator. You can also click the Full Page link to display Favorites in full page mode.
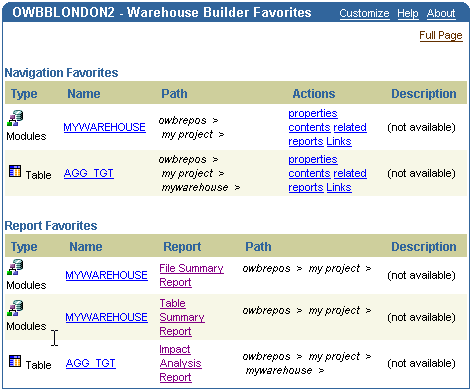
Figure 12-11 Favorites Portlet

Text description of fav_port.gif follows.

Text description of the illustration fav_port.gif

To view your favorite Navigator pages, select an item name under the column Name. You can also use the action links to view the properties, contents, related items, reports, or links associated with this item.

To view your favorite Reports, select a report name under the Report column. If you click on the item name under the column Name, the Navigator page for that item displays.

Navigator Portlet

The Navigator Portlet enables you to browse repositories accessible to the current user. The Navigator Portlet has the same functionality as the main Navigator page, except it displays within the area of the portlet. You can click the Full Page link to display the Navigator in full page mode.
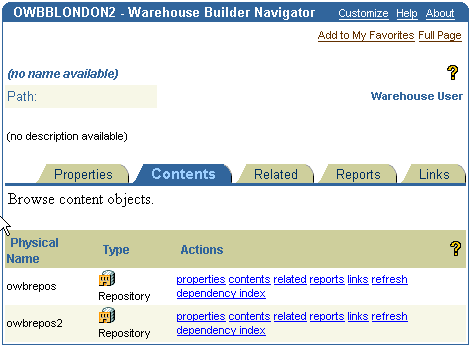
Figure 12-12 Navigator Portlet

Text description of nav_port.gif follows.

Text description of the illustration nav_port.gif

Reports Portlet

The Reports Portlet displays a Warehouse Builder Report on your Oracle Portal home page. This portlet does not contain a default Report. In order to display a Report, add a report to your favorites and use the Customize link on this portlet to add it.
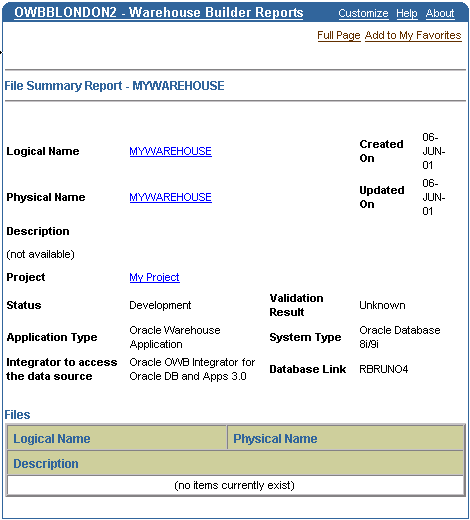
Figure 12-13 Reports Portlet

Text description of rpt_port.gif follows.

Text description of the illustration rpt_port.gif


Note:

When you have a Reports portlet on your Oracle Portal home page, it refreshes each time you reload the home page. This can delay the home page display.


Using Warehouse Builder Browser to View Reports

To view Warehouse Builder Reports:

  1. Select a Warehouse Builder Repository from the Repository drop-down list in the Warehouse Builder Browser Launcher portlet.

    The Repository list contains repositories that have been previously set up by your Warehouse Administrator using the Warehouse Builder Browser Administration pages.

Figure 12-14 Selecting a Repository

Text description of laun_por.gif follows.

Text description of the illustration laun_por.gif

  1. Select the role you want to use:

    • Warehouse Engineer

    • QA User

    • Warehouse User

    The role determines the available reports. Roles are set up by your Warehouse Administrator in the Warehouse Builder Browser Administration pages. For more information, see "Understanding Roles".

  2. Click Browse.

    This displays the Warehouse Builder Navigation Pages. You can then navigate around your repository and find the item to report on.

  3. Select the Reports tab to display the available reports for that item.

  4. Select the view link to view the report.

About Warehouse Builder Reports

When you first install or upgrade Warehouse Builder, you can use the Warehouse Builder Browser Assistant to set up your Warehouse Builder Browser. You can either run this wizard during your installation process, or defer it to a later time. See the Warehouse Builder Installation Guide for instructions on how to use this wizard.

After Warehouse Builder Browser is installed, you can add the Warehouse Builder portlets to your Portal home page. You can run Metadata reports using the Browser from either the Warehouse Builder client or Oracle Portal.


Note:

In order to use the Warehouse Builder Browser you must have access to an Oracle Portal site with the Warehouse Builder Browser portlet installed. For more information about installing the Warehouse Builder Browser portlet, see the Warehouse Builder Installation Guide.


Available Warehouse Builder Reports

Warehouse Builder provides a set of standard metadata reports. Use these pre-built reports to examine your metadata. The following types of reports are available:

Summary Reports

Summary Reports are run against a module. Each Summary Report presents a list of items contained within the module. The type of items displayed is determined by the Summary Report you select. For example, a Table Summary Report lists all tables in the module. A Materialized View Summary Report lists all Materialized Views in the module. Header information that identifies the module also displays. Selecting the name of an item displays the Detailed Report for that item.

Available Summary Reports for a Module include:

Business Area Summary Report

Dimension Summary Report

Fact Summary Report

File Summary Report

Function Library Summary Report

Materialized View Summary Report

Sequence Summary Report

Table Summary Report

Transform Map Summary Report

View Summary Report

Figure 12-15 show a section from a Dimension Summary Report.
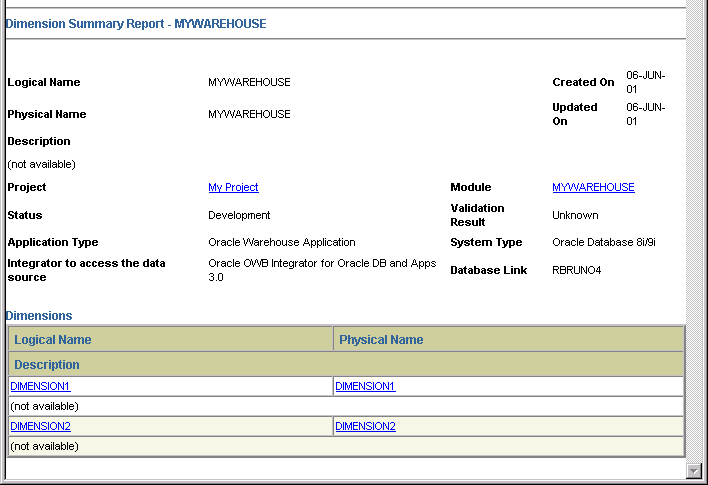
Figure 12-15 Dimension Summary Report

Text description of sum_rpt.gif follows.

Text description of the illustration sum_rpt.gif

Detailed Reports

Detailed reports provide comprehensive information about an item. For example, a Detailed Table Report will list information about the table columns, keys, foreign keys and physical configuration parameters. Table 12-1 list the Detailed Reports and their contents.

Table 12-1 Detailed Reports  
Report Contents

Detailed Installation Report

Projects

Detailed Project Report

Modules and Business Areas

Detailed Module Report

Facts, Dimensions, Function Libraries, Materialized Views, Sequences, Tables, Views, Transform Maps, Files and physical configuration parameters

Detailed Dimension Report

Hierarchies, Levels, Level Attributes and physical configuration parameters

Detailed Fact Report

Measures, Dimensions and physical configuration parameters

Detailed Table Report

Columns, Keys, Foreign Keys and physical configuration parameters

Detailed View Report

Columns, Keys, Foreign Keys and physical configuration parameters

Detailed Materialized View Report

Columns, Keys, Foreign Keys, and physical configuration parameters

Detailed Sequence Report

Columns and physical configuration parameters

Detailed File Report

Records and physical configuration parameters

Detailed Record Report

Fields

Detailed Business Area Report

Items in the Business Area

Detailed Function Library Report

Functions and physical configuration parameters

Detailed Function Report

Parameters and Function Implementations

Detailed Transform Map Report

Object Uses, Map Components, Item Maps and physical configuration parameters

Figure 12-16 shows a section from a Detailed Fact report.
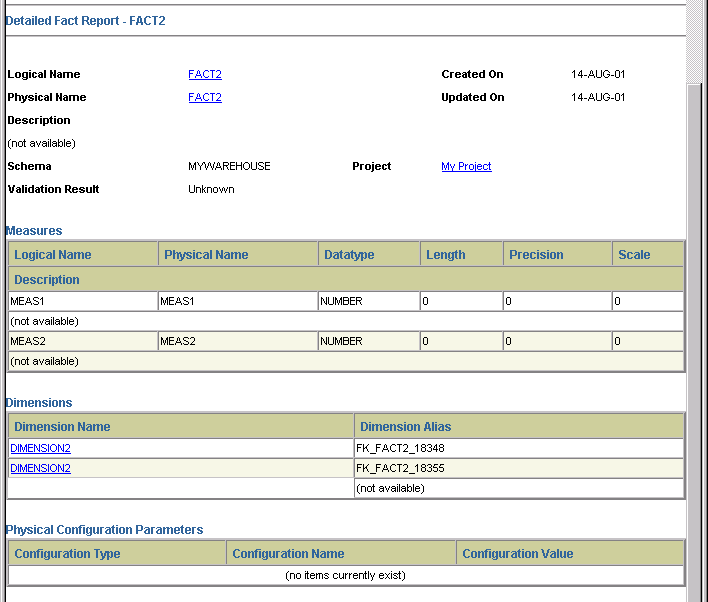
Figure 12-16 Detailed Fact Report

Text description of det_fat_.gif follows.

Text description of the illustration det_fat_.gif

Implementation Reports

Implementation Reports can be run on Dimensions and Facts. They provide information on how physical objects are used to implement logical objects. Table 12-2 lists the available Implementation Reports.

Table 12-2 Implementation Reports  
Report Content

Fact Implementation Report

Tables that implement the Fact, Columns that implement the Measures, Foreign Keys that implement the Fact to Dimension Use

Dimension Implementation Report

Levels and the tables that implement them, Level Attributes and the Columns that implement them

Lineage and Impact Analysis Reports

Lineage and Impact Analysis Reports are available for Facts, Dimensions, Materialized Views, Tables, Views, and Records. These reports should not be confused with the Lineage and Impact Analysis Diagrams.

Impact Analysis Reports

Impact Analysis Reports list all items belonging to the subject of the report that are used as a source of a mapping. The name of the mapping and the name of the item that it is mapped to is also displayed. The report gives a one step impact analysis for all items related to the selected item.

For example, if you list all the columns in a table that is used as a source in any maps, use this report.

Lineage Reports

Lineage Reports are similar to Impact Analysis Reports. They list items that are the targets of a map.

Figure 12-17 shows a section from an Impact Analysis report.
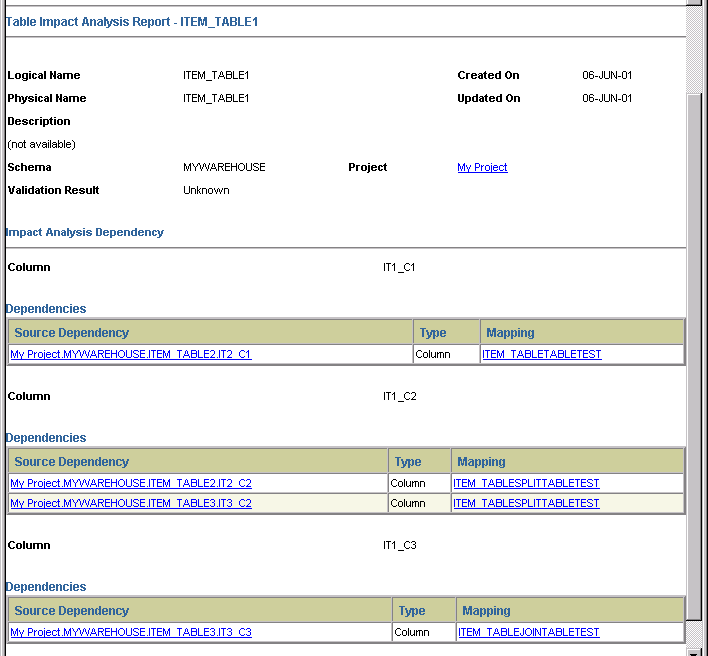
Figure 12-17 Impact Analysis Report

Text description of ia_rpt.gif follows.

Text description of the illustration ia_rpt.gif

Lineage and Impact Analysis Diagrams

A Lineage Diagram graphically displays all the objects and transformations that are used to make up the subject of the Diagram. Lineage can be performed at either the object level or the item level. At the Object Level, the diagram can contain Tables, Views, Materialized Views, Dimensions, Facts, Records, and Operators. At the item level the diagram can contain Columns, Measures, Fields, Operator Parameters, and Level Attributes.

The Lineage Diagram is displayed with the subject on the right side of the screen.

An Impact Analysis Diagram is identical except it shows all objects and transformations that might be affected by a change to the subject. The subject is displayed on the left side of the screen.

Figure 12-18 shows an example of an Impact Analysis Diagram.
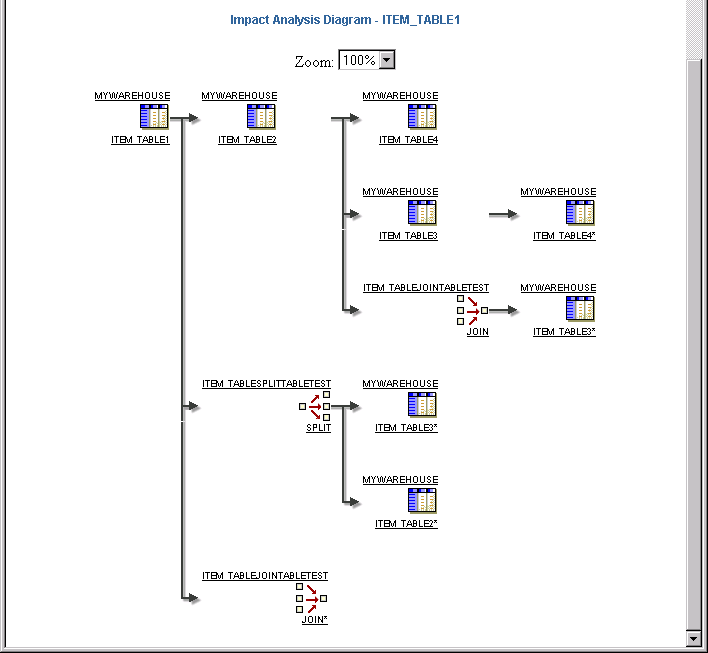
Figure 12-18 Impact Analysis Diagram

Text description of ia_dgrm.gif follows.

Text description of the illustration ia_dgrm.gif

Lineage and Impact Analysis diagrams are created based on a Dependency Index. In order for the data displayed in the diagram to be current, the index must be refreshed. For more information, see "Managing the Dependency Index".

Using Warehouse Builder Browser

Use Warehouse Builder Browser to browse metadata reports and search for specific information by using the various functions of the pages including:

Navigating the Warehouse Builder Browser

You can navigate the Warehouse Builder Browser in many ways. The main type of page is the Navigator page that includes the following parts:
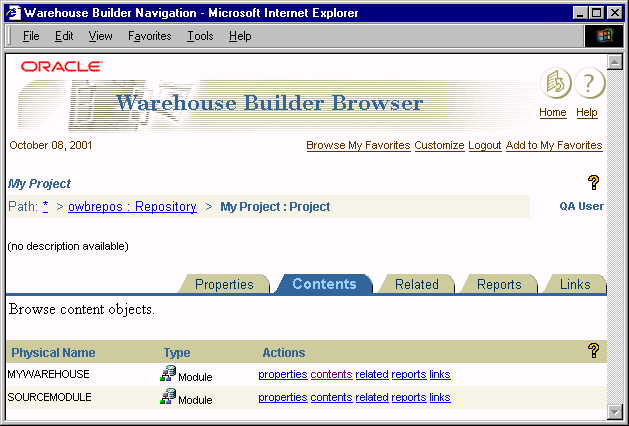
Figure 12-19 Warehouse Builder Navigator

. Text description of nvgtr.gif follows.

Text description of the illustration nvgtr.gif

General Page Information

The top of every Warehouse Builder Browser page defines the type of page you are looking at and has links to other common pages.

Figure 12-20 Navigator Header

Text description of nav_head.gif follows.

Text description of the illustration nav_head.gif

The header contains the following:

Current Item Information

The center of the Navigator contains the current item definition and provides information to identify the item and its type.

Figure 12-21 Item Definition

Text description of nav_item.gif follows.

Text description of the illustration nav_item.gif

The current item information section contains the following:

Properties Tab

The Properties tab displays property name-value pairs for the current item. The property names are different depending on the type of the current item.
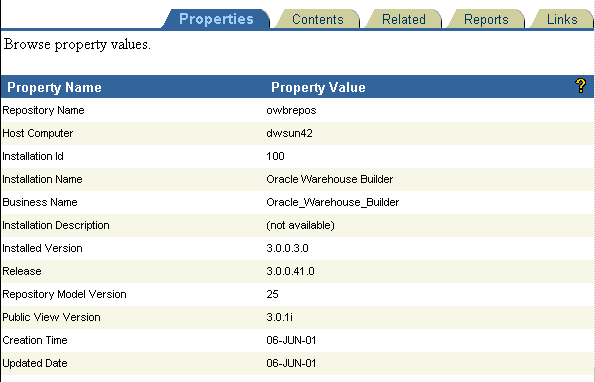
Figure 12-22 Properties Tab

Text description of prop.gif follows.

Text description of the illustration prop.gif

Table 12-3 Property Column Values
Column Name Value

Property Name

The name of the property as defined in the Warehouse Builder Public Views. For more details on the Public views, see "Creating Other Custom Reports".

Property Value

The value of the property from the Warehouse Builder repository for the current item.

Contents Tab

The Contents tab lists the items that the current item contains. For example, if the current item is a table, then the Contents tab lists the columns, keys, and foreign keys. Use this tab when you drill down into the Warehouse Builder repository. In Figure 12-23, the current item is the Warehouse Builder repository and the list of items that the repository contains. Table 12-4 lists the columns in the Contents tab and brief descriptions of their values.

Figure 12-23 Contents Tab

Text description of contents.gif follows.

Text description of the illustration contents.gif

Table 12-4 Contents Column Values  
Column Name Value

Name

The name of the item.

Type

An icon showing a graphical representation of the item type along with the item type.

Actions

A set of links that go to the tab named on the link for the current item.

  • Properties: Selecting this makes the item on that row the current item and goes to the Properties tab for that item.

  • Contents: Selecting this makes the item on that row the current item and goes to the Contents tab for that item.

  • Related: Selecting this makes the item on that row the current item and goes to the Related tab for that item.

  • Reports: Selecting this makes the item on that row the current item and goes to the Reports tab for that item.

  • Links: Selecting this makes the item on that row the current item and goes to the Links tab for that item.

Related Tab

The Related tab allows you to view relationships between items. For example, if the current item is a table, then you can identify tables related by foreign keys. You can use this tab to drill down into items in the repository. When you make one of these items the current item, the path switches to represent the path of the new item.

Figure 12-24 shows the foreign key associations with a table. Table 12-5 lists the columns in the Related tab and brief descriptions of their values.

Figure 12-24 Related Tab

Text description of related.gif follows.

Text description of the illustration related.gif

Table 12-5 Related Column Values  
Column Name Value

Name

The name of the item.

Type

An icon showing a graphical representation of the item type along with the item type name.

Actions

A set of links that go to the tab named on the link for the current item.

  • Properties: Selecting this makes the item on that row the current item and goes to the Properties tab for that item.

  • Contents: Selecting this makes the item on that row the current item and goes to the Contents tab for that item.

  • Related: Selecting this makes the item on that row the current item and goes to the Related tab for that item.

  • Reports: Selecting this makes the item on that row the current item and goes to the Reports tab for that item.

  • Links: Selecting this makes the item on that row the current item and goes to the Links tab for that item.

Reports Tab

The Reports tab shows you the available reports for the current item. Each role has its own set of reports available for each item type. A Warehouse User sees a different set of reports than a Warehouse Engineer. Table 12-6 lists the columns in the Reports tab with brief descriptions of their values.
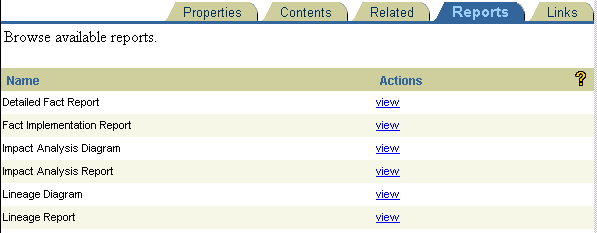
Figure 12-25 Reports Tab

Text description of reports.gif follows.

Text description of the illustration reports.gif

Table 12-6 Reports Column Values  
Column Name Value

Name

The name of the report.

Actions

View: Displays the report.

Links Tab

The Links tab allows you to associate other sources of information with an object or type of object. You can link to anything that can be described with a URL, such as documents stored in Oracle Portal content areas or other web pages.

Figure 12-26 Links Tab

Text description of lnks1.gif follows.

Text description of the illustration lnks1.gif

Use the Customize link on the Links tab to:

To edit a link:

  1. Navigate to the object or object type that the link is associated with and select the Links tab.

  2. From the Links tab, select Customize.

    The Customize Warehouse Builder Links page displays the Existing Links.
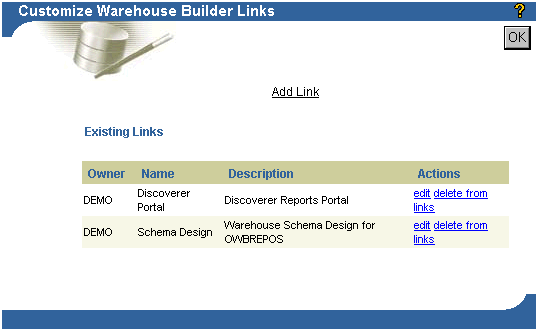
Figure 12-27 Customize Warehouse Builder Links Page

Text description of lnks2.gif follows.

Text description of the illustration lnks2.gif

  1. Select edit for the link you want to edit.

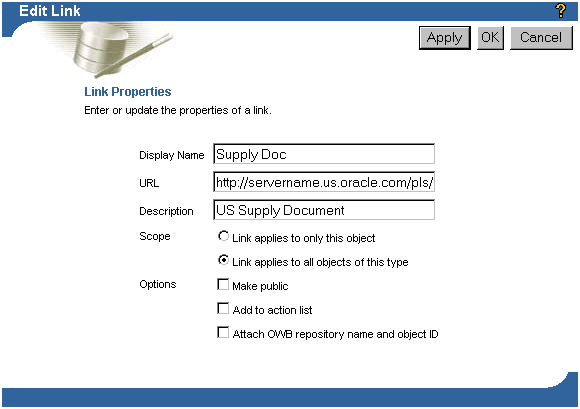
    The Edit Link page displays the current link settings.

Figure 12-28 Edit Link Page

Text description of editlnk.gif follows.

Text description of the illustration editlnk.gif

  1. Edit the link properties and click OK.

To delete a link:

  1. Navigate to the object or object type that the link is associated with and select the Links tab.

  2. From the Links tab, select Customize.

    The Customize Warehouse Builder Links page displays the Existing Links.
  3. Select delete from links for the link you want to delete.

    The link is deleted and the Customize Warehouse Builder Links page displays without the deleted link in the list of existing links.

  4. Click OK to go back to the Links tab.

To add a link:

  1. Navigate to the object, or object type that you want the new link associated with and select the Links tab.

  2. From the Links tab, select Customize.

    The Customize Warehouse Builder Links page displays the Existing Links.

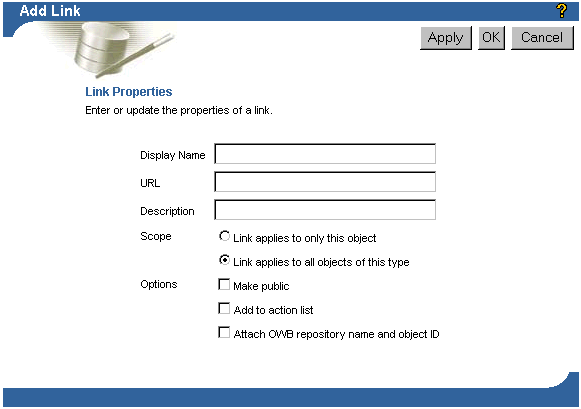
  3. Select Add Link.

    The Add Link page displays.

Figure 12-29 Add Link Page

Text description of lnks3.gif follows.

Text description of the illustration lnks3.gif

  1. Specify the link properties using Table 12-7and click OK.

    Table 12-7 Link Properties  
    Field Description

    Display Name

    Type a name for the link.

    URL

    For an external web site, provide the complete URL.

    For files that are in an Oracle Portal content area, use the Oracle Portal Navigator to reach the content area where the file is listed. Right-click on the file and copy the URL location. Then return to the Add Link page and paste the URL into the URL field.

    Description

    Type a description for the link.

    Scope

    Choose one of the options:

    • Link applies to only this object: For example, if the current item is the Customer Table, this option makes this link available to only the Customer Table.

    • Link applies to all objects of this type: For example, if the the current item is the Customer Table, this option makes this link available to all tables.

    Options

    Choose from the following options:

    • Make Public: Select this option if you want other users to access this link.

    • Add to action list: Select this option to add a link on the Contents tab for the current item.

    • Attach Warehouse Builder repository name and object ID: Select this option to attach the Warehouse Builder repository name and object ID to the link.

Browsing Favorites

Selecting the Browse My Favorites link goes to your Warehouse Builder Favorites page. Every navigation page and every report has an Add to My Favorites link on the top right corner. When you select this link, a link to the current report or Navigation page is added to your Favorites list. You can also use the features on the Favorites pages to delete items from the list and to change the formatting of the list.

The Favorites Page consists of the following:
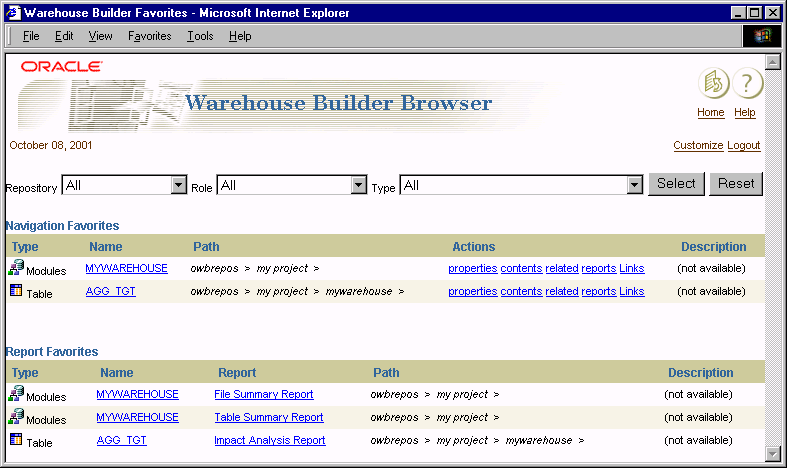
Figure 12-30 Warehouse Builder Favorites Page

Text description of favoritd.gif follows.

Text description of the illustration favoritd.gif

General Page Information

The top of every Warehouse Builder Browser page has a header that defines the type of page you are looking at, and has links to your default home page, your Favorites customization page, and log out.

If you want to customize your Favorites page, select the Customize link. For details about customizing your page, see "Customizing Your Favorites Page".

Filter

You can narrow down the content of the two Favorite tables by selecting a particular Repository, Role, or Item Type. Each of these Items has an All option.

Figure 12-31 Favorites Filter

Text description of favorite.gif follows.

Text description of the illustration favorite.gif

Navigation Favorites

This list contains items added from the Navigation pages. The table contains these columns:

Figure 12-32 Navigation Favorites

Text description of favoritb.gif follows.

Text description of the illustration favoritb.gif

Reports Favorites

This list contains items added from the Report pages. The table contains these columns:

Figure 12-33 Reports Favorites

Text description of favorita.gif follows.

Text description of the illustration favorita.gif

Customizing Your Favorites Page

To customize your favorites page, click the Customize link in the Warehouse Builder Favorites header. Table 12-6 lists the available actions and brief descriptions.
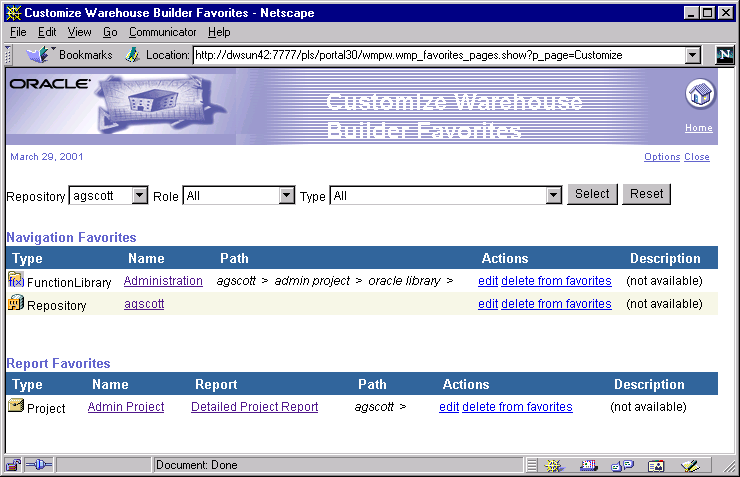
Figure 12-34 Customize Favorites Page

Text description of favoritc.gif follows.

Text description of the illustration favoritc.gif

Table 12-8 Customization Actions 
Action Description

Edit

Use the Edit action to enter a description for a favorite. The description appears as a column in the Favorites list.

Choose OK or Cancel to return to the Customize Page.

Delete from Favorites

Use this action to remove an entry from the Favorites table. It does not remove the item from the Warehouse Builder Repository.

Selecting the Options link on the Favorites Customize page goes to the Customize Display Options page. Use this page to change the layout of your favorites on the Favorites page.
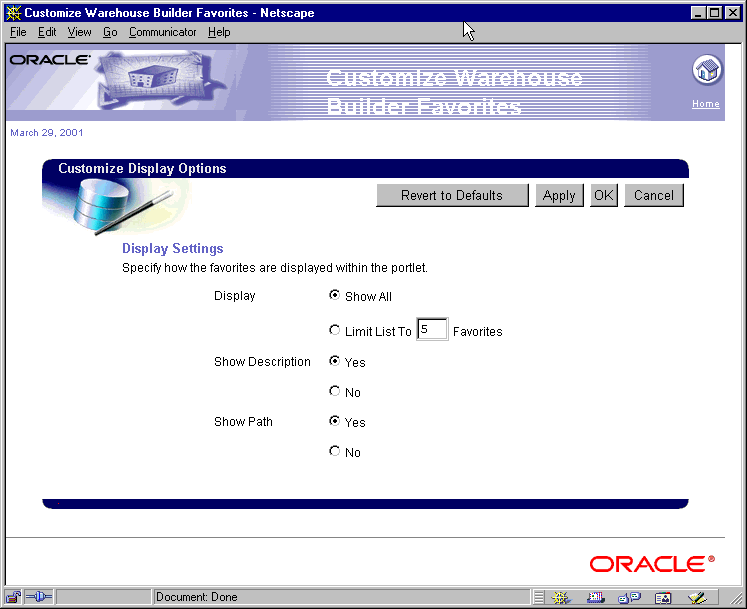
Figure 12-35 Favorites Customize Display Options Page

Text description of cust_dis.gif follows.

Text description of the illustration cust_dis.gif

This page contains the following options:

Creating Custom Reports

You can create custom reports on your metadata using the Warehouse Builder Public Views. These views provide access to your metadata repository tables and report on your data definitions, transformations, and deployment areas. You can use the Warehouse Builder Browser or another reporting tool to view the reports.

To create a custom report that can be viewed in the Warehouse Builder Browser, follow the steps in these sections:

Creating a Custom Report

To create a custom report:

  1. Log on to Oracle Portal and select the Database Objects tab from the Navigator page.

  2. Find the schema where the Warehouse Builder Browser is loaded, and edit the schema details to ensure that the Application Schema check box is selected.

  3. Select the Applications tab, and click on the Create New Application link.

  4. Create a new application and click OK.

  5. Select the application you just created and select the Create New Report link.

  6. Select the Report from SQL Query link from the page that displays next.

  7. Type the report name and display name and click Next.

  8. Type the SQL query to define the report and click Finish.

Click Next to continue to pages where you can customize the appearance of the report. To customize the report at a later time, select the Edit action.

Your SQL queries must reference a database link to the Warehouse Builder repository. You can use the default_owb_link created during the Warehouse Builder Browser installation. The SQL query for a report can only call PUBLIC database link or links within the application schema where a report resides.

Although Reports can reside in a schema other than Warehouse Builder Browser schema. The report must be executable by the Warehouse Builder Browser schema. To grant execution privilege for a portal report, go to Oracle Portal Home Page > Database Objects > Database Schemas > Report Schema > Report Package > Grant Access.

The following query provides a simple project report that lists the information systems it contains:

select * from all_iv_information_systems@default_owb_link where project_id = :id

When run from the Warehouse Builder Browser Navigation pages, the marker :id is automatically substituted with the appropriate value.

Verify that the report can be run in the following environments:

Registering a Custom Report

To register a custom report with the Warehouse Builder Browser:

  1. From the launcher portlet, click the Administer Warehouse Builder Browser link, and then select the Register a Custom Report link.

  2. Select the type and repository from the drop-down lists.

  3. Enter a display name for the report.

  4. Enter the qualified package name for the report in the format <schema>.<package>. The package name is displayed on the Develop page for the report.

  5. Click OK.

    The report appears in the resource list of the administration page.

Adding a Custom Report to a Role

To add a custom report to a Warehouse Builder Browser role:

  1. Click the roles action link from the resource list entry for the custom report.

  2. Click the add action link for each role that you want to access the report.

Viewing a Custom Report

To view a custom report from the Warehouse Builder Browser:

  1. Log on to the Warehouse Builder Browser, select the role that has access to the report, and click Browse.

  2. Navigate to an instance of the report type and select the Reports tab.

  3. The custom report appears in the reports list. Select the view action link.

    The report displays.

Creating Other Custom Reports

Use the tables below to determine which Public Views to report from. Table 12-9 lists repository object types and their associated public views. Table 12-10 lists runtime object types and their associated views. For detailed information on each view, including what objects they contain, see Appendix G, "OWB Public View Tables Management".

Table 12-9 Repository Object Types and Associated Views  
Object Type Views

Folder

ALL_IV_INFORMATION_SYSTEMS

ALL_IV_INSTALLATIONS

ALL_IV_PROJECTS, ALL_IV_SCHEMAS

ALL_IV_FILES

Project

ALL_IV_PROJECTS

Module

ALL_IV_INFORMATION_SYSTEMS

Dimension

ALL_IV_DIMENSIONS

    Level

ALL_IV_DIM_LEVELS

    Level Attribute

ALL_IV_DIM_LEVEL_ATTRIBUTES

    Hierarchies

ALL_IV_DIM_HIERARCHIES

ALL_IV_DIM_HIERARCHY_LEVELS

    Foreign Keys

ALL_IV_DIM_IMPLS

ALL_IV_KEYS

ALL_IV_FOREIGN_KEYS

    Unique Keys

ALL_IV_DIM_IMPLS

ALL_IV_KEYS

ALL_IV_FOREIGN_KEYS

    Key Column

ALL_IV_KEY_COLUMN_USES

ALL_IV_COLUMNS

    Configurations

ALL_IV_OBJECT_CONFIGURATIONS

Fact (Cube)

ALL_IV_CUBES

    Fact Attribute

ALL_IV_CUBE_MEASURES

    Foreign Keys

ALL_IV_CUBE_IMPLS

ALL_IV_KEYS

ALL_IV_FOREIGN_KEYS

ALL_IV_CUBE_MEASURE_DIM_USES

    Unique Keys

ALL_IV_DIM_IMPLS

ALL_IV_KEYS

ALL_IV_FOREIGN_KEYS

    Key Column

ALL_IV_KEY_COLUMN_USES

ALL_IV_COLUMNS

    Configurations

ALL_IV_OBJECT_CONFIGURATIONS

Table

ALL_IV_TABLES

    Columns

ALL_IV_COLUMNS

    Foreign Keys

ALL_IV_FOREIGN_KEYS

    Unique Keys

ALL_IV_KEYS

    Key Column

ALL_IV_KEY_COLUMN_USES

ALL_IV_COLUMNS

    Configurations

    Indexes

    Partitions

ALL_IV_OBJECT_CONFIGURATIONS

View

ALL_IV_VIEWS

    Columns

ALL_IV_COLUMNS

    Foreign Keys

ALL_IV_FOREIGN_KEYS

    Unique Keys

ALL_IV_KEYS

    Key Column

ALL_IV_KEY_COLUMN_USES

ALL_IV_COLUMNS

    Configurations

ALL_IV_OBJECT_CONFIGURATIONS

Materialized View

ALL_IV_VIEWS

    Columns

ALL_IV_COLUMNS

    Foreign Keys

ALL_IV_FOREIGN_KEYS

    Unique Keys

ALL_IV_KEYS

    Key Column

ALL_IV_KEY_COLUMN_USES

ALL_IV_COLUMNS

    Configurations

    Indexes

    Partitions

ALL_IV_OBJECT_CONFIGURATIONS

Sequence

ALL_IV_SEQUENCES

    Column

ALL_IV_COLUMNS

    Configurations

ALL_IV_OBJECT_CONFIGURATIONS

File

ALL_IV_FILES

    Record

ALL_IV_RECORDS

    Field

ALL_IV_FIELDS

    Unique Key

ALL_IV_KEYS

    Configurations

ALL_IV_OBJECT_CONFIGURATIONS

Business Tree

ALL_IV_CLASSIFICATIONS

ALL_IV_CLASSIFICATION_ITEMS

    Business Area Shortcut

ALL_IV_CLASSIFICATIONS

ALL_IV_CLASSIFICATION_ITEMS

Transform Category

ALL_IV_FUNCTION_LIBRARIES

    Transforms

ALL_IV_FUNCTIONS

Transform

ALL_IV_FUNCTIONS

    Parameters

ALL_IV_FUNCTION_PARAMETERS

    Implementation

ALL_IV_FUNCTION_IMPLS

Map

ALL_IV_XFORM_MAPS

    Stage

ALL_IV_XFORM_MAP_COMPONENTS

ALL_IV_XFORM_MAP_PROPERTIES

ALL_IV_XFORM_MAP_PARAMETERS

    Data Source (DS)

ALL_IV_TABLES

ALL_IV_VIEWS

ALL_IV_MATERIALIZED_VIEWS

ALL_IV_RECORDS, ALL_IV_SEQUENCES

    DS Parameter Groups

ALL_IV_XFORM_MAP_COMPONENTS

    DS Parameters

ALL_IV_XFORM_MAP_PARAMETERS

    Data Target (DT)

ALL_IV_TABLES

ALL_IV_VIEWS

ALL_IV_MATERIALIZED_VIEWS

ALL_IV_RECORDS, ALL_IV_SEQUENCES

    DT Parameter Groups

ALL_IV_XFORM_MAP_COMPONENTS

    Operator

ALL_IV_XFORM_MAP_COMPONENTS

    Operator Parameter Groups

ALL_IV_XFORM_MAP_PARAMETERS

    Variable

ALL_IV_XFORM_MAP_COMPONENTS

    Parameter

ALL_IV_XFORM_MAP_PARAMETERS

    Configurations

ALL_IV_OBJECT_CONFIGURATIONS

Configuration Usage

ALL_IV_OBJECT_CONFIGURATIONS

    Configuration Parameters Usage

ALL_IV_OBJECT_CONFIGURATIONS

    Configuration Parameter Values

ALL_IV_OBJECT_CONFIGURATIONS

    Line

ALL_IV_OBJECT_CONFIGURATIONS

    Generated Object

ALL_IV_OBJECT_CONFIGURATIONS

Impact Analysis

ALL_IV_ALL_OBJECTS

ALL_IV_IMPACT_DEPENDENTS

ALL_IV_LINEAGE_DEPENDENTS

Table 12-10 Runtime Objects and Associated Views  
Object Type Views

    Process Runs

ALL_IV_PROCESS

ALL_IV_PROCESS_RUN

    Audit Detail

ALL_IV_MAP_RUN

ALL_IV_RUN_TARGET

    Audit Error Log

ALL_IV_RUN_ERROR

Table 12-10 lists the Public Runtime Views.

Using the Administration Pages

From the Oracle Portal Home page, select the Administer Warehouse Builder Browser link to access the Warehouse Builder Administration pages.

Figure 12-36 Warehouse Builder Administration Portlet

Text description of admn_por.gif follows.

Text description of the illustration admn_por.gif

Figure 12-37 Warehouse Builder Launcher Portlet

Text description of laun_por.gif follows.

Text description of the illustration laun_por.gif

The Warehouse Builder Administration pages can only be accessed if your Oracle Portal user name has full administrator privileges.

The Administration page contains the following administration actions:

Registering a Warehouse Builder Repository

Before you can report on metadata in a repository, that repository must be registered with the Warehouse Builder Browser. Registrations creates the link to the repository.


Note:

When you register a Warehouse Builder repository, the database link to that repository must already exist. If it does not, you must create one. Skip to Administering Database Links to create a database link before continuing.


To register a Warehouse Builder Repository:
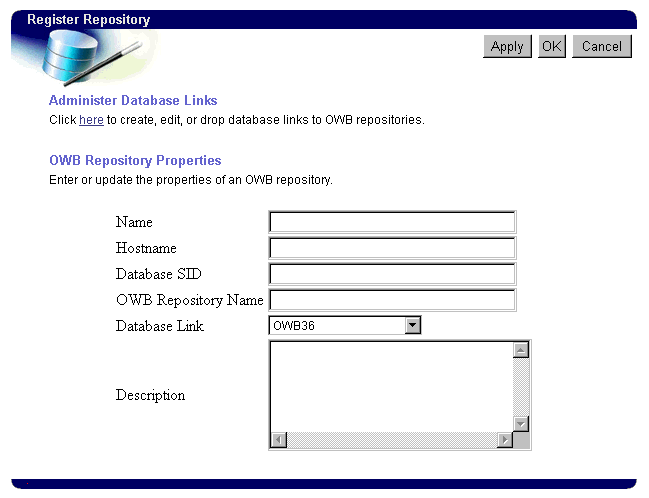
  1. Click Register an OWB Repository on the Warehouse Builder Administration home page. This goes to the Register Repository page.

Figure 12-38 Register Repository Page

Text description of reg_rep.gif follows.

Text description of the illustration reg_rep.gif

  1. Specify the Warehouse Builder repository properties. Table 12-11 lists the properties.

    Table 12-11 Warehouse Builder Repository Properties  
    Field Description

    Name

    The user-defined name to identify the repository in the browser system. This name is displayed in the navigation pages.

    Host Name

    The name of the server machine for the repository.

    Note: If you used the default host name LocalHost when you ran the Repository Assistant, enter LocalHost here even if Oracle Portal is running from another machine.

    Database SID

    The SID of the repository database.

    OWB Repository Name

    The name of the repository schema.

    Database Link

    The name of the database link used to access the repository. The link must already be created using the Administer Database Links page. This field must be specified even if the repository is in the same database as the browser system.

    Description

    The user-defined descriptive text. This appears in the navigation pages for the repository.

  1. Click Apply to register the repository.

  2. Click OK.

    The repository displays in the Warehouse Builder Administration home page.

Administering Database Links

You can create, view, edit, or drop database links to Warehouse Builder repositories from the Administer Database Links page. This section describes each of these actions.
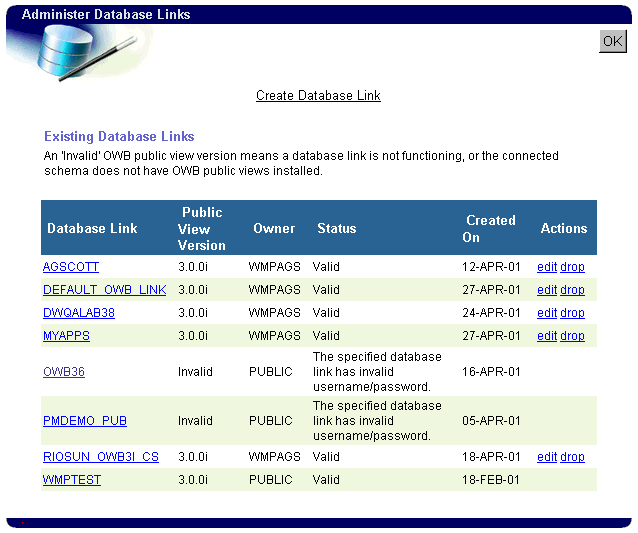
Figure 12-39 Administer Database Links Page

Text description of admin_db.gif follows.

Text description of the illustration admin_db.gif

To create a database link:

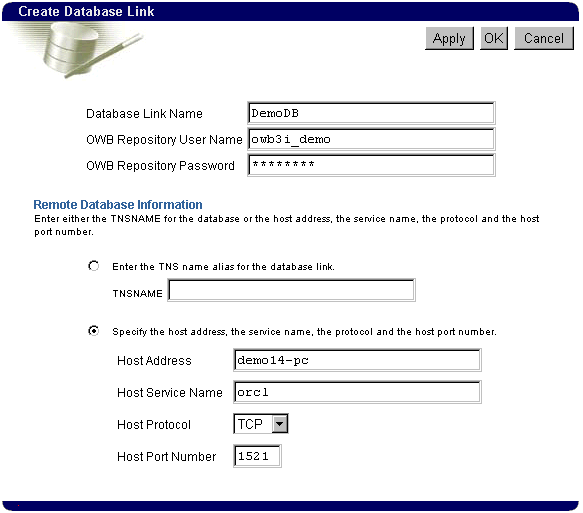
  1. Select Create Database Link from the Administer Database Links page.

Figure 12-40 Create Database Links Page

Text description of crt_db_l.gif follows.

Text description of the illustration crt_db_l.gif

  1. Specify the database link name.

  2. Specify the Warehouse Builder repository user name and password.

  3. Specify the remote database information. You can either:

    • Enter the TNS name for the database.

    • Enter the host address, service name, protocol, and host port number.

  4. Click Apply to connect the link.

  5. Click OK.

    The new link displays on the Administer Database Links page.

To view a database link:

  1. Select the name of the database link from the Administer Database Links page.

    The View Database Link page displays with a detailed report on the database link you selected.

Figure 12-41 View Database Link Page

Text description of v_db_lnk.gif follows.

Text description of the illustration v_db_lnk.gif

  1. Click OK.

    The browser returns to the Administer Database Links page.

To edit a database link:

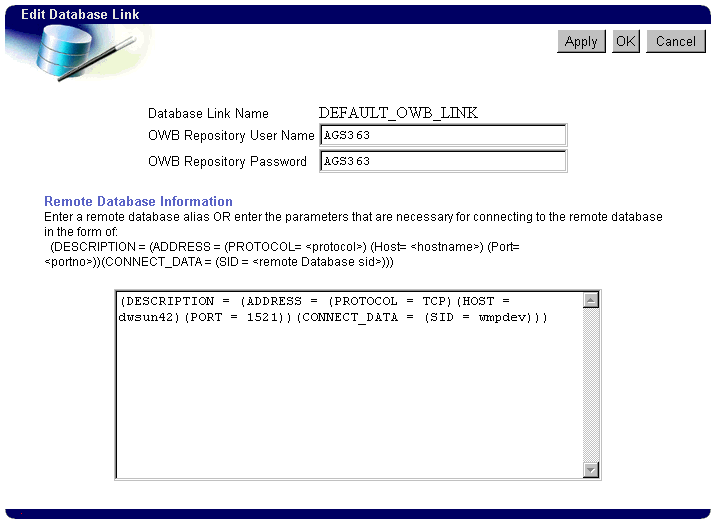
  1. From the Administer Database Links page, select edit for the database link you want to alter. The edit link is under the Actions column.

    The Edit Database Link page displays.

Figure 12-42 Edit Database Link Page

Text description of ed_db_ln.gif follows.

Text description of the illustration ed_db_ln.gif

  1. Edit the database link and click Apply.

  2. Click OK.

To drop a database link:

.


Note:

Dropping a database link deletes it permanently. You must create a new link to use it again.


  1. If the database link has been used to register Warehouse Builder repositories, unregister the Warehouse Builder repositories.

  2. From the Administer Database Links page, select drop for the database link you want to drop. The drop link is under the Actions column.

    The database link is dropped and the browser returns to the Administer Database Links page.

Unregistering a Repository

To unregister a Repository:

  1. Select the Administer Warehouse Builder Browser link from the Browser home page.

    The Warehouse Builder Administration page displays with the registered repositories listed in the table at the bottom of the page.

Figure 12-43 Registered Repositories and Roles

Text description of unreg.gif follows.

Text description of the illustration unreg.gif

  1. Select the repository to unregister and click on the unregister link.

    The repository is unregistered and no longer appears in the list of registered repositories. You can no longer browse it using the Browser.

Registering a Custom Report

A custom report is an application component created using the Oracle Portal facilities. Registration of the report provides the browser system with the information required to invoke the report. For more information, see "Creating Custom Reports".

To register a custom report:
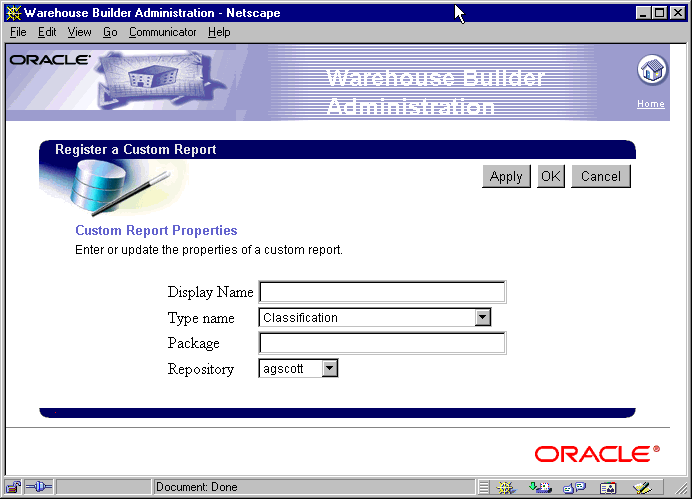
  1. Select Register a Custom Report from the Warehouse Builder Administration page. The Register a Custom Report page displays.

Figure 12-44 Register Custom Report Page

Text description of reg_cust.gif follows.

Text description of the illustration reg_cust.gif

  1. Enter the report properties. Table 12-12 lists the custom report properties.

    Table 12-12 Custom Report Properties
    Field Description

    Display Name

    This is the name of the report which is seen in the reports list page.

    Type Name

    This is the name of the data type reported on by this report.

    Package

    This is the full name of the PL/SQL package which implements this report.

    Repository

    This is the name of the repository containing target objects for this report.

  1. Click Apply or OK to complete the registration.

Purging Stale User Information

If you add users through the Warehouse Builder Browser and remove them through Oracle Portal, the user information remains in the Access pages of the Warehouse Builder Browser. Use the Purge Stale User Information link to remove these users and groups.


Note:

When you click Purge Stale User Information, the information is purged. No confirmation message displays.


Resource Management

The Resource Management page contains a table listing all resources that have been registered in the Warehouse Builder Browser. The following sections describe how to modify these resources.
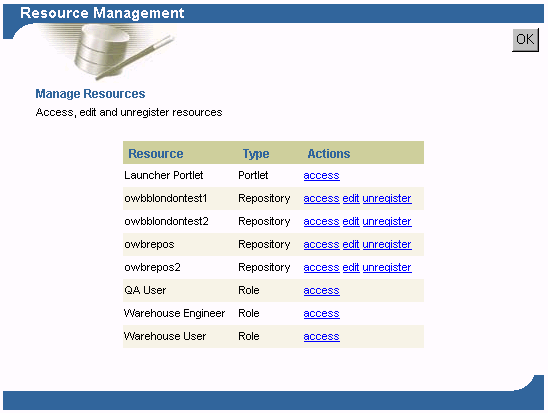
Figure 12-45 Resource Management

Text description of rscrc_mn.gif follows.

Text description of the illustration rscrc_mn.gif

Table 12-13 lists the types of resources.

Table 12-13 Browser Resources  
Resource Type Description

Portlet

A portlet provided by the browser system. The Launcher portlet provides access to repository navigation, reporting, favorites, and administration.

Repository

Warehouse Builder Repository that can be browsed using the Warehouse Builder Browser.

Role

A view of the data in a Warehouse Builder Repository. For more information, see "Understanding Roles".

Custom Report

A custom report on a Warehouse Builder repository object.

Managing Portlet Access

Use the Portlet Access pages to grant and revoke access to Warehouse Builder portlets. The users and groups that have access are listed under Change Access.
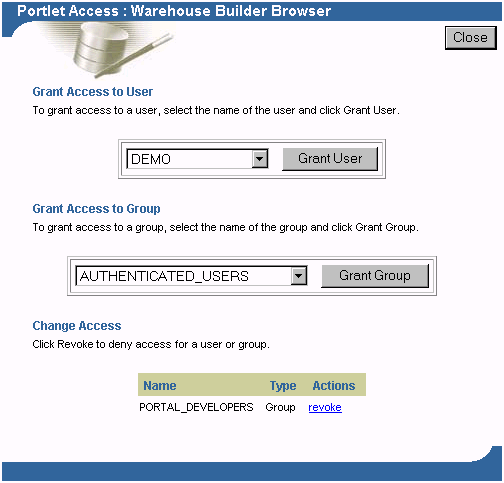
Figure 12-46 Portlet Access

Text description of port_aca.gif follows.

Text description of the illustration port_aca.gif

From the Portlet Access page, you can:

Managing Repositories

The Resource Management page lists all registered repositories. The actions listed next to the repository are described in Table 12-14.

Table 12-14 Repository Management
Actions Description

Access

Use this to grant or revoke repository access privileges to the users.

Edit

Use this to edit repository properties.

Unregister

Use this to unregister the repository. After unregistration, the repository can no longer be browsed using the browser system. You must re-register the repository if you want to browse it again.

Managing Custom Reports

The Resource Management page lists all registered custom reports. The actions listed next to the repository are described in Table 12-15.

Table 12-15 Custom Report Management
Actions Description

Role

Use this to assign a report to one or more roles. When the report is assigned to a role, it appears in the appropriate report list for that role.

Edit

Use this to edit custom report properties.

Unregister

Use this to unregister the report. After unregistration, the report can no longer be browsed using the browser system.

Assigning a custom report to a role adds the report to the appropriate report list page for that role. The name and subject type of the report are indicated at the top left corner of the page. A list of the available roles is provided in the table at the bottom of the page.

Understanding Roles

In order to browse the Warehouse Builder Repository, choose one of the pre-defined roles:

The Administrator can assign these roles to users and groups. All of the pre-defined Reports and Navigation pages are available to all roles. When you add custom reports or register repositories, you can assign them to different roles.

For the QA User role, objects that fail validation display an error icon in the Contents tab of the Navigation page.
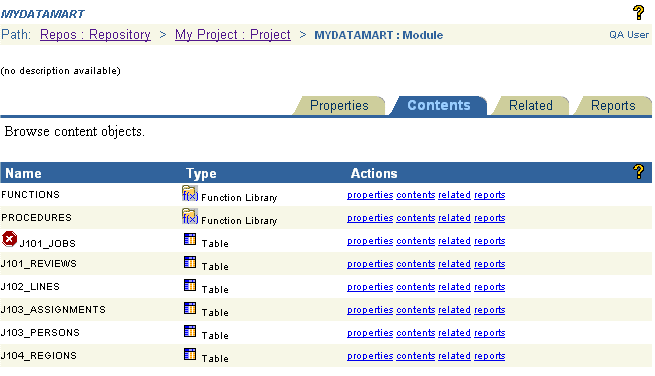
Figure 12-47 Validation Error

Text description of qavalida.gif follows.

Text description of the illustration qavalida.gif

Managing Preferences

Use the Manage Preferences page to save and load Warehouse Builder Browser preferences. This lets you retain your preferences when you upgrade to a new version of Warehouse Builder Browser. You can copy schema preferences across schemas.

The preferences you can save include:
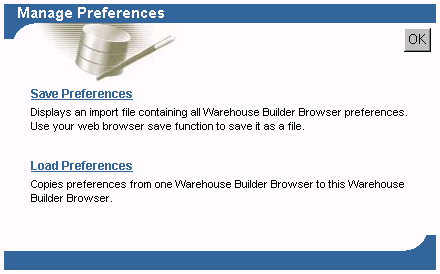
Figure 12-48 Manage Preferences Page

Text description of mng_pref.gif follows.

Text description of the illustration mng_pref.gif

Saving Preferences

To save preferences to a file:

  1. Select Save Preferences from the Manage Preferences page.

    The preferences display in a separate window in text format

  2. From the browser menu bar, select File, and then Save As to save the file.

This file can be loaded into Warehouse Builder Browser using a tool such as SQL* Plus.

Loading Preferences

To load preferences from an existing schema:
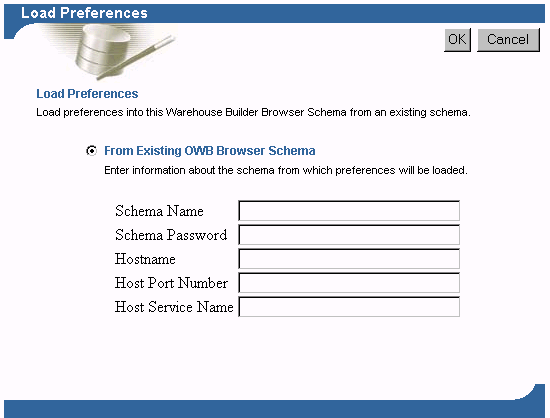
  1. Select Load Preferences from the Manage Preferences page.

Figure 12-49 Load Preferences Page

Text description of load_pre.gif follows.

Text description of the illustration load_pre.gif

  1. Specify the following information from an existing Warehouse Builder Browser schema:

    • Schema Name

    • Schema Password

    • Hostname

    • Host Port Number

    • Host Service Name

  2. Click OK to load the preferences into the current Warehouse Builder schema.

    A status page displays the preferences that were loaded and any errors that occurred. All errors must be resolved to load the preferences. Errors due to missing database links provide links to the Create Database Links page.


    Note:

    Database links are not automatically created. If the preferences you are loading contain references to repositories, the database links to those repositories must be created before the load can be successful.


    Managing the Dependency Index

    Use the Manage Dependency Index page to specify the refresh frequency options for the dependency index for each repository. The dependency index is used to increase performance when running lineage and impact analysis diagrams. You can refresh the dependency index at any time from the Repository page of the Warehouse Builder Navigator.

    Setting the Refresh Options

    To specify the dependency refresh option:

    1. Open the Warehouse Builder Browser, and select Manage Dependency Index from the Administration page or portlet.

      The Manage Dependency Index page displays the available repositories and refresh options.
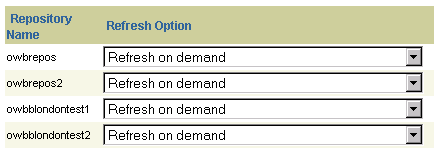
    Figure 12-50 Setting Refresh Options

    Text description of mng_di.gif follows.

    Text description of the illustration mng_di.gif

    1. Choose one of the options from the drop-down list and click OK. Table 12-16 describes each option.

      Table 12-16 Dependency Index Options
      Option Description

      Refresh on demand

      You must activate the refresh dependency index link to refresh the index. This link is located on Navigator page that lists all accessible repositories. The dependency index is only refreshed when this action link is activated.

      This is the best option when using a repository that changes infrequently.

      Refresh on first diagram request of the session

      Refreshes the dependency index when the first Lineage or Impact Analysis diagram for a repository is run during a session.

      This is the best option if you want current information, but are not concerned with repository updates that occur during the session.

      Refresh on every diagram request

      Refreshes the dependency index every time a Lineage or Impact Analysis diagram is requested.

      This is the best option if you want to display your diagrams and reports with the latest information in the repository.

    Refreshing the Dependency Index on Demand

    You can refresh the dependency index at any time. If you run a Lineage or Impact Analysis diagram that has never been refreshed, an automatic refresh occurs prior to displaying the diagram.

    To refresh the dependency index:

    1. Open the Warehouse Builder Browser from the Launcher portlet.

      The Contents tab that displays lists the available repositories.
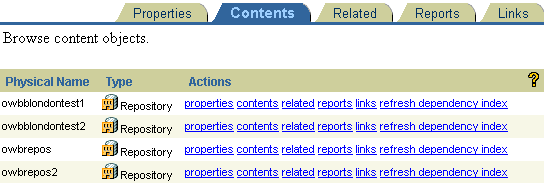
    Figure 12-51 Refreshing the Dependency Index

    Text description of rfrsh_da.gif follows.

    Text description of the illustration rfrsh_da.gif

    1. Select refresh dependency index.

      The Refresh Dependency Index page displays with a log of previous refreshes at the bottom of the page. The elapsed time helps you determine how long the operation will take.
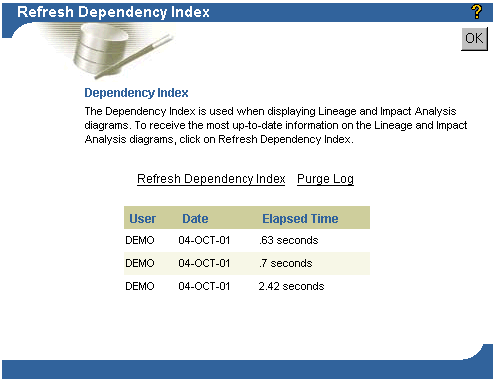
    Figure 12-52 Dependency Index Refresh Log

    Text description of rfrsh_di.gif follows.

    Text description of the illustration rfrsh_di.gif

    1. Select Refresh Dependency Index to refresh the dependency index based on the latest data in the repository.

      After the refresh is complete, the log displays the user name, date, and elapsed time of the refresh. You can purge the log by selecting Purge Log. This purges the log of the refreshes except for the last refresh.


Go to previous page Go to next page
Oracle
Copyright © 1996, 2002 Oracle Corporation.

All Rights Reserved.
Go To Documentation Library
Home
Go To Product List
Solution Area
Go To Table Of Contents
Contents
Go To Index
Index