Skip Headers

Oracle9i Warehouse Builder User's Guide
Release 2 (v9.0.2)

Part Number A95949-01
Go To Documentation Library
Home
Go To Product List
Solution Area
Go To Table Of Contents
Contents
Go To Index
Index

Go to previous page Go to next page

11
Administration

This chapter covers information relating to the repository and metadata stored within it. When you first install or upgrade Warehouse Builder, you can use the following wizards to set up Warehouse Builder:

You can either run these during the installation or upgrade, or run them later. See the Oracle9i Warehouse Builder Installation Guide for instructions.

This chapter includes the following topics:

About the Warehouse Builder Metadata Loader

Use the Warehouse Builder Metadata Loader (MDL) to export objects from a Warehouse Builder repository to a file and to import objects from a file into Warehouse Builder repository. With this method, you can move metadata into a different repository. The MDL supports the exporting and importing of different types of objects, such as tables, facts, dimensions, materialized views, mappings, transformation categories, transformations, sequences, and information belonging to the objects including columns, constraints, parameters, and named attribute sets. You can export an entire project or a subset of objects from a project. You can execute the export and import utilities using a command line in an MS-DOS window.

Using the MDL With Multiple Users

Warehouse Builder enables multiple users to access the same repository at the same time by applying locks to objects that are being modified. Locking affects metadata import. When you import metadata, Warehouse Builder applies locks to all individual objects you are importing. When the import is complete, the changes are committed.

Using the MDL with Large Files

Large MDL exports and imports can require a large amount of memory. For large exports and imports, if the default -Xmx setting of 256M in exp.bat, imp.bat, or owbclient.bat is not enough, MDL fails due to lack of memory. Increasing the -Xmx setting in the appropriate bat file can fix this problem.

When importing a large MDL file that results in a large number of updates or adds, Warehouse Builder cannot have the capacity to lock all of the objects affected depending on the Warehouse Builder repository configuration. In this case, Warehouse Builder attempts to switch to single user mode. Also, if more than 300 locks or seventeen percent of the total enqueue resources for the Warehouse Builder repository, whichever is less, are required to import an MDL data file, Warehouse Builder attempts to automatically switch to single user mode. This allows the MDL to avoid performance degradation when using a large number of locks. This also helps limit the potential of running out of enqueue resources. If the MDL switches to single user mode, no other users are able to log on to the repository until after the MDL import completes.

Run large MDL exports and imports on the database server where the Warehouse Builder repository resides in order to get the best performance.


Note:

To avoid potential loss of work, perform large imports when usage is at a minimum.


This section describes the components of the Metadata Loader:

Metadata Export Utility

The Metadata Export Utility exports objects from a Warehouse Builder repository to an operating system file. The utility can export an entire project, a set of modules, or a set of objects defined by a module. It can also export the global-shared transformation library.

Export File

The export file is a delimited character file which can be read with a text editor. Each record within the file begins with a keyword followed by one or more variable-length fields separated by a pipe (|) or caret (^). The separator character is specified when the file is exported. The pipe (|) is the default separator character.

Example 11-1 Sample Records from an Export File

#Project data <PhysicalName> <LogicalName> <UniversalID> <Version Label>
PROJECT|WarehouseName|Warehouse Name|A86184D5336911D58E9000B0D02A59E4|null
#Dimension <PhysicalName> <LogicalName> <UniversalID> <Prefix> <UsageType> <Imported> 
<Generated>
DIMENSION|Channels|Channels Dimension Data 
Mart|7E727655029911D58DC900C04F48E9ED|ch|null|N|N
Subsets of Objects

You can export all of the objects in a project or a subset of those objects. For example, you can export the entire warehouse project to a file, a few selected modules, or selected objects within a source or warehouse module.

When you export a subset of objects, the utility exports definitions for each object selected and all of that object's ancestors. For example, if you export only the dimension, the export file contains definitions for:

Table 11-1 lists the repository objects that can be exported and imported by the Metadata Loader.


Note:

If you are exporting a subset of objects, make sure you export all referenced objects and import them as well. The Metadata Import Utility allows you to import repository objects even if the object's references cannot be satisfied.


Table 11-1 Repository Objects  
Projects Modules Module Objects

Warehouse Builder Project

Source

Files

Sequences

Tables

Views

Warehouse

Business Areas

Dimensions

Facts

Mappings

Materialized Views

Sequences

Tables

Transformation Categories

Transformations

Views

Exported Values for Configuration Parameters

By default, the Metadata Export Utility exports values for configuration parameters. To override this, run the Metadata Export from the command line and include the statement CONFIGPARAM=N in the Metadata Export Utility's parameter file. For more information, see "Metadata Loader Command Line Utility".

Exporting Metadata

  1. Select the names of the objects you want to export.

    To export a project:

    • Select the project name from the Project tree view.

    • From the Project menu, select Metadata Exports and then File.

    To export a module or set of modules from a project:

    • Select the names of the module(s) to be exported from the Project tree view. Press the Control button to select multiple modules.

    • From the Project menu, select Metadata Exports and then File.

    To export a subset of objects in a module:
    • Double-click a module in the Project tree view to open the Module Editor.

    • Select the names of the objects or object types to be exported. Press the Control button to select multiple modules.

    • From the Module menu, select Metadata Export.

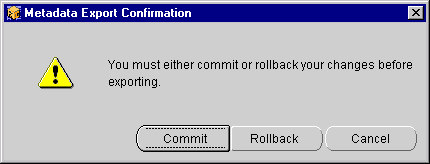
  2. If you have made any changes and you want to run the export, the Metadata Export Confirmation dialog displays. Click Commit to save any changes or Rollback to ignore changes and revert to the previously saved version.

Figure 11-1 Metadata Export Confirmation

Text description of mdexp2.gif follows.

Text description of the illustration mdexp2.gif

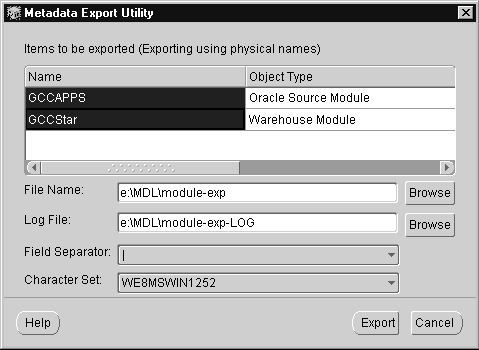
Figure 11-2 Metadata Export Utility

Text description of meuexpmo.gif follows.

Text description of the illustration meuexpmo.gif

  1. Specify the following:

    • File Name: Typethe name of the export file to create. Click Browse button to locate a directory or file.

    • Log File: Enter the name of the log file to create. The MDL writes diagnostic and statistical information to the log file. Click Browse to locate a directory or file.

    • Field Separator: Select a field separator. The MDL uses the field separator to separate the object and its attributes as shown in Example 11-1. The default is the pipe symbol (|). You can change it to a caret symbol (^) using the drop-down list.

    • Character Set: Select the character set to use in the export file. The default character set is defined by the Warehouse Builder client machine. Use the drop-down list to change the output character set.

  2. Click Export.

    The Metadata Export Progress dialog displays the progress. When the export completes, the Metadata Export Results dialog displays.
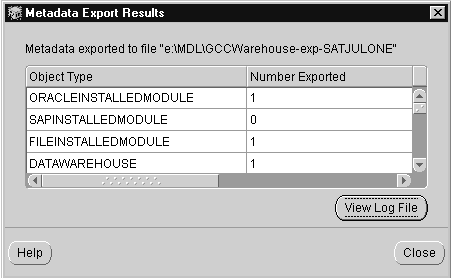
Figure 11-3 Metadata Export Results

Text description of meuexpre.gif follows.

Text description of the illustration meuexpre.gif

Metadata Import Utility

The Metadata Import Utility imports objects from an export file into a Warehouse Builder repository. The Metadata Import Utility operates in one of four modes: add, replace, add and replace, and add and merge.

Import Searching

When you use the Metadata Import Utility, it searches the repository for any repository objects that exist in the repository and in the file you are importing. There are three methods to search for objects: Universal Identifiers, Logical Names, and Physical Names.

For example, if the search is by the logical name of a repository object in the export file, the Metadata Import Utility searches the repository for the object's logical name. If the an object with the corresponding logical name is not found, the resulting actions are based on the import mode you select. Table 11-2 lists and describes the available import modes.

Table 11-2 Import Mode without Matching Logical Names  
Import Mode Result

Add Mode

A new object is created.

Replace Mode

A warning message is written to the log file that the object cannot be found to replace and the object is skipped.

Add and Replace Mode

A new object is created.

Add and Merge Mode

A new object is created.

If the Metadata Import Utility finds the logical name, the following actions result based on the import mode. Table 11-3 lists and describes the available import modes.

Table 11-3 Import Mode with Matching Logical Names  
Import Mode Result

Add Mode

A message is written to the log file that the object already exists and the object is skipped.

Replace Mode

The object is replaced.

Add and Replace Mode

The object is replaced.

Add and Merge Mode

The object is merged.

When importing using the add and replace, and replace mode, the import completely replaces the existing object's children so that the final object is exactly the same as the source object. Any children of a repository object that are not replaced or added are deleted. This occurs regardless of whether a child occurs in a mapping or is a foreign, primary, or unique key column.

For example, in the MDL export file, the CUST table contains three columns with the physical names: Last_Name, First_Name, and Middle_Init. In the Warehouse Builder repository, the same table already exists, and contains four columns with the physical names: Last_Name, First_Name, Status, and license_ID. During a replace operation, the columns Last_Name and First_Name are replaced, column Middle_Init are added, and column Status and license_ID are deleted. The final result is that the CUST table in the Warehouse Builder repository contains the same metadata from the CUST table in the export file. Table 11-4 lists examples of repository objects and children.


Note:

A replace operation can lead to malformed constraints and mapping definitions.


Table 11-4 Examples of Repository Objects and Children 
Repository Object Children

Tables, Views, Materialized Views

Columns, Foreign Keys, Unique Keys, Primary Keys, Check Constraints, Named Attributes, Configurations

Dimensions

Levels, Level Attributes, Hierarchies, Level Relationships, Columns, Foreign Keys, Unique Keys, Primary Keys, Check Constraints, Named Attributes, Configurations

Facts

Measures, Columns, Fact Foreign Keys, Segmented Unique Keys, Foreign Keys, Unique Keys, Primary Keys, Check Constraints, Named Attributes, Configurations

Transformations

Parameters, Implementations, Configurations

Files

Records, Fields, Configurations

Business Areas

Business Area Relationships

Importing Metadata

To import objects from an export file:

  1. From the Administration menu, select MetaData Import.

    The MetaData Import Utility window displays.

    If you have made any changes before starting the import, the Metadata Import Confirmation dialog displays. Click Commit to save any changes or Rollback to ignore changes and revert to the previously saved version.
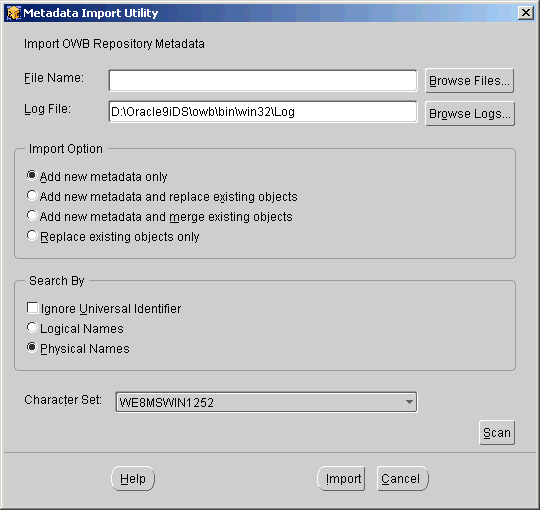
Figure 11-4 Metadata Import Utility

Text description of miupsibn.gif follows.

Text description of the illustration miupsibn.gif

  1. Specify the following:

    File Name: Type in or browse to the export file you want to import.

    Log File: Create a log file for the import. Warehouse Builder reads and processes the exported metadata and writes status and diagnostic information in the log file.

    Import Options:

    • Add new metadata only: Adds new objects to a repository. If you import a file that contains objects that already exist in your repository, they are ignored. The old objects remain unchanged.

    • Add new metadata and replace existing objects: Adds new objects to a repository and replaces existing objects.

    • Add new metadata and merge existing objects: Adds new objects and merges existing objects in your repository. This reconciles any changes you have made to your repository with changes or additions that were made elsewhere and then exported to an MDL file.

    • Replace existing objects only: Replaces existing objects in your repository.

    Search by:

      • Logical Names: Searches your repository using the logical names of the objects you are importing to make sure the objects do not already exist.

      • Physical Names: Searches your repository using the physical names of the objects you are importing to make sure the objects do not already exist

      Character Set: Select the type of character set used to create the import file. The default character set is defined by the Warehouse Builder client machine. Use the drop-down list to change the output character set.
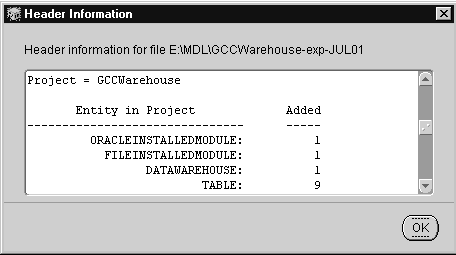
    • Click Scan to display the exported metadata header information and a summary of the total number of object types contained in the exported metadata file.

    Figure 11-5 Header Information

    Text description of miuimpsc.gif follows.

    Text description of the illustration miuimpsc.gif

    1. Click Import.

      The Metadata Import Confirmation dialog displays only if the exported metadata data information has not been reviewed.
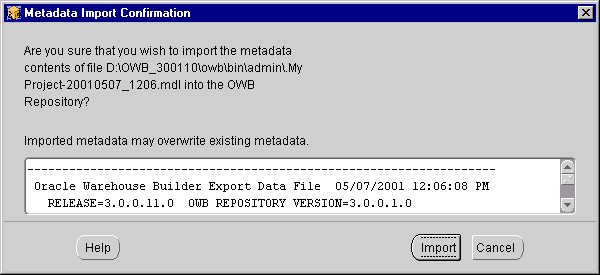
    Figure 11-6 Metadata Import Confirmation

    Text description of mdi_conf.gif follows.

    Text description of the illustration mdi_conf.gif

    1. Click Import to continue.

      The Metadata Import Progress panel displays. When the import is complete, the Metadata Import Results dialog displays.
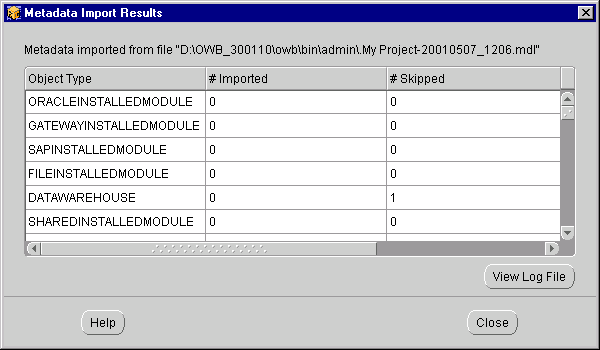
    Figure 11-7 Metadata Import Results

    Text description of mdi_rslt.gif follows.

    Text description of the illustration mdi_rslt.gif

      This dialog displays the object types and the number of each type that were imported or skipped. For a detailed view of the import process, click View Log File. This displays the entire log file.

    The Log File

      There are three types of status messages in the log file:

    • Informational: Provides information about the import or export.

    • Warning: Cautions you about the import or export of an object.

    • Error: Indicates that the MDL export or import was aborted and did not complete successfully.

    Example 11-2 displays the contents of an import log file. The import statistics display the total number of objects that have been added, replaced, and skipped.

    Example 11-2 Sample Import Log File

    Import started at 04/25/2001 4:59:46 PM 
    ******************************************************************************** 
    *  Import for OWB Release: 3.0.0.0.0   Version: 3.0.0.3.0 
    *  User: user30_3i   Connect String: epaglina-pc:1521:ora8i 
    *  Data File: d:\owb3000\sco_dim_time_phy_m_tgt.mdl 
    *  Log File: d:\owb3000\imp_dim_time_phy_m_tgt.log 
    *  Trace: B 
    *  Trace File: d:\owb3000\imp_dim_time_phy_m_tgt.trc 
    *  Physical Names: Y   Mode: CREATE 
    *  Ignore Universal Identifier: Y   Commit At End: Y 
    ******************************************************************************** 
    Informational at line 15: MDL-1207 PROJECT with physical name <PRJ_Dimension> not imported
    because it already exists. 
    Informational at line 21: MDL-1207 DATAWAREHOUSE with physical name <WH> not imported 
    because it
    already exists. 
    Informational: MDL-1134 COMMIT issued at end of import data file. 
    
    Counts for OWB Import Utility 
    ----------------------------- 
    
    Total Projects Processed by Import = 1 
    
    ------------------------------- 
    
    Project = PRJ_Dimension 
    
    Entity in Project                    Added     Replaced    Skipped 
    -------------------------------      -----     --------    ------- 
    DATAWAREHOUSE:                         0           0          1 
    DIMENSION:                             1           0          0 
    LEVEL:                                            3               0             0 
    HIERARCHY:                             2           0          0 
    LEVELRELATIONSHIP:                     4           0          0 
    COLUMN:                               18           0          0 
    UNIQUEKEY:                             8           0          0 
    PRIMARYKEY:                            2           0          0 
    CONFIGPARAM:                          60           0         60 
    CHILDCONFIG:                          14           0          0 
    
    Import ended at 04/25/2001 4:59:52 PM 
    
    Detailed Error Messages

    If you are running an MDL Import or Export and encounter an error, an error message displays.

    You can click Detail to display a detailed error log that lists the repository object and the object line that the error occurred in. This is useful for troubleshooting. In the example below, the repository object is the CUST dimension and the object is the TOTAL level.
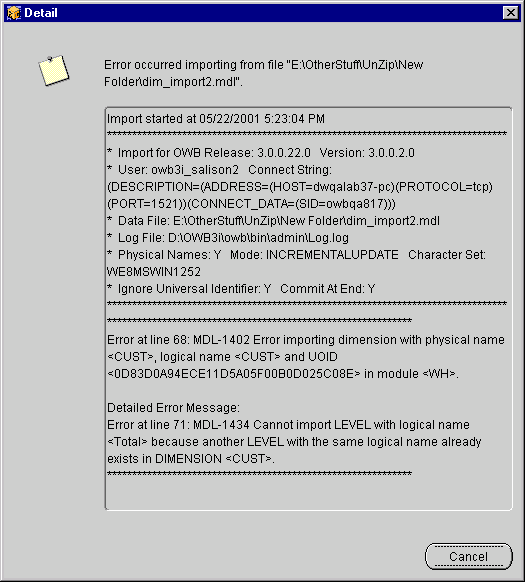
    Figure 11-8 Detailed Error Message

    Text description of det_err_.gif follows.

    Text description of the illustration det_err_.gif

    Metadata Loader Command Line Utility

    You can execute the Metadata Loader Utilities from an MS-DOS window. These two utilities allow you to disable the export of configuration values, vary the separator character within an export file, and maintain directive files for selected export operations. These operations automate the consolidation or synchronization of metadata in multiple repositories that have a similar project structure.

    The scripts for executing both the export and import utilities reside in the $OWBHOME\owb\bin\win32 directory for the Windows platform and $OWBHOME/owb/bin/solaris for UNIX platforms. Both the export and import utilities are driven by a set of directives. You can specify the directives in the following ways:

    • Provide directives as a response to command-line prompts.

    • Create a directives file.

    • Provide directives as a response to command-line prompts, and create a directives file.

    The following examples describe how to export and import Warehouse Builder definitions using these utilities with a directive file.

    Directive Keywords for the Export Utility

    The format for a directive is:

      Keyword=Value

    You can also form a directive by replacing the value with the wildcard character (*), which matches any string, or with a list of named objects:

      Keyword=*

      Keyword=(value-1, value-2, ... , k)

    For example, you can specify a set of tables to be exported as:

      TABLES=(Customers, Products, Days)

    The directives can be written in a simple text file. Table 11-5 summaries the keywords used to form export directives. You can use the comment indicator (#) to document your directive scripts. Put the indication in the first column of a record and follow it with text.

    Table 11-5 Keywords for Export Utility Directives  
    Utility Prompt Keyword Description

    Username/passw@host:port:sid

    USERID

    Username, password and connection as a string.

    USERNAME

    The user name for accessing Warehouse Builder repository.

    PASSWORD

    The password that matches USERNAME.

    HOST

    Machine name for Warehouse Builder repository.

    PORT

    Port for Warehouse Builder repository.

    SID

    SID for Warehouse Builder repository.

    Project Name

    PROJECT

    Project name. Wildcard format supported for Project, but if used, no other object type keywords can follow. In order to export shared transformations, use PROJECT=Global Shared.

    Export File

    FILE

    File name for the exported data.

    Field Separator

    FIELDSEPARATOR

    Field separators: |, ^ or ~.

    Log File

    LOG

    File name for the status and statistics of the export.

    Parameter File

    PARFILE

    Parameter file contains keyword directives.

    CONFIGPARAM

    Export configuration values (Y/N). Default is Y.

    TRACE

    Debug messages. Options:

    S - write messages to screen
    Y - write messages to a file
    B - write messages to screen and a file

    TRACEFILE

    Trace file name.

    PHYSICALNAMES

    Use physical names (Y/N) for lookup of objects to be exported. Default is N.

    CHARACTERSET

    The character set to use for the export data file.

    MODULES

    If wildcard or multi-value format used for MODULE, no other object type keywords can follow. If simple format is used, this keyword can appear multiple times, directly followed by keywords for any of its owned object types which can be selected using any format (simple, wildcard, multiple).

    TABLES

    VIEWS

    FILES

    SEQUENCES

    MATERIALIZEDVIEWS

    DIMENSIONS

    FACTS

    TRANSFORM
    CATEGORIES

    For wildcard or multi-value format, no FUNCTIONS keyword can follow. If simple format then this keyword can appear multiple times, directly followed by a FUNCTIONS keyword, which can use any format (simple, wildcard, multiple).

    FUNCTIONS

    MAPPINGS

    HELP

    Use HELP=Y for a complete list.

    #

    Comment line used in a parameter file.

    Export a Project

    This example describes how to export an entire warehouse project. The operation requires two steps: create the directives file and then execute the Metadata Export Utility.

    Create the Directives File

    The directives file is a simple text file that contains a set of directives for the export utility.

    USERID=GCCWH/GCCWH@dwdoc11-pc:1521:ora816
    PROJECT=GCCWarehouse
    FILE=e:\MDL\GCCWarehouse-exp-JUL01
    FIELDSEPARATOR=|
    LOG=e:\MDL\GCCWarehouse-exp-JUL01-LOG
    CONFIGPARAM=N
    
    Execute the Export Utility

    The following command invokes the Metadata Export Utility and specifies the above directive file:

    w:\owb\bin\win32>exp parfile=e:\MDL\EXP_Directives
    Processing ... Export successful.

    The objects have now been exported to the file and can be imported into a repository using the Metadata Import Utility.

    Directive Keywords for the Import Utility

    You can direct the import utility to import objects from a file by answering prompts or by creating a file with a set of directives. Table 11-6 summaries the keywords used to form a directive. The format for each directive is Keyword=value.

    Table 11-6 Keywords for Import Utility Directives  
    Utility Prompt Keyword Description

    Username/passw@host:port:sid

    USERID

    Username, password and connection as a string.

    USERNAME

    The user name for accessing Warehouse Builder repository.

    PASSWORD

    The user password that matches USERNAME.

    HOST

    Machine name for Warehouse Builder repository.

    PORT

    Port for Warehouse Builder repository.

    SID

    SID for Warehouse Builder repository.

    Import File

    FILE

    File name for the data to be imported.

    Import Mode

    MODE

    CREATE, REPLACE, UPDATE, or INCREMENTALUPDATE.

    Log File

    LOG

    File name for the status and statistics of the export.

    Parameter File

    PARFILE

    Parameter file contains keyword directives.

    CONFIGPARAM

    Import configuration values (Y/N). Default is Y.

    TRACE

    Debug messages. Options:

    S - write messages to screen
    Y - write messages to a file
    B - write messages to screen and a file

    TRACEFILE

    Trace file name.

    PHYSICALNAMES

    Use physical names (Y/N) to lookup objects to be imported. Default is Y.

    CHARACTERSET

    The character set to use for the export data file.

    HELP

    Use HELP=Y for a complete lis.t

    #

    Comment line used in a parameter file.

    IGNOREUniversalID

    Ignore (Y/N) the universal id as the search criteria. Default is N.

    PRESERVEDESCRIPTION

    Preserve the description (Y/N) of already existing objects if the MDL data file does not have a description for the object. Default is N.

    SINGLEUSER

    Request a single user lock (Y/N) for running the import. Default is N.

    If a MODE directive is not included, then the default is CREATE.

    Import Selected Modules

    This example shows you how to import two modules using the Import Utility. The operation requires two steps: create a directive file and then execute the Metadata Import Utility.

    Create the Directives File

    The directives file is a simple text file that contains a set of directives for the export utility.

    USERID=GCCWH/GCCWH@dwdoc11-pc:1521:ora816
    FILE=e:\MDL\gccstar-exp
    LOG=e:\MDL\gccstar-imp-LOG
    MODE=CREATE
    CONFIGPARAM=N
    
    Execute the Import Utility

    The following command invokes the Import Utility and specifies the above directive file:

    w:\owb\bin\win32>imp parfile=e:\MDL\IMP_Directives.txt
    Processing ...
    Import successful.
    

    Validation Rules Governing Import

    When you import a set of definitions from exported metadata, the Import utility can update existing definitions in a Warehouse Builder Project.

    Mapping Definitions

    A mapping definition can be updated in a repository that is not identical to the mapping in the exported metadata file if any objects (tables, facts, transformations) that the mapping references cannot be found in the target repository. A warning message is written to the log file when this occurs.

    Code Generation

    Before you generate scripts from imported definitions, first configure the definitions and then validate them. The validation identifies malformed definitions. For additional information on the configuration, validation and generation of scripts, refer to Chapter 9, "Configuring, Generating, and Deploying".

    Foreign Key Definitions

    A foreign key definition can be updated in a repository that is not identical to the foreign key in the exported metadata file if its referenced unique or primary key does not exist in the target repository. A warning message is written to the log file that the foreign key does not contain a referenced key.

    Splitter for Exporting and Importing OWB Mappings

    The Split utility provides a workaround for the memory limitations of the MDL import utility when you are importing a large number of mappings. This utility generates export and import scripts for migrating mappings in pieces as opposed to migrating them all at the same time. The generated scripts have matching MDL parameter files that utilize the CREATE mode. These files can be edited.

    If the MDL import fails because of large data, the split utility can be used to re-export and import the mapping data in smaller pieces. All other object types must be exported and imported using the standard MDL utilities. Only mappings can be split into smaller pieces. To export all entities other than mappings, a parameter file containing the following can be used:

    • VIEWS=*

    • TABLES=*

    • SEQUENCES=*

    • MATERIALIZEDVIEWS=*

    • FACTS=*

    • FILES=*

    • DIMENSIONS=*

    • VIRTUALTABLES=*

    • TEMPORARYTABLES=*

    • TRANSFORMCATEGORIES=*

    The split utility splits the mappings within a module in a Warehouse Builder project. The size of the pieces are determined by a parameter located in a file provided with this application.

    The expsplit batch script accepts the following arguments:

    • A parameter file, specified in the form c:\temp\owb_apps.txt. The parameter file has special keywords outlined below that identify the number of mappings, data file names, and extensions.

    • A parameter target file prefix, specified in the form c:\temp\owb_apps the piece number (numbered from 1). A .txt suffix is added to the generated parameter file, a .bat suffix is added for the export batch file, and a _imp.bat suffix is added to the import batch file.

    The following example shows you how to start the split utility.

    expsplit exampleparams.txt c:\temp\ora_apps 
    

    The following example uses a parameter file exampleparams.txt. This file contains the following parameters:

    • userid=apps/apps@130.35.12.73:1521:orcl0

    • PHYSICALNAMES=Y

    • LOG=c:\temp\owb_data_apps

    • LOGEXT=log

    • FILE=c:\temp\owb_data_apps

    • FILEEXT=dat

    • FIELDSEPARATOR=^

    • PROJECT=EDWPRJ

    • MODULES=EDW_COMMON_MODULE

    • TYPE=MAPPINGS

    • COUNT=70

    This file is similar to the export parameter file for Warehouse Builder Metadata Loader, with the changes listed in Table 11-7.

    Table 11-7

    Keyword in Parameter File Description

    FILE

    Prefix of data file, the chunk number, and file extension (FILEEXT) define the data file name where you exported the data.

    FILEEXT

    The data file extension.

    PHYSICALNAMES

    Used for name matching.

    LOG

    Prefix of the log file, the chunk number, and file extension (FILEEXT) define the log file name.

    LOGEXT

    The log file extension.

    PROJECT

    A single project name must be specified.

    MODULES

    A single module name must be specified.

    TYPE

    Must be MAPPINGS.

    COUNT

    The number of mappings to be written to each export chunk.

    Split Utility Export Parameter Keyword Descriptions

    If the mappings for a Warehouse Builder project are split, the generated parameter files are named as follows:

    owb_apps1.txt

    owb_apps2.txt

    and so on.

    A batch file is generated c:\temp\owb_apps.bat (given the parameter target file prefix) to export the data from the repository. An import batch file is created to import, using create mode, into the same repository. These files can be edited if different target databases are required.

    To migrate data using the split utility:

    1. Using command line or Warehouse Builder, perform MDL export of all objects other then mappings.

      To export all objects other than mappings in a command line, use a parameter file with the following keywords:

      • VIEWS=*

      • TABLES=*

      • SEQUENCES=*

      • MATERIALIZEDVIEWS=*

      • FACTS=*

      • FILES=*

      • DIMENSIONS=*

      • VIRTUALTABLES=*

      • TEMPORARYTABLES=*

      • TRANSFORMCATEGORIES=*

    If Warehouse Builder is used to perform export, use multi-select to select and export objects other then mappings.

    1. Import the new export file into target repository.

    2. Split the mappings and export them using split utility

      expsplit exampleparams.txt c:\temp\ora_apps

      The utility connects to the source repository, splits mappings, and creates multiple parameter files according to exampleparams.txt. These parameter files are used during the export. The utility also creates an export batch file and an import batch file.

      Table 11-8 lists the files that are created.

      Table 11-8 Files Created by the Split Utility
      Description File Name

      Batch file to perform export

      c:\temp\ora_apps.bat

      Batch file to perform import

      c:\temp\ora_apps_imp.bat

      Multiple parameter files to be used by export and import batch files

      c:\temp\ora_apps1.txt

      c:\temp\ora_apps2.txt

      c:\temp\ora_apps3.txt

      1. Run the export batch file to export mappings into the location specified in the parameter file (variable FILE specified in step 3).

      2. Modify generated parameter files c:\temp\ora_apps1.txt, c:\temp\ora_apps2.txt. Edit the connection information to point to the target repository.

      3. Run import batch file c:\temp\ora_apps_imp.bat to complete the import.

      About Batch Services

      Use Batch Services to run bulk operations, such as the import and export of metadata directly from the command line. You can also use Batch Services to run Warehouse Builder operations such as validation, generation, and deployment of objects in a database. You can choose to run single operations, or you can use parameter and bulk parameter files to run multiple operations. When you run command line operations, log files are written and stored for each operation. Batch Services can also be scheduled to run independently from the Warehouse Builder client application.

      The Batch Service command line scripts are in the following locations:

      UNIX

      • $OWBHOME/owb/bin/solaris/batchservice.ksh

      Windows NT/2000

      • $OWBHOME\owb\bin\win32\batchservice.bat

      Using the Batch Services Command Line Syntax

      The types of Batch Service command line scripts include:

      • Validation

      • Generation

      • Deployment

      • Metadata Import

      • Metadata Export

      You can run these scripts as single operations, or you can create a parameter file and a parameter file script that runs multiple operations using a single script. For more information, see "Running Multiple Command Line Operations".

      Table 11-9 provides descriptions for the notations used in the command line syntax for Batch Services.

      Table 11-9 Batch Service Command Line Notations  
      Notation Description

      <user>

      Enter the database user name to connect to the Warehouse Builder repository.

      <duser>

      Enter the database user name to connect to the runtime database.

      <passwd>

      Enter the password required by the user name to connect to the Warehouse Builder Repository.

      <dpasswd>

      Enter the password required by the user name to connect to the runtime database.

      <host>

      Enter the host machine name of the Warehouse Builder repository.

      <dhost>

      Enter the host machine name of the runtime database.

      <SID>

      Enter the SID of the Warehouse Builder repository.

      <dSID>

      Enter the SID of the runtime database.

      <port>

      Enter the listener port number of the Warehouse Builder repository database.

      <dport>

      Enter the listener port number of the runtime database.

      <project name>

      Enter the name of the project that contains the object.

      Note: The Kornshell does not recognize strings enclosed in quotes as one argument. Use the standard typesetter ("_^") notation of inserting space to denote spaces.

      For example:

      Type "My Project" (with one space) as "My_^Project" in the command line.

      <application name>

      Enter the name of the module within the project that contains the object.

      <element name>

      Enter the exact name of the object. Case-sensitive.

      <element type>

      Enter the object type of any Warehouse Builder object.

      You can choose from one of the following: TABLE, VIEW, MATERIALIZEDVIEW, DIMENSION, FACT, MAPPING, SEQUENCE, TRANSFORMATION.

      Note: Use TRANSFORMATION to denote the object type for Transformation Categories.

      The following tables contain the command line syntax to perform various operations. To perform these operations on transformations, you must use transformation-specific syntax.

      • Table 11-10, "Validation Syntax"

      • Table 11-11, "Generation Syntax"

      • Table 11-12, "Deployment Syntax"

      • Table 11-13, "Metadata Import Syntax"

      • Table 11-14, "Metadata Export Syntax"

        Table 11-10 Validation Syntax  
        Operation Command Line Syntax

        Validate

        batchservice.ksh <user> <passwd> <host> <SID> <port> -validate <project name> <application name> <element name> <element type> [<logDir>]

        For Example:

        batchservice.ksh owbusername owbpassword servername-pc ora817 1521 -validate "My_^Project" im1 tab1 TABLE /tmp/.owbObjects

        Validate Transformation Categories

        batchservice.ksh <user> <passwd> <host> <sid> <port > -validate <project> <module> {<transformation_library_folder>|<transformation_library_folder%%object_name>} TRANSFORM {<logdir>}

        For Example:

        batchservice.ksh owbusername owbpassword servername-pc ora817 1521 -validate "My_^Project" IM1 Functions%%SortingTransform

        Table 11-11 Generation Syntax  
        Operation Command Line Syntax

        Generate

        batchservice.ksh <user> <passwd> <host> <SID> <port> -generate <project name> <application name> <element name> <element type> [<logDir>]

        For Example:

        batchservice.ksh owbusername owbpassword servername-pc ora817 1521 -generate "My_^Project" im1 tab1 TABLE /tmp/.owbObjects

        Generate Transformation Categories

        batchservice.ksh <user> <passwd> <host> <sid> <port > -generate <project> <module> {<transformation_library_folder>|<transformation_library_folder%%object_name>} TRANSFORM {<logdir>}

        For Example:

        batchservice.ksh owb90004 owb sroychow-pc3 ora816 1521 -generate "My_^Project" IM1 Functions%%SortingTransform

        Table 11-12 Deployment Syntax  
        Operation Command Line Syntax

        Deploy to File

        batchservice.ksh <user> <passwd> <host> <SID> <port> -deployfile <project name> <application name> <element name> <element type> <deploy directory path> [<logDir>]

        For Example:

        batchservice.ksh owbusername owbpassword servername-pc ora817 1521 -deployfile "My_^Project" im1 tab1 TABLE /tmp/scott /tmp/.owbObjects

        Deploy to Database

        batchservice.ksh <user> <passwd> <host> <SID> <port> -deploydb <project name> <application name> <element name> <element type> <duser> <dpasswd> <dhost> <dSID> <dport> [<logDir>]

        For Example:

        batchservice.ksh owbusername owbpassword servername-pc ora817 1521 -deploydb "My_^Project" im1 tab1 TABLE owbrtusername owbrtpassword rtservername-pc ora817 1521 /tmp/.owbObjects

        Deploy Transformation Category to File

        batchservice.ksh <user> <passwd> <host> <sid> <port > -[deployfile] <project> <module> {<transformation_library_folder>|<transformation_library_folder%%object_name>} TRANSFORM {<logdir>}

        For Example:

        batchservice.ksh owbusername owbpassword servername-pc ora817 1521 -deployfile "My_^Project" IM1 Functions%%SortingTransform /tmp/.username

        Deploy Transformation Category to Database

        batchservice.ksh <user> <passwd> <host> <sid> <port > -[deploydb] <project> <module> {<transformation_library_folder>|<transformation_library_folder%%object_name>} TRANSFORM <runtimeuser> <runtimepasswd> <runtimehost> <runtimesid> <runtimeport>

        For Example:

        batchservice.ksh owbusername owbpassword servername-pc ora817 1521 -deploydb "My_^Project" IM1 Functions%%SortingTransform owbrtusername owbrtpassword rtservername-pc ora817 1521

        Table 11-13 Metadata Import Syntax  
        Operation Command Line Syntax

        Import with Option to Use Physical Names

        batchservice.ksh <user> <passwd> <host> <SID> <port> -import <import file name> <log file name> < mode> <use_physical_names >

        where
        <mode> = CREATE, REPLACE, UPDATE, or INCREMANTALUPDATE
        <use_physical_names> = true or false

        For Example:

        batchservice.ksh owbusername owbpassword servername-pc ora817 1521 -import class_project.mdl log1.log CREATE true

        Import with Option to Use Physical Names and Specify Character Set

        batchservice.ksh <user> <passwd> <host> <SID> <port> -import <import file name> <log file name> < mode> <use_physical_names > <character set>

        where
        <mode> = CREATE, REPLACE, UPDATE, or INCREMANTALUPDATE
        <use_physical_names> = true or false

        For Example:

        batchservice.ksh owbusername owbpassword servername-pc ora817 1521 -import class_project.mdl log1.log CREATE true WE8MSWIN1252

        Import with Option to Use Physical Names, Ignore Universal ID, and Specify Character Set

        batchservice.ksh <user> <passwd> <host> <SID> <port> -import <import file name> <log file name> < mode> <use_physical_names > <ignoreUniversalID> <character set>

        where
        <mode> = CREATE, REPLACE, UPDATE, or INCREMANTALUPDATE
        <use_physical_names> = true or false
        <ignoreUniversalID> = true or false

        For Example:

        batchservice.ksh owbusername owbpassword servername-pc ora817 1521 -import class_project.mdl log1.log CREATE true true WE8MSWIN1252

        Table 11-14 Metadata Export Syntax
        Operation Command Line Syntax

        Export a Project

        batchservice.ksh <user> <passwd> <host> <SID> <port> -exportproject <projectName> <export file name> <log file name> <character set> <physical names > <field separator> <physical name> {<config parameter>}.

        For Example:

        batchservice.ksh owbusername owbpassword servername-pc ora816 1521 -exportproject "My_^Project" exportfile logfile WE8MSWIN1251 "|" true "Y"

        Export a Module

        batchservice.ksh <user> <passwd> <host> <SID> <port> -export <projectName> <application name> <export file name> <log file name> <character set> <physical names > <field separator> <physical name> {<config parameter>}.

        For Example:

        batchservice.ksh owbusername owbpassword servername-pc ora816 1521 -export "My_^Project" IM1 exportfile logfile WE8MSWIN1251 "|" true "Y"


        Note:

        You must include the single attached dash in front of an action. For example, -import is valid, but import and --import are not valid.


      Running Multiple Command Line Operations

      You can run multiple command line operations using a single script by creating parameter files. The parameter file is a separate text file that contains a batch of command line operation scripts with the same syntax used in the single operations. When you type the parameter file command line script to run the parameter file, you only need to specify the parameter file. Parameter files enhance performance by providing a single connection for all of the operations listed in the file. You can also choose to use a bulk parameter file for very large groups of operations to improve performance. Bulk parameter files refer to outside files such as data files and error files.

      Table 11-15 contains the command line syntax for the parameter and bulk parameter file scripts.

      Table 11-15 Parameter File Command Line Syntax  
      Operation Command Line Syntax

      Executing a Parameter File with Deployment to Database

      batchservice.ksh <user> <passwd> <host> <SID> <port> -paramfile <paramfile> [<duser> <dpasswd> <dhost> <dSID> <dport>]

      For Example:

      batchservice.ksh owbusername owbpassword servername-pc ora817 1521 -paramfile batchservce.param owbrun owbrun sever-pc3 ora817 1521

      Executing a Parameter File without Deployment to Database

      batchservice.ksh <user> <passwd> <host> <SID> <port> -paramfile <paramfile>

      For Example:

      batchservice.ksh owbusername owbpassword servername-pc ora817 1521 -paramfile batchservce.param

      Executing a Bulk Parameter File with Deployment to Database

      batchservice.ksh <user> <passwd> <host> <SID> <port> -bulkparamfile <bulkparamfile> [<duser> <dpasswd> <dhost> <dSID> <dport>]

      For Example:

      batchservice.ksh owbusername owbpassword servername-pc ora817 1521 -bulkparamfile bulkbatchservce.param owbrun owbrun sever-pc3 ora817 1521

      Executing a Bulk Parameter File without Deployment to Database

      batchservice.ksh <user> <passwd> <host> <SID> <port> -bulkparamfile <bulkparamfile>

      For Example:

      batchservice.ksh owbusername owbpassword servername-pc ora817 1521 -bulkparamfile bulkbatchservce.param

      Example 11-3, Example 11-4, Example 11-5, and Example 11-6 display the contents of a sample parameter file, bulk parameter files, and data file. Use the comments in the example as guidelines for creating these files.

      Example 11-3 Parameter File

      =====================================================================
      # Place a pound sign before your comments
      # validate "My_^Project" <application Name> <element Name> <element Type> <logdir>
      validate "My_^Project" IM1 TAB1 TABLE  /tmp/.owbObjects
      # generate
      # generate "My_^Project" <application Name> <element Name> <element Type> <logdir>
      generate "My_^Project"  IM1 TAB1 TABLE /tmp/.owbObjects
      #deploy
      # similarly we do for deploy in file system and the database.
      deploydb "My_^Project"  IM1 TAB1 TABLE <logdir>
      import import.mdl importmdl.log CREATE true true WEMSWIN1251
      =====================================================================


      Note:

      The keywords are in lowercase, and there is no dash in front of the keyword like in the command line option.


      Example 11-4 Bulk Parameter File

      =====================================================================
      # pound sign is for comments
      # The bulkErrorFile is the location of the error report.
      bulkErrorFile = /somebulkErrorFile
      # The defaultprojectAppResultDir is the directory the results are stored in. 
      # If you leave it empty then it takes the current directory.
      defaultProjectAppResultDir  = ~/
      # The project is where you enter the name of the Project. 
      project = "My_^Project" 
      # The application is the name of the module.
      application = IM1
      # For projectAppFCOData, specify the data file for this module with the path.
      # The data file contains the actions to be performed on specified objects.
      projectAppFCOData = /tmpA/Object/data1.dat
      # projectAppFCODeployFileOK specifies whether to deploy to file or not.
      # The default is false.
      projectAppFCODeployFileOK = false
      # projectAppFCODeployFileDir specifies the directory to deploy the generated scripts to.
      projectAppFCODeployFileDir = /tmpA/Object/
      # projectAppFCODeployFileType specifies the file type to deploy.
      # There are three options: DDL,ANALYZE, or ALL. The default is ALL.
      projectAppFCODeployFileType=  DDL 
      # projectAppFCODeployDataBaseOK specifies whether to deploy to database or not.
      # The default is false.
      projectAppFCODeployDataBaseOK = false
      # projectAppFCODeployDatabaseType is the type of file you are deploying.
      # There are two options: PLS and ALL. The default is ALL.
      projectAppFCODeployDatabaseType = PLS
      # The projectAppResultDir is the directory where Batch Services results are sent to.
      projectAppResultDir  = /tmpA
      # end of Bulk Setup parameter file
      =====================================================================


      Example 11-5 Import Bulk Parameter File

      =====================================================================
      # pound sign is for comments
      bulkErrorFile = /somebulkErrorFile
      defaultProjectAppResultDir  = ~/
      # Provide a full path for the import. The default is the current directory.
      importFullPath = 
      # Specify the MDL files to import. You can import multiple MDL exported files.
      # See note following this example for more information.
      importFiles = A*.mdl
      # Specify whether or not to run import. The default is true.
      importMode = true
      # Specify whether or not to import by physical names.
      importUsePhysicalName = 
      # Specify whether or not to ignore the UOID when importing. The default value is true.
      importIgnoreUOID = 
      # Provide a character set string.
      importCharacterSet = 
      =====================================================================
      

      You can import files by:

      • Specifying MDL files by name, such as A1.mdl, A2.mdl.

      • Using wildcards, such as *.mdl, A*.mdl, and *_Mapp_*.mdl.

      Example 11-6 Data File

      =====================================================================
      # pound sign is for comment
      # OBJECT NAME, OBJECT TYPE ACTION SET
      # <elementname>,<elementype> {<service> <, >}+
      TAB1,TABLE validate generate deploydb
      TAB2,TABLE validate generate deployfile
      MAPP1,MAPPING generate deploydb
      # end of FCO Data file
      =====================================================================
      

      Locating and Reviewing Log Files

      The output for validation, generation, and deployment are stored in their respective log files. The log file has the following typical structure. The messages are shown in italics. The action and the date of activity are highlighted in bold. Example 11-7 shows a validation log file.

      Example 11-7 Validation Log File


      BEGIN -----------------------------------------------
      Input: 
      owbusername owbpassword servername-pc ora817 1521  -validate  My_^Project  im1  tab1  
      TABLE  
      
      Output: 
      directory = /owb/owbhome/owb/bin/im1_tab1_validate.log
      
      Action = validate   Date = Mon Apr 02 14:30:26 GMT-08:00 2001
      project = im1,  element = tab1,  type    = TABLE, 
      "ERROR", "No Columns", "Add new Column"
      END   -----------------------------------------------
      

      About the Warehouse Builder Transfer Wizard

      The Warehouse Builder Transfer Wizard enables you to synchronize, integrate, and use metadata stored in multiple sources and formats.

      Warehouse Builder Transfer Wizard Overview

      The Warehouse Builder Transfer Wizard allows you to import metadata from and export metadata to data warehousing tools. The Transfer Wizard performs two major tasks:

      1. Exporting selected metadata from the Warehouse Builder repository using a bridge to a variety of targets. The target can be:

        • Object Management Group (OMG) file

        • Oracle Discoverer versions 3.1 and 4i

        • Oracle Express

        • Oracle 9i OLAP Server

      2. Importing selected metadata from source tools into the Warehouse Builder repository using a bridge. The source can be:

        • Object Management Group (OMG) file

        • Computer Associates ERwin (3.5.1)

        • Powersoft PowerDesigner (version 6)

        • Oracle 9i OLAP Server

      The Transfer Wizard creates an intermediate XML file conforming to the XML Metadata Interchange (XMI) standard. This process is transparent when you use the Transfer Wizard. You provide the source and target parameters and the Transfer Wizard performs the exporting, conversion, and downloading tasks.

      Figure 11-9 shows an example of the transfer process for exporting metadata from Warehouse Builder into Discoverer.
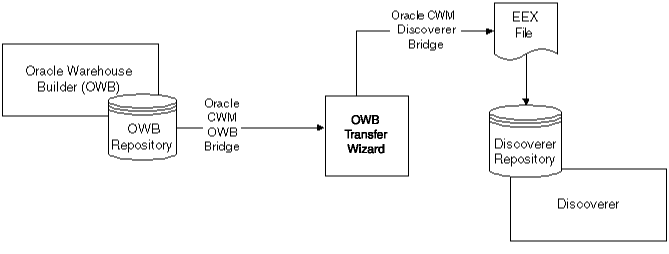
      Figure 11-9 Warehouse Builder Transfer Wizard Model

      Text description of cwmtranw.gif follows.

      Text description of the illustration cwmtranw.gif

      Transfer Considerations

      Before you transfer metadata between two data warehousing tools, you need to perform tasks within the source tool to ensure that the metadata transfers successfully and displays appropriately in the target tool.

      For detailed information on transfer considerations for metadata import and export, refer to Appendix H, "Warehouse Builder Bridges: Transfer Parameters and Considerations".

      Importing Metadata into Warehouse Builder

      After you have prepared your source tools to ensure a successful transfer, you can use the Warehouse Builder Transfer Wizard to import the metadata. For more information on transfer considerations, refer to Appendix H, "Warehouse Builder Bridges: Transfer Parameters and Considerations".

      The Warehouse Builder Transfer Wizard enables you to import metadata from the following types of sources:

      • A flat file that conforms to the OMG standard

      • Computer Associates ERwin

      • Powersoft PowerDesigner

      • Oracle9i database containing OLAP objects

      This section contains instructions for using the Warehouse Builder Transfer Wizard to import metadata into Warehouse Builder:

      For more information on transfer considerations, refer to Appendix H, "Warehouse Builder Bridges: Transfer Parameters and Considerations".

      To launch the Transfer Wizard for an import:

      1. Open Oracle Warehouse Builder.

      2. Select the Administration view from the vertical tool bar at the left of the Warehouse Builder console window.

      3. From the Administration menu, select MetaData Import, and then Bridge.

        The Oracle Transfer Wizard Welcome window displays, identifying the steps you perform while using the Transfer Wizard.

        If you want to display version information about the Transfer Wizard, click About Oracle WB Transfer Tool. For version information about the individual bridges, press the Bridge Versions button from the About Oracle WB Transfer Tool dialog.

      4. Click Next.

        The Data Source and Target Identification window displays.

      5. In the From field, identify your metadata source (OMG, CA ERwin, PowerDesigner). In the To field, accept the default (Warehouse Builder import).

      6. Optionally, enter a Description of the metadata to be transferred.

        This description displays in the progress bar during the transfer process and is useful when you are performing multiple transfers.
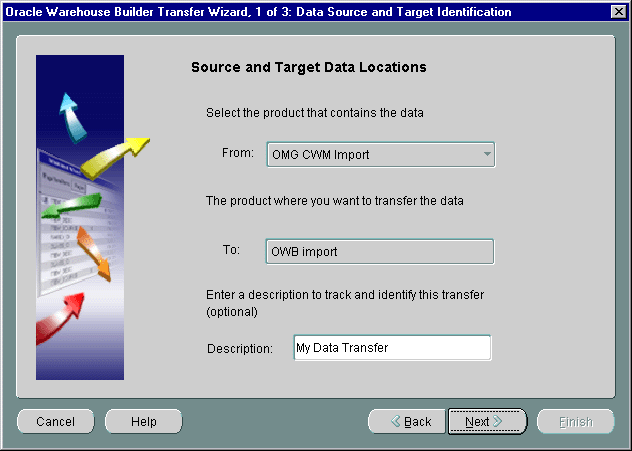
      Figure 11-10 Data Source and Target Identification Window

      Text description of tw_soura.gif follows.

      Text description of the illustration tw_soura.gif

    3. Click Next.

      The Transfer Parameter Identification window displays.
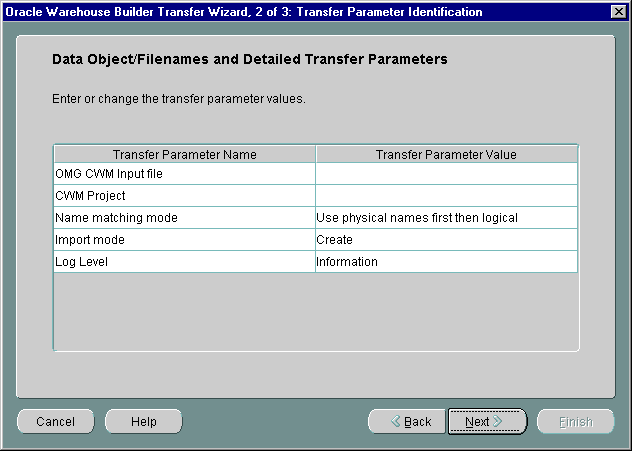
      Figure 11-11 Transfer Parameter Identification Window

      Text description of tw_sourb.gif follows.

      Text description of the illustration tw_sourb.gif

        The Transfer Parameters window displays a different list of parameters based upon the metadata source you selected.
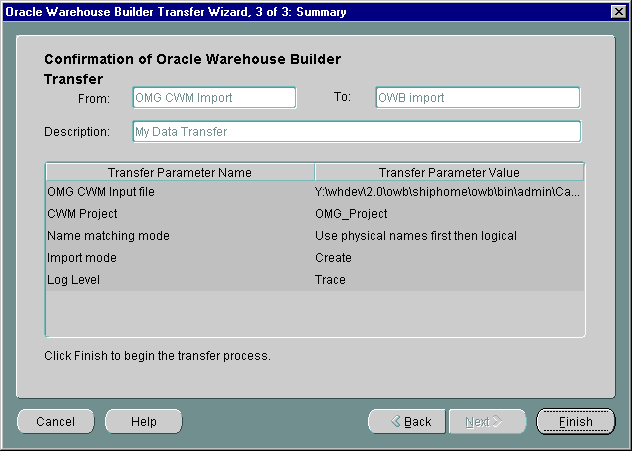
      • Click Next. The Summary window displays.

      Figure 11-12 Summary Window

      Text description of tw_sourd.gif follows.

      Text description of the illustration tw_sourd.gif

      1. Review your entries.

        If any are incorrect, click Back to return to the previous screen and make the necessary changes.

      2. Click Finish on the Confirmation window.

        The transfer window displays with a status bar.
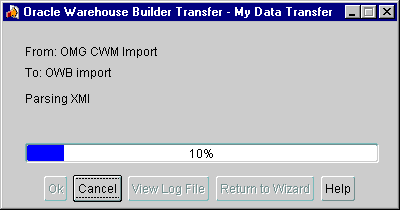
      Figure 11-13 Data Transfer Progress Panel

      Text description of tw_sourc.gif follows.

      Text description of the illustration tw_sourc.gif

      1. Do one of the following:

          • If you determine the cause of the failure from the Information Log, note the data requiring update. Close the log by clicking OK. On the transfer window, click Return to Wizard and update the erroneous data on the Transfer Parameters window. Then transfer the data again.

          • If you cannot determine the cause of the failure from the Information Log, you can create a Trace log. Close the current log by clicking OK. On the transfer window, click Return to Wizard and change the Log Level to Trace on the Transfer Parameters window. Then transfer the data again.

        If the transfer is successful, the Transfer Wizard creates an output file and stores it in the location you specified.

        Exporting Metadata from Warehouse Builder

        After you have prepared your target tools to ensure a successful transfer, you can use the Warehouse Builder Transfer Wizard to export the metadata. For more information on transfer considerations, refer to Appendix H, "Warehouse Builder Bridges: Transfer Parameters and Considerations".

        The Warehouse Builder Transfer Wizard enables you to export metadata to the following types of targets:

        • A file that conforms to the OMG standard

        • Oracle Discoverer 3.1

        • Oracle Express

        • Oracle Discoverer 4i

        • Oracle 9i Database to store OLAP objects

        This section contains instructions for using the Warehouse Builder Transfer Wizard to export metadata from a Warehouse Builder project to a target. For more information on transfer considerations, refer to Appendix H, "Warehouse Builder Bridges: Transfer Parameters and Considerations".

        To export metadata using the Warehouse Builder Transfer Wizard:

        1. Open Oracle Warehouse Builder.

        2. Select the Project mode from the vertical tool bar at the left of the Builder client window.

        3. From the Project menu, select MetaData Export, and then Bridge.

          The Oracle Transfer Wizard Welcome window displays, identifying the steps you perform while using the Transfer Wizard.

        4. Click Next.

          The Data Source and Target Identification window displays.

        5. In the From field, accept the default (Warehouse Builder Export) and in the To field, select your target (OMG, Discoverer 3.1, Express, or Discoverer 4i) to identify the target for your export.

        6. Optionally, enter a Description of the metadata to be transferred.

          This description displays in the progress bar during the transfer process and is useful when you are performing multiple transfers.
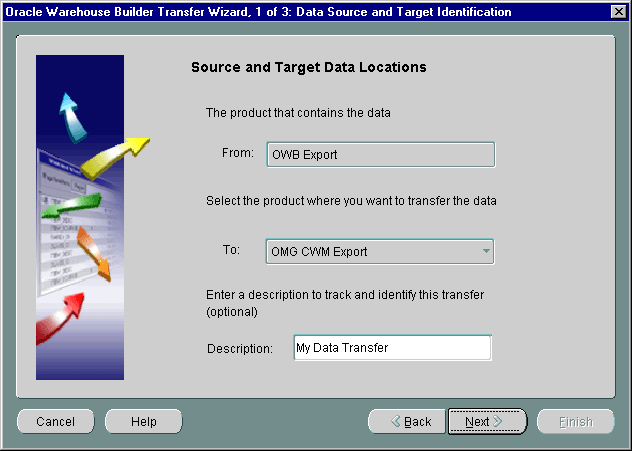
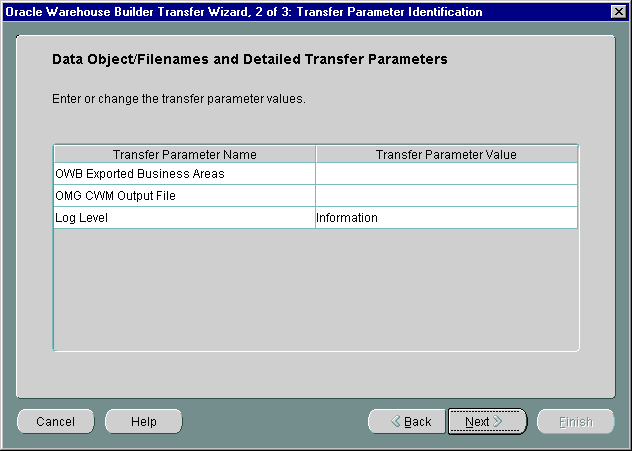
        Figure 11-14 Source and Target Information Window

        Text description of tw_soure.gif follows.

        Text description of the illustration tw_soure.gif

        1. Click Next.

          The Transfer Parameter Identification window displays.

        Figure 11-15 Transfer Parameter Identification Window

        Text description of tw_owb_a.gif follows.

        Text description of the illustration tw_owb_a.gif

          The Transfer Parameters window table lists parameters that you must enter or select. This window displays a different set of parameters depending on the target you selected in the previous step.

        • Click Next.

          The Confirmation of Warehouse Builder Transfer window displays.
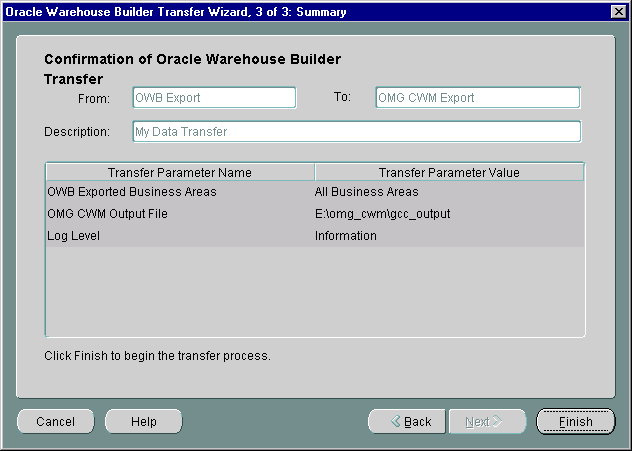
        Figure 11-16 Summary Window

        Text description of tw_owb_b.gif follows.

        Text description of the illustration tw_owb_b.gif

        1. Review your entries.

          If any are incorrect, click Back to return to the previous screen and make the necessary changes.

        2. Click Finish.

          The transfer window displays with a status bar.
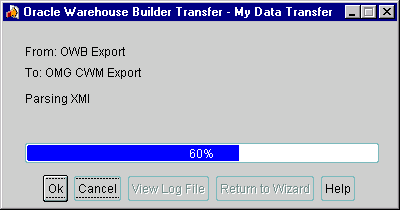
        Figure 11-17 Data Transfer Progress Panel

        Text description of tw_owb_c.gif follows.

        Text description of the illustration tw_owb_c.gif

        1. Do one of the following:

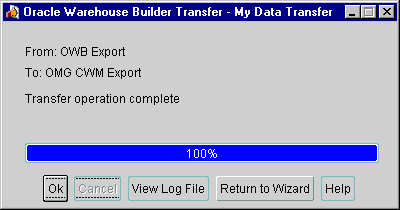
          • If the transfer completes successfully, click OK.

        Figure 11-18 Data Transfer Complete Panel

        Text description of tw_owb_t.gif follows.

        Text description of the illustration tw_owb_t.gif

          • If you determine the cause of the failure from the Information Log, note the data requiring update. Close the log by clicking OK. On the transfer window, click Return to Wizard and update the erroneous data on the Transfer Parameters window. Then transfer the data again.

          • If you cannot determine the cause of the failure from the Information log, you can create a Trace log. Close the current log by clicking OK. On the transfer window, click Return to Wizard and change the Log Level to Trace on the Transfer Parameters window. Then transfer the data again.

        During a successful transfer, the Transfer Wizard creates the output file and stores it in the location you specified.

        About the Archive/Restore Utility

        The Archive/Restore Utility allows you to save and load versions of your Warehouse Builder repository metadata. The Archive and Restore utilities initially write to a file system. You can then move files from this file system into a third-party version control tool such as Oracle Repository, ClearCase, or SourceSafe.
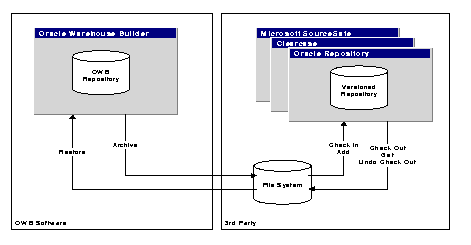
        Figure 11-19 Archive/Restore

        Text description of 11admin9.gif follows

        Text description of the illustration 11admin9.gif

        Use the following sections to assist you with your Archive/Restore:

        There are two places in Warehouse Builder where you can set up the version label used in the archive/restore. The first is in the New Project Wizard. The New Project Wizard contains a step that allows you to define version properties. The version label that you set here is the version label that is used when that project is archived. After you have created a project, you can edit the version label by opening the Properties dialog for the project. Click the Version Properties tab to modify the project version label.

        Archive and Restore are different from Import and Export. Table 11-16 and Table 11-17 describe the differences between these features.

        Table 11-16 Differences Between Archive and Export
        Feature Archive Export

        Character Set

        UTF8

        User Configured

        Field Separator

        Pipe Character (|)

        User Configured

        Read-only Detection

        Detects and prompts you to re-try

        Detects and then fails

        Dump Format

        MDL

        MDL

        Log File Name

        Generated

        Generated and User configured

        Table 11-17 Differences Between Restore and Import
        Feature Restore Import

        Character Set

        UTF8

        User Configured

        Complete Project Replacement

        Yes

        User must first delete project

        Dump Format

        MDL

        MDL

        UniversalID Preservation

        Always

        User Configured

        Name Preservation

        Always

        User Configured

        Log File Name

        Generated

        Generated and User configured

        Setting up Preferences

        You can set up most of the archive and restore specifications using the Preferences dialog from the Administration or Project views. Use this dialog to specify labeling options, archive/restore directory locations and log folders.

        To set up Archive/Restore preferences:

        1. Select Preferences from the Administration or Project menus depending on the view you selected.

          The Preferences dialog displays.

        2. Select the Archive/Restore tab if it is not displayed on top.

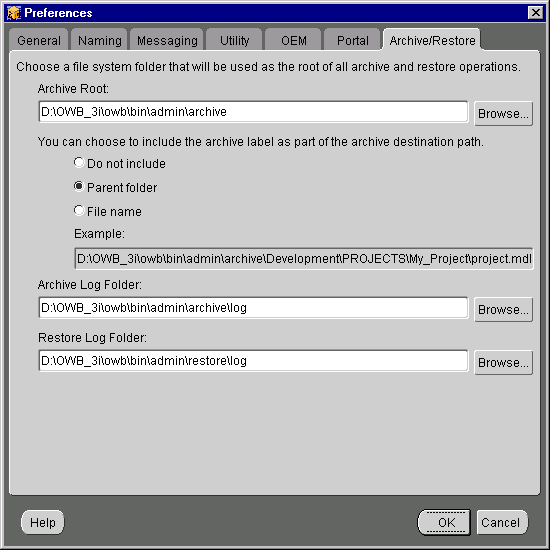
        Figure 11-20 Archive/Restore Preferences

        Text description of arch_res.gif follows.

        Text description of the illustration arch_res.gif

        1. Browse to or create a default root folder for archiving.

          The archive service creates additional folders.

        2. Specify how you want to handle the label. The options are listed in Table 11-18.

          Table 11-18 Label Options
          Label Option When to Use Generated Path Name

          Do not include

          For Source Control Management when the path name never changes.

          The path is consistent and not dependent on the version label value.

          Parent Folder

          For Source Control Management when the label value changes slowly. For example, labels like Development, Alpha, Beta, and Production. Also good for dumps to a file system.

          The generated path changes with each new version label.

          File name

          When dumping files to a file system.

          The generated path changes with each new version label.

          This appends the label name as the base part of the terminal file name. For example, if the label is development, the file name is development.mdl. If there is no label and this mode is selected, the file name is nolabel.mdl.

        1. Browse to or create a location for your Archive Log Folder.

          This folder contains the archive log files as they are created. The log files contain detailed information about the archive including how the file was created and the contents of what was archived. The name of each log file is automatically derived from the logical project name that is being archived. All archive log files start with A and incorporate the label, date, and time to make them unique.

        2. Browse to or create a location for your Restore Log Folder.

          This folder contains the restore log files as they are created. The log files contain detailed information about the restore including how the file was created and the contents of what was restored. The name of each log file is automatically derived from the logical project name contained in the archive. All restore log files start with R and incorporate the label, date, and time to make them unique.

        3. Click OK.

          The preferences have been set. You can now proceed to archiving and restoring your project.

        Archiving a Project

        Archiving a project allows you to copy metadata stored within a Warehouse Builder repository to an external location for the purpose of securing that data at a fixed point in time. Warehouse Builder provides an Archive Wizard to assist you in this process.


        Note:

        Before you archive your project, you can update the project version label with the Project Properties dialog.


        To archive a project:

        1. Select Archive from the Project menu or from the Administration menu depending on the view you selected. You can also select Archive from the right-click menu when a project is selected.

          The Archive Wizard Welcome page displays.

        2. Click Next.

          The Summary page displays a summary of the archive settings prior to running the archive process. If you want to see the details of your archive after the archive process is complete, check the Show details dialog following a successful archive box.
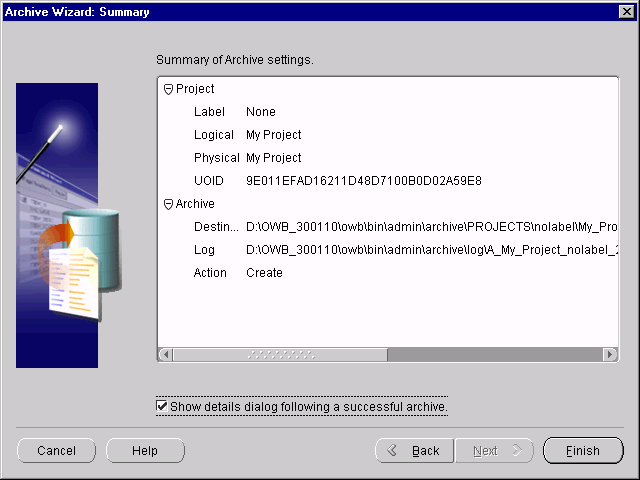
        Figure 11-21 Archive Wizard Summary Page

        Text description of arch_wia.gif follows.

        Text description of the illustration arch_wia.gif


        Note:

        No changes can be made from the wizard. If you notice an error in the Archive Wizard Summary page, click Cancel and make the appropriate changes to your Archive/Restore Preferences before continuing with the archive.


        1. Click Finish.

          This begins the archive process. A progress window appears. When the progress bar reaches 100%, the archive process is complete.

          If you checked the Show details dialog following a successful archive box, the Archive Results dialog displays. This dialog displays the name of each object type and how many of each were archived.
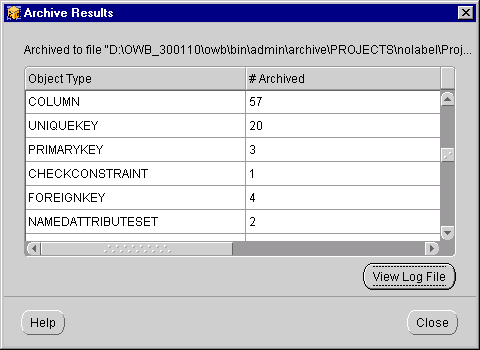
        Figure 11-22 Archive Results

        Text description of arch_rsl.gif follows.

        Text description of the illustration arch_rsl.gif

          For a more detailed look at the archive process, click View Log File. This displays the entire log file.
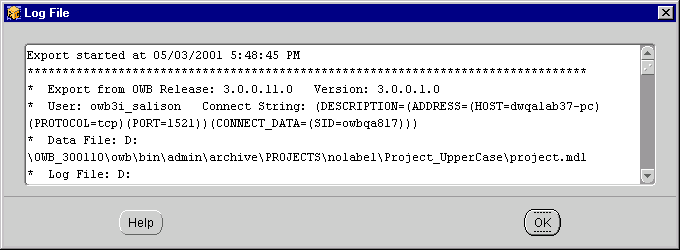
        Figure 11-23 Archive Log File

        Text description of arch_log.gif follows.

        Text description of the illustration arch_log.gif

        Restoring a Project

        Restoring a project allows you to recreate metadata within a Warehouse Builder repository from an external location.

        To restore a project:

        1. Select Restore from the Administration menu in the Administration View.

          The Restore Wizard Welcome page displays.

        2. Click Next.

          The Select Archive page displays. Browse to or type the Archive File you want to restore.
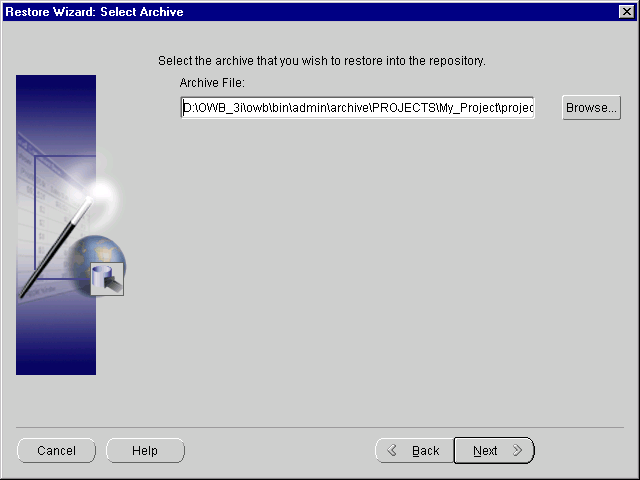
        Figure 11-24 Select Archive Page

        Text description of rest_wiz.gif follows.

        Text description of the illustration rest_wiz.gif

        1. Click Next.

          The Summary page displays a summary of the restore settings prior to running the restore process. If you want to see the details of your restore after the restore process is complete, check the Show details dialog following a successful restore box.
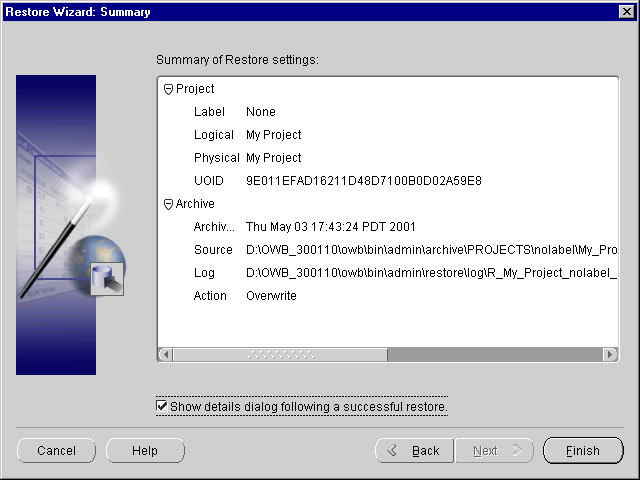
        Figure 11-25 Restore Wizard Summary Page

        Text description of rest_wia.gif follows.

        Text description of the illustration rest_wia.gif

        1. Click Finish.

          This begins the restore process. A progress window appears. When the progress bar reaches 100%, the restore process is complete.

          If you checked the Show details dialog following a successful restore box, the Restore Results dialog displays. This dialog displays the name of each object type, how many of each were restored, and how many of each were skipped.
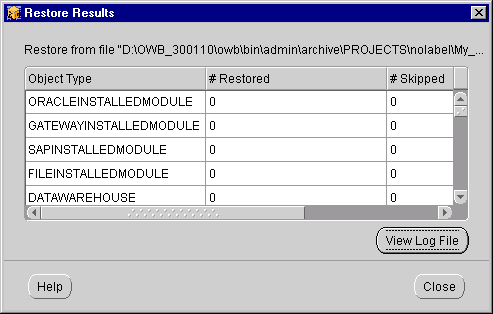
        Figure 11-26 Restore Results

        Text description of rest_rsl.gif follows.

        Text description of the illustration rest_rsl.gif

          For a more detailed look at the archive process, click View Log File. This displays the entire log file.
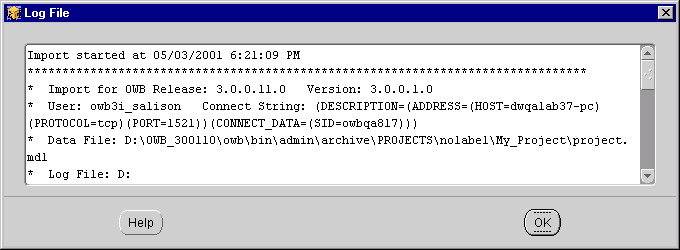
        Figure 11-27 Restore Log File

        Text description of rest_log.gif follows.

        Text description of the illustration rest_log.gif

        Using Discoverer Workbooks for Metadata and Runtime Reporting

        Warehouse Builder enables you to run reports on its design time metadata and runtime audit data using Oracle Discoverer workbooks. To run these reports, you must first install and access the Discoverer Workbooks packaged with Warehouse Builder. Discoverer workbooks can be used to run three types of reports: Definition reports, QA reports, and Runtime Reports.

        • Definition reports: used to report on design objects within the Warehouse Builder repository. Drill paths within these reports enable you to drill down on related data.

        • QA reports: used to report on incomplete and invalid object definitions. These reports are useful in tracking down logical errors in your design, such as facts without dimensions, dimensions without levels, mismatched data types in column mappings, or unused sources and targets within mappings.

        • Runtime reports: used to report on runtime data and to track down runtime errors.

        Warehouse Builder is packaged with a set of Discoverer files, including import End User Layer (EUL) templates (.eex) and Discoverer workbook files (.dis). The following sections describe how to use these files to install and set up the EULs in Discoverer and how to access the Discoverer workbooks.

        To install and access the Discoverer workbooks:

        1. If necessary, establish a database connection and grant user privileges to enable access between the Discoverer administrator database and Warehouse Builder database.

        2. Create an .eex file using the files and templates packaged in Warehouse Builder.

        3. Import the .eex file into Discoverer Administration tool using the Import Wizard.

        4. Open the workbooks and run reports using the Discoverer Plus Edition or the Discoverer User Edition.

        Installing the EUL Template and Workbooks

        Before you can install the EUL templates and access the Discoverer workbooks, you must locate the necessary files packaged with your Warehouse Builder installation. You must also provide the required database connection information to enable the Discoverer administrator to access the Warehouse Builder data.

        Prerequisites

        • Install Oracle Discoverer. See the Oracle Discoverer Administration Installation Guide for details.

        • Install Warehouse Builder and locate the following files in the DiscoMetaDataReports-Design and DiscoMetaDataReports-Runtime directories.

          The following files used to install the Definition and QA workbooks are located at: \<OracleHome>\owb\misc\DiscoMetaDataReports-Design

          • EUL Template: owbdefqa_template.eex

          • Definition Workbook: owbdef.dis

          • QA Workbook: qa.dis

          • Utility Files: eexfix.bat and eexfix.class

          The following files used to install the Runtime workbook are located at: \<OracleHome>\owb\misc\DiscoMetaDataReports-Runtime

          • EUL Template: owbruntime_template.eex

          • Runtime Workbook: runtime.dis

          • Utility Files: eexfix.bat and eexfix.class

        Setting Database Connections

        To report on Warehouse Builder metadata, the Discoverer EUL must point to the correct instance in that database. The Discoverer administrator has a user account on the database where it is installed. If the Warehouse Builder metadata resides in the same database, you must provide the administrator with the user account for that instance and provide select privileges on public views. If the Warehouse Builder metadata resides in a different database, you must create a database link to enable the Discoverer administrator to connect to that database. Refer to the SQL Reference Manual for information on how to create a database link.

        Creating Specific .eex Files

        Once you provide this connection information and the administrator is able to connect to the Warehouse Builder metadata, you can create the .eex files by running the following scripts.

        • To create an .eex file for Definition and QA workbooks, run the following script from a DOS prompt in the \OracleHome\owb\misc\DiscoMetaDataReports-Design directory:

          eexfix owbdefqa_template.eex mydesign.eex <OWBuser> [<OWBlink>]

          <OWBuser> is the user account and <OWBlink> is the database link required to access the Warehouse Builder metadata.


          Note::

          The user name and database link must be uppercase.


        • To create an .eex file for Runtime workbook, run the following script from a DOS prompt in the \OracleHome\owb\misc\DiscoMetaDataReports-Runtime directory:

          eexfix owbruntime_template.eex myruntime.eex <OWBuser> [<OWBlink>]

        Once you run this script, a .eex file is created and stored in the same directories as the packaged files.

        • For Definition and QA Workbooks, the .eex file is stored in, \OracleHome\owb\misc\DiscoMetaDataReports-Design.

        • For Runtime Workbooks the .eex file is stored in, \OracleHome\owb\misc\DiscoMetaDataReports-Runtime.

        You are now ready to import these files into the Discoverer 4.0 and view and edit the EUL using Discoverer Administration Edition.

        Importing .eex Files into Discoverer

        You can import the .eex files into Discoverer by using the Import Wizard in the Administration tool. Refer to the Discoverer Administration User's Guide for details on importing .eex files.

        Accessing the EUL within Discoverer Administration

        After you import the .eex files, you can access the EUL for Warehouse Builder metadata and runtime audit data using the Discoverer Administration tool. This EUL is built using public views and contains high-level objects defined within Warehouse Builder projects. This reporting structure also facilitates user additions and extensions in future.

        In the Administration tool, you can view a list of all the public views (grayed out) contained in the EUL that are not visible to the end user. These public SQL views, published with the Warehouse Builder installation, can also be used to construct new customized EULs.
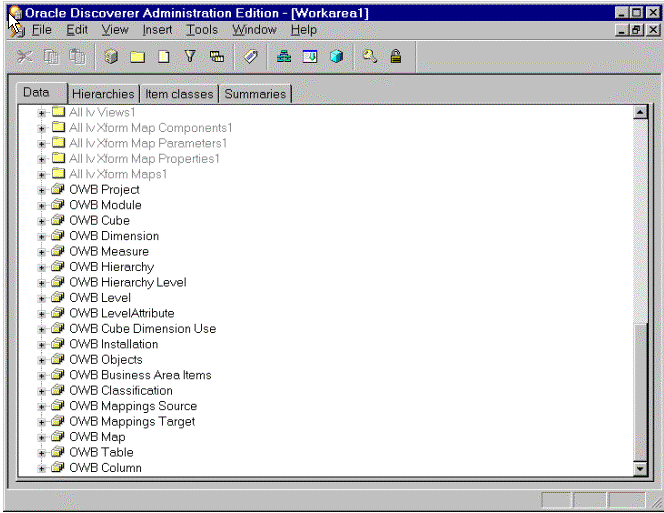
        Figure 11-28 EUL for Definition and QA Workbooks

        Text description of eul.gif follows.

        Text description of the illustration eul.gif

        Table 11-19 lists all the folders within the EUL for Warehouse Builder Definitions and QA workbooks and describes their contents. For descriptions of all the public views (grayed out and prefixed by All), refer to Appendix H, "Warehouse Builder Bridges: Transfer Parameters and Considerations".
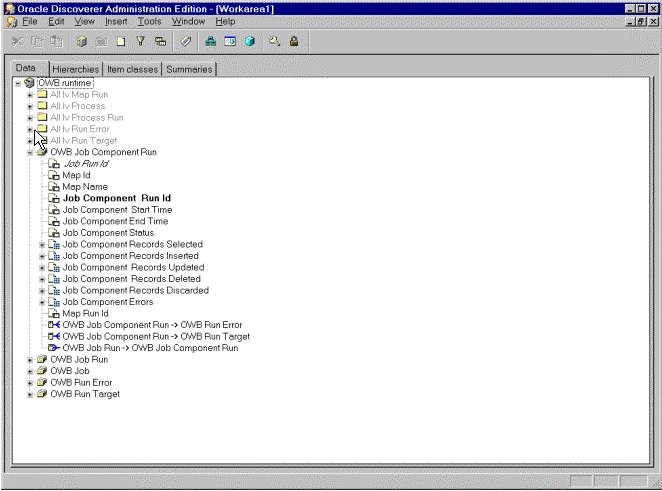
        Table 11-19 Description of Warehouse Builder Design EUL Folders  
        EUL Folder Description

        OWB Project

        The root node of Warehouse Builder design. A structure within the Warehouse Builder repository where you store definitions that describe your logical warehouse

        OWB Module

        Containers within the Warehouse Builder Projects that store definitions to define and populate your data warehouse.

        OWB Cube

        Core Fact entity in the Warehouse Builder dimensional model. They are central tables that hold the aggregate data from one or more data tables and contain foreign keys to dimension tables.

        OWB Dimension

        Entity in the Warehouse Builder dimensional model that organizes and indexes data for the fact tables.

        OWB Measure

        Part of the Warehouse Builder cube.

        OWB Hierarchy

        Hierarchies contained within each Warehouse Builder dimension that describe the parent-child relationship among a set of levels.

        OWB Hierarchy Level

        Levels contained within the Warehouse Builder hierarchy.

        OWB Level

        Levels contained within the Warehouse Builder dimensions. A combination of levels forms a hierarchy.

        OWB Level Attribute

        Attributes that define the level and the columns within the level.

        OWB Cube Dimension Use

        Describes how a cube relates to the dimensions.

        OWB Installation

        Contains information on this particular Warehouse Builder installation

        OWB Objects

        All the objects in the Warehouse Builder design.

        OWB Business Area Items

        Items within a Business Area in a Warehouse Builder Project.

        OWB Classification

        Used to generally classify objects (implements business areas).

        OWB Mappings Source

        The sources of Warehouse Builder Mappings.

        OWB Mappings Target

        The targets of a particular source.

        OWB Map

        Warehouse Builder mappings and their targets.

        OWB Table

        Table objects in the Warehouse Builder design.

        OWB Column

        Columns contained within the tables in the Warehouse Builder design.

        Figure 11-29 EUL for Runtime Workbook

        Text description of eul2.gif follows.

        Text description of the illustration eul2.gif

        Table 11-20 lists all the folders within the EUL for Warehouse Builder Runtime workbook and describes their contents. For descriptions of all the public views (grayed out and prefixed by All), refer to Appendix H, "Warehouse Builder Bridges: Transfer Parameters and Considerations".

        Table 11-20 Description of Warehouse Builder Runtime EUL Folders  
        EUL Folder Description

        OWB Job

        The job or process that is executed from time to time.

        OWB Job Run

        The individual runs of a job.

        OWB Job Component Run

        The job components within a specific job run.

        OWB Run Target

        The target table of a particular job component run.

        OWB Run Error

        The errors encountered while running the job component.

        Accessing Workbooks using Discoverer User Edition

        To open the workbooks and run reports on Warehouse Builder metadata, connect to the Discoverer Plus Edition and open the workbooks owbdef.dis (for the Definition workbook) and qa.dis (for the QA workbook) from the following location:

        \OracleHome\owb\misc\DiscoMetaDataReports-Design

        You can open the runtime.dis file (for the Runtime workbook) from the following location:

        \OracleHome\owb\misc\DiscoMetaDataReports-Runtime

        These workbooks connect to the EULs previously installed.

        If the Workbook in Other Database Account dialog displays, choose the default Open the workbook in current database account.
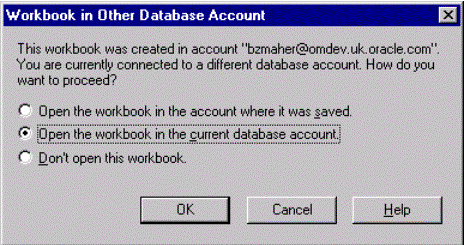
        Figure 11-30 Workbook in Other Database Account

        Text description of discoplu.gif follows.

        Text description of the illustration discoplu.gif

        If you receive a warning about missing objects, the workbook cannot connect to the EUL. Check for incorrectly specified .eex file generation parameters. To validate these parameters, cancel out of this workbook and follow the prompts to create a table query based on the Warehouse Builder definition metadata EUL. If you do not see any objects in the Warehouse Builder definition metadata EUL, then the user you entered does not exist or does not have access to the data. Check to see if you have used a wrong user or entered the user name in lower case when creating the .eex file.

        To check the information entered in the .eex file, open Discoverer Administration, open the Business Area Warehouse Builder definition metadata, right-click on one of the grayed out folders, and check its properties for the user name.


        Note::

        The user name must be entered in uppercase.


        If you need to correct an error, you must rerun the .eex file generator with the correct user name and database link, delete this Business Area, and re-import it into Discoverer. You must also reconnect the Discoverer Plus Edition.

        Navigating Workbooks

        A workbook can contain multiple worksheets that enable you to document and manage your Warehouse Builder data. For example, the QA workbook contains worksheets for facts without dimensions, source objects not used, and mismatched data types. Reports or query results displayed in a worksheet can be edited and printed.

        You can make your reports easier to read and more informative by reformatting them. To reformat the width of the columns, position your cursor in the column header between columns, so that it displays arrows pointing in both directions. Drag the column to make it wider or narrower.

        When viewing Warehouse Builder metadata, you can choose objects from projects and modules defined within the Warehouse Builder repository. A down-pointing triangle to the right of the Page Items header signifies that you can click on the arrow and choose the Project Name, the Module Name, or the Table Name (when applicable).

        Worksheets enable you to perform drill-down analysis on hierarchical data. A right-pointing triangle to the left of a column header signifies that you can drill down on that object. To perform a drill down:

        • Select the object you want to drill on.

        • Right-click the object and select Drill from the pop-up menu.

        The report displays the properties and hierarchical relationships for that object.

        Definition Workbook

        The definition workbook enables you to run reports on the objects defined within the Warehouse Builder repository, for example, Project, Measures, Dimensions, Hierarchies, Business Area, Tables, and Mappings.
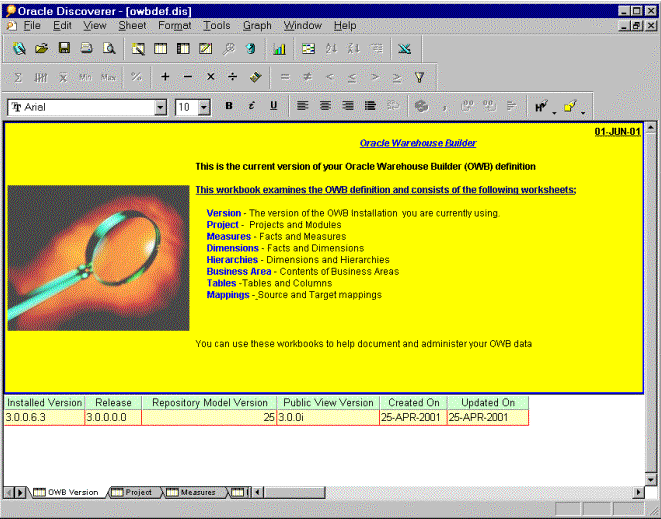
        Figure 11-31 Workbook Definition

        Text description of defwork1.gif follows.

        Text description of the illustration defwork1.gif

        The Version worksheet within the Definitions Workbook displays all the worksheets available within this workbook.
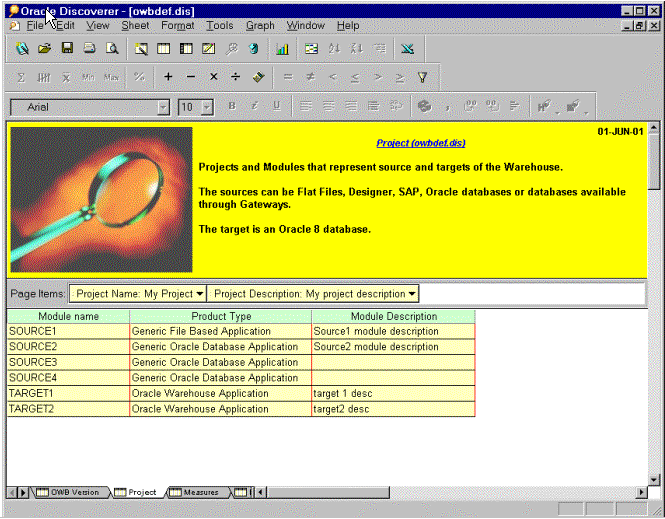
        Figure 11-32 Project Worksheet

        Text description of defwork2.gif follows.

        Text description of the illustration defwork2.gif

        The Project worksheet contains the projects and modules defined within a logical Warehouse Builder design. The worksheet displays both source (Flat File, SAP, Designer, Oracle Database) and target modules.
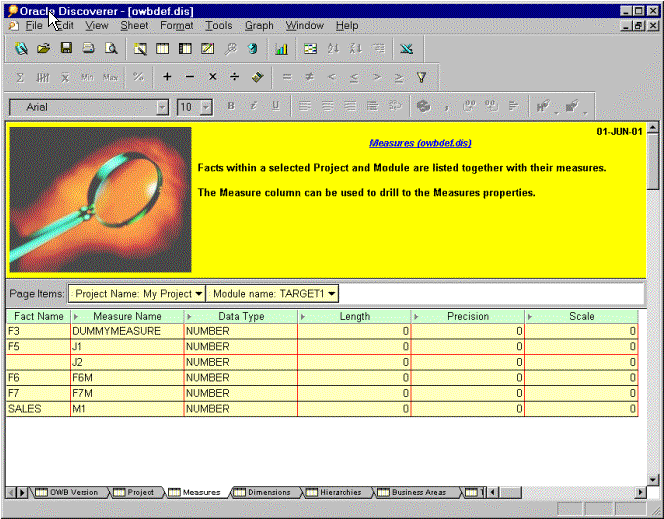
        Figure 11-33 Measures Worksheet

        Text description of defwork3.gif follows.

        Text description of the illustration defwork3.gif

        The Measures worksheet lists the Fact tables defined within the selected project and module, along with their measures. You can further drill down on the Measure Name column to view measure properties such as data type, length, precision, and scale.
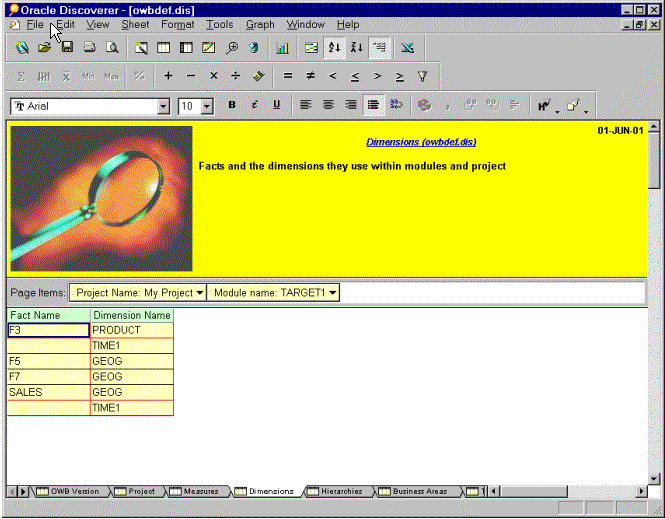
        Figure 11-34 Hierarchy Worksheet

        Text description of defwork4.gif follows.

        Text description of the illustration defwork4.gif

        The Hierarchy worksheet lists all the dimensions, hierarchies, and levels defined within the selected project and module. You can drill on level names to view the level attributes and further on to view the attribute properties.
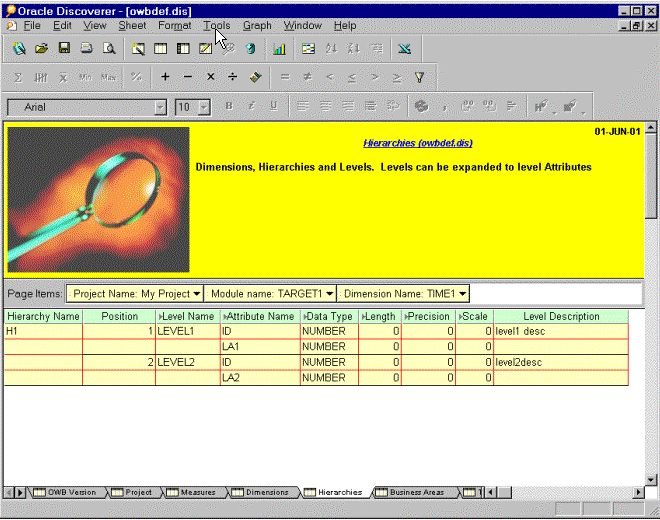
        Figure 11-35 Dimensions Worksheet

        Text description of defwork5.gif follows.

        Text description of the illustration defwork5.gif

        The Dimensions worksheet lists all the fact tables within the selected project or module, and the dimensions they reference.
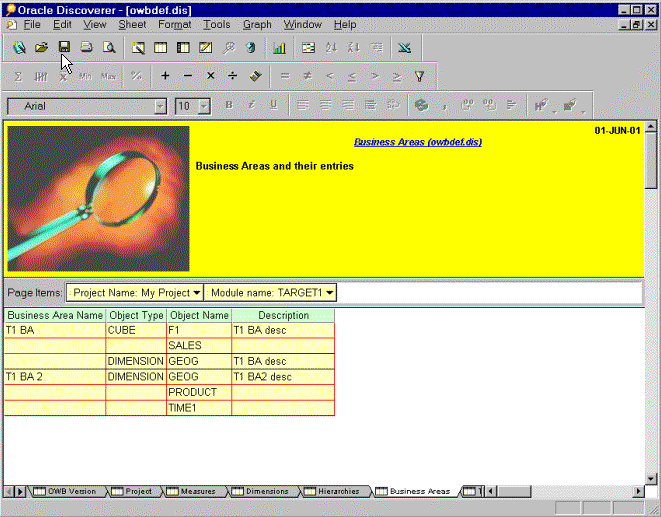
        Figure 11-36 Business Area Worksheet

        Text description of defwork6.gif follows.

        Text description of the illustration defwork6.gif

        The Business Area worksheet lists all the Business Areas defined within the selected project. It also lists the objects defined within each business area.
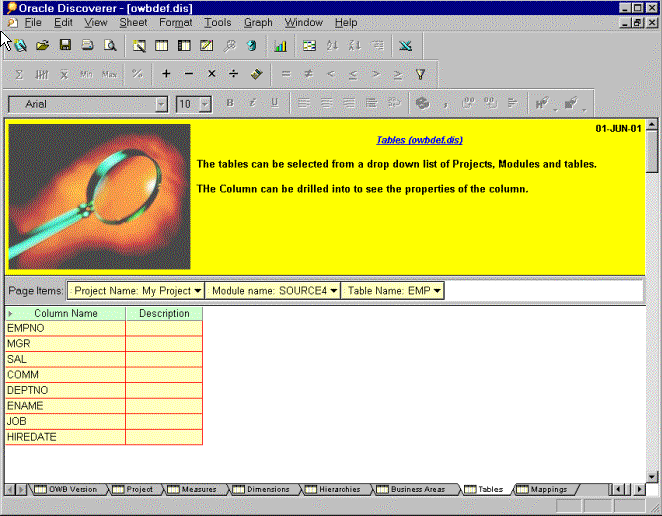
        Figure 11-37 Tables Worksheet

        Text description of defwork7.gif follows.

        Text description of the illustration defwork7.gif

        In the Tables worksheet, you can choose a table from a specific project and module. The worksheet then displays the columns defined within the selected table. The columns can be drilled on to view the column properties.
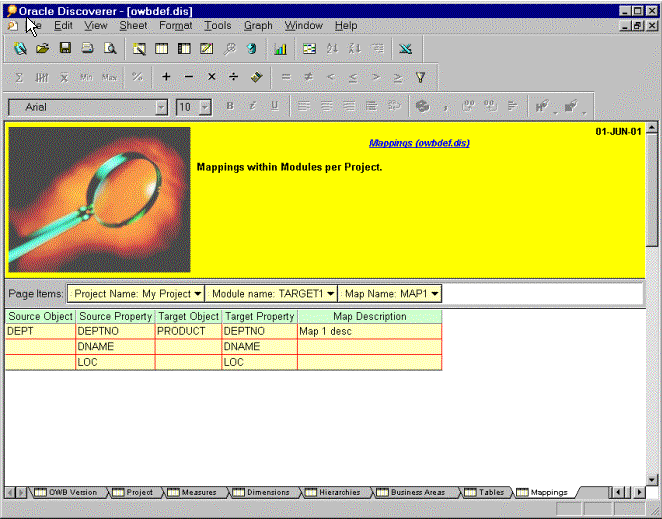
        Figure 11-38 Mappings Worksheet

        Text description of defwork8.gif follows.

        Text description of the illustration defwork8.gif

        In the mappings worksheet, you can choose a mapping from a specific project and module. The worksheet then displays the source and target objects defined within that mapping.

        QA Workbooks

        The QA Workbooks enable you to report on incomplete and invalid object definitions. These reports are useful in tracking down logical errors in your Warehouse Builder design. The QA workbook contains the following types of worksheets.
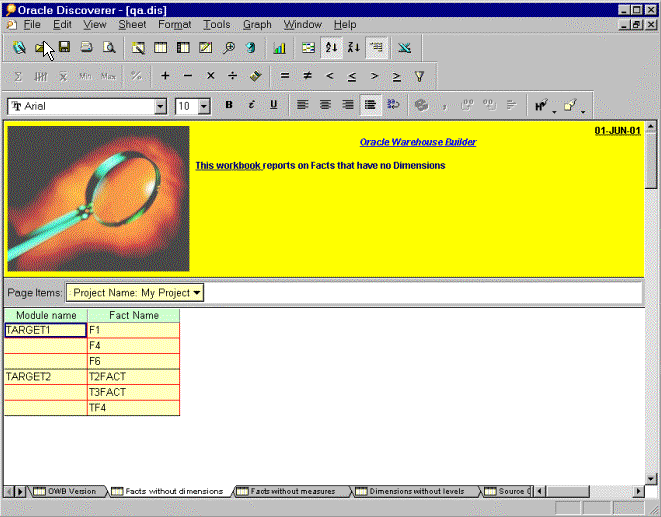
        Figure 11-39 Facts without Dimensions Worksheet

        Text description of defworka.gif follows.

        Text description of the illustration defworka.gif

        The Facts without Dimensions worksheet reports on erroneous fact tables, within the selected project, that do not reference any dimensions.
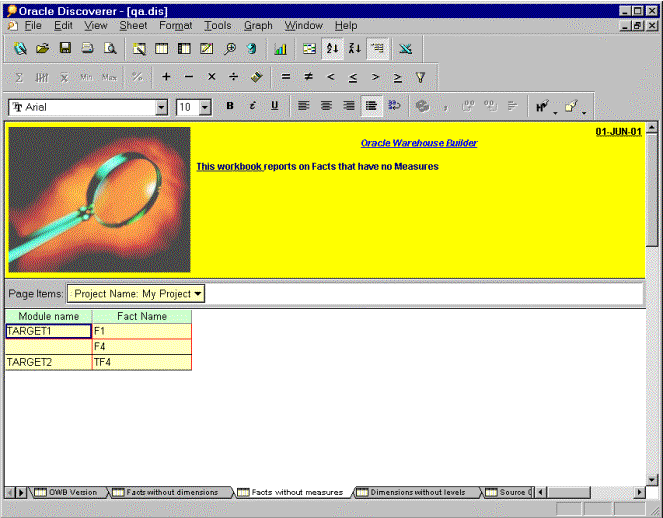
        Figure 11-40 Facts without Measures Worksheet

        Text description of defworkb.gif follows.

        Text description of the illustration defworkb.gif

        The Facts without Measures worksheet reports on fact tables, within the selected project, that do not contain defined measures.
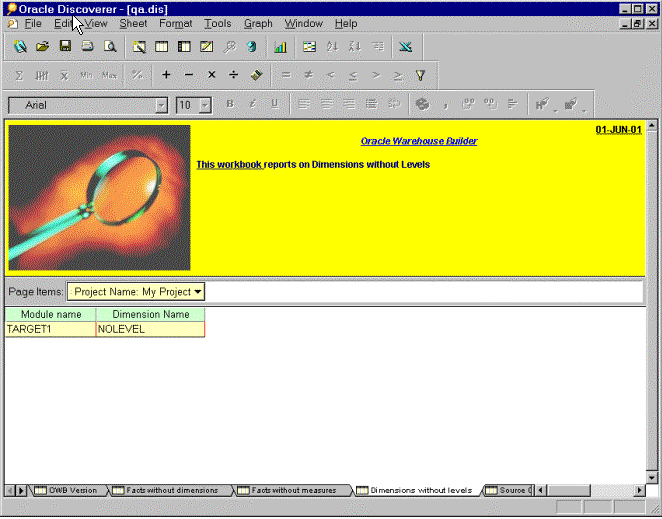
        Figure 11-41 Dimensions without Levels Worksheet

        Text description of defworkc.gif follows.

        Text description of the illustration defworkc.gif

        The Dimensions without Levels worksheet reports on the dimensions, within the selected project, that do not contain any defined levels.
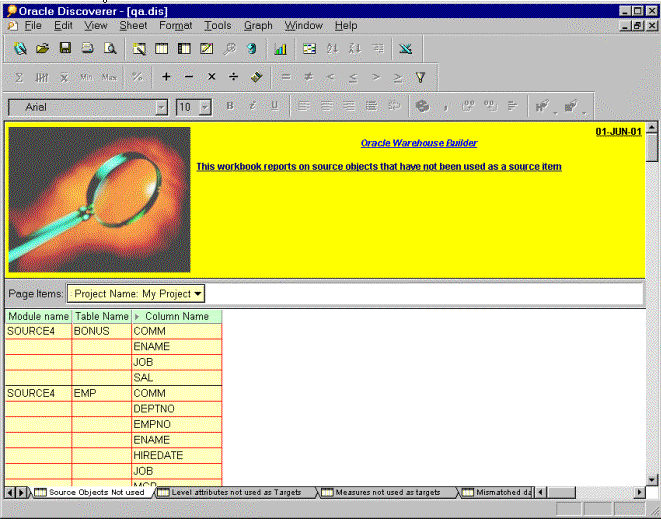
        Figure 11-42 Source Objects Not Used Worksheet

        Text description of defworkd.gif follows.

        Text description of the illustration defworkd.gif

        The Source Objects Not Used worksheet reports on the source objects that have not been used as source items within mappings in the selected project.
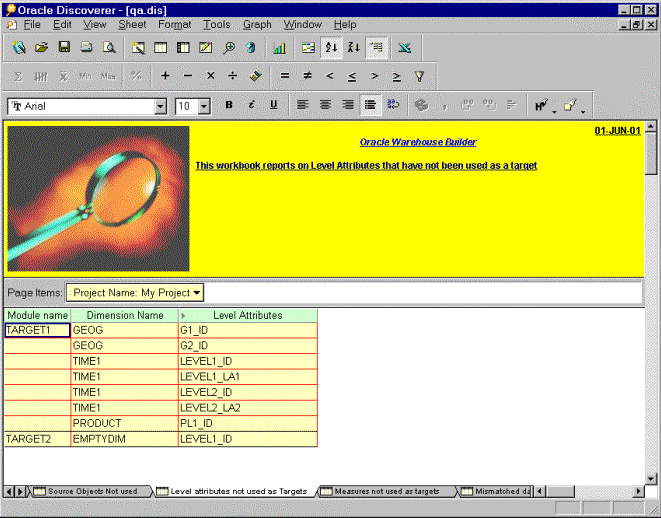
        Figure 11-43 Level Attributes Not Used as Targets Worksheet

        Text description of defworke.gif follows.

        Text description of the illustration defworke.gif

        The Level Attributes Not Used as Targets worksheet reports on the level attributes that have not been used as a target within mappings in the selected project.
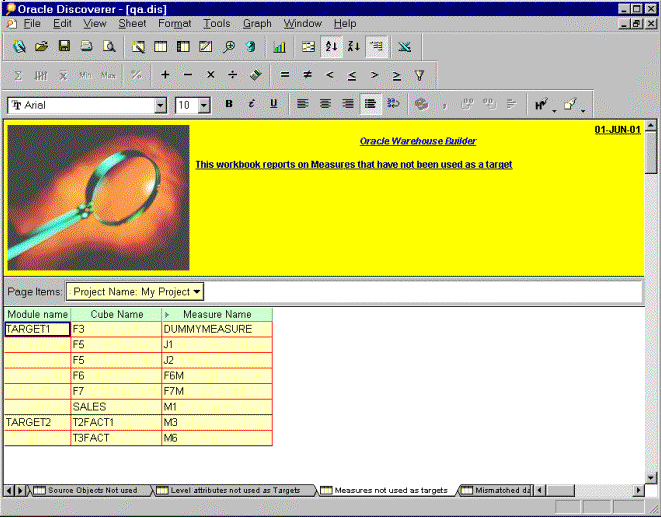
        Figure 11-44 Measures Not Used as Targets Worksheet

        Text description of defworkf.gif follows.

        Text description of the illustration defworkf.gif

        The Measures Not Used as Targets worksheet reports on the measures that have not been used as a target in the selected project.
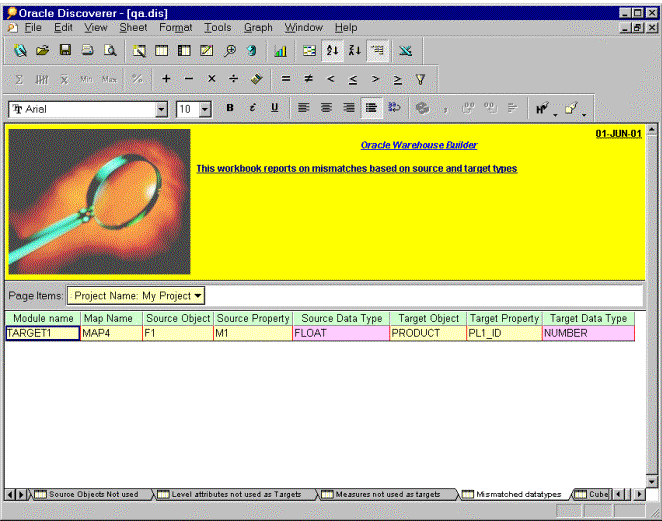
        Figure 11-45 Mismatched Data Types Worksheet

        Text description of defworkg.gif follows.

        Text description of the illustration defworkg.gif

        The Mismatched Data Types worksheet reports on mismatches based on the source and target types in the selected project.

        Runtime Workbooks

        The Runtime workbooks enable you to report on runtime data and track down runtime errors. The following worksheets are available within the runtime workbooks.
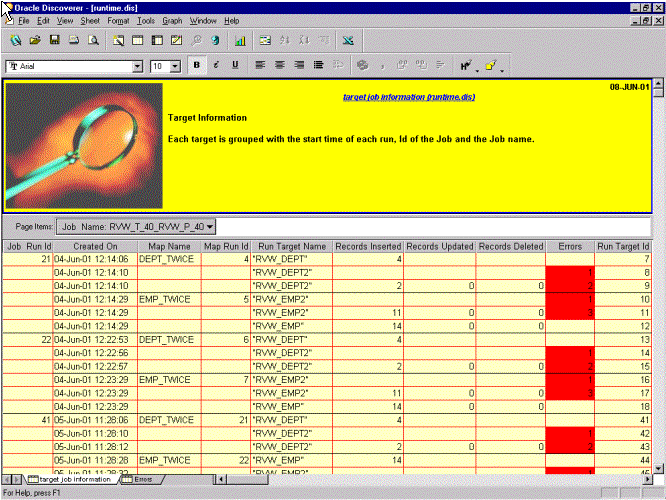
        Figure 11-46 Target Job Information Worksheet

        Text description of runwork1.gif follows.

        Text description of the illustration runwork1.gif

        The Target Job Information worksheet reports on the job runs for each job selected from the Page Items field. A job includes several Warehouse Builder mappings that can be run separately. This report lists information on the runs along with any errors that were encountered.
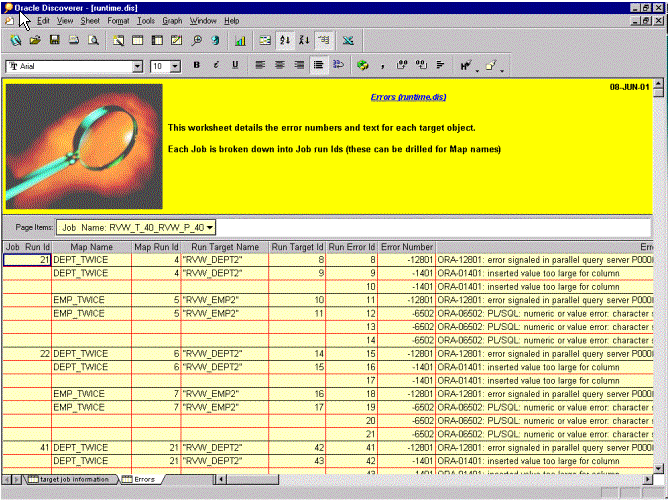
        Figure 11-47 Errors Worksheet

        Text description of runwork2.gif follows.

        Text description of the illustration runwork2.gif

        The Errors worksheet displays the error numbers and error messages for each target object within a Warehouse Builder mapping within the selected job.

        Improving Performance of Workbooks

        You can use the Query prediction feature within Discoverer to measure the cost of running Discoverer Workbooks.

        Since the Warehouse Builder design data resides in one physical table (CMPALLCLASSES) with numerous views, the default settings for the Discoverer Query prediction are not optimal for increasing performance. To increase performance, you can either disable query prediction by updating the registry, or ANALYZE the table to gather information as indicated in the Discoverer documentation.

        Below is an extract from the Discoverer Administration documentation. For details refer to the Discoverer Administration User's Guide.

        For Windows NT, Discoverer 4.1 registry settings are stored under:

        \\HKEY_CURRENT_USER\Software\Oracle\Discoverer 4\Database

        For Windows 2000, Discoverer 4.1 registry settings are stored under:

        \\HKEY_CURRENT_USER\Software\Oracle\Webdisco 4\Default\Database

        QPPEnable =1 (0 = false, 1 = true): This setting enables you to turn Query Prediction on or off. Uses query prediction/performance (QPP) if set to 1.

        An alternative is to analyze the Warehouse Builder table to improve the efficiency of the query prediction.

        SQL> analyze table <username.tablename> compute statistics for all columns;

        SQL> analyze table <username.tablename> compute statistics;

        For example, if the user name is Warehouse Builder, then the statement is:

        analyze table OWB.CMPALLCLASSES compute statistics for all columns;

        analyze table OWB.CMPALLCLASSES compute statistics;

        This analyze statement only needs to be run occasionally.


Go to previous page Go to next page
Oracle
Copyright © 1996, 2002 Oracle Corporation.

All Rights Reserved.
Go To Documentation Library
Home
Go To Product List
Solution Area
Go To Table Of Contents
Contents
Go To Index
Index