Skip Headers

Oracle9i Warehouse Builder User's Guide
Release 2 (v9.0.2)

Part Number A95949-01
Go To Documentation Library
Home
Go To Product List
Solution Area
Go To Table Of Contents
Contents
Go To Index
Index

Go to previous page Go to next page

9
Configuring, Generating, and Deploying

This chapter describes how to generate a physical warehouse instance from a logical warehouse design. You begin this process by configuring the properties of the target warehouse module. You can then validate the definitions and generate the scripts used to create the warehouse objects and the mapping scripts used to load the warehouse. When you deploy the scripts, the warehouse objects are created and the mapping scripts are stored in the warehouse instance. This chapter also describes how to upgrade the warehouse.

This chapter includes the following topics:

Configuring a Physical Instance

When you configure a physical instance, you specify which objects in the logical warehouse design to physically deploy. You also define the physical characteristics of the warehouse objects. Physical characteristics are determined by a set of parameters stored in the configuration properties inspector for the object. Most parameters have default values.

To configure a data warehouse, you must define the physical properties listed in Table 9-1, which summarizes the properties you can configure for each object deployed to the physical warehouse.

Table 9-1 Physical Configuration Properties 
Warehouse Object Properties

Warehouse Module

Database link definitions, generation preferences, the job name to register with Oracle Enterprise Manager, runtime and target directory names, and warehouse module identification properties.

Dimension

Indexes, partitions, partition keys, constraints, columns, performance, parallel, partition parameters, table space used to store, generation options for time dimensions, generation options, and identification.

Fact

Indexes, partitions, partition keys, constraints, columns, performance, parallel, partition parameters, table space used to store, and identification.

Mapping

These parameters are described in Chapter 8.

Materialized View

Indexes, partitions, partition keys, performance, parallel, partition parameters, materialized view parameters, table space used to store, and identification.

Sequence

Sequence Parameters and Identification.

Table

Indexes, partitions, partition keys, constraints, columns, performance, parallel, partition parameters, table space used to store, and identification.

Transformation Libraries

Identification.

View

Identification.


Note:

Database links, indexes, and partitions are physical objects. They are not created during the logical design. They must be created in the Configuration Properties inspector before you can configure their parameters. See "Creating Database Links, Indexes, and Partitions" for more information.


Setting up Configuration Properties

To set up configuration properties:

  1. Select the module you want to configure from the navigation tree in the Warehouse Module Editor.

  2. From the Edit menu, select Configure.

    The Configuration Properties inspector displays.

  3. Choose the parameter you want to configure and click the space to the right of the parameter name to edit the value.

    Depending on the parameter, you can either select an option from a drop-down list or type a value.

Guidelines for Configuring Warehouse Modules

Table 9-2 describes the categories of parameters in the Configuration Properties inspector for Warehouse Modules.
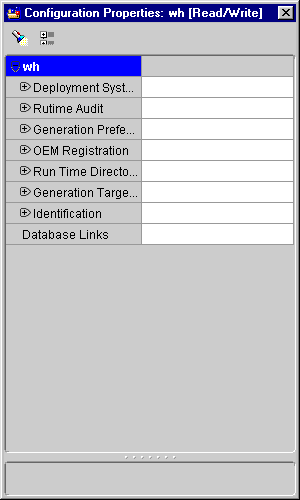
Figure 9-1 Configuration Properties Inspector for Modules

Text description of dblink.gif follows.

Text description of the illustration dblink.gif

Table 9-2 Warehouse Module Configuration Parameters  
Category Parameter Description

Deployment System Type

Target Database Type

Defines the target database type. Select either Oracle8i or Oracle9i from the drop-down list

Runtime Audit

Audit Level

Defines how the audit data is collected and stored in the Runtime Audit Tables. Select one of the following options from the drop-down list:

  • None: No audit data is collected.

  • Statistics: Records basic runtime statistics such as the number of rows processed.

  • Error Details: Records basic runtime statistics and detailed information about rows containing errors.

  • Complete: Records basic runtime statistics, detailed information about rows containing errors, and the rowid of every row.

Generation Preferences

End of Line

Defines the end of line markers. This is dependent on the platform to which you are deploying your warehouse. For UNIX, use \n, and for NT, use \r\n.

OEM Registration

OEM Job Name

Type in the suffix that is appended to the name of a mapping script when it is registered with Oracle Enterprise Manager. The default is _job.

Runtime Directories

Log Directory

Log directory for the SQL*Loader. The default is log\.

Runtime Directories

Archive Directory

Not currently used. The default is archive\.

Runtime Directories

Receive Directory

Not currently used. The default is receive\.

Runtime Directories

Input Directory

Not currently used. The default is input\.

Runtime Directories

Invalid Directory

Directory for Loader error and rejected records. The default is invalid\.

Runtime Directories

Work Directory

Not currently used. The default is work\.

Runtime Directories

Sort Directory

Not currently used. The default is sort\.

Runtime Directories

Queue Listener Directory

Location of Warehouse Builder Work Flow Queue Listener. The default is workflow\.

Runtime Directories

Queue Listener Host

Computer name for the Work Flow Queue Listener. The default is the local host.

Generation Target Directories

TCL Directory

Location of the Tcl scripts that can be registered with Oracle Enterprise Manager. These are used to schedule and run initial and incremental loader jobs. The default is tcl\.

Generation Target Directories

DDL Directory

Location of the scripts that create database objects for the target schema. The default is ddl\.

Generation Target Directories

DDL Extension

File name extension for DDL scripts. The default is .ddl.

Generation Target Directories

DDL Spool Directory

Buffer location for DDL scripts during the script generation processing. The default is ddl\log.

Generation Target Directories

LIB Directory

Location of scripts that generate Oracle functions and procedures. The default is lib\.

Generation Target Directories

LIB Extension

Suffix appended to a mapping name. The default is .lib.

Generation Target Directories

LIB Spool Directory

Location of scripts that generate user-defined functions and procedures. The default is lib\log\.

Generation Target Directories

PL/SQL Directory

Location of the PL/SQL scripts. The default is pls\.

Generation Target Directories

PL/SQL Extension

File name extension for PL/SQL scripts. The default is .pls.

Generation Target Directories

PL/SQL Run Parameter File

Suffix for the parameter script in a PL/SQL job. The default is _run.ini.

Generation Target Directories

PL/SQL Spool Directory

Buffer location for PL/SQL scripts during the script generation processing. The default is pls\log\.

Generation Target Directories

Loader Directory

Location of control files. The default is ctl\.

Generation Target Directories

Loader Extension

Suffix for the loader scripts. The default is .ctl.

Generation Target Directories

Loader Run Parameter File

Suffix for the parameter initialization file.
The default is _run.ini.

Generation Target Directories

Pure Extract Run Parameter File

Suffix for the parameter script in a Pure Extract job. The default is _run.ini.

Generation Target Directories

Pure Integrate Run Parameter File

Suffix for the parameter script in a Pure Integrate job. The default is _run.ini.

Identification

Name, Previous Deployment Name and Deployable

Contains general information about the dimension, fact, or table including the name, the name that it was last deployed with, and whether it is deployable.

Guidelines for Configuring Dimensions, Facts, and Tables

Warehouse Builder generates two scripts for a dimension: one to create the dimension object and the other to create the underlying table. Additional scripts are generated when indexes are defined on the dimension table, or when the definition is generated with the Time Dimension Wizard. The configuration parameters for a dimension specify how these scripts are generated and whether the dimension is deployed.
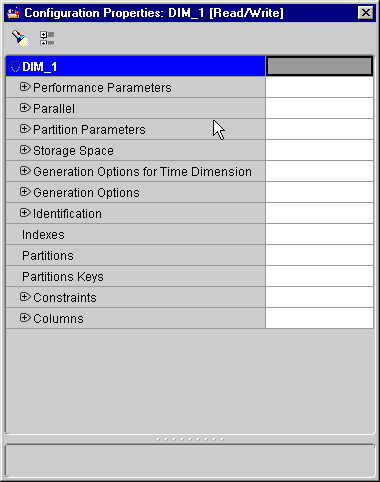
Figure 9-2 Configuration Properties Inspector for a Dimension

Text description of dimcnfig.gif follows.

Text description of the illustration dimcnfig.gif

Table 9-3 defines the configurations parameters for dimensions, facts, and tables. For information on creating indexes, partitions, and partition keys see "Creating Database Links, Indexes, and Partitions".

Table 9-3 Dimension/Fact/Table Configuration Parameters  
Category Parameter Description

Performance Parameters

Log to Redo Log File

Recovery requirements for a data warehouse are usually less strenuous than for a transaction system. Set to nologging to improve performance. The default is logging.

Performance Parameters

Analyze Table: Estimate Percent

Value represents the sample size as a percentage of total rows. When set to a nonzero value, Warehouse Builder generates a DDL script to analyze the table.

To improve performance, use a high number for a large dimension table and a low number for a small dimension table. The default is 99.

Parallel

Parallel

Enables parallel processing when the table is created. If you are using a single CPU or a non-Oracle database, set to nonparallel to improve performance. The default is parallel.

Partition Parameters

Hash SubPartition Number and Store in Tablespace

Defines the partition key and method. Select Hash or Range. These parameters only apply if you create hash partitions. For more information, see "Creating Partitions".

Storage Space

Tablespace

Defines the name of each tablespace. A dimension table can reside in one or more tablespaces if partitions are defined. If you do not use partitions, then the storage space resides on a single tablespace.

Generation Options for Time Dimension

Start and End Date

When you create a definition for a dimension using the Time Dimension Wizard, Warehouse Builder generates an insert statement to load the underlying table. The Start and End Date parameters determine the range of dates.

Generation Options

Generate Table

Specifies whether or not to create the dimension table. The default is true.

Generation Options

Generate Dimension

Specifies whether or not to generate a script to create the object. Set this parameter to true only when the warehouse requires the hierarchy and level information. Create this information for an instance that relies on materialized views that reference this dimension.

Identification

Name, Previous Deployment Name and Deployable

Contains general information about the dimension, fact, or table including the name, the name that it was last deployed with, and whether it is deployable.

Guidelines for Configuring Materialized Views

Warehouse Builder generates one script to create a materialized view and another for its foreign key reference constraints. This is the same generation process used for views and tables. Additional scripts are generated when indexes are defined on the view.
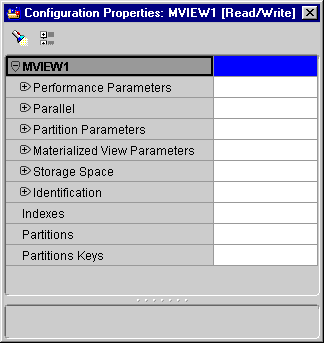
Figure 9-3 Configuration Properties Inspector for Materialized Views

Text description of cpmvcs.gif follows.

Text description of the illustration cpmvcs.gif

The Configuration Properties inspector for a materialized view contains most of the same categories as dimensions, facts, and tables. See Table 9-3 for the parameter descriptions. Table 9-4 defines parameters specific to materialized views.


Note:

  • Warehouse Builder does not generate code for a view if its query text is not included in its configuration properties and if its columns are not defined.

  • Warehouse Builder generates a create materialized view statement to deploy the view even if its syntax is invalid. Warehouse Builder does not check the syntax of the select statement used to define a materialized view.


Table 9-4 Materialized View Parameters  
Parameter Description

Build

Immediate: Populates the view when it is created.

Deferred: Delays population until the next refresh operation.

The default is Immediate.

Refresh

Complete: Specifies the complete refresh method implemented by executing the view's query.

Fast: Specifies the incremental refresh method which refreshes the view according to changes that have occurred to the master tables.

Force: Specifies that when a refresh occurs, Oracle8i/9i performs a fast refresh if possible or a complete refresh otherwise.

The default is Complete. For more information on restrictions to the refresh parameter, see the Oracle8i/9i documentation.

Query Rewrite

Enable: Marks the view eligible for query rewrite.

Disable: Marks the view ineligible for query rewrite.

The default is Enable.

Base Tables

Type the exact name of the base tables separated by commas. If the tables were created in Preserve Case, enclose table names with quotes.

The default is blank.

Guideline for Configuring Sequences

Warehouse Builder generates a script for each sequence object. A sequence object has a Start With and Increment By parameter. Both parameters are numeric.
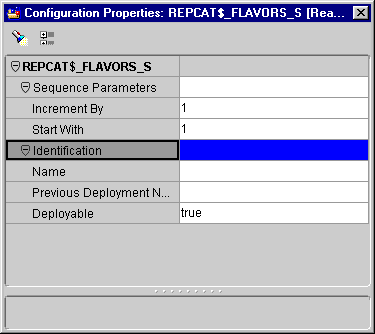
Figure 9-4 Sequences Configuration Properties Inspector

Text description of seq_conf.gif follows.

Text description of the illustration seq_conf.gif

Guidelines for Configuring Views

Warehouse Builder generates a script for each view defined in a warehouse module. You can configure whether to deploy specific views or not.
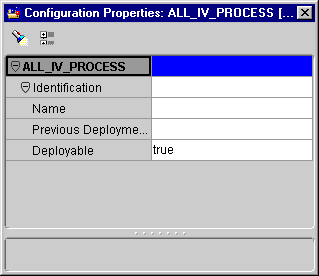
Figure 9-5 View Configuration Properties

Text description of view_con.gif follows.

Text description of the illustration view_con.gif


Note:

  • Warehouse Builder does not generate code for a view if its query text is not included in its configuration properties and if its columns are not defined.

  • Warehouse Builder generates a create view statement to deploy the view even if its syntax is invalid. Warehouse Builder does not check the syntax of the select statement used to define a view.


Creating Database Links, Indexes, and Partitions

Physical objects such as database links, indexes, partitions, and partition keys cannot be created when you are designing the warehouse. If you want to create these objects in your database when you deploy, you must define the configuration properties before deploying the warehouse. These objects can only be created in relation to certain objects. Database links can only be created in the warehouse module Configuration Properties inspector. Indexes, partitions, and partition keys can only be created in the dimension, fact, table, and materialized view Configuration Properties inspectors.

Creating Database Links

Target schemas pull data from database sources using PL/SQL packages. These packages rely on database links to connect with the sources. A definition for a database link must be created, configured, and deployed for each database source. The database link is deployed in the target schema.

Each time you create a mapping that pulls data from a database source, Warehouse Builder verifies that a definition for the required database link exists. If the definition does not exist, Warehouse Builder creates one from the connection information stored in a source module for a mapping. This means, the default parameter values for a database link correspond with the connection information in a source module.

When you deploy a physical instance, the database links generated by Warehouse Builder must point to the correct sources. For example, if a test application system was used to develop the logical warehouse but the physical instances use real data stored in production systems, then you must reconfigure the definitions to reflect this change.

Definitions for database links are visible in the Configuration Properties inspector for the warehouse module. You can specify the host machine using a SQL*Net connect string or by providing the host name, port, and ID of the database instance.


Note:

If your source and target tables are in the same instance, you can link directly to the schema. You set this up in the mapping configuration. When the source module references an Oracle Designer repository, you must configure the database link to point to the actual database and not the Designer repository.


You can create bitmap indexes on facts, dimensions, tables, and materialized views.

To create bitmap indexes:

  1. Select a table, fact, dimension, or materialized view from the Warehouse Module Editor.

  2. From the Edit menu, select Configure or right-click the table and select Configure from the pop-up menu.

    The Configuration Properties inspector for the entity displays.

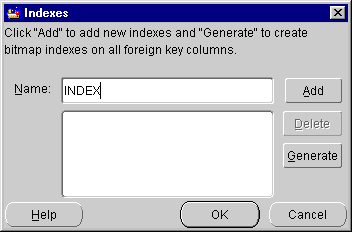
  3. Select Indexes and then the ... button located in the right column.

    The Indexes dialog displays.

Figure 9-6 Indexes Dialog

Text description of indexwin.gif follows.

Text description of the illustration indexwin.gif

  1. Type a name in the Name field and click Add.

    Repeat this step for each index you want to create.

  2. Click Generate.

    The Impact report for Bitmap Index creation dialog displays.

    Before indexes are generated, Warehouse Builder checks the table for foreign keys. Warehouse Builder does not generate indexes if:

    • There are no foreign keys on the table.

      In this case, Warehouse Builder informs you that no index can be created because there are no foreign keys on the table.

    • There are foreign keys on the table but there are no columns defined for them.

    • There are foreign keys on the table and some of them already have indexes.

      If there is already a bitmap index created on one of the columns, then the column name and the name of the existing index displays in the Impact Report dialog along with a message that no new bitmap index can be created for these columns.
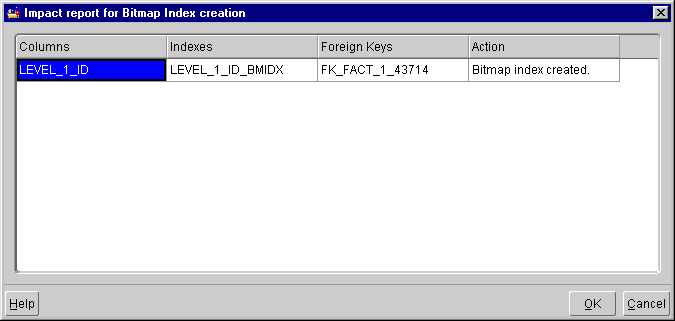
    Figure 9-7 Impact Report For Bitmap Index Creation Dialog

    Text description of indeximp.gif follows.

    Text description of the illustration indeximp.gif

    1. Click OK if the indexes are correct, otherwise click Cancel.

    After you create indexes, you can edit their parameters using the Configuration Properties inspector.

    To configure bitmap indexes:
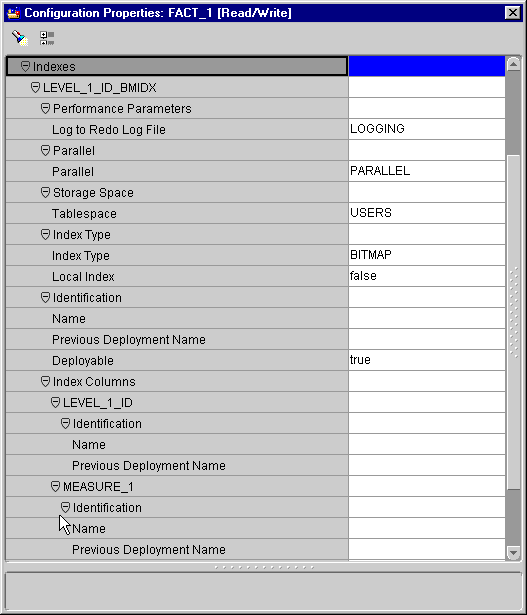
    1. Click the Index node in the Configuration Properties inspector.

    Figure 9-8 Configuration Properties Inspector Showing Indexes

    Text description of cpindexe.gif follows.

    Text description of the illustration cpindexe.gif

    1. Set the Index Type to Bitmap.

      Table 9-5 describes the remaining parameters for indexes.

      Table 9-5 Index Parameters  
      Parameter Default Description

      Index Columns

      None

      The columns in the index.

      Log to Redo

      Logging

      Indicates whether the creation of the index logs into the redo log file. Set to nologging to improve performance.

      Parallel

      Parallel

      Enables parallel processing when the table is created. If you are using a single CPU or a non-Oracle database, set to nonparallel to improve performance.

      Tablespace

      Users

      Specifies the tablespace to hold the index in.

      Index Type

      Bitmap

      The type of index: bitmap, unique, or none.

      Local Index

      False

      Specifies that the index is partitioned on the same columns, with the same number of partitions and the same partition bounds as the table.

      Name

      blank

      The name of the index.

      Previous Deployment Name

      blank

      Previous name of the index when it was last deployed. This is used during a warehouse upgrade.

      Deployable

      true

      Specifies if this index is deployable.

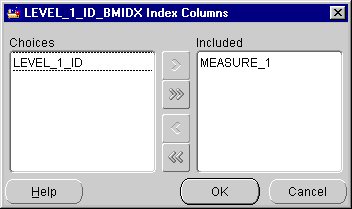
    1. Select the Index Columns:

      1. Click the ... button in the Index Columns field.

        The Index Columns dialog displays.

      2. Select the columns you want to include from the Choices list.

      3. Click the right arrow to move them to the Included list.

      4. Click OK.

      Figure 9-9 Index Columns Dialog

      Text description of indexcol.gif follows.

      Text description of the illustration indexcol.gif

      1. Close the Configuration Properties inspector.

    For information about indexing strategies, see:

    • Oracle8i/9i Data Warehousing Guide

    • Oracle8i/9i Database Performance Guide and Reference

    • Oracle Enterprise Manager Database Tuning with the Oracle Tuning Pack

    Creating Partitions

    Partitions are created on tables to improve query and load performance and to simplify the management of physical storage. Transportable tablespaces are introduced for performance reasons and to transport data across Oracle8i/9i databases. A transportable tablespace is the fastest means to move a large volume of data between two Oracle8i/9i databases. Dimension tables and materialized views occupy storage space and are candidates for intelligent partitioning.

    You can create and configure definitions for partitions from the Configuration Properties inspector. A table can be partitioned using hash, range, or a combination of hash and range partitions.
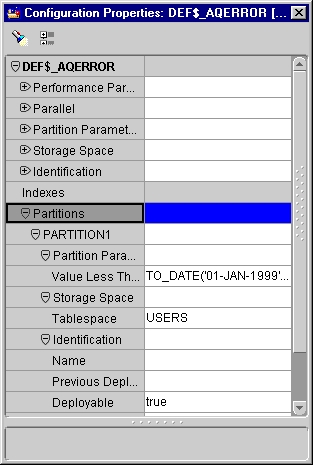
    Figure 9-10 Configuration Properties Inspector Showing Partitions

    Text description of cpparran.gif follows.

    Text description of the illustration cpparran.gif

    Table 9-6 describes the parameter settings for partitions.

    Table 9-6 Partition Parameters  
    Parameter Default Description

    Value Less Than

    TO_DATE('01-JAN-1999',
    'DD-MON-YYYY')

    Specify the non-inclusive upper bound for the current partition. The entry is an ordered list of literal values corresponding to column_list in the partition_by_range_clause. You can substitute the keyword MAXVALUE for any literal in value_list. MAVALUE specifies a maximum value that sorts higher than any other value, including NULL.

    Tablespace

    USERS

    The value specified is the actual physical attribute of the segment associated with the table. For partitioned tables, the value specified for TABLESPACE is the default physical attribute of the segments associated with all partitions specified for the table.

    Name

    Blank

    Name of the partition.

    Previous Deployment Name

    Blank

    Previous name of the partition when it was last deployed. This is used during a warehouse upgrade.

    Deployable

    True

    Specifies if this partition is deployed.

    In order to use Partition Exchange Loading, you need to set key constraints on DATE columns. This column must be part of a primary or unique key on the table, an it must be the first column if it is segmented. This key must be index enabled and that index must be set on the same columns as the primary or unique key. See "Configuring Partition Exchange Loading (PEL)" for information on PEL.

    Table 9-7 describes the partition key parameters.

    Table 9-7 Partition Key Parameters  
    Parameter Default Description

    Type

    Range

    Can be Range or Hash.

    Name

    Blank

    Name of the partition key.

    Previous Deployment Name

    Blank

    Previous name of the partition key when it was last deployed. This is used during a warehouse upgrade.

    Deployable

    True

    Specifies if this partition key is deployable.

    To set partitions on a table:

    1. Open the Configuration Properties inspector for the target table.

    2. Click the Partitions field and then click the ... button.

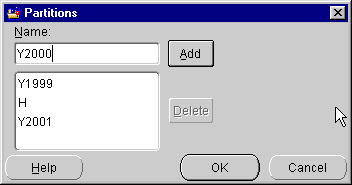
      The Partitions dialog appears.

    Figure 9-11 Partitions Dialog

    Text description of partitio.gif follows.

    Text description of the illustration partitio.gif

    1. Click the Name field and enter a partition name.

    2. Click Add.

      You can delete a partition name from the list by highlighting it and clicking Delete.

      A partition naming convention enables the PEL to automatically construct the correct partition name based on freshly loaded data. The partition name must contain information on all the time levels leading to the intended granularity. This convention also enables Warehouse Builder to calculate the Value Less Than property automatically. Table 9-8 describes the PEL naming convention.

      Table 9-8 The Warehouse Builder Partition Naming Convention  
      Name Pattern Example

      Ydddd

      for example Y1999

      Ydddd_Qd

      Y1999_Q1)

      Ydddd_Qd_Mdd

      Y1999_Q1_M02)

      Ydddd_Qd_Mdd_Ddd

      Y1999_Q1_M02_D03)

      Ydddd_Qd_Mdd_Ddd_Hdd

      Y1999_Q1_M02_D03_H16)

      Ydddd_Qd_Mdd_Ddd_Hdd_Mdd

      Y1999_Q1_M02_D03_H16_M20)

      If the partition name does not match one of the above patterns, then the default value is TO_DATE ('01-jan-1999','dd-mon-yyyy').

    3. Click OK.

      Using the partition name and the Value Less Than property, Warehouse Builder generates a DDL script for setting the partitioned table. The Value Less Than property defines the contents of the partition.

      To edit the partition values:

      1. Open the Configuration Properties inspector for the target table.

      2. Click the partition you want to edit.

      3. If you want to edit the partition boundary value:

        1. Click the Value Less Than field.

        2. Enter a value.

      4. If you want to rename a partition:

        1. Click the field of the partition you want to rename and click the ... button.

          The Partitions dialog appears.

      Figure 9-12 Partitions Dialog

      Text description of partitia.gif follows.

      Text description of the illustration partitia.gif

        1. Highlight the value in the rename field and enter a value.

        2. Click OK.

      1. Close the Configuration Properties inspector.

      Defining Hash Partitions

      To create a hash partition, specify the hash key, number of partitions, and tablespace names. Oracle8i/9i partitions the storage space and stores rows according to a hash algorithm.

      Defining Range Partitions

      To create a set of range partitions, you specify a range key, names for the partitions, and a set of tablespaces. Oracle8i/9i then stores rows in a partition according to the specified ranges.


      Note:

      If you are using Partition Exchange Loading, refer to the Oracle8i/9i documentation to set up range partitions.


      Defining a Range with Hash Subpartitions

      You can create a set of range partitions that have hashed subpartitions. Create a range partition key, a set of partitions, and then create a hash partition key to specify the number of logical partitions.

      Configuring Partition Exchange Loading (PEL)

      You can increase the speed at which data loads by using the Oracle8i/9i server partitioning swapping capability. The PEL technique performs data loading by exchanging the partition identities of a target table with a temporary table. Data loads into the temporary table in parallel or using direct path units. If this load completes, then the temporary table holding the new data takes over the identity of one empty partition from the user-defined target table. At the same time, the empty partition assumes the identity of the source table. The exchange process is a DDL operation and involves no data movement. PEL is useful for:

      • Loading relatively small amounts of data into a target containing a much larger amount of historical data.

      • Incremental inserts spanning only one empty partition.

      • When a target is partitioned by DATE.

      • Repetitive data loading into the same partition in a target table.

      If you have an Oracle8i warehouse module, then you must use local indexes in order to take advantage of PEL. Local indexes require that all indexes be partitioned like the table. When the temporary table is swapped into the target table using the PEL, so are the identities of index segments. There is no need to manipulate actual index blocks.

      To set partition exchange loading:

      1. Open the Configuration Properties inspector for the mapping.

      2. Expand the Sources and Targets node.

      3. Expand node for the name of the mapping target operator.

      4. Expand the Partition Exchange Loading node.

      5. Click the Enabled field and select True from the drop-down list.

      6. Click the Partition Granularity field and select the granularity level from the drop-down list.

        This property must match the partition granularity of your target table.

      Validating Definitions and Generating Scripts

      After you configure a set of definitions for a physical instance, you need to validate them before you generate and deploy objects and scripts to a physical instance. This section describes how to validate and generate a selected set of definitions.

      Validating Definitions

      Validation works as an error reporting tool for the data warehouse loading scripts. When you generate deployment code, Warehouse Builder validates it before deploying it to the repository. A set of configured definitions must be validated before scripts are generated for these reasons:

      • Incorrect data warehouse definitions

        You can create incorrect definitions. For example, if you add a foreign key constraint to a fact table that does not reference a column in a dimension table, Warehouse Builder stores the definition in the warehouse module. The definition fails the validation process until the reference is satisfied.

      • Data type mismatches

        You can create definitions with data type mismatches. When the validation process runs, a warning message displays.

      • Metadata Import Utility

        The Import Utility can include definitions that are malformed for a number of reasons. For more information, see "Metadata Import Utility".

      Validation can apply to objects that are not generated. For example, if you may need to validate a source module to understand a foreign key constraint violation. Only target modules can generate code.

      If you validate and generate in read-only mode, then the generated code does not remain in the repository. An alert dialog informs you if you are generating in read-only mode. You can validate a single definition, a set of definitions, or all the definitions stored in a warehouse module.

      To validate a set of definitions:

      1. Select an object or a group of objects from the Warehouse Module Editor.

      2. From the Module menu, select Validate or right-click the object and select Validate from the pop-up menu.

        Warehouse Builder validates the selected object definitions and displays the results in the Validation Results dialog.
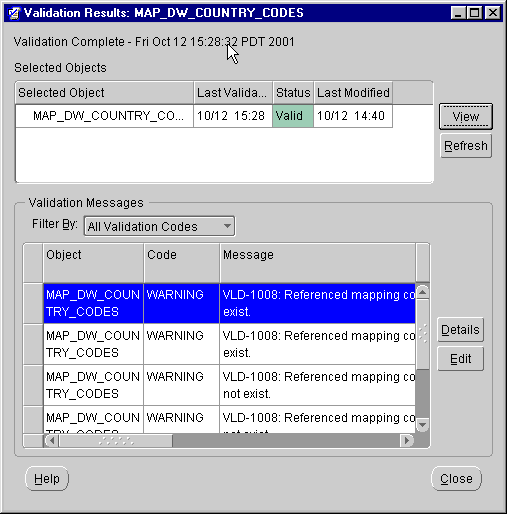
      Figure 9-13 Validation Results Dialog

      Text description of validati.gif follows.

      Text description of the illustration validati.gif

      The dialog lists summary information for each object selected for validation. The summary information includes:

      • Name of the object selected for the validation

      • Date and time of the last validation

      • Valid or Invalid status

      • Date and time of the last update

      Click View to display the validation results in a text editor. This can be useful if you want to save these results to a file.

      Click Refresh to refresh your validation results. This can be useful if you are running validations in more that one window.

      The validation messages lists individual messages for the highlighted object:

      • Name of the object

      • Validation Code:

        Error: Displays if the script causes code generation or deployment failure.

        Warning: Displays if the script may cause failure during generation, deployment, or runtime.

        Success: Displays if the script does not cause any known problems.

      • Validation error message

      Click Details to view additional details on the highlighted object.

      Click Edit to open an Editor in Warehouse Builder to edit the highlighted object. For example, if you have a table highlighted and you click Edit, the Table Editor opens with the highlighted table displayed.


      Note:

      A Validation Results dialog displays when you validate a definition. To view these results at a later time, select Validation Messages from the View menu.


      Valid and Invalid Definitions

      During the validation process, Warehouse Builder assigns a warning or an error code to each malformed expression within an individual definition.

      • Valid: The validation process runs and no error codes are generated.

      • Invalid: The validation process runs and at least one error code is generated. The definition can also include one or more warning codes.

      Generating Scripts

      During this phase, Warehouse Builder validates and generates the scripts required to create and populate the instance.

      Warehouse Builder generates the following types of scripts for a target warehouse:

      • DDL scripts to create or drop database objects.

      • SQL*Loader control files to extract and transport data from file sources.

      • Tcl scripts to schedule and manage jobs registered with Enterprise Manager.

      When you generate objects, a single script is generated for each physical object you want to create. For example, there is one script for each index you are creating.

      This is useful if you need to re-deploy a single object at a later time without deploying the entire warehouse again.

      To generate scripts for a set of objects in a warehouse module:

      1. Open the Warehouse Module Editor and select a set of warehouse objects.

        You can select an individual object, a set of objects, or all the objects in the module.

      2. From the Module menu, select Generate.

        The Generation Mode dialog displays.
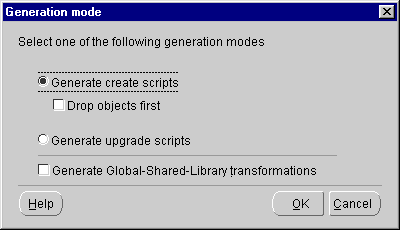
      Figure 9-14 Generation Mode Dialog

      Text description of generati.gif follows.

      Text description of the illustration generati.gif

      1. Select the type of script to generate and click OK.

        The scripts are generated and the Generation Results dialog displays.
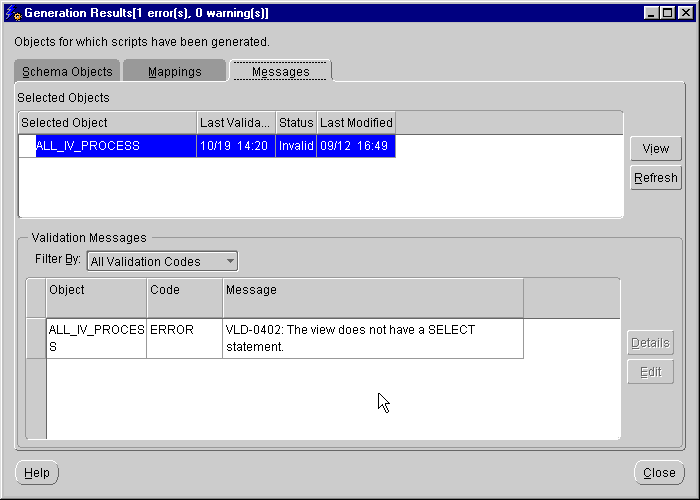
      Figure 9-15 Generation Results Dialog

      Text description of generatd.gif follows.

      Text description of the illustration generatd.gif


      Note:

      A Generation Results dialog displays when you generate a script to create an object. To view these results at a later time select Generated Scripts from the View menu.


      Verifying the Generation Results

      The following sections summarize the scripts generated for each object in the warehouse module.

      Database Links

      When a data warehouse pulls data from its database sources using database links, the following occurs:

      1. Warehouse Builder generates a script for a database link to the source database.

      2. The database link is deployed in the target schema.

      3. The PL/SQL scripts that pull data from a source database reference the source tables using the deployed synonyms.

      For example, Warehouse Builder generates the following script to create a database link to a source.

      ALTER SESSION ENABLE PARALLEL DDL;
      CREATE DATABASE LINK SOURCE
       CONNECT TO source IDENTIFIED BY manager
       USING 'source';


      This database link is deployed to the physical instance by executing the script.

      Dimensions

      Warehouse Builder can generate multiple DDL scripts for each dimension depending on whether indexes are configured. The scripts can include a DDL script for:

      • The underlying table and its configured partitions.

      • The hierarchies and levels defined on the table.

      • The indexes and index partitions configured for the table.

      After generating the DDL, the Generation Results dialog displays.

      The Generation Results dialog contains a list of scripts that create the following objects:

      • Table

      • Dimension

      • Index

      You can view any of the generated scripts by selecting the dimension name and clicking View. The example below shows the code generated to add hierarchies onto an existing table:

      ALTER SESSION ENABLE PARALLEL DDL;
       CREATE  FORCE  DIMENSION customers_DIM 
      LEVEL customer IS  CUSTOMERS.cs_cust_WH
      LEVEL account IS  CUSTOMERS.at_account_ID
      LEVEL segment IS  CUSTOMERS.sg_segment_ID
      HIERARCHY customer_sums ( 
      customer CHILD OF account CHILD OF segment ) 
      ATTRIBUTE customer DETERMINES (cs_loctype,cs_ship_to_num)
      ATTRIBUTE account DETERMINES (at_account_desc)
      ATTRIBUTE segment DETERMINES (sg_segment_desc);


      Views and Materialized Views

      Warehouse Builder can generate multiple DDL scripts for each materialized view depending on whether indexes are configured for the view. The scripts can include DDL scripts for:

      • The materialized view and its configured partitions.

      • The foreign key reference constraints.

      • The indexes and index partitions configured for the table.

      • The partitions configured for the table.

      After generating the DDL, the Generation Results dialog displays. You can view the generated code and deploy the materialized view from this dialog.

      If the view you are generating is part of a mapping, Warehouse Builder does not generate a DDL script for the view. Warehouse Builder generates a regular package assuming the view can be updated.

      Check to ensure the view can be updated before including it in the map. Views and materialized views are generated in the same way as tables.


      Note:

      When you generate scripts for a view:

      • Warehouse Builder does not generate code for the view if a query script in its definition has an error. Warehouse Builder does not check the query script for errors when you define the view.

      • If a view references dimensions, then you must deploy the dimensions before you deploy the view.


      Mappings

      Warehouse Builder generates multiple scripts to implement each PL/SQL mapping:

      • PL/SQL scripts create the PL/SQL packages that pull data from database sources, perform transformation operations, and load data into the physical instance of the data warehouse.

      • DDL scripts create database links.

      • Tcl scripts that are registered with Oracle Enterprise Manager and Oracle Workflow to support job scheduling as well as to capture and log audit and error information.

      The Generation Results dialog includes a Run button. Click Run to load data into the target warehouse. See Chapter 10, "Managing Loads and Updates" for information on how to schedule and monitor database loading using Oracle Enterprise Manager and Oracle Workflow. See Chapter 11, "Administration" for information on analyzing audit and error messages using the Runtime Audit Viewer.

      Sequences

      Warehouse Builder generates a single DDL script for each sequence defined by the warehouse module. Each script creates a sequence object in the physical instance.

      Tables

      Warehouse Builder generates multiple DDL scripts for each table, including DDL scripts for:

      • The table and its configured partitions.

      • Constraints on the table.

      • The indexes and index partitions configured for the table.

      • The partitions configured for the table.

      After generating the DDL, the Generation Results dialog displays. You can view the generated code and deploy the dimensions from this dialog.


      Note:

      Fact tables reference dimensions using foreign key reference columns. You must deploy the referenced dimensions to the physical instance before you deploy the fact table.


      Post-Generation Tasks

      After the scripts have been generated, the Generated Scripts dialog displays with two tabs:

      • Schema Objects tab

      • Transforms tab

      Schema Objects Tab

      The Schema Objects tab displays objects that you can deploy to create your warehouse.

      Select from these actions:

      • View Code: View and edit the code generated by Warehouse Builder. Select the object name and then click View Code. The generated code displays in a code editor. You can view or edit the code. If you edit the code, Warehouse Builder prompts you to save your changes when you close the dialog.

      • Deploy: Deploy the selected objects to your target data warehouse. See the description under the Transforms tab for more information.

      • Save as File: Save the code to a file in order to use another tool to deploy. See the description under the Transforms tab for more information.

      Transforms Tab

      The Transforms tab displays mappings that you can deploy to create your warehouse. Select an object and choose from these actions:

      • View Code: View and edit the code generated by Warehouse Builder. Select the object name and then click View Code. The generated code displays in a code editor. You can view or edit the code. If you edit the code, Warehouse Builder prompts you to save your changes when you close the dialog.

      • Deploy: Deploy the selected object to a physical instance of the warehouse. This is when your data warehouse is physically created. You must select all the necessary generated scripts and then click Deploy. You must select the runtime database you are deploying to each time you deploy. You can configure once and deploy to many instances.

        You can select which scripts to deploy to your warehouse. You deploy all scripts when you create the warehouse. If you decide to create additional objects, such as indexes, at a later time, you can generate and deploy those scripts without re-deploying the entire warehouse.

      • Save as File: Save the code to a file in order to use another tool to deploy. Choose this option when you want to deploy a script that creates an object to a subdirectory of the Top Directory. The Top Directory is an operating system directory that is configured for the warehouse module.

        Warehouse Builder writes the generated script to a subdirectory that corresponds with the script language as defined in the Generation Results or Generated Scripts dialog. The script is written to the file:

        \Top Directory\ddl\database_link_name.ddl

        For example, the generated scripts for the Customers dimension are written to the DDL subdirectory in the following form:

        e:\target\ddl\Customers.ddl

        e:\target\ddl\Customers_DIM.ddl

        Where the Top Directory was configured as e:\target.

      • Run: Run a deployed PL/SQL package that implements a mapping. Use this to test PL/SQL load packages with small data samples. Schedule initial loads and periodic refreshes of a physical instance as jobs in Oracle Enterprise Manager.

      Deploying Scripts

      To create and populate the physical instance of the data warehouse, you run the generated scripts to deploy objects in the target schema, deploy the scripts to an operating system directory, register the scripts with Oracle Enterprise Manager and Oracle Workflow, and then schedule jobs to initially load the warehouse.

      To deploy generated job scripts:

      1. Select a module and open the Warehouse Module Editor.

      2. From the View menu, select Generated Scripts.

        The Generated Scripts dialog displays with the Schema Objects tab on top.
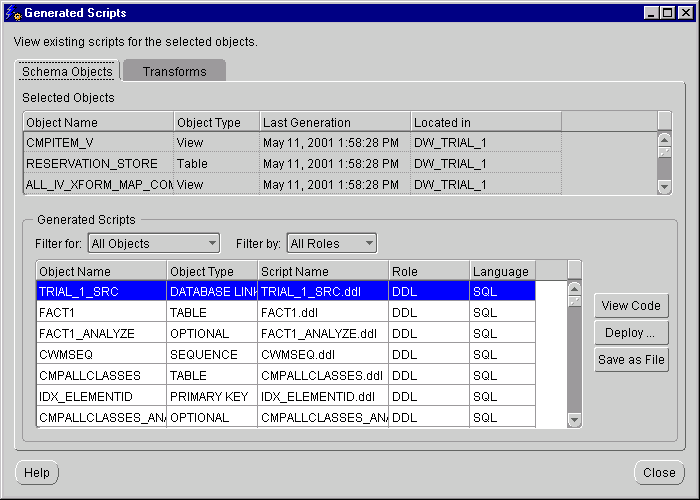
      Figure 9-16 Generated Scripts Dialog

      Text description of wmegenlm.gif follows.

      Text description of the illustration wmegenlm.gif

      1. Select the tab that contains the object or mapping you want to deploy and click Deploy.

        The Connection Information dialog displays.
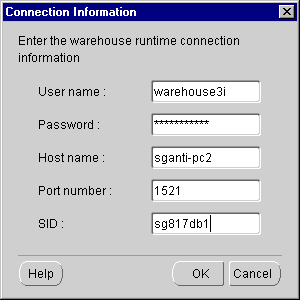
      Figure 9-17 Connection Information Dialog

      Text description of connect_.gif follows.

      Text description of the illustration connect_.gif

      1. Specify the runtime connection information and click OK.

        The Database Deployment dialog displays. Use this to verify the objects you are deploying.
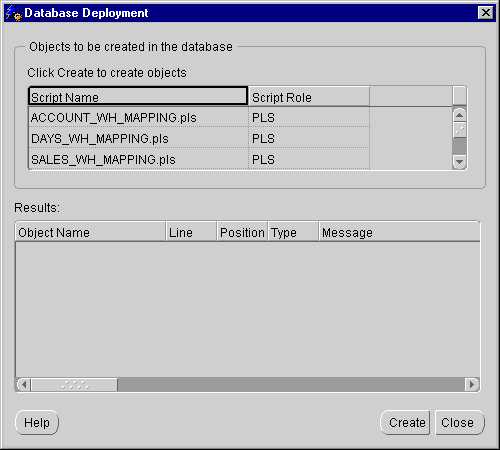
      Figure 9-18 Database Deployment Dialog

      Text description of deploy_t.gif follows.

      Text description of the illustration deploy_t.gif

      1. Click Create to continue with the deployment.

        The deployment process writes the scripts to the file system configured as Top Directory in the warehouse module. Once the process is complete, the Database Deployment dialog displays again with the results of the deployment displayed in the lower-half of the dialog.
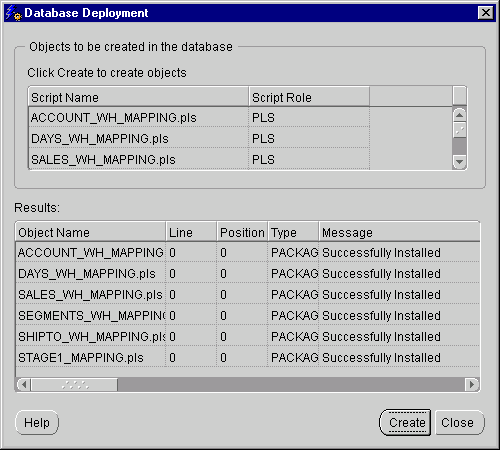
      Figure 9-19 Database Deployment Dialog Showing Results

      Text description of deploy_r.gif follows.

      Text description of the illustration deploy_r.gif

      1. Click Close.

        The scripts have now been deployed to the database.


        Note:

        When you schedule and execute jobs using Oracle Enterprise Manager or Oracle Workflow, you must deploy the following Tcl scripts generated by Warehouse Builder to the Top Directory:

        • SQL*Loader mapping

        • PL/SQL mapping

        • External OS Command mapping

        • Pure Extract mapping

        • Pure Integrate mapping


        Deploying SAP Definitions

        After you generate the scripts for SAP mappings (choose Module then Generate), Warehouse Builder opens the Generation Results dialog. Use this dialog to deploy the ABAP code to the SAP target system.

        Choose from these actions:

        View Code: Views the generated code in a code editor dialog. You can edit, print, or save the file through this editor.

        Save as File: Displays the File System Deployment dialog. Click Save to save the generated scripts to a file system.

        Run: Displays the Connection Information dialog. Enter the following information to connect to the runtime library where you want to deploy the ABAP code.

        • User name: User name to connect to your target schema.

        • Password: Password for your target schema user.

        • Host name: Name of the computer where your target schema resides.

        • Port Number: Port number of the host computer.

        • SID: Unique database identifier of the target schema.

        The Connection Information (SAP Runtime) dialog for SAP targets displays the system settings for the target. Enter the following information to connect to the SAP system where you want to deploy the ABAP code.

        • Application Server: Name of the SAP source application server.

        • System Number: SAP system number for SAP GUI logon.

        • Client: SAP client number.

        • SAP User Name: SAP GUI user name.

        • SAP Password: SAP GUI password.

        • FTP User Name: SAP user (OS) account on the SAP application server that enables FTP access to the data file generated by ABAP code.

        • FTP Password: SAP password for the user (OS) account on the SAP application server that enables FTP access to the data file generated by ABAP code.

        Deploying ABAP Scripts for Non-Transparent Tables

        Once you have entered the complete connection information to your SAP target system, the Run the Objects dialog displays. When you click Run, Warehouse Builder automatically performs the following procedure:

        1. Uploads the generated ABAP code.

        2. Executes the ABAP code on the SAP system.

        3. Uses FTP to fetch data to the Warehouse Builder staging area.

        4. Uses SQL*Loader to upload data into your warehouse tables.

        Deploying ABAP Scripts Manually

        You can execute this procedure manually. When you generate an ABAP script for an SAP mapping, Warehouse Builder creates an ABAP program that you can run from the SAP GUI. Running this program creates two files for the SAP mapping:

        • A datafile of extracted data

        • A SQL*Loader control file based on the target table

        Copy the data files and control files for all of your SAP mappings to your Warehouse Builder staging area, and then run the SQL*Loader control files to process the data files into your data warehouse.

        Deploying PL/SQL Scripts for Transparent Tables

        Deployment of PL/SQL scripts for SAP transparent tables is the same as deployment of PL/SQL scripts for Oracle database sources. The PL/SQL scripts run in your Oracle data warehouse and perform remote queries to extract table data from the SAP application.

        Upgrading the Warehouse

        You can upgrade a warehouse physical instance after the initial load. You can drop, reconfigure, rename, and upgrade the objects in the instance to reflect changes in your environment. Warehouse Builder enables you to propagate incremental changes from your logical warehouse design to your physical instance, without having to drop objects or lose existing data. For example, you have tables containing data in your physical instance. If you modify the definition of these tables within Warehouse Builder by adding an index, changing a constraint, or renaming a column, you can directly reconcile these changes with the tables in your physical instance with a warehouse upgrade. Your changes are applied in a manner that preserves the existing rows of data within the tables in the physical instance.
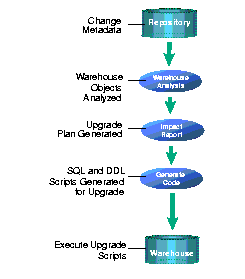
        Figure 9-20 Warehouse Physical Instance Upgrade

        Text description of 09gene21.gif follows

        Text description of the illustration 09gene21.gif

        Warehouse Builder analyzes the existing contents of the warehouse and synchronizes them with changes in the Warehouse Builder repository. Next, Warehouse Builder provides an Impact Report detailing the plan for the upgrade and generates necessary SQL and DDL scripts to manage this transition. Before executing the scripts, review the Impact Report to decide whether to perform the upgrade.

        You can create, add, update, and rename the following Warehouse objects:

        Dimension Table

        Materialized View

        Constraint (UK, FK, and check constraint)

        Dimension Object

        Materialized View log

        Indexes

        Hierarchy

        Table

        Database link

        Fact Table

        View


        Note:

        An upgrade does not work if you deploy a table with Float data type. Use the Number data type to achieve the same results.


        a

        A SQL summary of the changes is provided by Warehouse Builder. Warehouse Builder then generates a Tcl script to deploy the changes.

        Generating and Executing Upgrade Scripts

        To generate and execute upgrade scripts:

        1. Open the Warehouse Module Editor and select the set of definitions you want to upgrade.

          You can select an individual object, a set of objects, or all the objects in the module.

        2. From the Module menu, select Generate.

          The Generation Mode dialog displays.
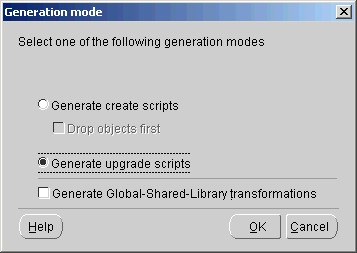
        3. Select Generate upgrade scripts.

        Figure 9-21 Generation Mode

        Text description of generate.gif follows.

        Text description of the illustration generate.gif

        1. Click OK.

          The Connection Information dialog displays.
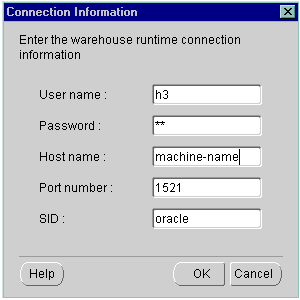
        2. Enter the user name, password, machine name, port number, and SID for the target runtime schema you want to upgrade.

        Figure 9-22 Runtime Database Connection Dialog

        Text description of generatc.gif follows.

        Text description of the illustration generatc.gif

        1. Click OK.

          The Generation Progress panel displays indicating the progress of the script generation for the selected objects.

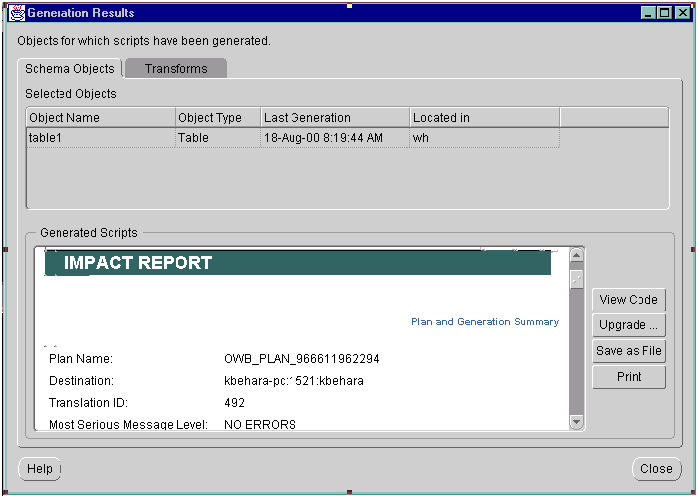
          After the process is complete, the Generation Results dialog displays an Impact Report listing all objects to be upgraded using the newly generated scripts. For more information on the options available on this dialog, "Post-Generation Tasks".

          Note:

          There is only one Impact Report generated for all the objects selected for upgrade.


          Figure 9-23 Generation Results

          Text description of generata.gif follows.

          Text description of the illustration generata.gif

            If there are no errors and your schema objects can be readily upgraded from the information supplied, the Upgrade button is activated. If the button is grayed-out, look for error messages within the Impact Report.

        2. Click Upgrade.

          The Upgrade dialog displays the script that upgrades the objects that were selected.

        3. Click Execute to run the script.

          While upgrading, the Execution progress area of the dialog reports the upgrade progress.
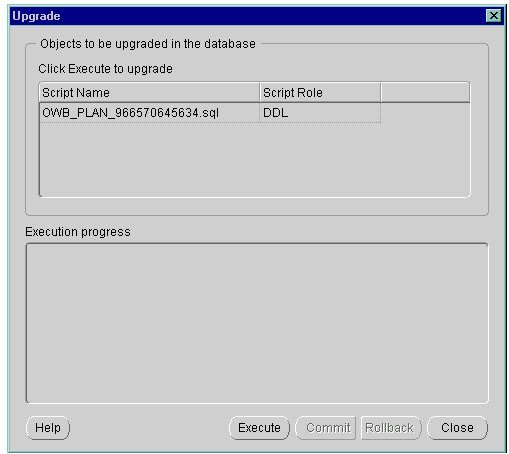
          Figure 9-24 Upgrade Dialog

          Text description of generatb.gif follows.

          Text description of the illustration generatb.gif

          1. When the script completes, you can either click Commit to keep the changes you have made, or Rollback to undo the changes.

            The physical instance in your target warehouse is upgraded.

          2. Click Close.

            The data warehouse is now ready to be loaded with data that matches the structure of the upgraded objects in your warehouse.


Go to previous page Go to next page
Oracle
Copyright © 1996, 2002 Oracle Corporation.

All Rights Reserved.
Go To Documentation Library
Home
Go To Product List
Solution Area
Go To Table Of Contents
Contents
Go To Index
Index