Skip Headers

Oracle9i Warehouse Builder User's Guide
Release 2 (v9.0.2)

Part Number A95949-01
Go To Documentation Library
Home
Go To Product List
Solution Area
Go To Table Of Contents
Contents
Go To Index
Index

Go to previous page Go to next page

8
Configuring and Generating Mappings

This chapter describes how to configure operator properties of a mapping, and how to manage code generation. It also describes how to reconcile mapping operators with repository objects, mapping validation, and techniques for improving deployment performance.

This chapter includes the following topics:

Reconciling Mapping Operators with Repository Objects

Once you have selected the source and target objects, configured their properties, and linked the operators, you may need to reconcile the mapping operators with their corresponding repository objects.

Coordinating mapping operators with the status of repository objects is called reconciliation. You can reconcile operators with repository objects (inbound) or you can reconcile repository objects with operators (outbound).

Do not confuse reconciliation with synchronization. While synchronization ensures that you are up-to-date with changes made by other users in a multi-user environment, reconciliation updates mapping operators with changes made to the physical repository objects.

Using Inbound Reconciliation

Inbound reconciliation updates the target mapping operator with its repository object. You can also use Inbound Reconcile to bind a mapping operator to a repository object. You can Inbound Reconcile an operator by name, position, object identifier match, or any combination of these methods.

You can use inbound reconciliation for any of the following reasons:

Inbound reconciliation has no impact on the linking of other mapping operators in the mapping to repository objects; Warehouse Builder preserves these links. Table 8-1 describes the operator types supported by reconciliation.

Table 8-1 Operator Objects Reconciled with Repository Objects 
Operator Object Repository Object

Mapping Tables

Table, Views, Materialized Views, Sequences, Files, Dimensions and Facts.

Mapping Views

Mapping Materialized Views

Mapping Sequences

Mapping Flat Files

Mapping Dimensions

Mapping Facts

Mapping Transformations

Transformations only.

To reconcile inbound mapping operators:

  1. Select a mapping operator on the Mapping Editor canvas.

  2. From the Edit menu, select Reconcile Inbound or right-click the header of the mapping operator and select Reconcile Inbound from the pop-up menu.

    The Inbound Reconcile Operator dialog displays.
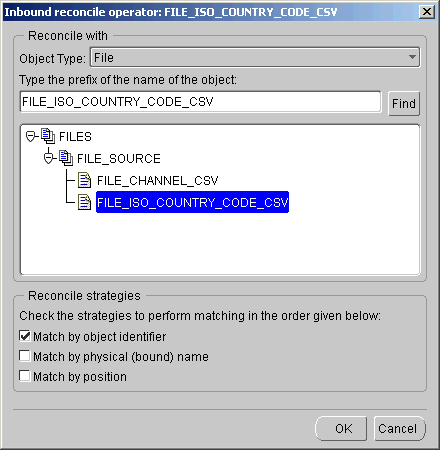
Figure 8-1 Inbound Reconcile Operator Dialog

Text description of reconcil.gif follows.

Text description of the illustration reconcil.gif

  1. Set the Reconciliation Strategies.

    • Matching by Object Identifier: This strategy uses the unique object identifiers to determine the correlation between the mapping operator attributes and those of the selected repository object. Attributes of the mapping operator that cannot be matched with those of the repository object are removed. This can happen if an attribute was added to the mapping operator and not reconciled, or if a column was removed from the repository object before reconciliation. When an attribute is removed, any incoming or outgoing mapping line connected to that attribute is also removed from the canvas. Attributes of the selected repository object that cannot be matched with those of the mapping operator are added as new attributes at the end of the mapping operator. Mapping lines for matched attributes are preserved. Use this strategy if you want to keep your mapping operators in step with changes to the bound repository object and if you want to maintain separate logical names for your mapping operator attributes despite changes to physical names in the repository object. Match by object identifier is not available if you want to reconcile to a different repository object.

    • Matching by Physical (Bound) Name: This strategy uses matching between the bound names of the mapping operator attributes and the physical names of the repository object attributes. Matching is case-sensitive. On inbound reconciliation, attributes of the mapping operator that cannot be matched with those of the repository object are removed. When an attribute is removed, any incoming or outgoing mapping line connected to that attribute is also removed from the canvas. Attributes of the selected repository object that cannot be matched with those of the mapping operator are added as new attributes to the mapping operator. Mapping lines for matched attributes are preserved. Because bound names are read-only after you have bound a mapping operator to a repository object, it is not possible to manipulate them to achieve a different match result in inbound reconciliation. You use this strategy if you want to maintain equivalence of physical names and logical names in your mapping operators. If a repository object column was renamed, it is interpreted as if the column were deleted and a new column inserted. The mapping lines for renamed attributes are removed. You can also use this strategy with a different repository object if there are changes in the repository object that would change the structure of the mapping operator.

    • Matching by Position: This strategy matches mapping operator attributes with columns, fields, or parameters of the selected repository object by position. For example, the first attribute of the mapping operator is reconciled with the first attribute of the repository object, the second with the second, and so on. If the mapping operator has more attributes than the repository object, then the excess attributes are removed from the mapping operator. If you remove an attribute, any incoming or outgoing mapping line connected to that attribute is also removed from the canvas. If the selected repository object has more attributes than the mapping operator, then they are added as new attributes to the end of the mapping operator. Mapping lines for existing attributes in the mapping operator are preserved. Use this strategy for reconciliation with a different repository object if you want to preserve the logical names of your mapping operator attributes. This strategy is most effective when the only changes to the repository object are the addition of extra columns, fields, or parameters at the end of the object.

    If you do not select a strategy, then the reconcile process replaces the attributes of the operator with an exact copy of the columns or fields of the selected repository object.

    If you select more than one strategy, then matching occurs in the following order:

    • Match by object identifier

    • Match by position

    • Match by name

  2. Click OK.

    Reconciliation also updates additional logical properties of an operator. For example, for a Mapping Flat File operator, information about the character set and filename are refreshed.

    Using Outbound Reconciliation

    Outbound reconciliation updates a selected repository object to reflect changes in the mapping operator. You can use outbound reconciliation for any of the following reasons:

    • To capture structural changes applied to the mapping operator and propagate these to the currently linked repository object.

    • To capture attribute logical name changes applied to the mapping operator and propagate these to the currently linked repository object.

    • To capture attribute data type changes applied to the mapping operator and propagate these to the currently linked repository object.

    • To create a new repository object in the same warehouse module or to create or replace a different repository object in a different module. You can do this if you are defining staging tables with your mappings.

    • To copy and map the attributes of one operator to a second operator and propagate these changes to the repository object associated with the second operator.

    You cannot create a repository object of a different type using outbound reconciliation. Outbound reconciliation has no impact on the linking of other mapping operators in the mapping to repository objects.

    Table 8-2 lists the eligible Mapping Operators for Outbound Reconcile:

    Table 8-2 Outbound Reconcile Operators
    Operator Type Notes

    Table

    Creates or updates a table object in the repository. Attributes and data type information are copied as columns of the table. Constraint properties are not copied.

    View

    Creates or updates a view object in the repository. Attributes and data type information are copied as columns of the view.

    Materialized View

    Creates or updates a materialized view object in the repository. Attributes and data type information are copied as columns of the materialized view. Constraint properties are not copied.

    Transformation

    Creates or updates a function object in the repository. Input attributes and data type information are copied as input parameters of the function. Output attribute and data type information is copied as return specification for the function.

    To reconcile outbound mapping operators:

    1. Select an operator on the canvas.

    2. From the Edit menu, select Reconcile Outbound or right-click the header of the operator and select Reconcile Outbound from the pop-up menu.

      The Outbound Reconcile dialog displays.
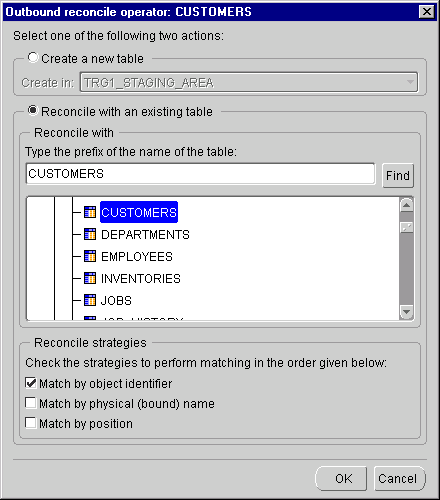
    Figure 8-2 Outbound Reconcile Dialog

    Text description of outbound.gif follows.

    Text description of the illustration outbound.gif

    1. Set the Reconcile Strategies.

    2. Click OK.

    You can use the outbound reconcile feature to create new objects or update existing objects in the repository that are derived from a mapping operator. After you have created a mapping operator, you can copy and map its attributes into a new operator. You can then create a new corresponding repository object that inherits the same properties.

    To create a new table in the repository associated with a Mapping Table:

    1. Select a Mapping Table.

    2. From the Edit menu, select Reconcile Outbound.

      The Reconcile Outbound dialog displays.

    3. Select Create a new table and its location in the repository.

    4. Click OK.

    A table with identical properties and attributes as the Mapping Table is created in the repository.

    Configuring a Mapping

    You use the properties inspectors to configure how the operators behave in an ETL process. The properties that you configure vary according to the processes you defined when you created the mapping. You can configure the following sets of properties using properties inspectors:

    • Mapping operator properties

    • Mapping operator attribute properties

    • Mapping physical properties

    The following sections describe the settings on the Operator Properties inspectors for mapping relational table, flat file, and materialized view operators. See Chapter 7, "Using Mapping Operators and Transformations" for information on settings unique to data flow operators.

    Configuring Mapping Table Operators

    This section describes how to configure a Mapping Table operator using the Operator Properties inspector. The Operator Properties inspector described in this section contains the same settings for Mapping Facts, Mapping Dimensions, Mapping Views, and Materialized Views.

    You configure settings in the following categories:

    • Mapping Operator Name

    • Conditional Loading

    Mapping Dimension and Mapping Fact operators contain a read-only category for keys.
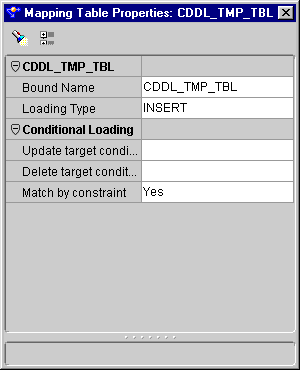
    Figure 8-3 Mapping Table Properties Inspector

    Text description of property.gif follows.

    Text description of the illustration property.gif

    To configure a Mapping Table operator:

    1. Select the operator you want to configure by clicking its header.

    2. From the Edit menu, select Properties or right-click the header of the operator and select Operator Properties.

      The Mapping Table Properties inspector displays.

    3. Click the operator name node to expand the properties list.

      1. Check the Bound Name.

      2. Select a Loading Type from the drop-down list.

    4. Click the Conditional Loading node.

      1. Enter an Update target condition or click ... to open Expression Builder and define a condition.

        If evaluated to true, the row is included in the update loading operation.

      2. Enter a Delete target condition or click ... to open Expression Builder and define a condition.

      3. Click Match by constraint and select Yes or No from the drop-down list.

    5. Check the Keys to ensure accuracy.

    6. Close the property inspector.

    Mapping Operator Name

    These settings define your operator name if it is unbound, and the loading type.

    Conditional Loading

    These settings define:

    • Update Target Condition: If evaluated to true, the row is included in the update loading operation.

    • Delete Target Condition: If evaluated to true, the row is included in the delete loading operation.

    • Match By Constraint: Indicates whether unique or primary key information on a target overrides the matching criteria obtained from its attributes.

    Keys (read-only)

    The following read-only settings are available in the mapping fact and mapping dimension operator properties.

    • Name: Name of the primary, foreign, or unique key.

    • Key Columns: Local columns that define this key. Each key is comma-separated if the operator contains more than one key.

    • Key Type: Type of key, either primary, foreign, or unique.

    • Referenced Keys: If the operator contains a foreign key, this is the key or keys used by the referenced object.

    Configuring Flat File Operators

    You can configure a Flat File operator as either a source or target. You can configure the Loading type and the first row naming for this operator. All other settings are read-only.
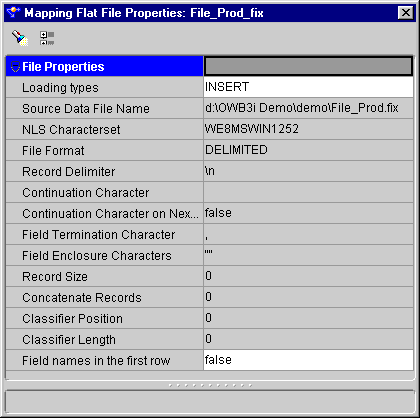
    Figure 8-4 Operator Properties Inspector (Mapping Flat File)

    Text description of oppropsf.gif follows.

    Text description of the illustration oppropsf.gif

    • Loading Types: Select a loading type from the drop-down list:

      INSERT- Creates a new target file. If a target file already exists, then it is replaced with a new target file.

      UPDATE-Creates a new target file. If a target file already exists, then it is appended.

      NONE-No operation is performed on the data target. This setting is useful for test runs, where all transformations and extractions are run but have no effect on the target.

    • Field Names in the First Row: Set this property to True if you want to write the field names in the first row of the operator or False if you do not.

    Configuring Transformation Operators

    The following settings are read-only. See "Adding Transformations" for more information on transformations.
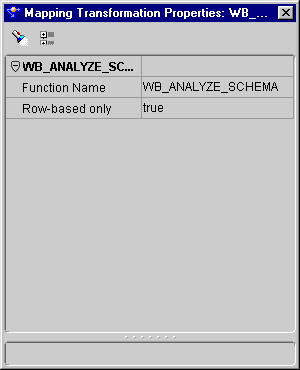
    Figure 8-5 Operator Properties Inspector (Transformation)

    Text description of oppropsx.gif follows.

    Text description of the illustration oppropsx.gif

    Function/Procedure Name: Name of the transformation.

    Row-based Only: Indicates if the transformation is loaded using row-based mode. Some transformations can use set-based mode or row-based mode.

    Configuring Mapping Operator Attributes

    You set most mapping operator attributes when you define them during the module definition phase. However, if you want to alter operator attributes to execute your mapping, you can do this directly from the Attribute Properties inspectors.
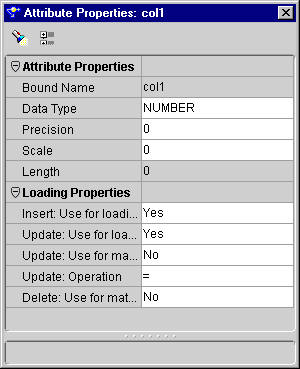
    Figure 8-6 Mapping Operator Attribute Property Inspector

    Text description of oppropsa.gif follows.

    Text description of the illustration oppropsa.gif

    Setting Attribute Properties

    This category contains the data object attribute settings.

    • Bound Name: Name used by the code generator to identify this item. By default, it is the same name as the item. This is a read-only setting.

    • Data Type: Type of data that this attribute will hold.

    • Precision: The maximum number of digits this attribute will have if the data type of this attribute is a number or a float. This is a read-only setting.

    • Scale: The number of digits to the right of the decimal point. This only applies to number attributes.

    • Length: The maximum length for a CHAR, VARCHAR, or VARCHAR2 attribute.

    Setting Loading Properties

    The mapping table, mapping dimension, mapping fact, mapping view, and mapping materialized view operators have a Loading Properties category. This category contains the following settings:

    • Insert: Use For Loading: This setting prevents data from moving to a target even though it is mapped to do so. If you select Yes (default), the data will reach the mapped target.

    • Update: Use For Loading: This setting prevents the selected attribute data from moving to a target even though it is mapped to do so. If you select Yes (default), the data will reach the mapped target attribute. If all columns of a unique key are not mapped, then the unique key is not used to construct the match condition. If no columns of a unique key are mapped, Warehouse Builder returns an error. If a column (not a key column) is not mapped, then it is not used in loading.

    • Update: Use For Matching: This setting updates a data target row only if there is a match between the source attribute and mapped target attribute. If a match is found, then an update occurs on the row. If you set this property to Yes (default), the attribute is used as a matching attribute. If you use this setting, then all the key columns must be mapped. If there is only one unique key defined on the target entity, use constraints to override this setting.

    • Update: Operation: When a matching row is located and an update operation is performed on the target, different computations can be done between the data of the source attribute and the target attribute on the matched row before the resulting value is stored onto the target. You can specify one of the following target conditions:

        =

      target:= source

        +=

      target:= source + target

        -=

      target:= target - source

        =-

      target:= source - target

        ||=

      target:= target||source

        =||

      target:= source||target

    • Delete: Use For Matching: Deletes a data target row only if there is a match between the source attribute and mapped target attribute. If a match is found, then a delete occurs on the row. If you set this property to Yes (default), the attribute is used as a matching attribute. The constraints can override this setting.

    Configuring Physical Properties for a Mapping

    After you set the mapping operator properties, you can configure the physical properties of the mapping using the Configuration Properties dialog. The following sections describe the basic steps for configuring the physical properties of a mapping containing tables, flat files, and SAP files.

    The Configuration Properties inspector displays the physical properties of the mapping grouped into different categories:

    • Deployable

    • Step Type

    • Runtime Parameters

    • Source and Target

    The properties that are available for configuration vary according to the type of object. Use the properties inspectors to review and configure each object you are planning to deploy.
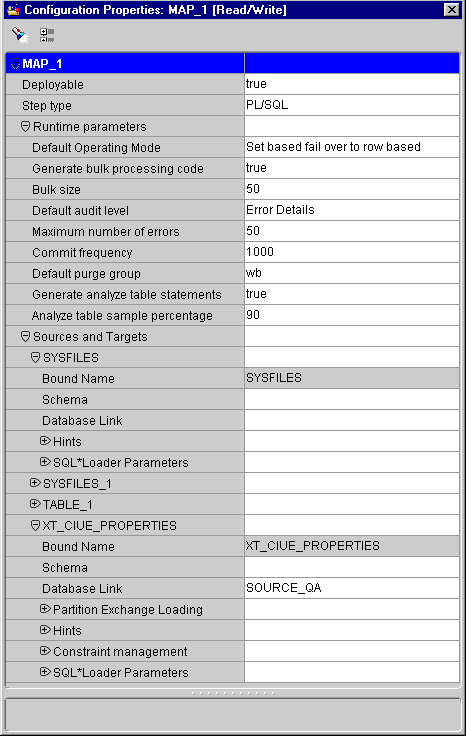
    Figure 8-7 Configuration Properties Inspector For Mapping Tables

    Text description of physconf.gif follows.

    Text description of the illustration physconf.gif

    To configure mapping physical properties:

    1. From the Edit menu, select Properties... or right-click the mapping you want to configure and select Configure... from the pop-up menu.

      The Configuration Properties inspector displays.

    2. Expand the Runtime Parameters node to configure your mapping for deployment.

      See "Setting Runtime Parameters" below for information on these settings.

    3. Expand the Sources and Targets node to set the physical properties of the operators in the mapping.

      See "Setting Sources and Targets" for information on these settings.

    4. Close the window.

    Setting Deployable

    This setting enables Warehouse Builder to generate a set of scripts to create a data warehouse object for those mapping entities marked as deployable.

    • True: Marks the mapping entity as deployable (default).

    • False: Marks the mapping entity as not deployable.

    Setting the Step Type

    A mapping step is the result of the implicit mapping graph analysis performed on a mapping. Mapping steps are automatically created and maintained; you cannot add, delete, or rename them. A step can be one of the following types:

    • PL/SQL

    • SQL*Loader

    Each type has related physical configuration parameters that you can configure using the Configuration Property inspector. Code can be generated for mapping steps in its associated language.

    Setting Runtime Parameters

    This section describes the runtime parameters.

    Default Operating Mode: You can set your mapping to generate code using the following settings:

      SET BASED-Enables Warehouse Builder to insert all of the data in a single SQL command. This option depends upon a correctly designed mapping. This setting assigns SQL as the implementation language to each operator unless an operator does not support SQL. If an operator does not support SQL, then all operators in the mapping use PL/SQL as the implementation language. You can use set based if you:

      • Want to increase the speed of DML operations

      • Are confident your data is clean

      • Do not require extensive auditing

      ROW BASED-Starts from the beginning of the mapping and assigns SQL as the implementation language to each operator. If the code generator finds an operator that supports PL/SQL, it assigns that language to all subsequent mapping operators. This setting offers the most auditing or debugging information since it is likely that the expressions or transformations in the mapping will be implemented in PL/SQL. You can use row based if:

      • Some of your data may not load successfully but you still want to load other rows

      • You want the maximum amount of runtime auditing

      ROW BASED (TARGET ONLY)-The implementation language of the data target operators using this setting is always PL/SQL. When used with Set Based Fail Over, this setting allows the error rows to be stored into the audit table when data is being loaded into the target. Although this is mainly used when the source data is clean, there may be errors when loading it into the targets. For example, a foreign key constraint violation when loading a fact with a missing primary key at the dimension, or an incompatible implicit data type conversion due to the limited length, scale, or precision of the data targets.


      Note:

      If you are using a flat file as a target, then you must use this setting. Your mapping will not generate code in any other default operating mode.


      SET BASED FAIL OVER TO ROW BASED-The mapping is first executed in set based mode. If any error occurrs, the execution fails over to row based. If this operating mode cannot be implemented by the code generator, a runtime exception occurs.

      SET BASED FAIL OVER TO ROW BASED (TARGET ONLY)-The mapping is first executed in set based mode. If any error occurrs, the execution fails over to row based (Target Only) mode. If this operating mode cannot be implemented by the code generator, a runtime exception occurs.

    • Default Audit Level: The audit level that is used when executing the package. Audit levels dictate the amount of audit information that is captured in the runtime schema when the package is run. The audit level settings are:

      NONE-No auditing information is recorded in runtime.

      STATISTICS-Statistical auditing information is recorded in runtime.

      ERROR DETAILS-Statistical plus error information is recorded in runtime.

      COMPLETE-All auditing information is recorded in runtime.

    • Default Purge Group: The purge group used when executing the package. Each audit record in the runtime schema is assigned to the purge group specified.

    • Maximum Number of Errors: The number for maximum errors reached that are used when executing the package. Execution of the package terminates when the number of errors reached is greater than the maximum number of errors value.

    • Commit Frequency: The commit frequency used when executing the package. Data is committed to the database after processing the number of rows specified in this parameter.

    • Bulk Processing: This setting enables you to load incremental amounts of rows from a source to a target. If you set it to false, PL/SQL processes the data one row at a time. If you set it to true, PL/SQL processes the data grouped by the amount of rows specified by the Bulk Size property.

    • Analyze Statistics Percentage: The percentage of rows to estimate when gathering statistics on the target tables. After data is loaded into the target tables, statistics used for cost-based optimization are gathered on each target table. You can set this parameter to the percentage of rows in each target table that is used for this analysis.

    Setting Sources and Targets

    The Configuration Properties inspector displays each operator in a mapping by name under the Sources and Target node. Each operator contains a set of properties you can edit.

    • Bound Name: The name used by the code generator to identify this item. By default, it is the same name as the item.

    • Schema: You can configure your mapping for Schema and Remote Schema Access. You can also link the mapping to a particular schema by clicking on the Schema field and entering a name. When you specify a schema by name, the PL/SQL and SQL generation handlers for the extract operators consider the property value when referring to the object name in the generated FROM clause.

    • Database Link: Database links define the physical connection information for remote access that can be referenced by the Remote Access property of an Extract Operator. The mapping configuration enables you to link the mapping to a database link in the warehouse module. Select a link by name from the drop-down list. See "Configuring Connection Information for Database Sources" for information on setting database links for modules, and see "Creating Database Links" for more information on database links.

    • Partition Exchange Loading: Use this parameter to match the partitioning of your targets and enable PEL. By default, PEL is disabled for all mappings. Set the following:

      • Enabled: set to true to use PEL. the target table must be partitioned to use PEL.

      • Granularity: Select the level of granularity for your partitions.

      See "Configuring Partition Exchange Loading (PEL)" for more information on PEL. See "Creating Partitions" for information on partitioning.

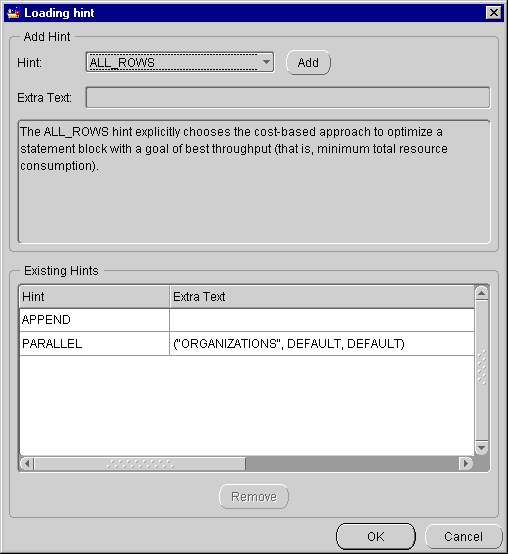
    • Hints: This setting enables you to define extraction or loading hints. Application developers often develop insights into their data. For example, they know that a query runs much faster if a set of tables is joined in one order rather than another. Warehouse Builder can incorporate these insights into the generated SQL code packages as SQL Optimizer Hints.

      To define hints for a mapping:

      1. Expand the name of the operator for which you want to define a hint.

      2. Expand Hints.

      3. Click either an Extraction Hint or a Loading Hint field.

      4. Click the ... button.

        The Extraction or the Loading Hint dialog displays.

    Figure 8-8 Loading Hint Dialog

    Text description of hint.gif follows.

    Text description of the illustration hint.gif

      1. Select a Hint from the drop-down list.

      2. Click Add.

        The hint appears in the Existing Hints field. Type additional text as appropriate in the Extra Text column.

      3. Click OK.

        The editor includes the hint in the mapping definition.

      For information on optimizer hints and how to use them, see Oracle8i/9i Designing and Tuning for Performance.

    • Constraint Management: This groups the following settings:

      Enable Constraints: Setting this parameter to false disables all referential constraints to and from the target table. This speeds loading by omitting constraint checking by the database. After all the data is loaded, the constraints are automatically enabled by Warehouse Builder. This property compromises referential integrity. If the data does not comply with the constraints, the constraint becomes invalid. In such cases, you have to manually resolve the referential integrity of the data. If set to the value true, then the REENABLE DISABLED_CONSTRAINTS clause is generated. This option automatically re-enables integrity constraints at the end of a direct-path load.

      Exceptions Table Name: If set to a non-blank value, then the EXCEPTIONS table clause is generated. This option specifies a table that must exist when SQL*Loader is run. It is used to insert the records of all rows that have violated one of the integrity constraints when constraint re-enabling is processed during a direct path load.

    • SQL*Loader Parameters: The SQL*Loader Parameters properties enable you to define the SQL*Loader options appropriate for your mapping. The values chosen during configuration directly affect the content of the generated SQL*Loader and the runtime control files. SQL*Loader provides two methods for loading data:

      • Conventional Path Load

      • Direct Path Load

      A conventional path load executes a SQL INSERT statement to populate tables in an Oracle database. A direct path load eliminates much of the Oracle database overhead by formatting Oracle data blocks and writing the data blocks directly to the database files. Because a direct load does not compete with other users for database resources, it can usually load data at or near disk speed. Certain considerations such as restrictions, security, and backup implications are inherent to each method of access to database files. See Oracle9i Database Utilities for more information.

      When designing and implementing a mapping to extract data from a flat file using SQL*Loader, there are several places where you can choose values for properties that affect the generated SQL*Loader script.

      Each load operator in a map has an operator property called Loading Types. The value contained by this property affects how the SQL*Loader INTO TABLE clause for that load operator is generated. Table 8-3 lists the INTO TABLE clauses associated with each load type.

      Table 8-3 Loading Types and INTO TABLE Relationship  
      Loading Types INTO TABLE

      INSERT/UPDATE

      APPEND

      DELETE/INSERT

      REPLACE

      TRUNCATE/INSERT

      TRUNCATE

      CHECK/INSERT

      INSERT

      NONE

      INSERT

    You can supply physical configuration information to affect the generated SQL*Loader output from either the configuration properties inspector or by setting the values in the physical step configuration. The following parameters are available in the Configuration Properties inspector:

    • Partition Name: Indicates that the load is a partition-level load. Partition-level loading lets you load one or more specified partitions or subpartitions within a table. Full database, user, and transportable tablespace mode loading does not support partition-level loading. Because incremental loading (incremental, cumulative, and complete) can be done only in full database mode, partition-level loading cannot be specified for incremental loads. In all modes, partitioned data is loaded in a format such that partitions or subpartitions can be loaded selectively.

    • Sorted Indexes: Identifies the indexes on which the data is presorted. This clause is allowed only for direct path loads. Because data that is sorted for one index is not usually in the right order for another index, you specify only one index in the SORTED INDEXES clause. When the data is in the same order for multiple indexes, all indexes can be specified at once. All indexes listed in the SORTED INDEXES clause must be created before you start the direct path load.

    • Singlerow: Intended for use during a direct path load with APPEND on systems with limited memory, or when loading a small number of records into a large table. This option inserts each index entry directly into the index, one record at a time. By default, SQL*Loader does not use SINGLEROW to append records to a table. Instead, index entries are put into a separate, temporary storage area and merged with the original index at the end of the load. Although this method achieves better performance and produces an optimal index, it requires extra storage space. During the merge, the original index, the new index, and the space for new entries all simultaneously occupy storage space. With the SINGLEROW option, storage space is not required for new index entries or for a new index. Although the resulting index may not be as optimal as a freshly sorted one, it takes less space to produce. It also takes more time because additional UNDO information is generated for each index insert. This option is suggested for use when either of the following situations exists:

      • Available storage is limited

      • The number of records to be loaded is small compared to the size of the table (a ratio of 1:20 or less, is recommended)

    • Trailing Nullcols: Sets SQL*Loader to treat any relatively positioned columns that are not present in the record as null columns.

    • Records To Skip: Invokes the SKIP command in SQL*Loader. SKIP specifies the number of logical records from the beginning of the file that should not be loaded. By default, no records are skipped. This parameter continues loads that have been interrupted for some reason. It is used for all conventional loads, for single-table direct loads, and for multiple-table direct loads when the same number of records are loaded into each table. It is not used for multiple-table direct loads when a different number of records are loaded into each table.

    • Database File Name: Specifies the names of the export files to import. The default extension is .dmp. Because Export supports multiple export files, you may need to specify multiple filenames to be imported. You must have read access to the imported files. You must also have the IMP_FULL_DATABASE role.

    Configuring Flat File Physical Properties

    When a mapping contains a flat file operator, the Configuration Properties inspector contains additional settings. When a mapping includes a Mapping Flat File operator as target, it generates a PL/SQL deployment code package.

    Mappings containing Mapping Flat File operators as sources generate SQL*Loader scripts. When a mapping uses SQL*Loader, the Configuration Properties inspector also contains settings for defining source file data and a category called Default that contains script parameters.

    Figure 8-9 Configuration Properties Inspector (Flat File Source)

    Text description of configpr.gif follows.

    Text description of the illustration configpr.gif

    To configure a mapping with a flat file:

    1. Select a mapping object from the navigation tree.

    2. From the Edit menu, select Configure... or right-click the mapping you want to configure and select Configure... from the pop-up menu.

      The Configuration Properties inspector displays.

    3. Expand the Runtime Parameters node to set the deployment code generation.

      See "Setting Runtime Parameters" for information on these settings.

    4. Expand the Sources and Targets node to set the file access information.

      See "Configuring Flat File Physical Properties" for information on these settings.

    5. If your flat file is being used as a source, then expand the Source Data File node to set data file information.

      See "Configuring Flat File Physical Properties" for information on these settings.

    6. If the flat file is being used as a source, then expand the Default node to set the control file information.

    7. Close the window.

    This section describes the configuration parameters for a SQL*Loader mapping.

    Parameters affecting script type:

    • Continue Load: If this parameter is set to true, then the generated SQL*Loader script is CONTINUE_LOAD. Otherwise, the SQL*Loader script will be LOAD. CONTINUE_LOAD is used when a direct load of multiple tables is discontinued and needs to be restarted. It is used in conjunction with the operator-level SKIP option.

    • Nls Characterset: Specifies the character set to place in the CHARACTERSET clause.

    • Operation Recoverable: Controls the output of the RECOVERABLE clause. True indicates that the load is recoverable. False indicates that the load is not recoverable and records are not recorded in the redo log.

    Parameters affecting the OPTIONS clause:

    • Direct Mode: Specifies the value of the DIRECT option as either =TRUE or =FALSE. True indicates that a direct path load will be done. False indicates that a conventional load will be done.

    • Perform Parallel Load: Specifies the value of the PARALLEL option as either =TRUE or =FALSE. True indicates that direct loads can operate in multiple concurrent sessions.

    • Errors Allowed: If the value specified is greater than 0, then the ERRORS = n option is generated. SQL*Loader terminates the load at the first consistent point after this error limit is reached.

    • Records To Skip: If the value specified is greater than 0, then the SKIP = n option is generated. This value indicates the number of records from the beginning of the file that should not be loaded. If the value is not specified, no records are skipped.

    • Records To Load: If the value specified is greater than 0, then the LOAD = n option will be generated. This value specifies the maximum number of records to load. If a value is not specified all of the records are loaded.

    • Rows Per Commit: If the value specified is greater than 0, then the ROWS = n option is generated. For direct path loads, the value identifies the number of rows to read from the source before a data is saved. For conventional path loads, the value specifies the number of rows in the bind array.

    • Read Size: If the value specified is greater than 0, then the READSIZE = n option is generated. The value is used to specify the size of the read buffer.

    • Bind Size: If the value specified is greater than 0, then the BINDSIZE = n option is generated. The value indicates the maximum size in bytes of the bind array.

    • Read Buffers: If the value specified is greater than 0, then the READBUFFERS n clause is generated. READBUFFERS specifies the number of buffers to use during a direct path load. Do not specify a value for READBUFFERS unless it becomes necessary.

    • Preserve Blanks: If this parameter is set to TRUE, then the PRESERVE BLANKS clause is generated. PRESERVE BLANKS retains leading white space when optional enclosure delimiters are not present. It also leaves trailing white space intact when fields are specified with a predetermined size.

    • Database File Name: If this parameter is set to a non-blank value, then the FILE= option is generated.

    Parameters affecting the INFILE clause:

    The Data Files configuration parameter enables you to specify the characteristics of the physical files to be loaded. The initial values for these parameters are set from the properties of the flat file used in the mapping.

    • Data File Name: The full physical filename of a data file to be loaded. The value entered is placed in the INFILE clause. You must enter the complete path name for the file in the syntax of the operating system on which the SQL*Loader script is deployed. The value specified is enclosed in single quotes in the generated code.

    • Bad File Name: The full physical filename of a bad file that SQL*Loader creates to store records that cause errors during insert or are improperly formatted. The value entered is placed in the BADFILE clause. You must enter the complete path name for the file in the syntax of the operating system on which the SQL*Loader script is deployed. The value specified is enclosed in single quotes in the generated code.

    • Discard File Name: The full physical filename of a discard that SQL*Loader creates to store records that are neither inserted into a table nor rejected. The value entered is placed in the DISCARDFILE clause. You must enter the complete path name for the file in the syntax of the operating system on which the SQL*Loader script is deployed. The value specified is enclosed in single quotes in the generated code.

    • Discard Max: The value entered, if greater than 0, is used to generate the DISCARD n clause. It specifies the number of discards that will terminate the load.

    For more information on each SQL*Loader option and clause, see Oracle8i Utilities or Oracle9i Database Utilities.
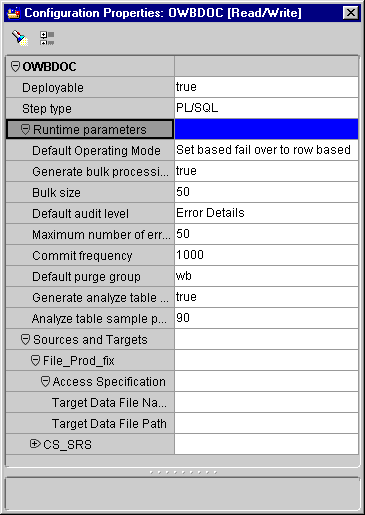
    Figure 8-10 Configuration Properties Inspector (Flat File Target)

    Text description of configpa.gif follows.

    Text description of the illustration configpa.gif

    To configure a mapping with a flat file as a target:

    1. Click Default Operating Mode and select Row based (target only) from the drop-down list.

    2. Expand the Sources and Targets node, then the Flat File node, and then the Access Specification node.

    3. Enter the name of the Target Data File.

    4. Enter the path of the target file into the Target Data File Path field.

      You must first set this path in the Init.ora file for your warehouse instance. The UTL_FILE_DIR parameter contains the path setting. For example, to load files in D:\Data\FlatFiles\File1.dat, set the parameter to:

      UTL_FILE_DIR=D:\Data\FlatFiles\


      You can create more than one valid path setting by copying and editing this line, ensuring the copied lines are consecutive:

      UTL_FILE_DIR=D:\Data\FlatFiles\
      UTL_FILE_DIR=E:\OtherData\


      You can bypass this by setting the parameter to:

      UTL_FILE_DIR=*


      Do not bypass this setting for production databases.

    Configuring SAP File Physical Properties

    This section describes how to configure the Step Type properties and Runtime Parameters specific to ABAP mappings. The configuration of a PL/SQL mapping from a transparent table in an SAP application is the same as the configuration of any other PL/SQL mapping.

    Setting the Step Type

    This parameter enables you to choose the type of code you want to generate for your SAP mappings.

    To choose the step type:

    1. Click the Step Type field and click the ... button.

      The Step Type dialog displays.

    2. From the drop-down list, select the type of code you want to generate: ABAP or PL/SQL scripts (for transparent tables only).

    3. Click OK.

    Setting the Runtime Parameters

    The following is the list of runtime parameters for SAP mappings and their recommended corresponding values. The default values are recommended for most parameters.

    • SAP System Version: Specifies the SAP system version number to which you want to deploy the ABAP code.

    • Staging File Directory: Specifies the location of the directory where the data generated by ABAP code resides.

    • Data File Name: Specifies the name of the data file created during code generation.

    • Control File Name: Specifies the name of the control file created during code generation.

    • Log File Name: Specifies the log file name created during code generation. This file is useful for debugging purposes.

    Validating and Generating a Mapping

    After you have set the Configuration Properties you are ready to validate and generate the scripts that deploy the mapping to the repository. Warehouse Builder generates code that executes the mapping. It can generate the following types of code:

    • PL/SQL for executing within the database

    • SQL Loader for flat files

    • TCL for use with Oracle Enterprise Manager

    Warehouse Builder selects the language based on the operators and objects you use in your mapping.

    Validating a Mapping

    You can validate your mapping prior to generating it to check for errors. The validation procedures verify foreign key references, object references, data type matches, and other properties in your mapping. See "Viewing the Generated Code for a Mapping" for information on viewing generated code in the Mapping Editor, and "Validating Definitions and Generating Scripts" for more information on validation and generation from the Module Editor.

    To validate a mapping:

    1. Select a mapping in the Warehouse Module Editor.

    2. From the Mapping menu, select Validate....

      The Validation Results dialog displays.
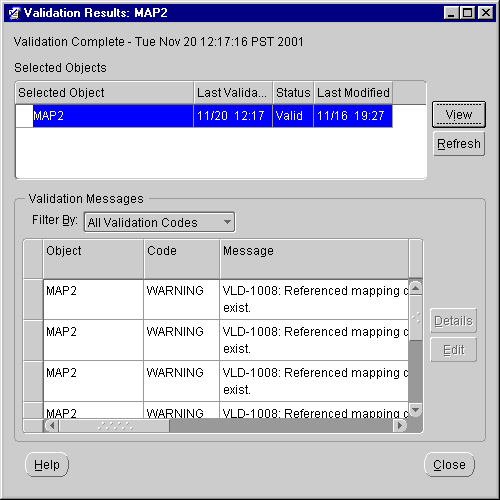
    Figure 8-11 Validation Results Dialog

    Text description of validata.gif follows.

    Text description of the illustration validata.gif

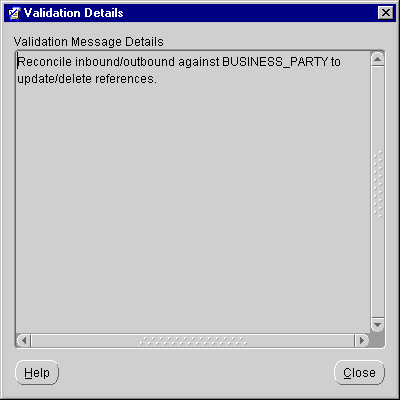
    1. Click Details to see the full message that appears in the Validation Message field.

    Figure 8-12 Details Window

    Text description of validatb.gif follows.

    Text description of the illustration validatb.gif

    If you have errors, the Validation Details window title bar lists their numbers. The Validation Details window contains suggestions for correcting them. You can open an editor to make these corrections by clicking Edit in the Validation Results Window. See "Validating Definitions" for more information on the Validation Results window.

    Generating a Mapping

    You can generate the code for a mapping from the:

    • Module Editor, which creates scripts with the generated code that you can deploy and run.

    • Mapping Editor, which generates code that you can inspect from a code viewer. Code generated from within the Mapping Editor does not remain in the repository as an object. Also, Mapping Editor code excludes auditing information and deployment code.

    When you generate a mapping, you are creating the SQL code that performs the DML and DDL commands necessary to move the data from the sources to the targets defined in your mapping. The code generator also validates the mapping before creating the code that implements your ETL design. See "Generating Scripts" for more information on generating scripts.


    Note:

    If you generate code at any time during your Warehouse Builder session, multi-user locking remains in effect until after you commit your changes.


    To generate code from the mapping editor:

    1. Select a mapping in the Warehouse Module Editor.

    2. From the Module menu, select Generate or right-click a mapping and select Generate from the pop-up menu.

      Warehouse Builder generates the code for the mapping and displays the Generation Results dialog.
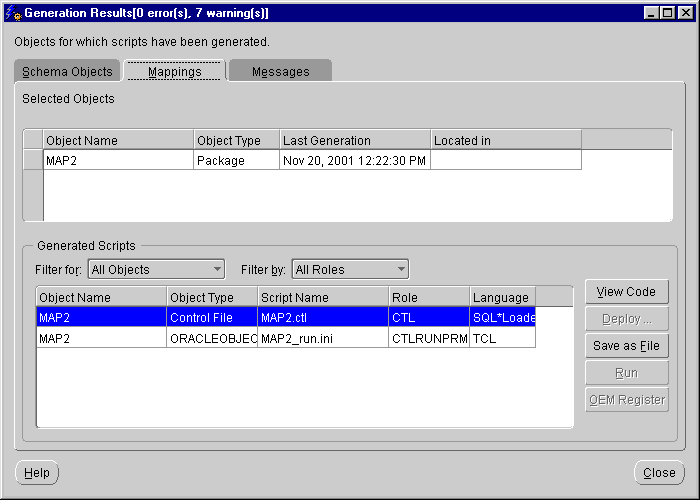
    Figure 8-13 Generation Results Dialog

    Text description of generatf.gif follows.

    Text description of the illustration generatf.gif

    For a Mapping that extracts records from a flat file and loads them as rows into a target table, the generated code results in a SQL*Loader control file. The control file reflects a mapping definition from a flat file to a table source and includes a date stamp.

    Viewing the Generated Code for a Mapping

    You can view generated code from the Mapping Editor at any stage of your mapping process. Warehouse Builder validates this code automatically before generating it. See "Validating Definitions and Generating Scripts" for more information on validation and generation from the Module Editor.


    Note:

    If you generate code at any time during your Warehouse Builder session, multi-user locking remains in effect until after you commit your changes.


    Viewing Intermediate Results

    You can view the generated code for a mapping from the Mapping Editor as an intermediate result. This type of code generation produces mapping code up to the selected attribute group in the mapping. The Code Viewer displays the code that goes into an input attribute group, the code that goes out of an output attribute group, and the load code is generated for a terminating input group.

    These incoming, outgoing, and load types of code are called aspects. You select aspects from the Code Viewer View menu. You can view one aspect at a time. For example, an output attribute group does not contain the input intermediate code result.

    You can leave the Code Viewer open and select any attribute group on the mapping canvas. The Code Viewer displays the code generated for the selected attribute group.

    To view intermediate results:

    1. Select an attribute group in an operator.

    2. From the Mapping menu, select Generate, and then Intermediate Result or right-click the mapping on the Module Editor navigation tree, select Generate and then Intermediate Result from the pop-up menu

    Viewing Code from the Module Editor

    You can generate simplified code from the mapping editor showing how data extraction, transformation, and load are performed. The generated code does not include support for auditing or bulk-processing.

    The code generator only generates code that handles the loading type specified in the data target operator. For example, if you choose INSERT/UPDATE as the loading type, only INSERT and UPDATE code appears in the generated code.


    Note:

    The system can generate code for multiple strategies. For example, if a step can be implemented in set-based and row-based operating mode, the Code Viewer will include both modes.


    To generate mapping code:

    1. From the Module menu, select Generate... or right-click the mapping and select Generate... from the pop-up menu.

    2. Select Generate create scripts in the Generation Mode dialog.

    The generated code contains all possible strategies that can be generated for that mapping. For PL/SQL mappings, a runtime parameter determines which operating mode to use when running the package.


    Note:

    If a mapping contains a Mapping View operator, Warehouse Builder does not generate a DDL statement for that view. Warehouse Builder generates a regular PL/SQL package with the assumption that the view can be updated.

    No error checking is done to verify if the view can be updated.

    Check to ensure that the view can be updated before including this view in the map. Warehouse Builder validation or generation treats views or materialized views the same as regular tables.


Go to previous page Go to next page
Oracle
Copyright © 1996, 2002 Oracle Corporation.

All Rights Reserved.
Go To Documentation Library
Home
Go To Product List
Solution Area
Go To Table Of Contents
Contents
Go To Index
Index