Release 2 (v9.0.2)
Part Number A95949-01
Home |
Solution Area |
Contents |
Index |
| Oracle9i Warehouse Builder User's Guide Release 2 (v9.0.2) Part Number A95949-01 |
|
This chapter describes how to create definitions for data sources. This chapter also shows you how to modify definitions, generate and display diagrams for the source objects, and print diagrams.
This chapter includes the following topics:
To access a source, you create a source module. You can create source modules for:
Warehouse Builder uses software integrators to read definitions and extract data from source systems. The New Module Wizard determines the correct integrator for a specific case from the source type and the version or system type. You can configure a module for an Oracle system, a non-Oracle database, or an Oracle Designer repository.
Table 5-1 summarizes application types and their corresponding integrators.
When you create a source module for a database source, you create or select a database link in the Warehouse Builder repository that points to the source. Warehouse Builder uses the link to access the data dictionary of the source.
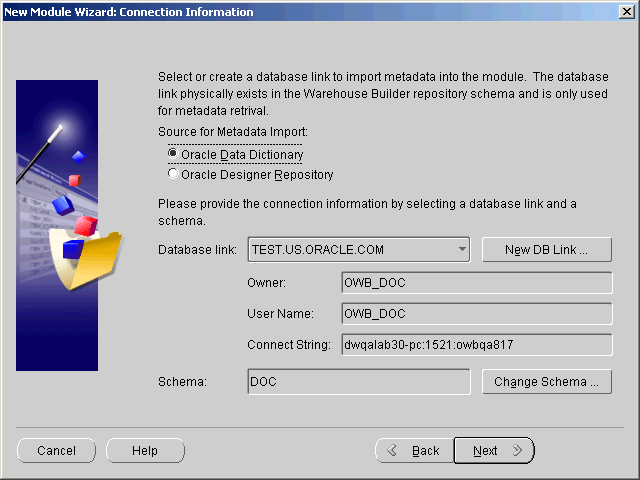
You specify the database link from the Connections page of the New Module Wizard. Select an existing database link from the drop-down list and verify the link owner, user name, and connect string. Create a new database link using the New Database Link dialog. Database administrators usually prefer to create and control database links to avoid security issues.
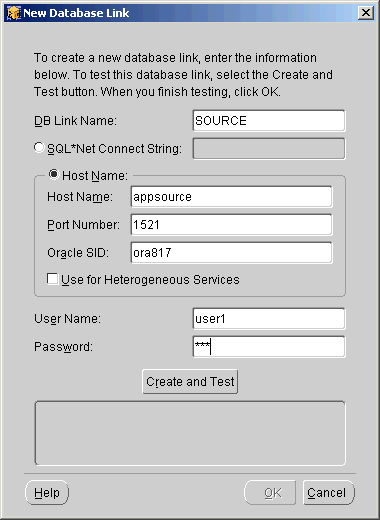
To create a new database link, specify the information in Table 5-2. You can specify the connection information as a connect string or as individual values.
For more information on database links and connect strings, see Oracle8i/9i Distributed Database Systems and Oracle8i/9i SQL Reference.
Warehouse Builder stores database link properties in the repository. After you create a database link, you can edit the link information in the module property sheet. For more information, see "Updating a Source Module".
Warehouse Builder communicates with non-Oracle systems using Oracle8i/9i Heterogeneous Services and a complementary agent. Heterogeneous Services makes a non-Oracle system appear as a remote Oracle database server. The agent can be an Oracle Transparent Gateway or the generic connectivity agent included with Oracle8i/9i.
For additional information on distributed processing systems, see Oracle8i/9i Distributed Database Systems.
This section describes how to create a source module that connects with an application based on a database system.
To create a database source module:
Warehouse Builder displays the welcome page for the New Module Wizard.
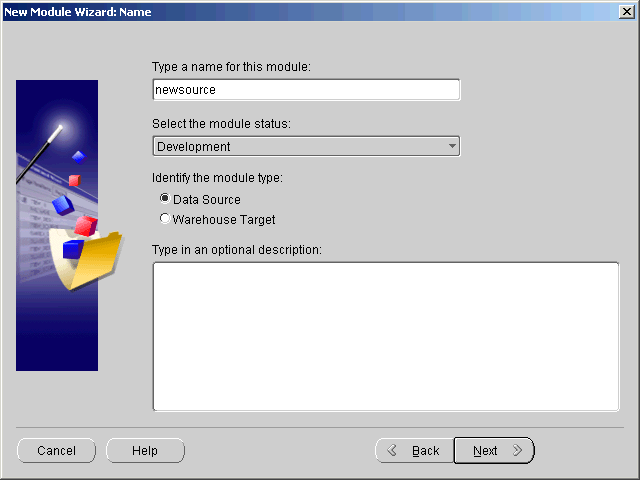
The wizard displays the Name page.
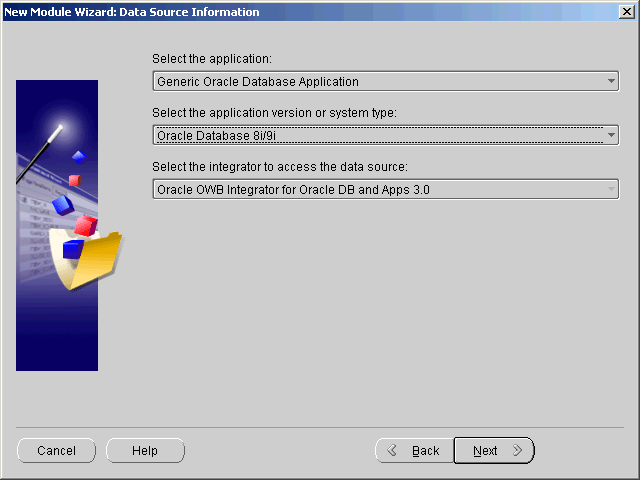
The wizard displays the Data Source Information page.
The wizard determines the correct integrator based on your selections.
The wizard displays the Connection Information page.
Click New DB Link to create the link if it not does not exist in the Warehouse Builder repository. For more information, see "Configuring Connection Information for Database Sources".
When the database link points to a heterogeneous services agent, the page contains an additional box for the gateway agent.
The wizard displays the link information and the name of the schema owner.
The wizard updates the schema owner name in the Connection page.
The wizard displays the Finish page. This page summarizes the information you entered on each of the wizard pages. Verify the information.
The wizard creates the source module and inserts its name in the project navigation tree.
You can create a source module that connects with an Oracle Designer repository. When the definitions for an application are stored and managed in an Oracle Designer repository, you can reduce the amount of time you need to connect with the application itself.
A property on the New Module Wizard's Connection page determines whether a module can import definitions from an Oracle Database or from an Oracle Designer Repository.

Check the button and select a database link that connects with the host where the Oracle Designer Repository resides. Otherwise, create the source module using the procedure described for the previous example.
This section describes how to create a source module that connects with an Oracle Designer 6i repository.
Designer 6i includes versioning for accessing repository objects. Designer 6i uses workareas to control versions of an object. By selecting a workarea, you specify a version of a repository object. The workarea acts as an object qualifier that you specify before you can access it.
With Designer 6i, you can group objects into Application Systems within workareas. An Application System contains definitions for namespace and ownership of objects and enables you to view objects even though they are owned by a different user. Because Designer 6i Application Systems are controlled by workareas, they have version control. Consult the Designer 6i documentation for more information about workareas and application systems.
All visible objects of an Application System are available for use as data sources in Warehouse Builder. To select Designer 6i objects as Warehouse Builder sources:
The New Module Wizard detects the Designer version available in a database link. If it finds Designer 6i, the Connection Information page changes to show the Workarea and the Application System fields along with a change button for each.
After you click Change, the New Module Wizard displays a selection list from which you choose either a workarea or an application system. The list of repository objects available for import is determined by the following criteria:
To create a Designer 6i source module:
Warehouse Builder displays the welcome page for the New Module Wizard.
The New Module Wizard displays the Name page.
The wizard displays the Data Source Information page.
The wizard determines the correct integrator based on your selections.
The wizard displays the Connection Information page.
Click New DB Link to create the link if it not does not exist in the Warehouse Builder repository. For more information, see "Configuring Connection Information for Database Sources".
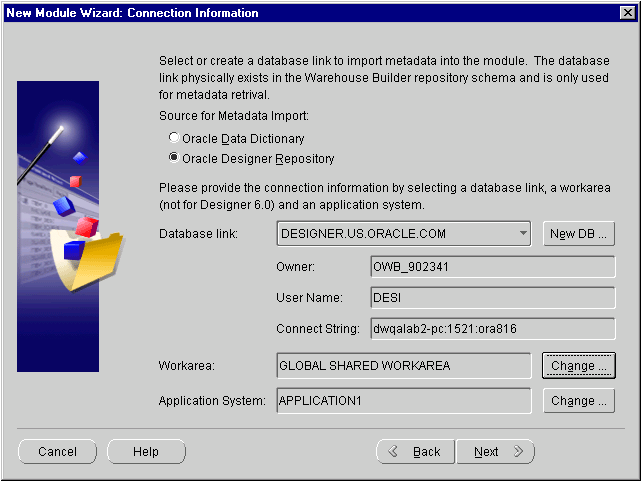
If the New Module Wizard detects a Designer 6i repository, the Workarea field, Application System field, and Change button is enabled. If the New Module Wizard detects a Designer 6.0 repository, an alert displays and the Workarea field and Change button are disabled.
You must specify a workarea before Warehouse Builder can select objects in the Designer 6i repository.
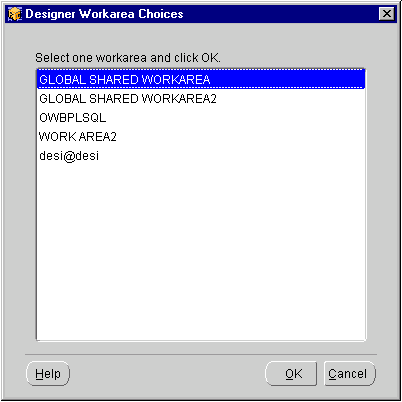
If you have not set a workarea, a dialog box prompts you to do so. You must set a workarea before you can select an application system.
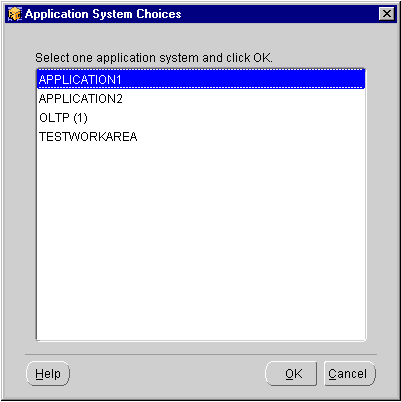
The wizard displays the Finish page. This page summarizes the information you entered on each of the wizard pages. Verify the information.
The wizard creates the source module and inserts its name in the project navigation tree.
A project may need to extract data from flat files. This section describes how to create a source module for a flat file source. Before you can create a file source module, the files must be local to the computer where the Warehouse Builder client is installed.
When the files reside on a UNIX operating system, the directory containing the files must be mapped to the Warehouse Builder host, which requires third-party software on the host to support a Network File System (NFS) connection.
The general steps for mapping a UNIX directory to a Warehouse Builder host are:
When you create a source module using the New Module Wizard, you can point the module to the NFS directory using the Browse button or by entering the complete path name to the directory.
To create a file source module:
Warehouse Builder displays the welcome page for the New Module Wizard.
The New Module Wizard displays the Name page.
The wizard displays the Data Source Information page.
The wizard determines the other selections.
The wizard displays the Connection Information page.
The Oracle9i Warehouse Builder integrator for flat files reads files that have fixed-length or delimited single record formats. Fixed-length files can contain logical records that have multiple physical records. Multiple record types can be classified in either fixed-length or delimited files.

The wizard displays the Finish page. This page summarizes the information you entered on each of the wizard pages. Verify the information.
The wizard creates the source module and inserts its name in the project navigation tree.
This section describes how to create a source module for an SAP data source. After you create the source module, you can import the metadata definitions from SAP tables using the Import Metadata Wizard.
To create the SAP source module:
Warehouse Builder displays the Welcome page for the New Module Wizard.
The wizard displays the Name page.
The wizard displays the Data Source Information Page.
When you select the Application Type (SAP), the wizard automatically selects the System Type and Integrator Type (SAP) for the application.
The wizard displays the Connection Information page for SAP applications.
RFC Connection type requires the following connection information:
SAPRFC.INI File requires the following connection information:
The wizard displays the Logon dialog for the SAP application.
The wizard attempts to log onto the SAP application. If unsuccessful, the wizard displays an error message; otherwise, it displays the Finish page.
If the application server version information entered on the Data Source Information page of the wizard does not match the actual application version for the source system, you are prompted with an error message. If necessary, click Back to return to the Data Source Information page and correct the application version, then logon again.
After you log on to the SAP source, the wizard displays the Finish page.
The wizard creates the new SAP source module and inserts its name in the project navigation tree.
You can update the definition of a source module by editing its property sheet. To display the property sheet, right-click on the module and select Properties. The property sheet for a module contains the following tabs:
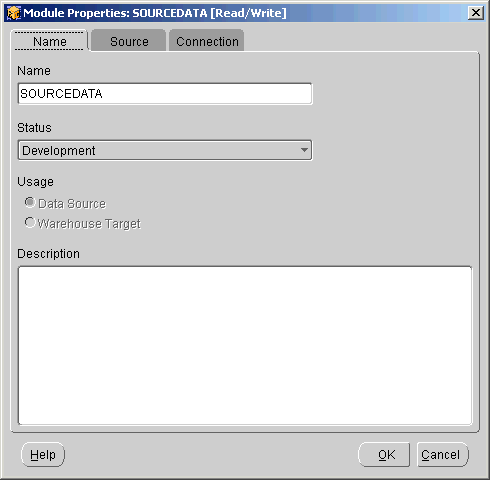
This section describes how to import definitions from a database application and store them in a source module.
You use the Import Metadata Wizard to import metadata from a database into a module. You can import metadata from an Oracle database, a non-Oracle database, and a Designer repository.
To import definitions from an Oracle database application into a source module:
The welcome page for the Import Metadata Wizard displays.
The Filter Information page displays.
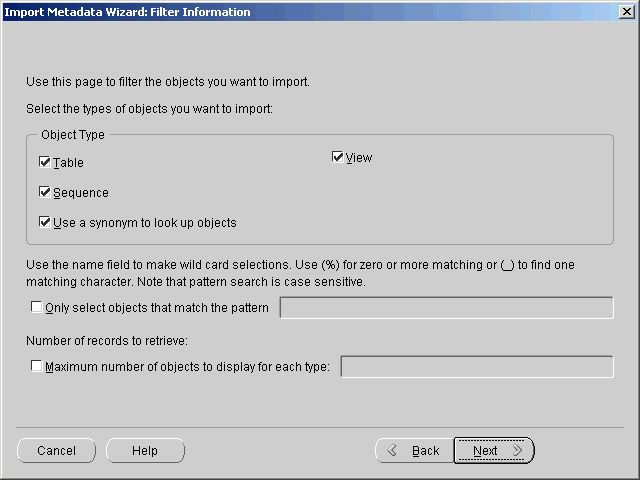
Warehouse Builder retrieves names that meet the filter conditions from the data dictionary and displays the Object Selection page.
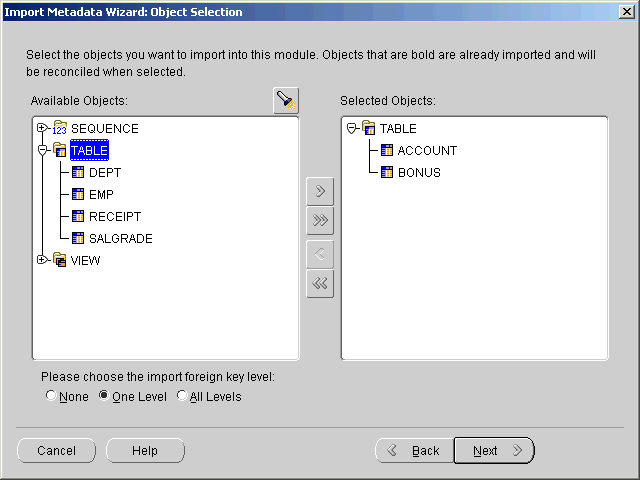
If you are re-importing definitions, previously imported objects appear in bold.
The Summary and Import page displays. This page summarizes your selections in a spreadsheet listing the name, type of object, and whether the object will be reconciled or created. Verify the contents of this page and add descriptions for each of the objects.
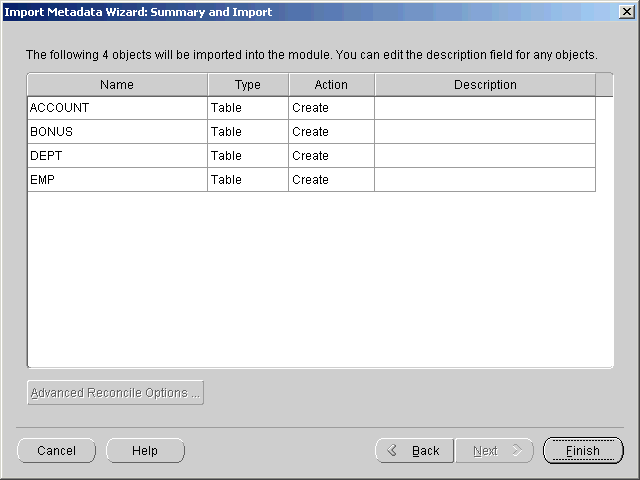
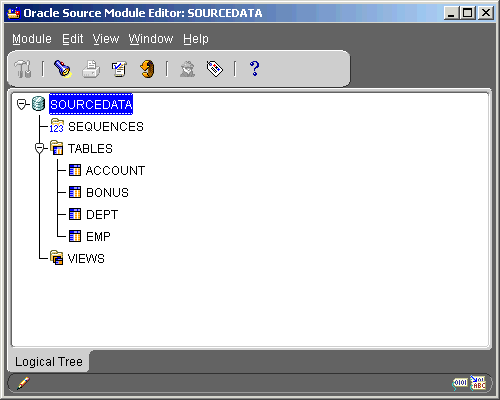
Warehouse Builder stores the definitions in the module.
Re-importing your source database definitions enables you bring in changes added to the source since your original import. You do not have to remove the original definitions from the repository. You are also given advanced options that enable you to preserve some of the changes you have made to the objects since the original import. This includes any new objects, foreign keys, relationships, and descriptions you have created.
To re-import definitions:
The welcome page for the Import Metadata Wizard displays.
The Filter Information page displays.
The Object Selection page displays. The objects that were originally imported display in bold.
The Summary and Import page displays. The Reconcile action is displayed for the objects you are re-importing.
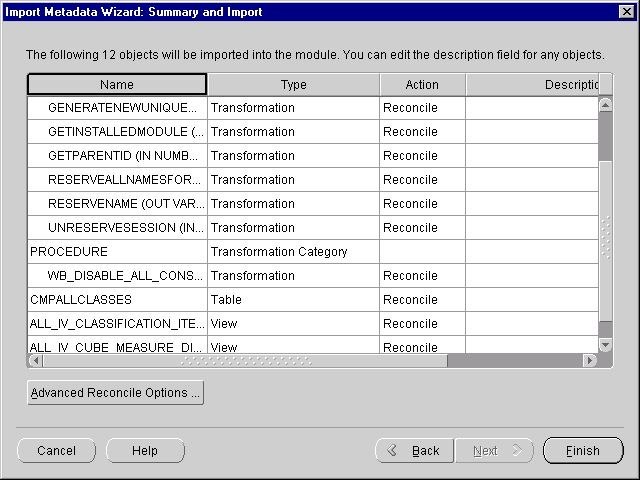
The Advanced Reconciliation Options dialog displays.
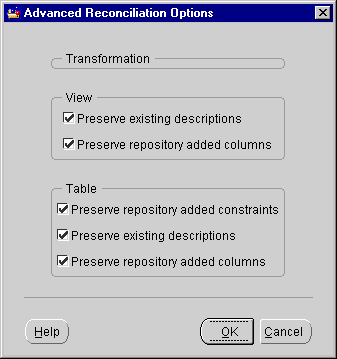
Select options for reconciling views:
Select options for reconciling tables:
Warehouse Builder reconciles and creates objects. When this is complete, the Import Results dialog displays.
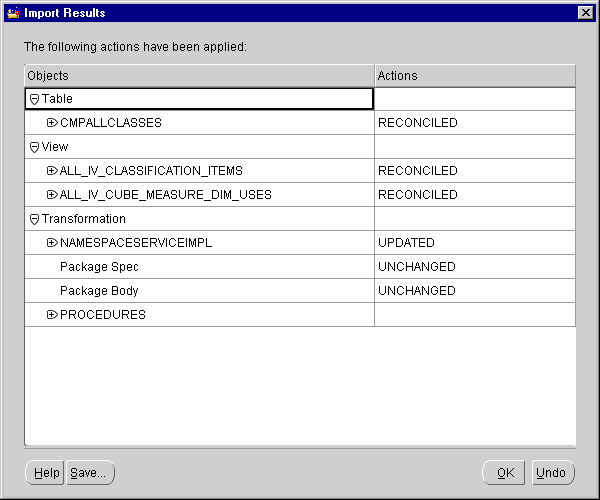
The report lists the actions performed by Warehouse Builder for each object.
Click Save to save the report. Make sure to use a naming convention that is specific to the re-import.
You can update source definitions, diagram individual definitions and their references, and print the diagrams using the Source Module Editor. To display this editor, double-click the module name.
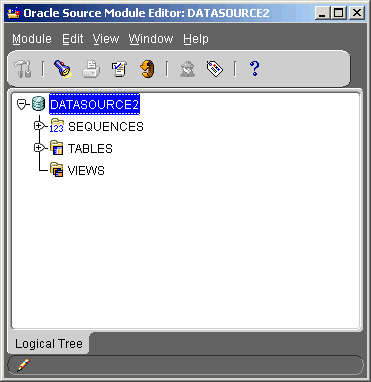
You can update a source definition by editing entries in its Property Sheet. To display a definition's property sheet, select its name in the navigation tree and then select Properties from the pop-up list.
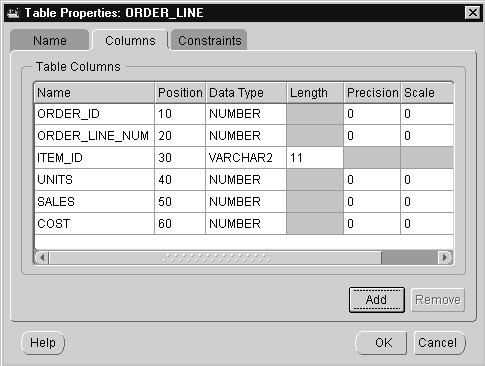
To update an existing entry, select the entry and enter the new information. Some entries have drop-down lists that limit the range of selections. For example, when you change the data type of a column, you must select an entry from a drop-down list. You can also add new entries or remove existing ones.
You can update the connection information for a data source by selecting another database link from the drop-down list.
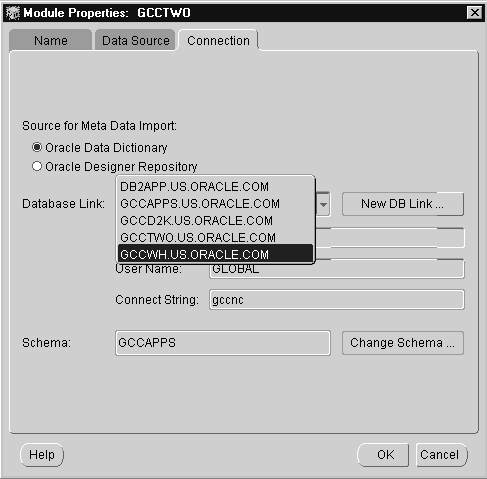
When you change the connection information, Warehouse Builder displays a warning message that you may compromise the existing definitions in the source module. To change the connection, click OK.
You can display a diagram for a definition and its references using the Source Module Editor. To display a diagram for a definition, select its name in the navigation tree and then select Edit from the pop-up list. The Source Module Editor displays a diagram of the definition.
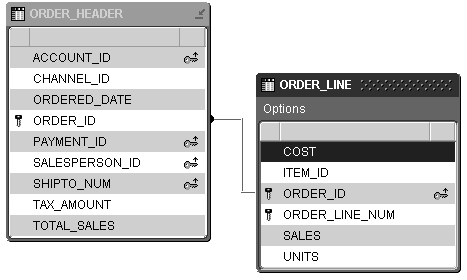
Each object in the diagram has a toolbar that you can use to sort the column names. The toolbar is divided into three rectangles. To sort the column names click one of the rectangles:
The sort order is only for display purposes and has no bearing on the ordering of column names within the definition.
To print a diagram of a source definition, display the diagram and then click the Print icon on the editor's toolbar.
This section shows you how to create a definition for a flat file. Using the Flat File Sample wizard you can:
After you create and store a format definition, you can use it to describe other flat files that have the same properties.
When you create a definition, the Flat File Sample Wizard opens the file, displays a sample of data, and requests detailed information about the file format. The Flat File Sample Wizard is structured as shown in Table 5-3.
Character set: Warehouse Builder's default NLS character set is the same as its host. If it differs from the source file's character set, the data sample might be unintelligible. You can display the data sample in the source's native character set by selecting it from the drop-down list. For complete information on NLS character sets, see the Oracle8i/9i National Language Support Guide.
Physical record length: The length of a fixed-format record can be specified as length in characters or set to a user-defined terminator. The length specification results in greater efficiency.
Logical records: Warehouse Builder can manage a source file of logical records. The number of physical records in a logical record can be fixed or variable. For a fixed number, you specify the number of physical records per logical record. For a variable number, you specify a continuation character at either the end or beginning of each physical record. See "Specifying Logical Records" for more information.
Multiple record types: The Flat File Wizard can interpret a source file that contains a variety of record types. You must specify the column within the source file that contains unique record types. You then scan the column to identify unique record type values, then define the characteristics of that record type. The record types can be renamed.
Field type: Describes the data type of the field for the SQL*Loader. Warehouse Builder supports the following set of portable data types:
The native numeric data is a number in character form; it is not a binary representation. The numeric data types are identical to CHAR except with respect to the DEFAULTIF and NULLIF constraints. See the discussion below on field constraints.
You can represent FLOAT EXTERNAL data either in scientific or regular notation. The representations 5.33 and 533E-2 are both valid.
For complete information on SQL*Loader field and data types, refer to Oracle8i/9i Utilities.
Field mask: The SQL*Loader uses dd-mon-yy as its default date mask. You can override this default by entering a valid date mask when you describe the file. For example, if the input data has the format DD-Mon-YYYY rather than the SQL*Loader default, you can enter the true format as a mask.
NULLIF/DEFAULTIF conditions: You can override the default action of the SQL*Loader by placing a DEFAULTIF or NULLIF condition on a field.
When you describe the field using the Flat File Sample Wizard, you can choose one of these constraints.
The following procedure describes how to create a definition for a file using the Import Metadata and Flat File Sample Wizards. Each logical record of this file consists of a single physical record. The location of the file was configured in the warehouse source module.
To create a definition for a flat file format:
Warehouse Builder displays the welcome page for the Import Metadata Wizard.
The wizard displays the Filter Information page. Use this page to filter file names.
The wizard displays the Object Selection page.
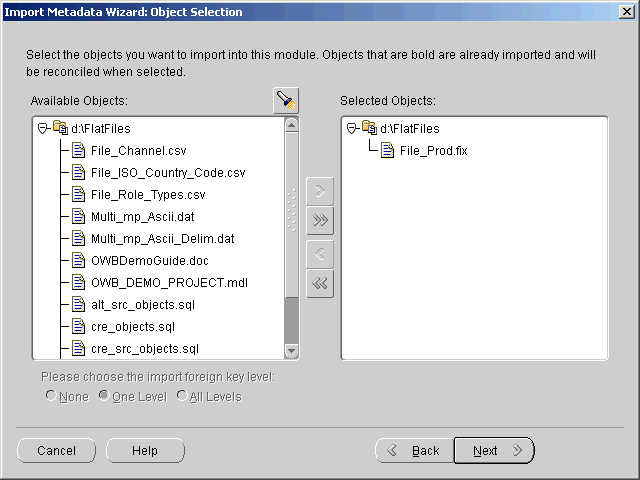
The wizard displays the Summary and Import page. The left-most column of this page contains a status ball which can be red or green. If green, then Warehouse Builder already has a definition of the file's format--proceed to step 15; if red, then you must create a format for the file using the Flat File Sample Wizard.
The wizard displays the welcome page for the Flat File Sample Wizard.
The wizard opens the file, reads a sample of data, and displays the File Setup page. This page displays the sample of data in a template with a few initial values set for the global properties.
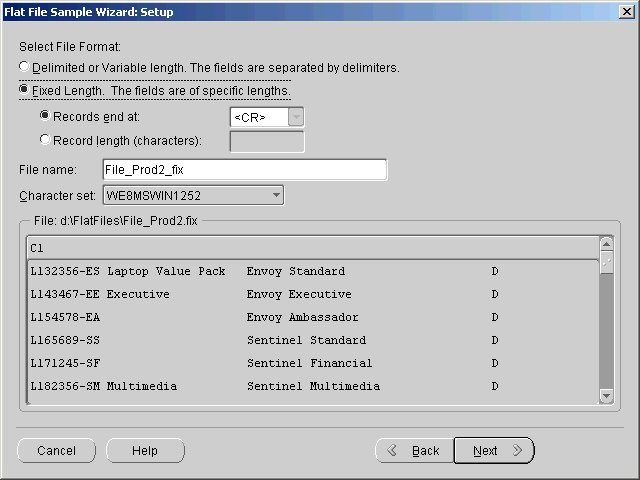
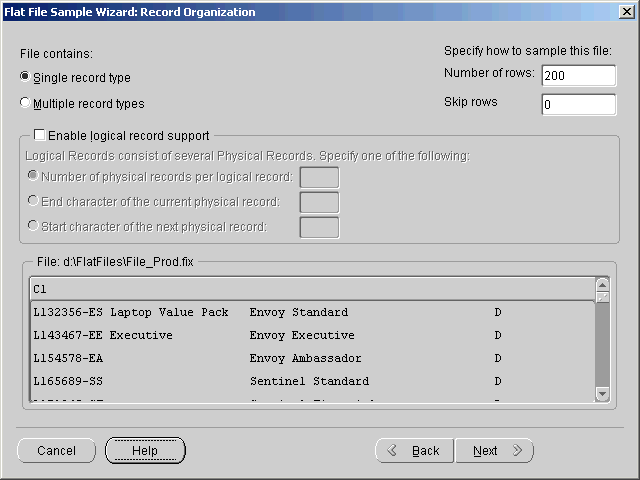
The wizard displays the Record Organization page. Use this page to specify whether the file contains single or multiple record types, or if it requires a logical record structure. You can also select how many rows of the file to sample.
The wizard displays the Column Definition page. Use this page to specify the column widths.
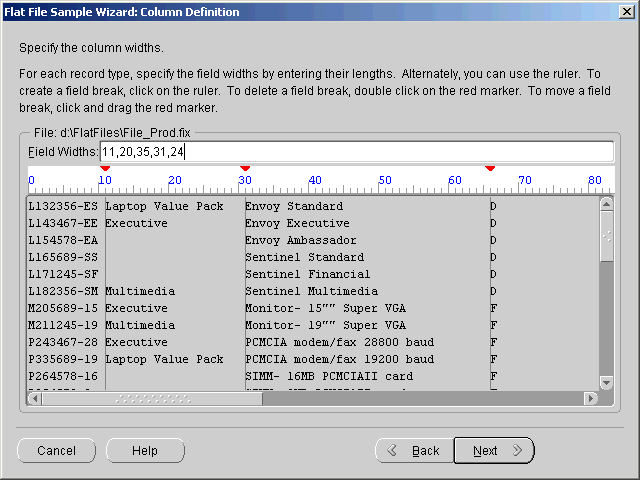
Define a column using one of two methods:
If you make a mistake, double-click the marker to restart.
Use the vertical and horizontal scroll bars to navigate.
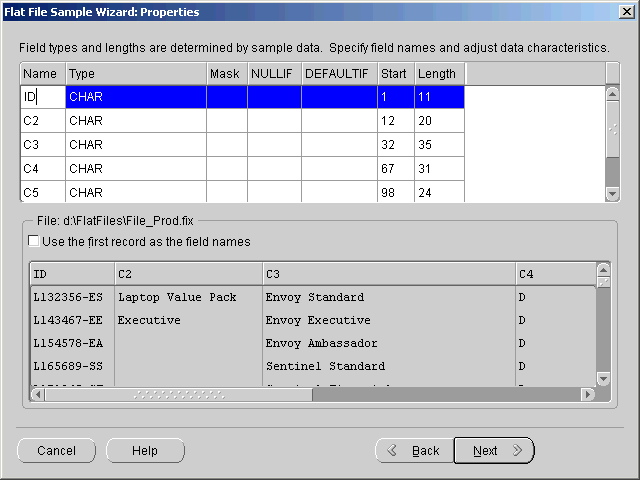
The wizard displays the Properties page. This page defines each field of the logical record just as you marked it off in the previous step.
If your flat file supplies or contains field names, select the check box Use the first record as the field names to automatically transfer header information.
For more information on these fields, see "Creating Definitions for Flat File Sources".
Warehouse Builder displays the Summary page. Verify that the definition is correct. If not, click Back to navigate the wizard pages.
Warehouse Builder exits the Flat File Sample Wizard and returns to the Summary and Import page of the Import Object Wizard.
The Summary and Import page has been updated:

If you open this wizard at a later time with a file that has the same format as the one you have just set, then you can select this entry from the Same As field instead of creating a new definition with the Flat File Sample Wizard.
Warehouse Builder creates a definition for file, stores the definition in the source module, and inserts the format's name in the source module's navigation tree.
You can define different record types within a file using the Flat File Sample Wizard.
To define multiple record types:
The wizard displays the welcome page for the Flat File Sample Wizard.
The wizard displays the Setup page.
The wizard displays the Record Organization page.
The wizard displays the Record Types page.
In the following example, the first column defines the record type, so the first column begins in position 0 and ends in position 1.
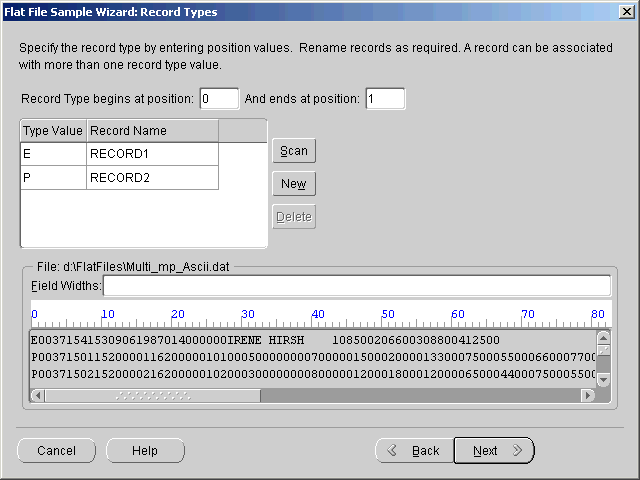
A list of distinct type values appears with the default record names RECORD1, RECORD2, and so on. You can edit the record names, select a different record name for any type value, and add or delete type values.
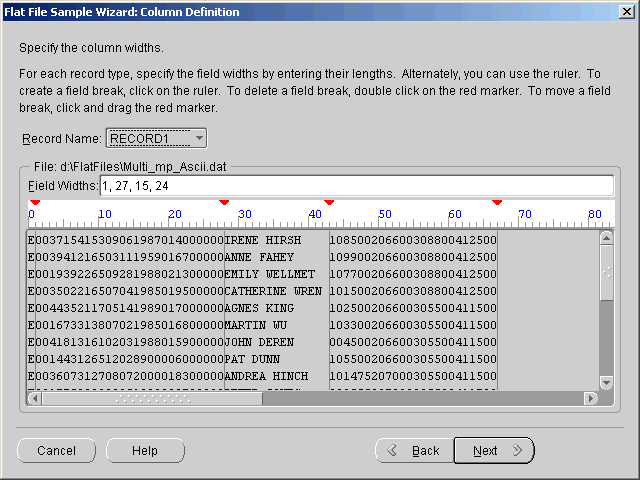
The wizard displays the Column Definition page.
The Field Width settings you define refer to the positions that contain the record type value. When you have adjusted the information for each column, either select another record name and define its columns or click Next to go to the Properties page.
The wizard displays the Summary page showing what is to be imported by the wizard.
The source module now contains a definition for the file format, and within it, definitions for the individual records.
When the logical record for a source file contains multiple physical records, you must specify the physical records and describe the assembly method. Only fixed-length files with a single record type can have logical records that contain multiple physical records.
To describe multiple physical records:
The wizard displays the welcome page for the Flat File Sample wizard.
The wizard displays the Setup page. Use this page to define the global properties.
The wizard displays the Record Organization page.

The wizard updates the display of the logical record in the lower panel to reflect your selection. The default selection is one physical record per logical record.
The following procedure describes how to create a definition for a file using the Import Metadata and Flat File Sample Wizards. The location of the file was configured in a warehouse source module.
To create a definition for a delimited file format:
Warehouse Builder displays the welcome page for the Import Metadata Wizard.
The wizard displays the Filter Information page which you can use to filter the file names.
The wizard displays the Object Selection page.
The wizard displays the Summary and Import page. The left-most column of this page contains a status ball that can be red or green. If green, then Warehouse Builder already has a definition of the file format. If red, you must create a definition for the file using the Flat File Sample Wizard.

If the ball is red and you cannot describe the file with the format, you must create a definition for the file's format.
To create a format:
The wizard displays the welcome page for the Flat File Sample Wizard.
The wizard opens the file, reads a sample of data, and displays the Setup page. This page displays a sample of data in a template with a few initial values set for the file's global properties.
Use the text box for the left and right enclosure characters to define text strings in the data. You can enter an enclosure character in the text box or select one from the drop-down list.
The wizard displays the Record Organization page.
The wizard displays the Properties page. Use this page to describe each field.
See the discussion for each field property in Step 12.
The wizard displays the Summary page. Verify that the format definition is correct. If not, navigate the wizard pages by clicking Back and correct the definition.
The Flat File Sample Wizard returns to the Summary and Object page of the Import Object Wizard.
The Summary and Object page has been updated. The status ball is now green and the File Structure Name column now has an entry.

You can open this wizard at a later time and use the file format you created to describe any flat that has the properties described by this format. Instead of sampling the new file you can select this format from the Same As field.
Warehouse Builder creates a definition for file, stores it in the source module, and inserts its name in the source module navigation tree.
When a flat file contains several different types of records, you can use the scanning feature within the Flat File Sampling Wizard to search and label record types.
To associate multiple record types within a flat file:
The wizard displays the welcome page for the Flat File Sample Wizard.
The wizard displays the Setup page. Use this page to define the file's global properties such as whether records are delimited by a character or space.
Define whether the file contains single or multiple record types.

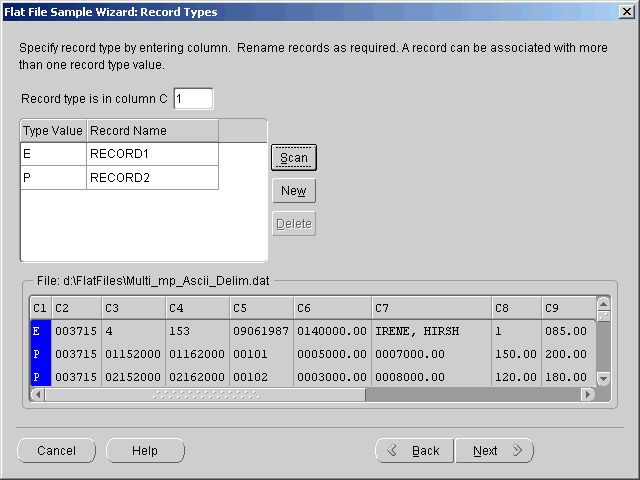
Records identified are named RECORD1, RECORD2, and so on. You can rename them by typing the new name in the field.
When you select a record type in the list, the lower panel shows data only for that record type.
The wizard displays the Properties page.
The wizard processes your records.
You can update the definition of the file format by editing its property sheet.
To update a file definition:
Warehouse Builder displays the General tab of the Flat File property sheet. You can edit the name and description of the definition. You can also change the global properties ascribed to the file, such as the physical record size, the number of physical records per logical record, and the delimit and enclosure characters.
Warehouse Builder displays the Structure page.
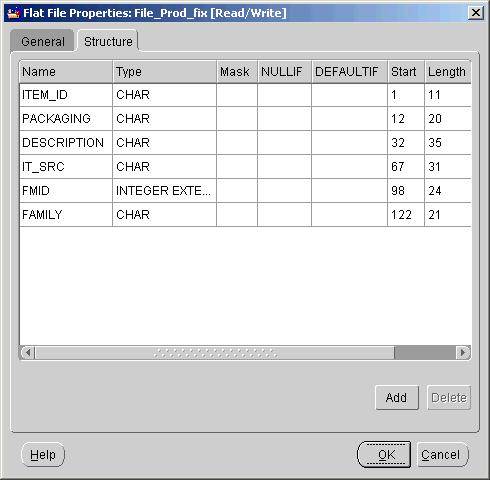

Warehouse Builder displays the Record sheet. You can edit the record type information, for example, you can delete a record type or add a new one.
You can import definitions that describe source data that can be extracted using Pure Extract and Pure Integrate. These imported definitions can then be the subject of mappings defined within your project.
You can also export definitions with Pure Extract and import them into a Warehouse Builder project. For a complete description of how to use the Oracle Warehouse Builder MetaData Loader Utility, refer to "About the Warehouse Builder Metadata Loader".
You can import definitions from an SAP application and store them in an SAP source module in your project. See "Create a Source Module for SAP Definitions" for instructions on how to create an SAP source module.
SAP application systems logically group numerous data tables under different business components. Examples of business components are FI - Finance and CO - Controlling.
The business component filter on the Import Metadata Wizard Filter Information page enables you to filter metadata from a business area of your interest within the SAP application. To select the appropriate business component, you can navigate to the SAP business component tree, locate a specific business component, and view a list of tables organized under that component.
To import metadata from an SAP application using the Import Metadata Wizard:
Warehouse Builder displays the welcome page for the Import Metadata Wizard.
The wizard displays the Filter Information page.
When you click Browse, the wizard displays the SAP R/3 Business Component Hierarchy Dialog, a hierarchical navigation mechanism for locating data objects in SAP applications. After you select a business component from this dialog, your selection displays on the blank Business Component field on the import wizard page.
The wizard displays the Object Selection page with a description of each table.
For a description of the keys, see the example for a database source module in this chapter.
The selected objects appear in the right pane of the Object Selection page.
The wizard imports definitions for the selected tables from the SAP Application Server and stores them in the SAP source module, then displays the Summary and Import page.
If you are re-importing metadata, the tables to be re-imported are displayed in bold. Click Advanced Reconcile Options to set your re-import options.
The SAP Integrator reads the table definitions from the SAP Application Server and creates the metadata objects in the Warehouse Builder repository.
|
|
 Copyright © 1996, 2002 Oracle Corporation. All Rights Reserved. |
|