Release 2 (v9.0.2)
Part Number A95949-01
Home |
Solution Area |
Contents |
Index |
| Oracle9i Warehouse Builder User's Guide Release 2 (v9.0.2) Part Number A95949-01 |
|
The following three chapters describe how to map data sources to targets. This chapter describes how to create and update mapping definitions. It also describes the Warehouse Builder Mapping Editor. The next chapter describes how to add operators and transformations to a mapping. The following chapter describes how to configure the logical and physical properties of a mapping, how to reconcile mapping operators with repository objects, and how to validate and generate the PL/SQL code used for deployment.
This chapter includes the following topics:
A mapping describes a series of operations that pulls data from sources, transforms it, and loads it into targets. When you create a mapping, you use operators to define the Extraction, Transformation, and Loading (ETL) operations that move data from a source object to a data warehouse target object. Mappings provide a visual representation of the flow of the data from sources to targets and the operations performed on the data. Define mappings using the Mapping Editor, Property Inspectors, Expression Builder, and Code Editor.
All mappings are based on mapping operators. A mapping operator is a logical representation of a physical repository object. A mapping operator contains row sets. A row set is any set of zero or more rows of structured data brought into or emerging from a mapping operator. A row is the basic unit of data in a mapping. The number of rows in a row set is the cardinality of that row set.
A mapping operator defines how input row sets are manipulated to produce output row sets. A mapping operator can alter the cardinality of row sets. Warehouse Builder contains several mapping operators, each with its own purpose for processing row sets.
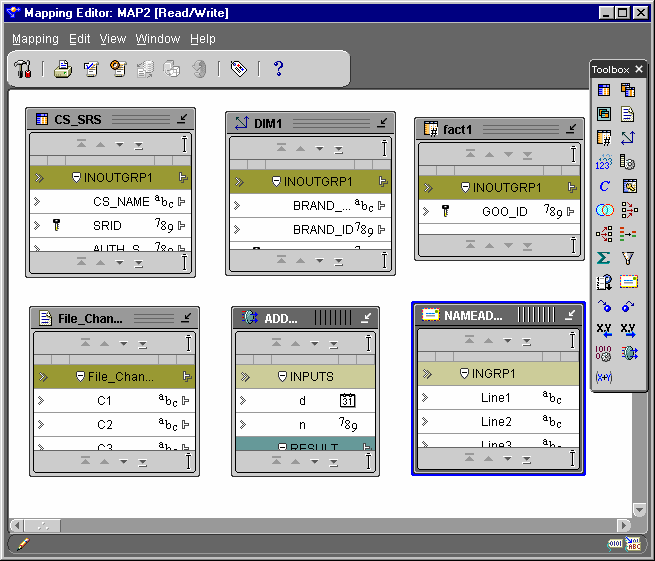
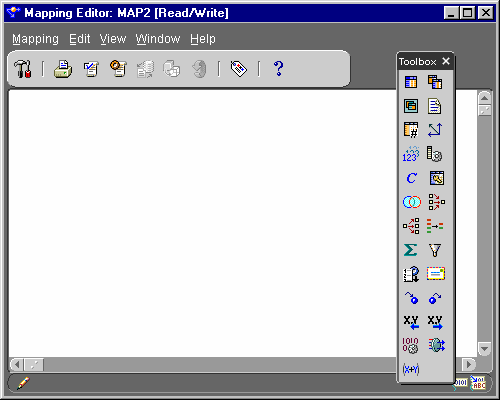
You define and edit mapping operators using the Mapping Editor and Property Sheets. The Mapping Editor contains a toolbox that visually represents the operators.
The operator types available within the Mapping Editor include:
To specify the purpose of an operator, edit the property inspector for the operator. You can set properties at the following levels:
Attributes are inputs and outputs for operators. Attributes belong to attribute groups. The group type determines the attribute type. An attribute group type can be an:
Attribute and attribute group names are logical. Although the attribute names of the target object are often the same as the logical attribute names of the operator, their properties remain independent of the attributes of the operator to which they are connected. This protects any expression or use of an attribute from corruption if it is manipulated within the operator. You can rename attribute groups and attributes independent of their sources. The cardinality of attribute groups must match in order to be used in the same input group.
A display set is a graphical representation of a group of operator attributes. By default, the All display set displays for all attribute groups. If an attribute group contains more than one display set, then you can select a different display set from the list on the View menu. You can define display sets for an attribute group in the mapping editor, or they can be inherited from the attribute sets of a warehouse object that are defined during the source and target definition phase of data warehouse design. See "Creating Attribute Sets" for information on attribute sets.
You can see only one display set at a time for an attribute group. By default, the Mapping canvas shows the display sets with all the attributes in the respective attribute groups. You can edit display sets and define new display sets for an operator in the Mapping Editor. See "Editing Operator Attributes" for more information.
Table 6-1 describes the default attribute sets for Display Sets.
Mapping operators are independent from the repository objects they represent. When you bind a mapping operator to a repository object, you create a link between them. This link causes the operator to inherit the attributes and attribute sets of the repository object.
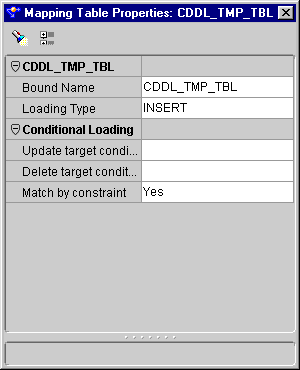
The Mapping Editor generates a default logical name for operators, which you can change at any time. Editing of bound operators is limited to changing the logical name and adding new attributes to the operator. Editing has no effect on the attributes of the physical repository object.
The bound name displays in the Bound Name property and in the tool tip for the mapping operator. The logical names used in the mapping for mapping operators and attributes can be different from the bound names. If you set your project preferences to logical name mode without propagation to physical names or if you define your mapping operator and attribute names in the Mapping Editor, then the logical names will be different. For more information, see "Using Inbound Reconciliation".
If you choose to leave an operator unbound, it generates code that does not affect any repository object. You must bind the mapping operator to a repository object in order for the code to affect the repository object. After you bind a mapping object to a repository object, it cannot be unbound.
The first part of this section describes the Warehouse Builder Mapping Editor. The remainder of this section describes how to define a mapping.
The Mapping Editor is the interface for defining what you want to transform and map. The mapping editor uses an operator for each operation you want to perform. A series of operations defines a mapping.
The Mapping Editor includes:


When you open the property inspector, you can select another operator, attribute, or attribute group and the property inspector displays the property for the selected object. Only one property inspector can be open at a time.
If no operator, attribute group, or attribute is selected while a property inspector is open, the property inspector shows an empty list.
When you define a mapping object, you create a container that holds the mapping operators defining the ETL process. Use the Mapping Editor to define a mapping by:
To create a mapping object:
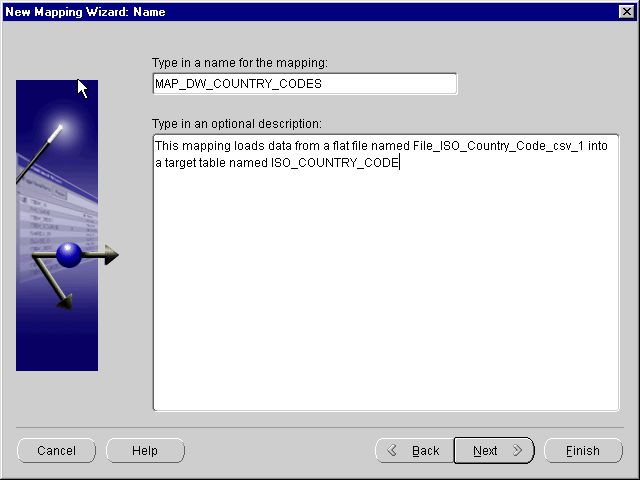
The New Mapping Wizard displays the Finish page. Verify the name of your new mapping.
Warehouse Builder stores the definition for the mapping and inserts its name in the warehouse module navigation tree. The Mapping Editor opens.
Use the Mapping Editor to define ETL operations. Open the Mapping Editor from the Warehouse Module Editor.
To display the Mapping Editor, do one of the following:
You can use a data operator as a data source or data target. Data operators include Mapping Tables, Mapping Dimensions, Mapping Facts, Mapping Views, and Mapping Materialized Views. Follow the same steps when you select any of these operators.
You can connect any data operator to any other mapping operator. A data operator generates a PL/SQL mapping.
To select a table operator:
The Add Mapping Table dialog displays.
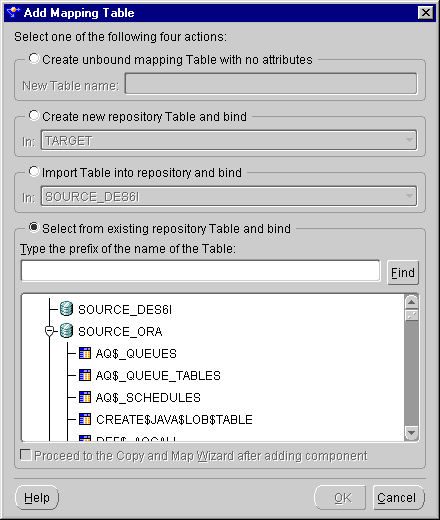
If you make this selection and click OK and have already defined a database link for the module from which you are importing the object, then Warehouse Builder returns the Database Link Information dialog. Enter the appropriate information in the dialog. If you have not defined a database link, then Warehouse Builder displays the New Database Link Information dialog. See "Configuring Connection Information for Database Sources" for information on how to define a new database link.
If you are selecting a Mapping Fact, a Mapping Dimension, or a Key Lookup operator, then you have two choices:
You do not have the option to import an object if you are selecting a Mapping View or a Mapping Materialized View operator.
A Mapping Table operator displays on the canvas. This operator shows the names and attributes of the table to which it is bound.

You can use a Mapping Flat File operator as a data source or data target. As a data source, the Mapping Flat File operator acts as the row set generator for reading from a flat file.
To use a flat file as a target, a file source module must exist and it must contain valid flat files. A mapping to a flat file target generates a PL/SQL package that is spooled into a flat file instead of loading data into rows in a table. When you define a Mapping Flat File operator as a target, you are using an existing file as a template for the target flat file. Warehouse Builder comes with a file source module called TARGET_FILES for use as a template. This module contains a comma-delimited file (CSV_FILE) and a fixed-length file (FIXED_LENGTH_FILE), and each file contains ten fields of the CHAR data type.
A mapping can contain up to 50 flat files as targets, and it can also contain a mix of flat files, relational objects, and transformations. You can connect a Mapping Flat File source operator to any other operator except another Mapping Flat File operator.
You have the following two options for a Mapping Flat File Operator:
The following section describes how to select an SAP operator as a source for a mapping. An SAP operator used as a source can be connected to Mapping Table, Mapping Dimension, and Mapping Fact operators. You can generate ABAP or PL/SQL code for your mappings. If you generate ABAP code, only the Filter and Joiner operators are available.
To select an SAP source:
The Add Mapping Table dialog displays.
The field at the bottom of the dialog displays a list of SAP tables whose definitions were previously imported into the SAP source module.
The editor places a mapping table on the mapping canvas to represent the SAP table.
When you select an SAP operator as a source, the option to Proceed to the Copy and Map wizard after adding component is enabled. If you check this option and click OK, Warehouse Builder displays the Copy and Map Wizard.
The Copy and Map wizard enables you to perform three functions: copy the selected source object, create a target object based on the source object definitions, and map the source object to the new target object. The Copy and Map option is only available when you select a single table as a source.
To use the Copy and Map Wizard:
The Copy and Map Wizard Welcome page displays.
The Target Name page displays.
If the repository already contains an object with the same name, a name conflict error message displays. You must then rename the object you are creating.
The Source Columns page displays.
The fields on this page are read-only. By default, this page displays and selects all columns defined within the source table. To deselect a column, uncheck the selection check box next to that column. Click Select All to copy all the columns within the table. Click Deselect All to deselect all the columns within the table. You must select at least one column to copy.
The Target Columns page displays. You use this page to customize the selected columns or add new ones to your target table. The first two columns within the table display the physical and logical names of the columns. You cannot modify the logical names, you can only modify the physical names of a column. The default physical names are copied from the source physical names.
Edit the following fields:
Click Add to add a new column within your target object. The Remove option is only enabled for columns you create. If you do not want to copy a column defined in the source object, click Back to return to the Source Columns page and deselect the column.
If the new name is not unique, a name conflict error message displays. Click OK to rename the column automatically or click Cancel to rename it yourself.
The Summary and Copy page displays. Verify the information on this page.
The Mapping Editor displays the source table mapped to the newly created target table. You can locate this bound target table under the TABLES node in the Warehouse Module Editor.
You can add operators that alter the source data as it flows to the data targets. Warehouse Builder includes data flow operators in the Toolbox. You can create custom operators using the Oracle Transformation Library or Expression Builder. See "Using Expression Builder" for information on creating custom operators.
To select a data flow operator, drag a data flow operator from the Toolbox and drop it onto the Mapping Editor canvas. After you make your selections, a data flow operator displays on the canvas. Each data flow operator requires a different set of tasks when you add them to a mapping. Chapter 7, "Using Mapping Operators and Transformations" describes the flow operators and how to add them to a mapping.
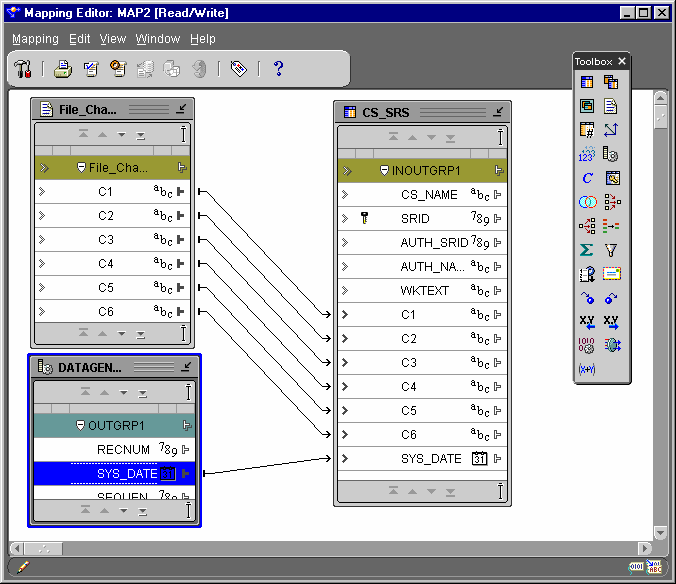
After you have defined mapping source operators, data flow operators, and target operators, you are ready to connect them. You can connect individual operator attributes to each other, or you can connect attribute groups. When you connect groups, you can control which attributes are connected using the Auto-Mapping dialog.
To connect mapping operators, do one of the following:
The position of the attribute where you start your mapping and the position where you release the mouse button determines the type of data flow connections you make in the mapping. If the mouse button is released over an invalid target, no data flow connection is established.
You cannot create the following links:
To connect mapping operator attributes, draw lines from output attributes or output attribute groups to input attributes or groups between the operators. These lines are data flow connections. The data flow connections graphically represent how the data flows from a source to a target.
To connect operators:
As you drag the mouse, a line appears on the Mapping Editor canvas to indicate a connection.
Repeat steps one through three until you have created all the data flow connections appropriate for your situation.
If you connect source attributes to target attribute groups, Warehouse Builder opens the Auto-Mapping dialog. Auto-mapping enables you to specify a rule that Warehouse Builder uses to automatically map source attributes to target attributes. After you specify Auto-Mapping options, Warehouse Builder creates the mapping.
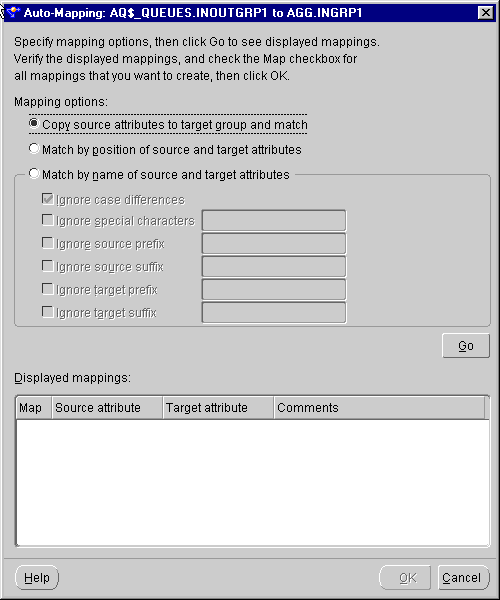
The Auto-Mapping dialog displays matching criteria and a panel that displays the mappings. Choose the match criteria by selecting:
Copy: Copies source attributes to the target group and creates mappings from the source attributes to the new target attributes.
Match by Position: Creates mappings between existing attributes based on the position of the attributes in their respective groups. Source and target attributes are matched in order, until all attributes for a target are matched. If a source operator contains more attributes than a target, then the remaining source attributes do not map to a target.
Match by Name: Creates mappings between existing attributes with matching names. By selecting from the list of options, you can specify auto-mapping between names that do not match exactly. You can combine these options:
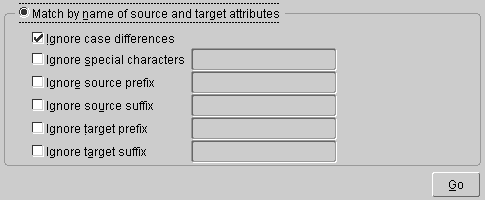
After you set the matching criteria, click Go.
If you attempt to map a source attribute group with no attributes, or if you are matching by name and there are no matches, an error dialog displays.
If one or more of the attributes can be matched, the Displayed Mappings field displays the matches. You can verify and change the mappings before they are implemented.
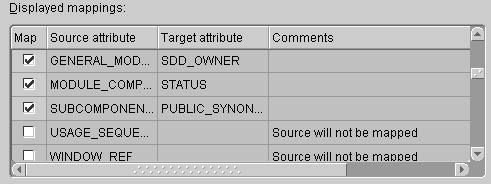
The check boxes for each attribute enable you to include or exclude attributes in a mapping. The source column lists the source attributes and the target column lists the matching target attributes. The comments column contains information about the results from your matching criteria. For example:
Target was already mapped: A target attribute can have only one mapping from one source attribute. The check box is unchecked and appears grayed out to indicate that the mapping will not be created.
Target may not be double-mapped: If name matching finds multiple matches to a target attribute, only one mapping can be created. The check box for the first mapping is checked, and all other mappings to that target attribute are unchecked. You can select only one check box. Selecting one attribute deselects any other attribute.
Source may be double-mapped: A source attribute can be mapped to different target attributes. If name matching finds multiple matches from a source attribute, all of these mappings can be created. You can then deselect the target attributes that you do not want to map to by clicking their check boxes.
Source will not be mapped: No target attributes are available for the source.
Target will not be mapped: No source attributes are available for the target.
Click OK to create the mapping.
If you open the Auto-Mapping dialog while the mapping editor is in read-only mode, an error displays. You must have read-write permission before you can use auto-mapping. See "About Multi-User Access" for more information on read-write permissions.
To complete the mapping, you may need to configure its operators. See "Configuring Mapping Table Operators" for information.
You can edit operator properties such as attributes, attribute groups, display sets, and names.
You can create a new attribute group in the mapping editor by right-clicking the name header and selecting Add/Remove Groups.
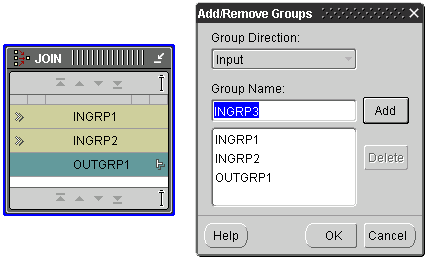
You cannot change the group direction. You add input groups to Joiners and output groups to Splitters. See "Adding Flow Operators to a Mapping" for more information.
For each mapping operator, you can add, remove, and rename attributes. After you have added or changed attributes or attribute groups, you must reconcile the mapping operators with their corresponding repository objects. See "Reconciling Mapping Operators with Repository Objects" for more information.
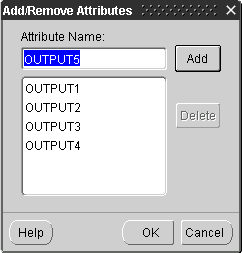
You can add attributes to or remove attributes from an operator on the Mapping Editor canvas.
To add attributes to an Operator:
The Add/Remove Attributes dialog displays.
To remove attributes from an operator:
The Add/Remove Attribute dialog displays.
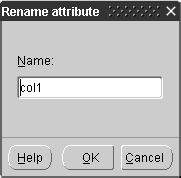
You can rename mapping operator attributes.
To rename an operator, attribute, or attribute group:
The Rename dialog displays.
|
|
 Copyright © 1996, 2002 Oracle Corporation. All Rights Reserved. |
|