Skip Headers

Oracle9i Warehouse Builder User's Guide
Release 2 (v9.0.2)

Part Number A95949-01
Go To Documentation Library
Home
Go To Product List
Solution Area
Go To Table Of Contents
Contents
Go To Index
Index

Go to previous page Go to next page

3
Defining Relational Targets

This chapter describes how to define a target module and define relational targets within a module.

This chapter includes the following topics:

Creating a Warehouse Target Module

Warehouse Builder stores definitions for target schemas in target warehouse modules.

To create a target warehouse module:

  1. In the Warehouse Builder Console, right-click MODULES and select Create Module.

    Warehouse Builder displays the New Module Wizard welcome page.

  2. Click Next.

    The wizard displays the Name page.

Figure 3-1 New Module Wizard Name Page

Text description of modwizna.gif follows.

Text description of the illustration modwizna.gif

  1. Enter the following:

    • A name for the module.

    • The status of the module.

    • Warehouse Target as the type of module.

    • A description of the module.

  2. Click Next.

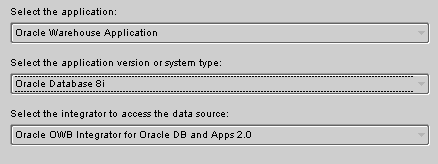
    The Target page displays information for Oracle8i/9i.

Figure 3-2 New Module Wizard Target Page

Text description of wiznmota.gif follows.

Text description of the illustration wiznmota.gif

  1. Click Next.

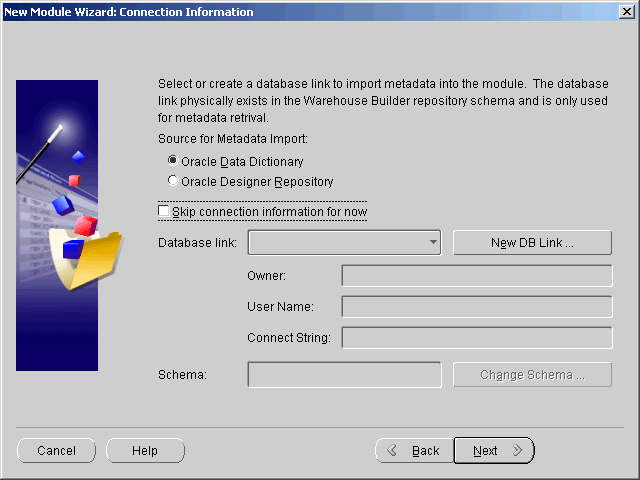
    The wizard displays the Connection Information page.

Figure 3-3 New Module Wizard Connection Information Page

Text description of modwizco.gif follows.

Text description of the illustration modwizco.gif

  1. If you are not importing any data definitions, click Next.

    If you intend to import definitions from a schema or an Oracle Designer repository:

    1. Select Oracle Data Dictionary or Oracle Designer Repository.

    2. If a link to the database has been defined in Warehouse Builder, select the link name from the drop-down list. To define a new link, click New DB Link.

      Warehouse Builder displays the New Database Link dialog.
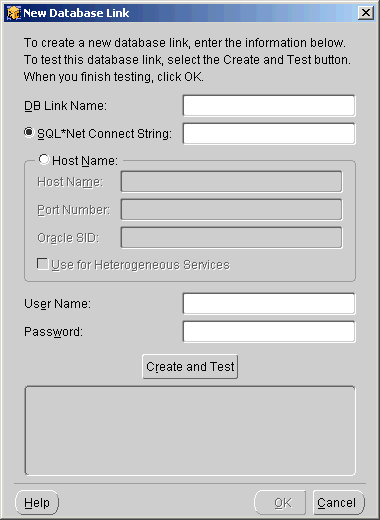
    Figure 3-4 New Database Link Dialog

    Text description of dblinka.gif follows.

    Text description of the illustration dblinka.gif

      1. Enter the following:

        • A name for the new link.

        • A SQL*Net connect string or complete host information. The connect string must be defined before you can test the connection.

        • A user name and password for the target schema.

      2. Click Create and Test.

        Warehouse Builder connects to the database using the information and displays a status message in the message box below the Create and Test button.


        Note:

        A warehouse module can connect only with an Oracle8i/9i database instance.


      1. Click OK.

    1. Click Next.

      Warehouse Builder displays a Finish page summarizing the information you entered. If you need to change any information, navigate back through the wizard pages using the Back button.


      Note:

      Warehouse Builder displays a warning dialog if the character set of the database instance differs from the character set of the Warehouse Builder host.


  2. Click Finish.

    Warehouse Builder creates the module in the active project and inserts its name in the MODULES branch of the navigation tree.

    Displaying the Warehouse Module

    You can view the warehouse module in the Warehouse Module Editor. Use the Warehouse Module Editor to view the structure of a module and create objects within the module.

    To open the Warehouse Module Editor:

    1. Expand the MODULES branch.

      Warehouse Builder lists the project modules.

    2. Double-click the warehouse module.

      The Warehouse Module Editor opens displaying the navigation tree.
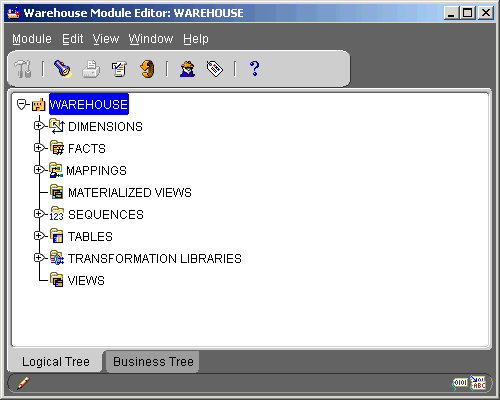
    Figure 3-5 Warehouse Module Editor Navigation Tree

    Text description of wmegccem.gif follows.

    Text description of the illustration wmegccem.gif

    Creating Table Definitions

    This section shows you how to create a definition for a table using the New Table Wizard and how to modify the table definition using the property sheet.

    Creating a Table Definition

    When you create a definition for a table, you enter detailed information about the table into a series of pages in the New Table Wizard.

    To create a table definition:

    1. In the Warehouse Module Editor, right-click TABLES and select Create Table.

      Warehouse Builder displays the welcome page for the New Table Wizard.

    2. Click Next.

      The wizard displays the Name dialog.

    Figure 3-6 The Name Dialog

    Text description of wizdimnb.gif follows.

    Text description of the illustration wizdimnb.gif

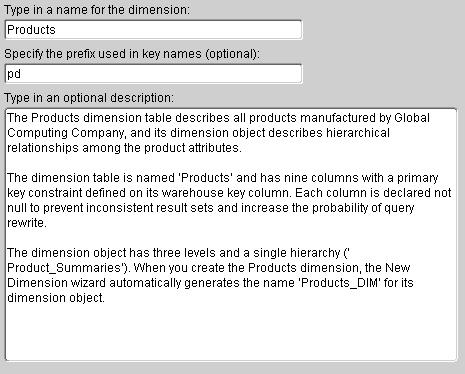
    1. Enter the following:

      • The name of the table.

      • A description of the table (optional).

    2. Click Next.

      The wizard displays the Columns page.

    3. Define the columns in the table.

      1. Click Add.

      2. Select a data type for the column from the drop-down list under Data Type. Warehouse Builder supports the following Oracle8i/9i data types:

        • CHAR

        • DATE

        • FLOAT

        • NUMBER

        • VARCHAR

        • VARCHAR2

      3. Enter the precision, length, or scale as appropriate for the data type.

      4. Specify null or not null. The default is null.

      5. Type a description of the column in the Note field (optional).

      Repeat these steps for each column.

    4. Click Next.

      The wizard displays the Constraints page. You can define constraints, if necessary.

    5. Click Next.

      The wizard displays the Finish page. Verify the description.

    6. Click Finish.

      The wizard creates a definition for the table, stores the definition in the warehouse module, and inserts the name in the navigation tree under TABLES.

      Updating Table Definitions

      You can view the definition for a table object in the Table Editor. You use the Table property sheet to edit the table.

      Using the Table Editor

      To open the Table Editor, right-click the table in the navigation tree and select Edit. Warehouse Builder displays the Table Editor.
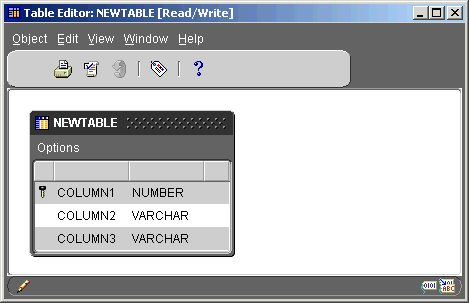
      Figure 3-7 Table Editor

      Text description of tableedi.gif follows.

      Text description of the illustration tableedi.gif

      Using the Table Property Sheet

      You can update the definition for a table by editing entries in the property sheet. In the Warehouse Module Editor, right-click the table and select Properties.
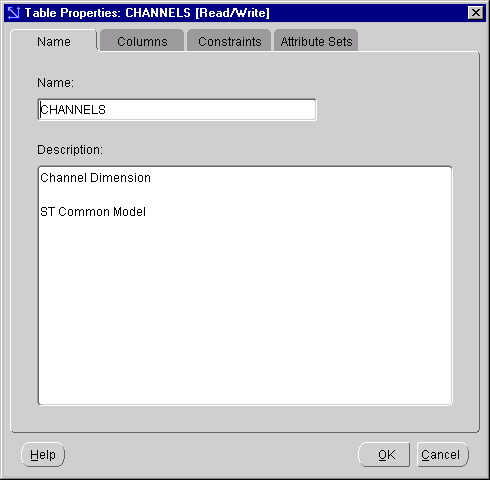
      Figure 3-8 Table Properties Sheet

      Text description of deprotaa.gif follows.

      Text description of the illustration deprotaa.gif

      The property sheet for the table has the following tabs:

      • Name

      • Columns

      • Constraints

      • Attribute Sets

      The following examples show you how to order columns within a table, change a UK to a PK constraint, create a check constraint, and create attribute sets.

      Ordering the Columns

      By default, the column names within a table are sorted in the order they were created. The order of column names in the property sheet is propagated to the DDL script that Warehouse Builder generates to create the table. The default ordering can cause problems if an application is sensitive to the order of columns. You can order columns so that a generated concatenated key for a fact table corresponds to expected query usage. This ordering can greatly influence query performance.

      To order the columns:

      1. Open the table Property Sheet.

      2. Select the Columns tab.

        Warehouse Builder displays the information on the columns in the table.
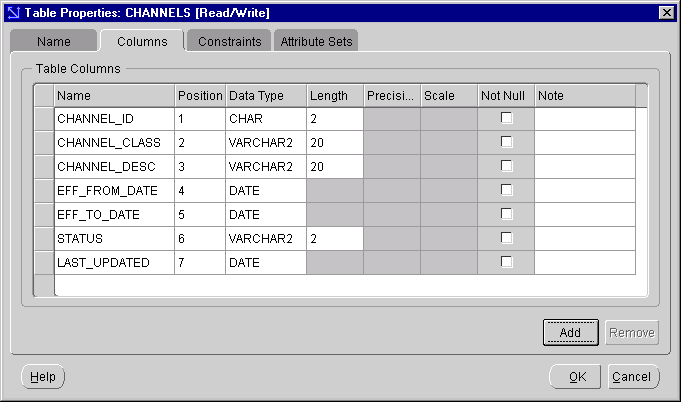
      Figure 3-9 Columns Tab of Table Properties Sheet

      Text description of deprocol.gif follows.

      Text description of the illustration deprocol.gif

      1. Select the gray box to the left of the column name and drag the row up or down the list.

      2. Click OK.

      You can order the following warehouse objects:

      • Dimensions

      • Facts

      • Tables

      • Materialized views

      • Conventional views

      Changing a Constraint

      Warehouse Builder automatically generates a UK constraint for each Level defined within a dimension table. The generated constraint is always on the column defined as the Level ID column, and except for the lowest-level, these constraints are purely logical constraints that are not used in the DDL to create the table. You can edit these constraints but you cannot remove them. If you attempt to remove one of these constraints, Warehouse Builder displays an error message.
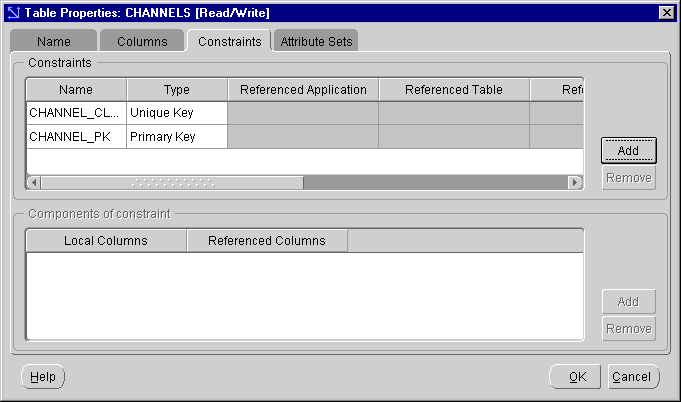
      Figure 3-10 Generated UK Constraints

      Text description of deprpcoa.gif follows.

      Text description of the illustration deprpcoa.gif

      When you declare a PK or UK constraint, you cannot later change it to a FK or CK constraint. You must drop the constraint and create a new one. Similarly, if you create an FK constraint, you cannot change it to any other kind of constraint. You must drop the constraint and create a new one.

      For a dimension table, Warehouse Builder automatically generates a UK rather than a PK constraint on the column that defines the lowest level of aggregation.

      To change a constraint type:

      1. Open the table property sheet and select the Constraints tab.

        Warehouse Builder displays the information on all constraints defined in the table.
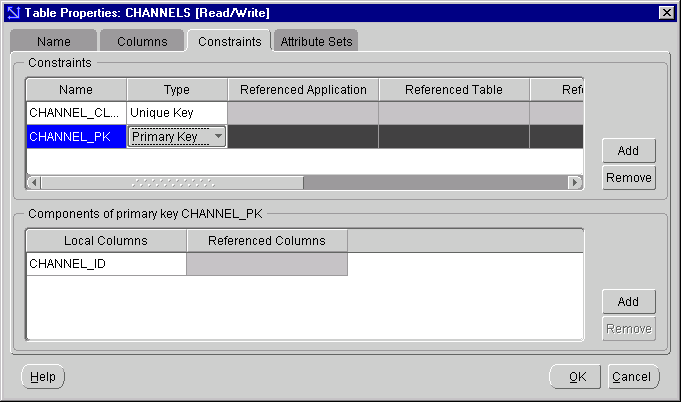
      Figure 3-11 Constraints Tab of Table Properties Sheet

      Text description of deprocon.gif follows.

      Text description of the illustration deprocon.gif

      1. Click the drop-down arrow under the Type column and select Primary Key.

      2. Change UK in the constraint name to PK.

        The editor only allows you to select a UK or PK constraint.

      3. Change the name of the constraint to reflect this change.

      4. Click OK.

        Warehouse Builder updates the definition of the underlying table.


        Note:

        You cannot remove a generated UK constraint or column for a dimension Level ID.


      Adding Check Constraints

      You can add a check constraint to any table column. These constraints enforce business rules on values stored in a dimension, fact, or table. They can also be used to define a not null constraint. However, using the Add Check Constraints feature can slow your load performance.

      To add a check constraint:

      1. Open the table property sheet and select the Constraints tab.

        Warehouse Builder displays information on all the constraints defined in the table.

      2. Click Add.

        Warehouse Builder inserts a row in the top pane.
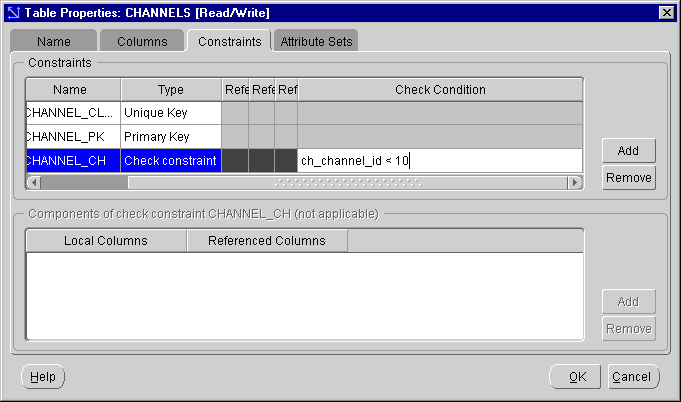
      3. Enter a name for the constraint, select Check Constraint, and enter a condition.

      Figure 3-12 Constraints Tab of Table Properties Sheet

      Text description of deprpck2.gif follows.

      Text description of the illustration deprpck2.gif

      1. Click OK.

        Warehouse Builder stores the CHECK constraint in the property sheet.

        A CHECK integrity constraint requires that a condition be true or unknown for every row of the table. If a statement causes the condition to evaluate to false, then the statement is rolled back.

        The condition of a CHECK constraint has the following limitations:

        • The condition must be a Boolean expression that can be evaluated using the values in the row being inserted or updated.

        • The condition cannot contain subqueries or sequences.

        • The condition cannot include the SYSDATE, UID, USER, or USERENV SQL functions.

        • The condition cannot contain the pseudocolumns LEVEL, PRIOR, or ROWNUM.

        For additional information on CHECK constraints, see the Oracle8i/9i Application Developer's Guide - Fundamentals.


        Notes:

        • The column name referenced in the condition of the CHECK constraint must exactly match a physical name defined for the table in its property sheet.

        • Warehouse Builder does not check the syntax of the condition. This can result in problems during the code generation phase when Warehouse Builder generates a create table statement to deploy the table.


        Creating Attribute Sets

        Columns in a table are called attributes. Each table in the warehouse module has a predefined attribute set consisting of all the table columns and another attribute set for each constraint. You can create additional named attribute sets containing any number of the table columns in the order you specify.

        You can add the following types of attribute sets:

        • User-defined: Optional attribute set that you can create, modify, or delete in the Table Properties sheet.

        • Bridge-type: Optional attribute set that can be transferred across a bridge for viewing in another software program. You can create, modify, or delete a bridge-type attribute set in the Table Properties sheet. A table can have only one bridge-type attribute set.

        Attribute sets are used in mappings.

        To add an attribute set:

        1. Open the table property sheet and select the Attribute Sets tab.

          Warehouse Builder displays information on the attribute sets defined in the table.

        2. Click Add.

          Warehouse Builder inserts a row in the top pane.

        3. Type a name for the attribute set under the Name column.

        4. Select USER_DEFINED or BRIDGE_TYPE from the drop-down list.

        5. Type a description.

        6. Click the check box for each attribute that you want to include.

          The order in which you select the columns determines their initial order in the attribute set.
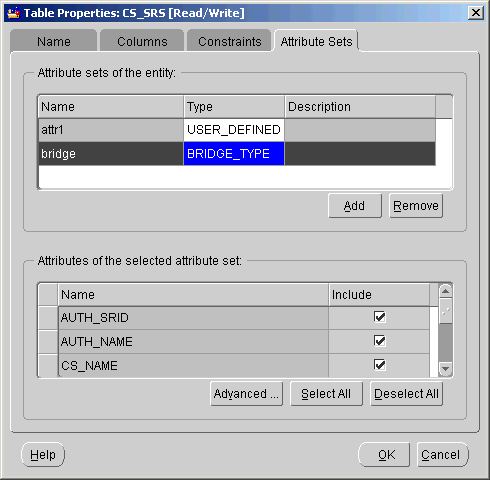
        Figure 3-13 Table Properties

        Text description of deattadd.gif follows.

        Text description of the illustration deattadd.gif


        Note:

        Changing the order of non-selected attributes has no effect after you close the Table Properties sheet.


        1. If you selected BRIDGE_TYPE, click Advanced to specify additional properties of the attribute set.

          Warehouse Builder displays the Advanced Attribute Set Properties dialog.
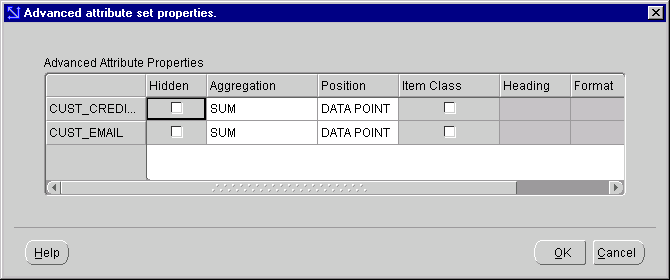
        Figure 3-14 Advanced Attribute Set Properties Dialog

        Text description of deattada.gif follows.

        Text description of the illustration deattada.gif

          1. For each attribute in the bridge-type attribute set, specify the properties:

            • Hidden: Click the check box to hide the column. In the Discoverer Administration Edition, hidden columns are greyed out. In the Discoverer User Edition, hidden columns are not shown.

            • Aggregation: Select SUM, MIN, MAX, AVG, COUNT, or DETAIL for no aggregation. The default is SUM.

            • Position: Select DATA POINT, PAGE, SIDE, TOP, or TOP/SIDE. The default is DATA POINT.

            • Item Class: Check for TRUE or uncheck for FALSE. The default is FALSE.

            • Heading: Enter the heading text.

            • Format: Enter the text for the format field.

          2. Click OK.

        1. Click OK to close the Table Properties dialog.

        Importing Definitions

        You can import definitions for tables, Views and Sequences into a warehouse module using the Import Metadata Wizard. For instructions, see "Importing Definitions from a Database".

        Creating Materialized View Definitions

        This section shows you how to create and update definitions for materialized views. You create a definition for a materialized view using the New Materialized View Wizard. You modify a view definition by editing a property sheet. In the New Materialized View Wizard, you enter:

        • A name and description

        • Aliases for columns

        • Queries that define the view

        • Constraints (only logical)

        Creating a Materialized View Definition

        When you create a definition for a materialized view, you enter detailed information about it into a series of pages for the New Materialized View Wizard.

        To create a materialized view definition:

        1. In the Warehouse Module Editor, right-click Materialized View and select Create Materialized View.

          Warehouse Builder displays the welcome page for the New Materialized View wizard.

        2. Click Next.

          The wizard displays the Name page.

        3. Enter the following:

          • The name of the view

          • A description of the view (optional)

        4. Click Next.

          The wizard displays the Columns page.

        Figure 3-15 Columns Page

        Text description of wizmvwco.gif follows.

        Text description of the illustration wizmvwco.gif

          To define a column:

          1. Click Add.

          2. Type the column name.

          3. Select the data type.

          Repeat this procedure for each column.

        • Click Next.

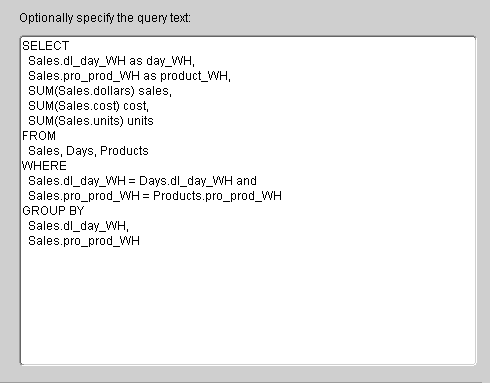
          The wizard displays the Query Text page.

        • Do one of the following:

          Figure 3-16 shows sample query text.

        Figure 3-16 Sample Query Text

        Text description of wizmvwqr.gif follows.

        Text description of the illustration wizmvwqr.gif


        Note:

        • Warehouse Builder generates code for a view only if query text is entered and columns are defined.

        • Warehouse Builder generates a Create Materialized View statement to deploy the view even if its syntax is invalid. Warehouse Builder does not check the syntax of the select statement used to define a view.

        • Entered queries are automatically completed with a semi-colon. Adding one will cause a syntax error.


        1. Click Next.

          The wizard displays the Define Constraints page.

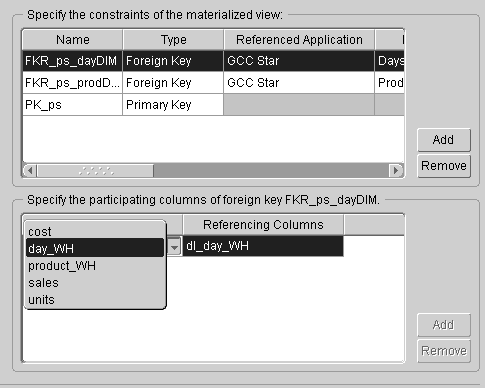
        Figure 3-17 Define Constraints Page

        Text description of wizmvwcs.gif follows.

        Text description of the illustration wizmvwcs.gif

        1. Define the key constraints:

          1. Click Add next to the upper box and enter the constraint name.

          2. Select the constraint type.

          3. Select the constraints:

            • Referenced application

            • Referenced table

            • Referenced key

          4. Click Add next to the lower text box. Select the columns local to the view that are in the constraint.

          Repeat these steps to define the other constraints.

        2. Click Next.

          The wizard displays the Finish page. Verify the summary, and if you need to modify the definition, click Back.

        3. Click Finish.

        The wizard creates a definition for the materialized view, stores this definition in the warehouse module, and inserts its name in the warehouse module navigation tree. Confirm this by fully expanding the editor navigation tree. The name of the materialized view now occurs under the MATERIALIZED VIEWS subtree.

        Updating a Materialized View Definition

        You can view the materialized view in the Materialized View Editor. Use the property sheet to edit the materialized view.

        To open the Materialized View Editor, right-click the materialized view and select Edit. The editor diagrams the materialized view and its references.

        To open the Materialized View properties sheet, right-click the materialized view and select Properties. You can modify the view definition by editing the property sheet. For examples on editing a property sheet, see "Updating Table Definitions".

        To rename a materialized view, right-click the view name and select Rename. Type the new name over the highlighted object name.

        Creating Conventional View Definitions

        This section describes how to create and update definitions for conventional views. You create a definition for a conventional view using the New View Wizard. You update the view definition by editing its property sheet.

        Creating a View Definition

        Although this view has similar structure to a materialized view, the views differ as follows:

        • Function: A view restricts access to a single family of products. A materialized view makes queries run faster.

        • Visibility: A view is visible to a class of users. A materialized view is transparent to users.

        • Physical Storage: A view occupies no storage space. A materialized view does.

        To create a view definition:

        1. Open the warehouse module and expand its navigation tree.

        2. Right-click View and select Create View.

          Warehouse Builder displays the welcome page for the wizard.

        3. Click Next.

          The wizard displays the Name page.

        4. Enter the following:

          • The name of the view

          • A description of the view (optional)

        5. Click Next.

          The wizard displays the Columns page.

        Figure 3-18 Columns Page

        Text description of wizmvwco.gif follows.

        Text description of the illustration wizmvwco.gif

        1. Define the columns:

          1. Click Add.

          2. Type the column name.

          3. Select the data type.

          Repeat this procedure for each column.

        2. Click Next.

          The wizard displays the Query Text page. When you create the definition for a view, you can:

          Figure 3-19 shows sample query text.
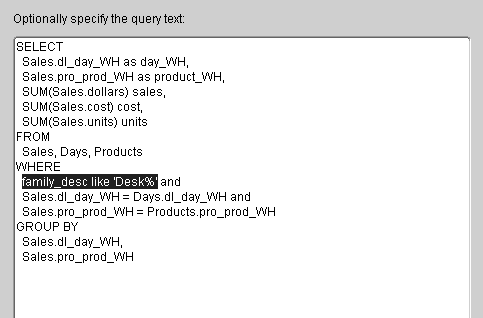
        Figure 3-19 Query Text

        Text description of wizvewqr.gif follows.

        Text description of the illustration wizvewqr.gif


        Note:

        • Warehouse Builder does not generate code for a view if its query text is not included in its Property Sheet or if it has no columns defined.

        • Warehouse Builder generates a Create View statement to deploy the view even if its syntax is invalid. Warehouse Builder does not check the syntax of the select statement used to define a view.


      2. Click Next.

        The wizard displays the Define Constraints page.

        Use this page to define logical constraints for a view. These constraints can be useful when the view serves as a data source in a mapping. The Mapping Editor can use the logical foreign key constraints to include the referenced dimensions as secondary sources in the mapping.
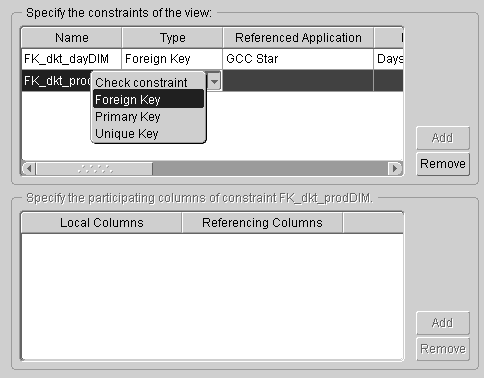
        Figure 3-20 Define Constraints Page

        Text description of wzvewdkt.gif follows.

        Text description of the illustration wzvewdkt.gif

          Define foreign key reference constraints as described in step 8 in "Creating a Materialized View Definition".

        • Click Next.

          Warehouse Builder displays the Finish page. Verify the description, and if you need to modify the definition, click Back.

        • Click Finish.

          Warehouse Builder creates a definition for the view, stores the definition in the warehouse module, and inserts its name in the warehouse module navigation tree under VIEWS.

        Updating a View Definition

        You can display the view in the View Editor. Use the property sheet to edit the view.

        To open the View Editor, right-click the view and select Edit. The editor diagrams the view and its references.
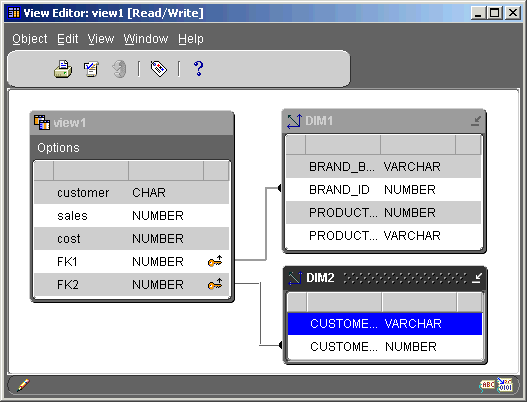
        Figure 3-21 View Editor

        Text description of vedsktop.gif follows.

        Text description of the illustration vedsktop.gif

        To open the View properties sheet, right-click the view and select Properties. You can modify the view definition by editing the property sheet. For examples on editing a property sheet, see "Updating Table Definitions".

        To rename a view, right-click the view name and select Rename. Type the new name over the highlighted object name.

        Defining a Sequence Object

        A sequence object populates the warehouse key column for a dimension. To define a sequence object, you use the New Sequence Wizard. You configure the sequence settings when you use the sequence in a mapping. See "Adding Mapping Sequences" for more information.

        To define a sequence object:

        1. Right-click SEQUENCE and select Create Sequence.

        2. Click Next.

        3. Enter a name and description for the sequence in the appropriate fields and click Next.

        4. Click Finish.


Go to previous page Go to next page
Oracle
Copyright © 1996, 2002 Oracle Corporation.

All Rights Reserved.
Go To Documentation Library
Home
Go To Product List
Solution Area
Go To Table Of Contents
Contents
Go To Index
Index