10g (9.0.4)
Part Number B10376-01
Home |
Solution Area |
Contents |
Index |
| Oracle Application Server 10g Administrator's Guide 10g (9.0.4) Part Number B10376-01 |
|
It contains the following topics:
When you installed Oracle Application Server, you were logged in to your operating system as a particular user. You should always log in as this user to manage your installation because this user has permission to view and modify the files in your installation's Oracle home.
You should set or modify some environment variables for this user, as described in Table 1-1.
If you have multiple installations of Oracle Application Server on one host, it is very important to completely set your environment when managing a particular installation.
Some Oracle Application Server commands use the ORACLE_HOME environment variable to determine which installation to operate on, and some use the directory location of the command. It is, therefore, not sufficient to simply reset your environment variables or cd into a different Oracle home as you move between installations. You must fully change to the new installation as follows:
On UNIX hosts, you may also use the su command to switch to the user, but be sure to use the "-" (dash) option so your environment is set the same as it would have been had you actually logged in as the user.
su - user
If you installed multiple installations as the same user, that is fine. Just make sure you are in the correct Oracle home and have the correct environment variables set when working on a particular installation. You may want to set up some scripts to enable you to easily change from one installation to another.
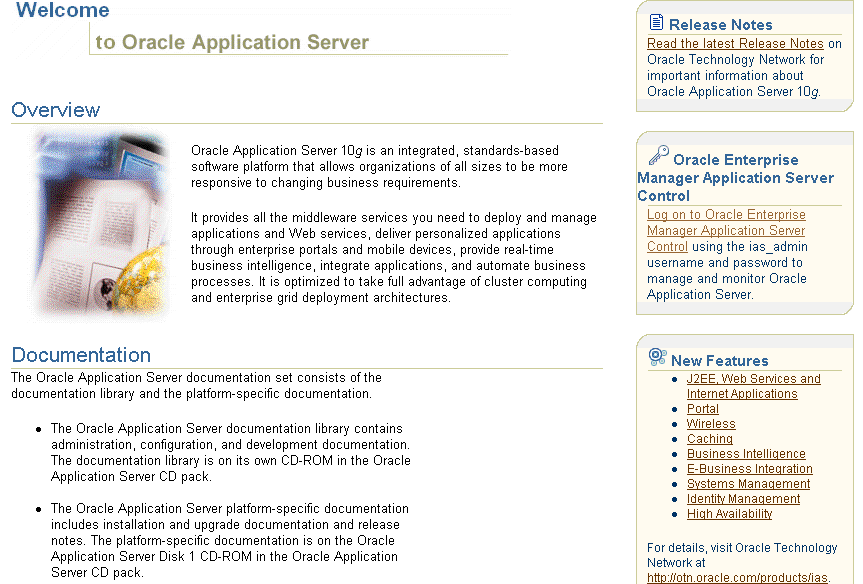
The Oracle Application Server Welcome Page is a great starting point for managing your application server. It includes the following:
Figure 1-1 shows the Oracle Application Server Welcome Page.
You can locate the URL for accessing the Welcome Page on the End of Installation Screen text, which is in the following file:
ORACLE_HOME/Apache/Apache/setupinfo.txt
The Welcome Page is accessible using the HTTP listener port on your installation. For example:
http://hostname.domain:7777
If you cannot access the Welcome Page, try the following:
setupinfo.txt and make sure you are using the correct URL (hostname and port number).
ORACLE_HOME/opmn/bin/opmnctl stopproc ias-component=HTTP_ServerORACLE_HOME/opmn/bin/opmnctl startproc ias-component=HTTP_Server
ORACLE_HOME/opmn/bin/opmnctl stopproc ias-component=WebCacheORACLE_HOME/opmn/bin/opmnctl startproc ias-component=WebCache
During installation, Oracle Application Server assigned port numbers to various components and services. It is important to check these port numbers for two reasons:
Chapter 5, "Managing Ports" for information on changing port numbers
See Also:
You can find the complete list of port numbers in:
ORACLE_HOME/install/portlist.ini
Example 1-1 shows a sample copy of this file.
;OracleAS Components reserve the following ports at install time.
;As a post-installation step, you can reconfigure a component to use a different
 port.
;Those changes will not be visible in this file.

[System]
Host Name = host1.mycompany.com

[Ports]
Oracle HTTP Server port =  7777
Oracle HTTP Server Listen port = 7778
Oracle HTTP Server SSL port = 4443
Oracle HTTP Server Listen (SSL) port = 4444
Oracle HTTP Server Diagnostic port = 7200
Oracle HTTP Server Jserv port = 8007
Application Server Control RMI port = 1850
Oracle Notification Server Request port = 6003
Oracle Notification Server Local port = 6100
Oracle Notification Server Remote port = 6200
Log Loader port = 44000
Java Object Cache port = 7000
DCM Java Object Cache port = 7101
Application Server Control port = 1810
Web Cache HTTP Listen port = 7777
Web Cache HTTP Listen (SSL) port = 4443
Web Cache Administration port = 4000
Web Cache Invalidation port = 4001
Web Cache Statistics port = 4002
Some things to note about portlist.ini are:
portlist.ini file, you may wonder how the application server determines port assignments, or you may wish to change some of the port numbers. You should leave the port numbers as they are until you have completed the tasks in this chapter and confirmed that all of your components are running properly. Then, you can consider changing port numbers. Note that some port numbers cannot be changed, and some require additional steps for updating other components.
Chapter 5, "Managing Ports" for information about port assignments and changing port numbers
See Also:
portlist.ini contains port numbers for components you did not select during installation. This is because Oracle Application Server reserves ports for all components during installation, even those that were not configured. These port numbers will be used if you configure components after installation.
portlist.ini file contains the port numbers that were assigned during installation and is very useful for getting started. However, it is not updated if you modify port numbers after installation. Once you start managing the application server, you should use the Application Server Control Ports Page for viewing port numbers, because it displays the current port numbers.
/etc/services. This causes Oracle Application Server to assume the port numbers are in use and skip to the next port numbers in the allotted port range, which are 3060 (non-SSL) and 3130 (SSL). If you would rather use the standard port numbers (389 and 636), you can change them, after making sure you are not using those port numbers on your system.
This task provides an introduction to managing components. It includes instructions for accessing component administration tools, post-installation notes about components, and pointers to more information.
Oracle Process Manager and Notification Server (OPMN) manages and monitors most Oracle Application Server components. It is installed and configured in every middle-tier and Infrastructure installation and is essential for running Oracle Application Server.
To get started with OPMN, use the opmnctl command to query the status of the components in your installation:
ORACLE_HOME/opmn/bin/opmnctl status
Example 1-2 shows sample output from the command. It displays the component name, process type, operating system process ID (PID), and status of each process.
Processes in Instance: biforms.myhost.myco.com
-------------------+--------------------+-------+---------
ias-component      | process-type       |   pid | status
-------------------+--------------------+-------+---------
wireless           | OC4J_Wireless      |   404 | Alive
Discoverer         | PreferenceServer   |   403 | Alive
Discoverer         | OAD                |   405 | Alive
Discoverer         | OSAgent            |   402 | Alive
WebCache           | WebCacheAdmin      |   401 | Alive
WebCache           | WebCache           |   400 | Alive
HTTP_Server        | HTTP_Server        |   399 | Alive
OC4J               | OC4J_BI_Forms      |   445 | Alive
OC4J               | OC4J_Portal        |   413 | Alive
OC4J               | home               |   412 | Alive
dcm-daemon         | dcm-daemon         |   715 | Alive
LogLoader          | logloaderd         |   N/A | Down
Notice that the LogLoader process is always down after installation. Log Loader is a feature that compiles log messages from various log files into a single repository. You can start Log Loader after installation.
You can use OPMN to start and stop your application server, monitor components, configure event scripts, and perform many other tasks related to process management.
Distributed Configuration Management (DCM) allows you to manage configuration information for application server instances, OracleAS Clusters, Oracle HTTP Server, Oracle Application Server Containers for J2EE (OC4J), Oracle Application Server Java Authentication and Authorization Service (JAZN) and OPMN.
DCM is installed and configured with every middle-tier and Infrastructure installation. All DCM installations use a DCM repository. There are two types of DCM repositories:
DCM schema. This repository type is used by Portal and Wireless, and Business Intelligence and Forms installations. It is the repository for J2EE and Web Cache installations if you chose to use Managed OracleAS Clusters during installation.
You can determine your repository type as follows:
ORACLE_HOME/dcm/bin/dcmctl whichFarm
During installation, DCM created a copy of your initial configuration with the dcmctl saveInstance command. If, after you start configuring your application server, you would like to return to the initial configuration, you can use the dcmctl restoreInstance command.
You can use DCM to save and restore configuration information, deploy applications, manage clusters, and much more.
Oracle HTTP Server is installed and configured with every middle-tier and Infrastructure installation.
You can access Oracle HTTP Server as follows:
http://hostname.domain:port
port is the Oracle HTTP Server Listen port number in:
ORACLE_HOME/install/portlist.ini
For example:
http://hostname.domain:7778
When you access Oracle HTTP Server, you will see the Oracle Application Server Welcome Page.
Oracle Application Server Containers for J2EE (OC4J) is a complete Java 2 Enterprise Edition (J2EE) environment.
When you install an instance, you get the following OC4J instances, depending on your configuration:
home--the default OC4J instance that comes with every middle-tier installation
OC4J_BI_Forms--contains servlets that support OracleAS Reports Services and OracleAS Discoverer
OC4J_Portal--contains a servlet that supports OracleAS Portal.
OC4J_Security--supports Identity Management Services
OC4J_Wireless--contains a servlet that supports OracleAS Wireless
oca--supports OracleAS Certificate Authority
If you configured OracleAS Web Cache during installation, you can access it as follows:
http://hostname.domain:port
port is the Web Cache HTTP Listen port number in:
ORACLE_HOME/install/portlist.ini
For example:
http://hostname.domain:7777
When you access OracleAS Web Cache, you will see the Oracle Application Server Welcome Page.
OracleAS Web Cache is a graphical user interface tool for configuring and monitoring OracleAS Web Cache.
You can access OracleAS Web Cache Manager by navigating to the following URL:
http://hostname.domain:port/webcacheadmin
port is the Web Cache HTTP Administration port number in:
ORACLE_HOME/install/portlist.ini
For example:
http://hostname.domain:4000/webcacheadmin
You can log in to OracleAS Web Cache Manager as ias_admin or administrator. The password for both accounts is the ias_admin password you supplied during installation.
|
See Also:
Oracle Application Server Web Cache Administrator's Guide for a list of post-installation configuration tasks |
If you configured OracleAS Portal during installation, you can access it as follows:
http://hostname.domain:port/pls/portal
port is the Web Cache HTTP Listen port number in:
ORACLE_HOME/install/portlist.ini
For example:
http://hostname.domain:7777/pls/portal
You can log in as portal using the ias_admin password you supplied during installation.
|
See Also:
Oracle Application Server Portal Configuration Guide for information on getting started and managing OracleAS Portal |
If you configured OracleAS Wireless during installation, you can access it as follows:
http://hostname.domain:port/webtool/login.uix
port is the Web Cache HTTP Listen port number in:
ORACLE_HOME/install/portlist.ini
You can log in as orcladmin using the orcladmin password.
If you configured OracleAS Discoverer during installation, you can access it as follows:
http://hostname.domain:port/discoverer/viewer
http://hostname.domain:port/discoverer/plus
http://hostname.domain:port/discoverer/portletprovider
port is the Web Cache HTTP Listen port number in:
ORACLE_HOME/install/portlist.ini
|
See Also:
Oracle Application Server Discoverer Configuration Guide for additional steps for configuring Discoverer, including installing Discoverer workbooks and End User Layer (EUL) into each database that contains data to be analyzed |
If you configured OracleAS Forms Services during installation, you can access it as follows:
http://hostname.domain:port/forms90/f90servlet/admin
port is the Web Cache HTTP Listen port number in:
ORACLE_HOME/install/portlist.ini
|
See Also:
Refer to the OracleAS Forms Services online help for more information on configuring and using Forms |
If you configured OracleAS Reports Services during installation, you can access it as follows:
http://hostname.domain:port/reports/rwservlet/getserverinfo
port is the Web Cache HTTP Listen port number in:
ORACLE_HOME/install/portlist.ini
You can log in as orcladmin with the orcladmin password.
|
See Also:
Oracle Application Server Reports Services Publishing Reports to the Web for more information on configuring and using Reports |
You must run the OracleAS Personalization Schema Creation Wizard, which creates the required schemas in the Oracle9i database. You can then start managing OracleAS Personalization.
If you installed an OracleAS Metadata Repository, you may be interested to know the status of the various schemas accounts and passwords. This information can be found in the following tables:
Consult this table if you registered the Metadata Repository with Oracle Internet Directory.
Consult this table if you did not register the Metadata Repository with Oracle Internet Directory.
The tables contain the account status and initial password for each schema. They also contain recommended actions to perform immediately after installation, depending on your requirements.
To unlock an account using SQL*Plus (be sure to have your ORACLE_HOME and ORACLE_SID environment variables set before you run these commands):
ORACLE_HOME/bin/sqlplus "SYS/password_for_sysAS SYSDBA" SQL> ALTER USER schema ACCOUNT UNLOCK;
To lock an account:
ORACLE_HOME/bin/sqlplus "SYS/password_for_sysAS SYSDBA" SQL> ALTER USER schema ACCOUNT LOCK;
The method for changing passwords varies by schema. Refer to Section 6.2, "Changing Schema Passwords" to determine the proper way to change a password.
Table 1-2 displays the postinstallation status of schemas in a Metadata Repository registered with Oracle Internet Directory.
Table 1-3 displays the postinstallation status of schemas in a Metadata Repository that is not registered with Oracle Internet Directory
During installation, SSL is not configured for some components. If you would like to enable SSL, you can consult the component documentation for instructions.
SSL is not enabled for the following components during installation:
Several more tasks to get you started are:
|
|
 Copyright © 2002, 2003 Oracle Corporation. All Rights Reserved. |
|