10g (9.0.4)
Part Number B10948-01
Home |
Solution Area |
Contents |
Index |
| Oracle Application Server Wireless Developer's Guide 10g (9.0.4) Part Number B10948-01 |
|
This chapter describes how Application Developers use the Service Manager to create and manage the service-related objects of the Oracle Application Server Wireless repository. Each section of this document presents a different topic. These sections include:
The Service Manager provides a set of wizards for the creation of such service-related objects as applications, notifications, data feeders, preset definitions and J2ME web services. The Service Manager's wizards enable you to create these objects quickly by presenting the creation of each of these objects as a discrete task, broken down into a series of steps. Completing these steps requires only a minimum of information. The Service Manager guides you through each of these steps to ensure that you enter information correctly.
In addition to these wizards, the Service Manager enables you to edit the OracleAS Wireless repository objects. You can also use the Service Manager to test and debug applications.
Table 5-1 describes the service-related objects which you can create, modify, test and delete using the Service Manager.
To access the Service Manager:
http://hostname:port/webtool/login.uix
For example, you access the login page through the following URL:
http://hostname:7777/webtool/login.uix
|
Note: 7777 is the default port number for Oracle Application Server Wireless. The port number range is 7777 to 7877. To ensure that you are using the correct port number, check the port number for Oracle Application Server Wireless stored in [Oracle home]/install/portlist.ini. For more information on port usage, see your Oracle Application Server installation documentation, and the Oracle Application Server Administrator's Guide. |
After you log into the OracleAS Wireless Tools, you access the Service Manager by clicking the Services tab (Figure 5-1). The Service Manager includes the following subtabs:
Clicking any of these subtabs invokes a browsing screen specific to the object. From these browsing screens, you can manage objects using functions for creating, editing and deleting, and testing.
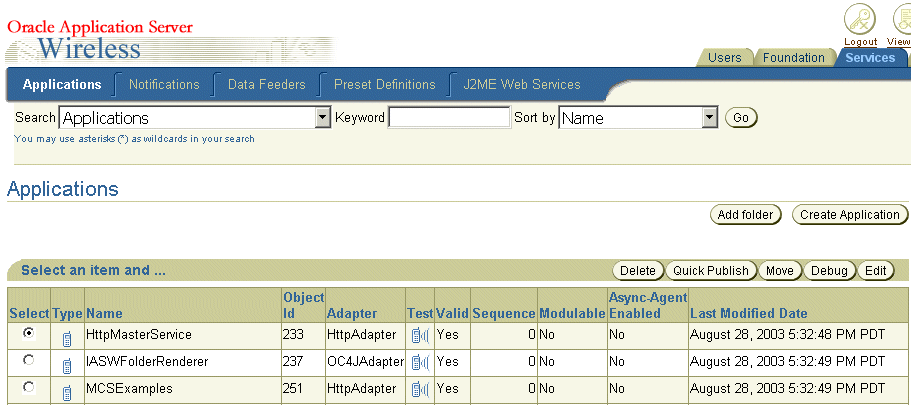
Selecting the Applications tab displays the Application browsing page, which enables you to create, edit, delete, search for, and move applications and folders. The page also enables you to test and debug applications and view them on a phone simulator.
After you create and test an application, you can publish the application to your home folder by clicking Quick Publish button on the browsing page. After you publish this application, you can run it from the Device Portal.
The Applications screen enables you to view the top-level folders in the hierarchy, which the Service Manager displays as hyperlinks. These hyperlinks (depicted in Figure 5-2) allow you to "drill down" or traverse deeper into the hierarchy with each successive click. The trace path displays the structure of the hierarchy, enabling you to see the level that you currently access.

When you first access the Service Manager, the tool defaults to the browsing screen for the applications folders. This browsing screen includes a table listing the current folders and applications in the repository. Table 5-2 describes the heading rows of the table.
The browsing screen the Service Manager enables you to search for an application or folder using a search field in conjunction with drop-down lists of search options, which you can use to either narrow or broaden your searches. The search results display as a list on the Search Result screen.
To find an object, perform one or more of the following and then click Go.
You can organize your applications by creating subfolders. These subfolders, which can represent topic areas, can be nested into other subfolders. When you create a subfolder, the Service Manager displays it as a hyperlink in the application browsing screen. Clicking this hyperlink enables you to see the folder's contents.
You create a folder by first clicking Add Folder in the application browsing screen. The Create Folder screen appears, in which you define the folder properties (described in Table 5-3). After you complete the screen, click Create. The browsing screen reappears and displays the new folder.
You create applications using the Service Manager's Application Creation Wizard. The creation process is divided into multiple steps, each of which is presented as a screen. You need only define the parameters which are required and applicable to your application; you can skip any unneeded screens (or parameters) and click Finish to complete your application.
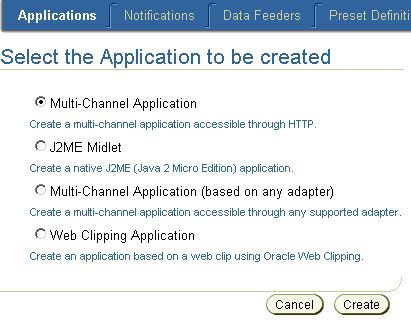
To access the Application Creation Wizard, click Create Application on the browsing page.
After you click Create Application, the Application Type screen appears (Figure 5-3). Using this screen, you select the type of application that you want to create. There are four types:
For multi-channel applications, the application content is retrieved from the HTTP adapter. The application result can be transformed and rendered on multiple device channels, including voice, messaging, and browsers.
A MIDlet is an application that runs on a device that supports Java's MIDP (Mobile Information Device Profile) specification. This application is invoked when users download a J2ME application, and can be run online and offline from smart devices.
For these applications, the application content can be retrieved from any adapter, such as the HTTP adapter, or the SQL adapter. The application result can be transformed and rendered on multiple device channels, including voice, messaging, and browsers.
A Web Clipping application's content is retrieved from the Web clipping studio, which can mobile-enable a Web-based application. The application result can be transformed and rendered on multiple device channels, including voice, messaging, and browsers
After you select the application type, click Create to launch the application creation wizard.
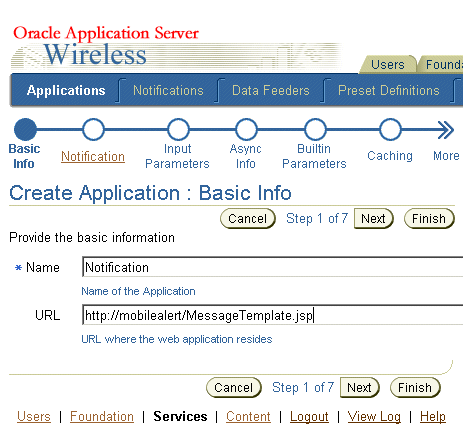
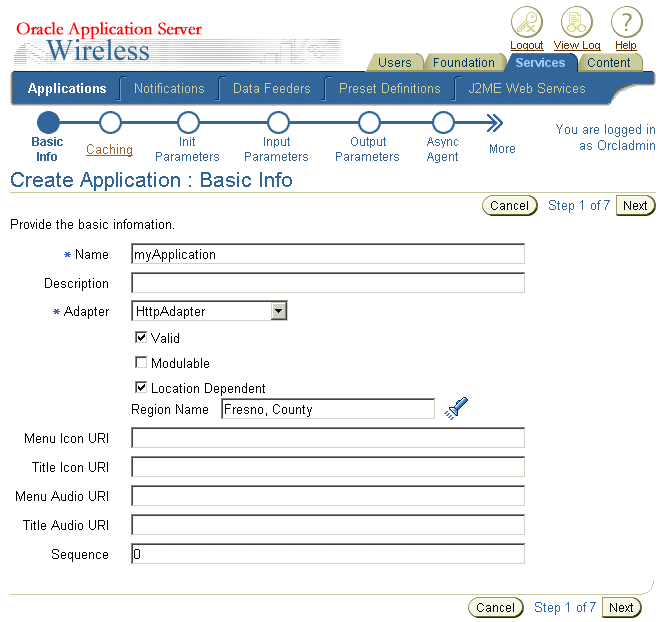
After you select Multi-Channel Application and then click Create, the first page of the wizard appears, in which you enter the basic information of the application (Figure 5-4).
Enter a unique name of the application (no two applications residing in the same folder can have the same name) and optionally, enter the URL pointing to the remote application which generates OracleAS Wireless XML or XHTML. You do not have to define the URL if this application is a message template used by a notification application.
You can complete the application at this point and exit the wizard by clicking Finish, or you can click Next to further define the application. Clicking Cancel at any point in an OracleAS Wireless wizard clears any of the values that you have entered.
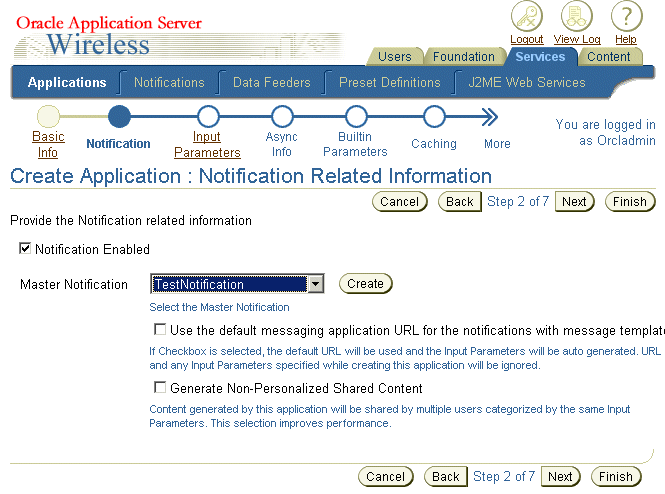
Complete the second step of the wizard (Figure 5-5) if this application is based on a notification (an alert).
Select the Notification Enabled option if this application can be invoked by the notification engine to generate content for the notification message.
After you select the Notification Enabled option:
Click Next or Finish.
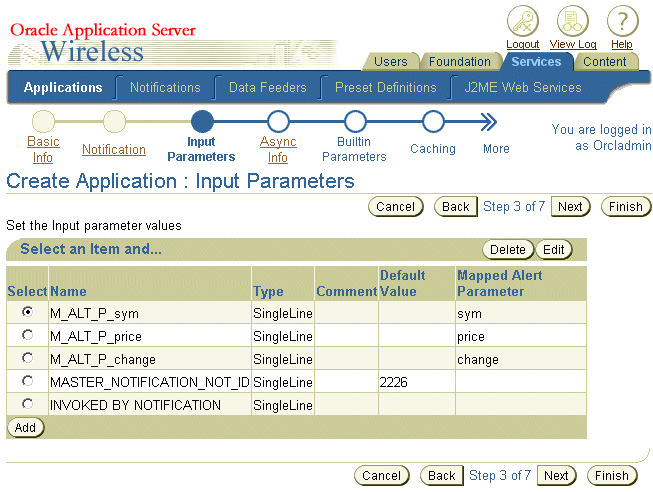
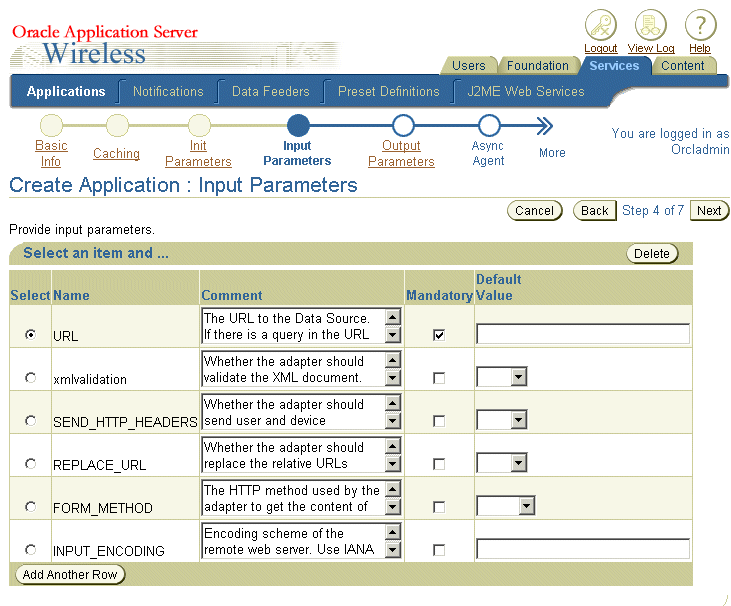
The Input Parameters screen (Figure 5-6) displays parameters which are passed to the mobile application (JSP, XHTML, MXML). The parameters for this application can either be defined in this screen, or by the Content Manager when publishing this application as an application link. For more information on publishing content, refer to the OracleAS Wireless Administrator's Guide.
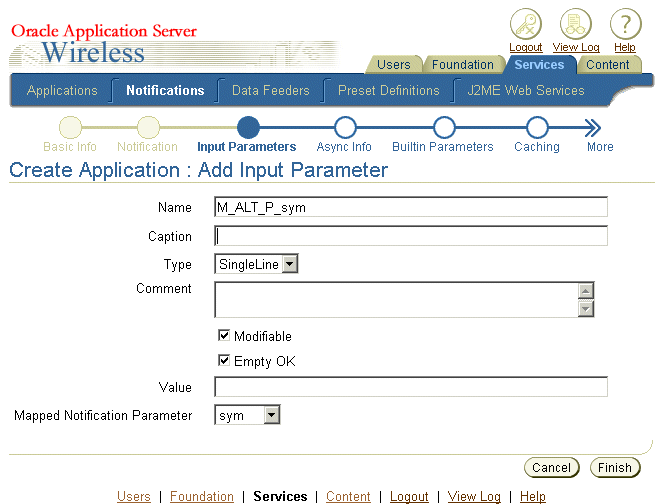
If you create a parameter that requires a value by leaving the Empty OK check box clear, and then do not enter a value for this parameter, then OracleAS Wireless prompts the user for this value at runtime.
If you select the Modifiable option, then the Content Manager can change this parameter when creating an application link from this application. If you do not select this option, then the Content Manager cannot change this parameter.
To add a new parameter to the application, you first click Add Another Row. You then define the parameters listed in Table 5-4 and then click Next or Finish.
Figure 5-7 depicts the Input Parameters screen, where you enter the values for the new input parameter.
To delete an input parameter, select the parameter you want to remove from the input parameter values and then click Delete.
To edit an input parameter, select the parameter you want to edit from the input parameter values and then click Apply.
If you select the Async Enabled option, then this application, when published, can be accessed through messaging on asynchronous devices. Users invoke the application by sending a request message to the OracleAS Wireless Server. The Async Listener then retrieves the message, routes it to the appropriate Async application and then replies, sending the user a message with the results of the executed request the user as a message. A complicated Async application can require several round trips for the message. OracleAS Wireless preserves the session for messages sent from the same device.
You set the Async information by selecting the Async Enabled check box and then by defining the values described in Table 5-5. Figure 5-8 depicts the Async Info. screen, where you defined the Async information.
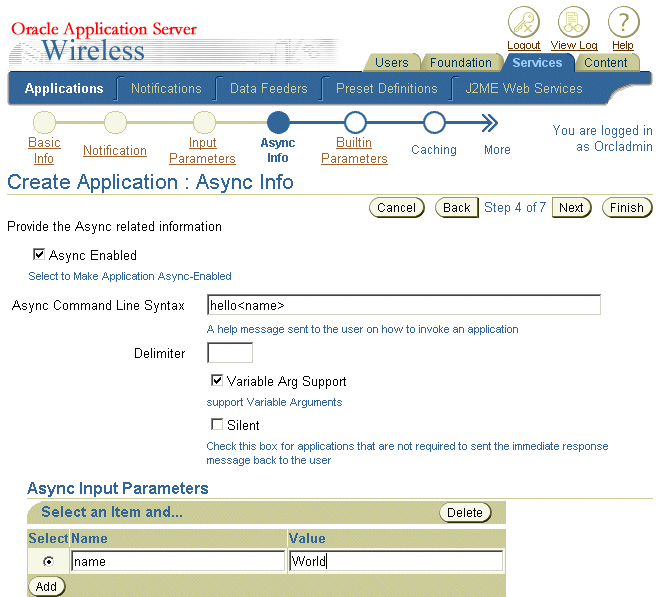
You add an input parameter by clicking Add and then by entering a name for the argument in the Name field. In the Value field, enter a default value for the argument. Leaving this field blank creates an application that requests a value from the user.
Click Next or Finish.
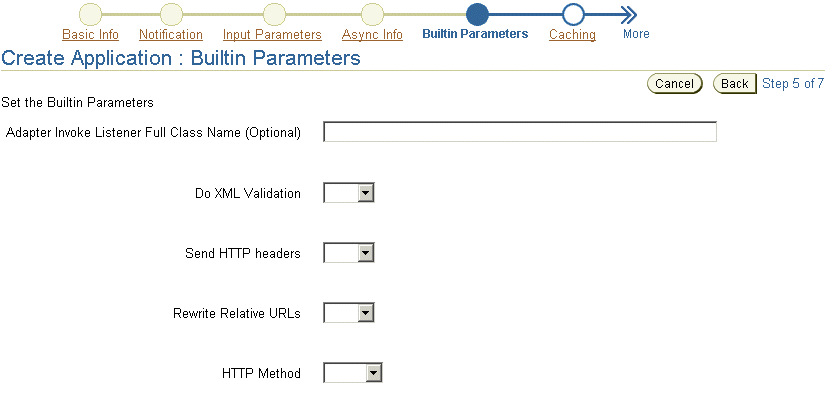
The built-in parameters are the predefined HTTP adapter parameters. Because these parameters default to the correct values, you do not have to configure them. Figure 5-9 depicts the wizard's Built-In Parameters screen.
If, however, you need to overwrite these default values:
Click Next or Finish.
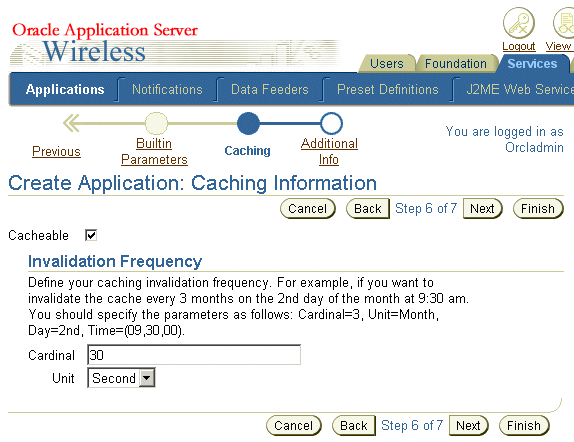
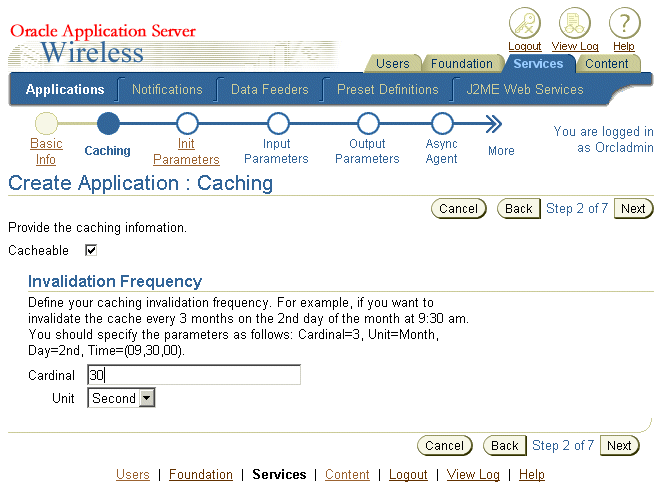
The Cacheable option enables you to create a cacheable application. For these applications, the HTTP adapter only retrieves the content from the mobile application for first time that the application is invoked. For subsequent invocations, the HTTP adapter retrieves the content from WebCache, not from the mobile application. As a result, cacheable applications reduce the application invocation time.
Specify the invalidation frequency (refresh frequency) for application content that is time-sensitive and becomes obsolete after a certain period of time. For example, if you specify the invalidation frequency for the Monday of each week at 6:00 am, then the cached content is invalidated at the time every week. The fresh content is stored in WebCache the next time that the HTTP adapter retrieves the content from the application. If you do not wish to store the mobile application content in WebCache, then do not select the Cacheable option and click Next.
To create an application of which the content can be stored in Web Cache, select the Cacheable check box (depicted in Figure 5-10) and then enter the frequency of the caching as a number value, of the unit selected from the Unit drop-down list.
Using the Unit drop-down list, select from among the following time units:
Using the drop-down lists, select the day and time (if applicable) for the invalidation frequency.
Click Next or Finish.
The final screen of the wizard (Figure 5-11) enables you to set the display module configuration attributes for the application. Table 5-6 describes the additional parameters. After you have defined the values, select Finish to complete the master application.
Table 5-6 Additional Parameters for a Multi-Channel Application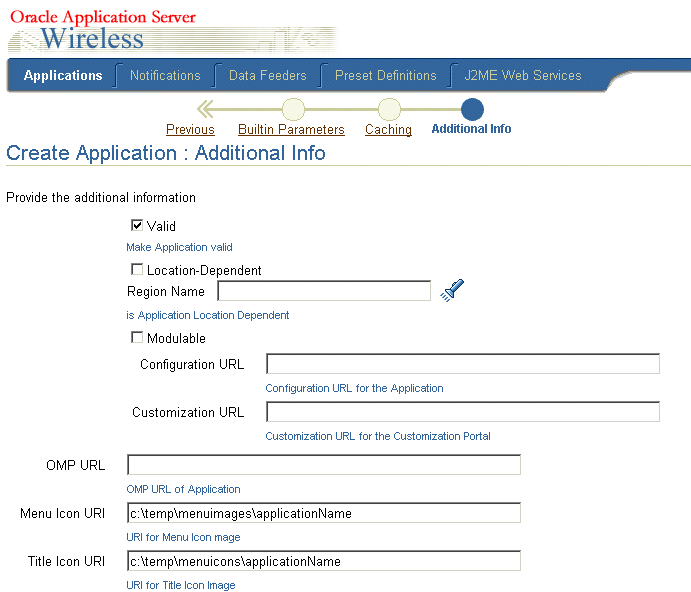
A OracleAS Wireless J2ME (Java 2 Micro Edition) application is a J2ME MIDlet programmed on top of the J2ME runtime and library. Using the J2ME MIDlet creation wizard, you can upload a MIDlet to the OracleAS Wireless J2ME Provisioning Server. The MIDlet can then be downloaded to a PC or to a device which supports J2ME MIDlets.
The J2ME Midlet creation wizard presents four steps:
You need only enter information that is relevant to your MIDlet. You can skip any irrelevant information by clicking the Finish button on any wizard page.
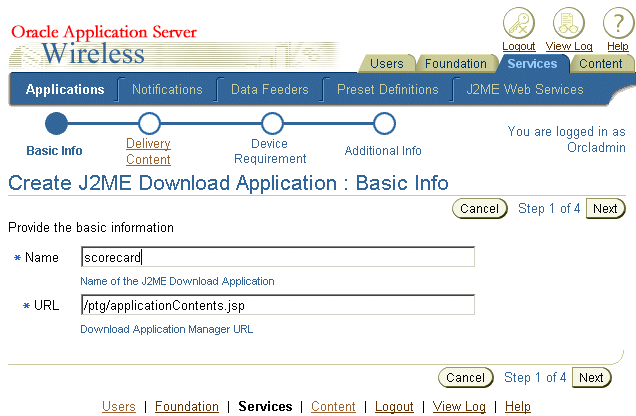
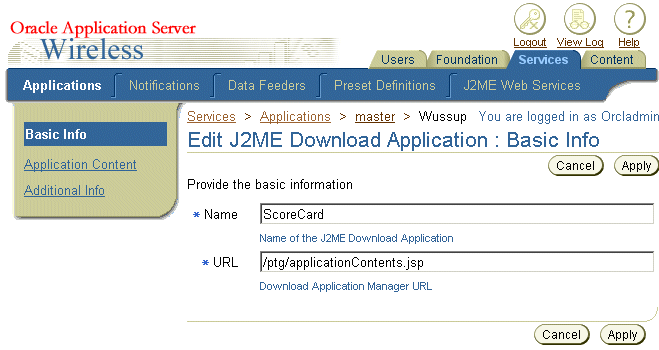
In this first step of the wizard (depicted in Figure 5-12), you define two required parameters: the a name for the J2ME application, and the URL to the mobile application which generates the J2ME application download page. By default, the OracleAS Wireless server provides a default J2ME download page.
Click Next.
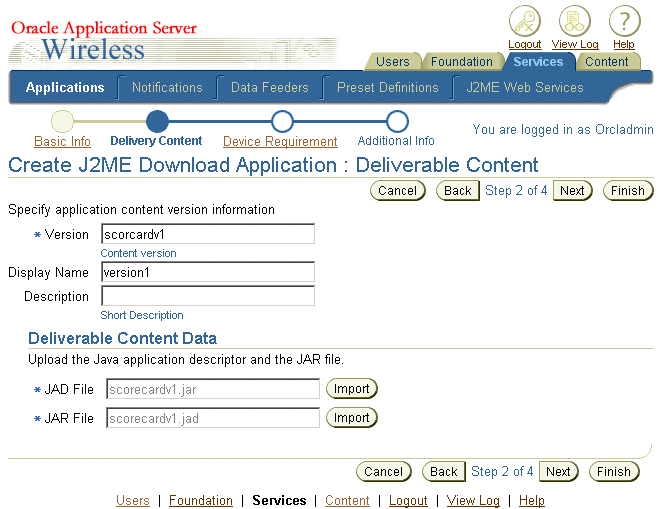
For a OracleAS Wireless J2ME MIDlet application, the delivery content is the J2ME MIDlet binary, the core of the application. The delivery content includes a JAD (Java Archive Descriptor) and a JAR (Java Archive file). Each version of the content is specific to different device requirements.
In Step 2 (depicted in Figure 5-13), you enter the version of the content. After you complete this application, you can create another version of the content for another device. The application's name and the version uniquely identify a J2ME MIDlet
You can also optionally enter a display name and description for this version of the contents.
The Import buttons enable you to browse for and select a JAD and JAR file for this application. To import these files, click the Import button. The Import File window appears. Click the Browse button, select the file and then click Import.
You can complete the application at this point by clicking Finish. Clicking Next takes invokes the Device Requirement screen (Figure 5-14).
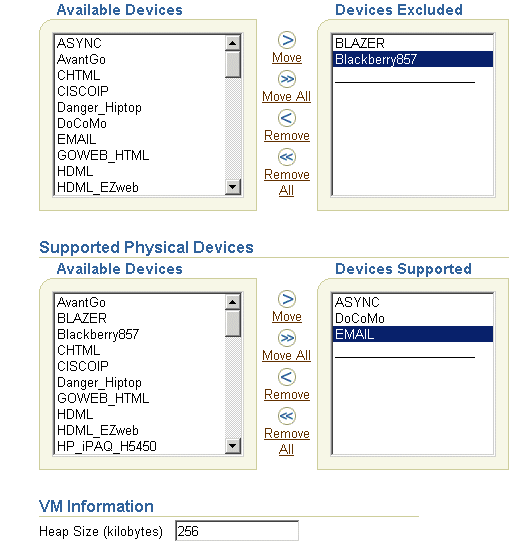
The device requirement criteria are evaluated when the J2ME is downloaded to a device at runtime. Each version of the deliverable content has a different device requirement.When a device requests the download, the J2ME Provisioning Server selects the version number with the requirements that match the profile of the device requesting the application.
The Devices Excluded section enables you to prevent the download of the MIDlet to a selected device. To exclude devices, use the right arrow buttons (> and >>) to move devices from the Available Devices pane to the Devices Excluded pane. The devices listed in Devices Excluded display an error message if users try to download this MIDlet to these devices. Use the left arrow keys (< and <<) to move devices from the Devices Excluded pane to the Available Devices pane. Similarly, use the arrow keys in the Supported Physical Devices section to select the devices or devices that support downloading this version of content.
|
Note: You cannot select the same device to both be excluded and supported; OracleAS Wireless automatically excludes a devices with such contradictory designations. |
Specify heap size requirement for JVM (Java Virtual Machine) running this J2ME application.
Click Next or Finish.
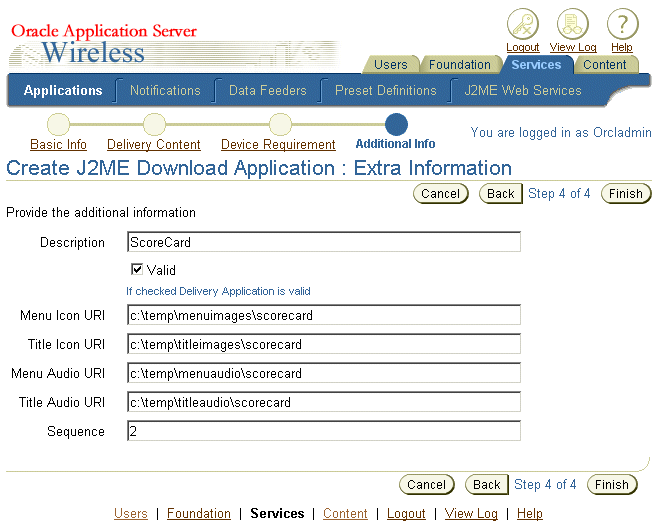
Defining the parameters of the Additional Information screen (Figure 5-15) enables you to set the display information for the MIDlet application. Click Finish to complete the J2ME MIDlet application. Table 5-7 describes these parameters.
For more information on creating J2ME MIDlet applications, see Chapter 12, "J2ME Development and Provisioning"
You create a multi-channel application by first selecting Multi-Channel application (based on any adapter) option from the Application Type screen (Figure 5-3).
|
Note: You must follow the sequence to its end to create an application; if you exit the wizard at any point by clicking Cancel, then you lose all of the values that you have entered. |
From the Browse Folder Screen, click Create Application. The Basic Information screen of the Application Creation Wizard appears (Figure 5-16). You use this screen to define the configuration parameters for the application, which are described in Table 5-8.
Table 5-8 Basic Configuration Parameters for the Application
| Parameter | Value |
|---|---|
|
Name |
The name of the application. |
|
Description |
An optional description of the application. |
|
Adapter |
A drop-down list of available adapters. Note: The SQL adapter and the Web Integration adapter are deprecated in this release. See OracleAS Wireless Administrator's Guide for more information on adapters. |
|
Valid |
Select the Valid check box to enable the application. |
|
Moduable |
Clicking this check box creates an application that can be deployed as a module component within another application. A modulable application can be reused across applications and provide a consistent user interface for applications requiring input from end users. |
|
Location-Dependent |
Select this check box to make the application specific to a designated region. Use this option to enable location-acquisition at runtime. |
|
Region Name |
If you select the Location-Dependent option, then you must select a region by clicking this button. |
|
Language |
A drop-down list of display languages. |
|
Title Icon URI |
The URI of an image used as the icon that appears on top of the screen when this application becomes the current application. You do not need to specify the format type in this URI, as OracleAS Wireless selects the image format appropriate to the user's device. |
|
Menu Icon URI |
The URI of an image used as the icon that appears next to the service in a menu listing. You do not need to specify the format type in this URI, as OracleAS Wireless selects the image format appropriate to the user's device. |
|
Title Audio URI |
The URI of the audio file (for example, a .WAV file) read by a voice xml gateway when users access an application. You do not need to specify the format type in this URI, as OracleAS Wireless selects the audio file format appropriate to the device. |
|
Menu Audio URI |
The URI of the audio file (for example, a .WAV file) read by a voice XML gateway along with the application in a menu listing. You do not need to specify the format type in this URI, as OracleAS Wireless selects the audio file format appropriate to the device. |
|
Title Icon URI |
The URI of an image used as the icon that appears on top of the screen when this application becomes the current application. You do not need to specify the format type in this URI, as OracleAS Wireless selects the image format appropriate to the user's device. |
|
Sequence |
The integer value that you enter in this field lets you alter the order in which services and folders appear on output devices. By default, these appear in order by sequence number, then by name. You can enter values in the sequence fields to rearrange the order in which the services and folders appear. |
Select the Cacheable check box (depicted in Figure 5-17) for an application with changing content. When selected, this option saves the adapter invocation and transformation. If you create a cacheable application, then you must also specify the frequency at which the OracleAS Wireless server notifies the cache that a Web page has changed by issuing an invalidation report. To define the invalidation frequency, enter an integer value in the Cardinal field and use the screen's drop-down lists to further define the time interval. If you do not wish to create applications that can be cached, then leave the Cacheable check box clear, and click Next.
Click Next. The Initialization (Init) Parameters screen appears.
The Init Parameters screen contains the initialization (init) parameters for the adapter that you selected in Step 2. Not all adapters have init parameters. Enter the values for the init parameters and then click Next. If the selected adapter does not contain init adapters, click Next.
If you want to plug in a listener for such purposes as debugging, specify the listener class in the HttpAdapterInvokerListener field. These listener methods are called at the following times:
|
Note: You must specify the classpath in the OC4J config/application XML file or you must copy the JAR file to wireless/lib. |
The Input Parameters screen (Figure 5-18) displays the input parameters for the adapter that you selected in Step 1. The Application Creation Wizard queries the adapter definition to determine the parameters that appear in this screen. Table 5-9 describes the input parameters for applications using the HTTP Adapter and the OC4J Adapter.
The Input Parameters screen enables you to select an input parameter as well as add and delete input parameters to the adapter implementation for this application.
To select an input parameter for the application, click the Select radio button next to the input parameter you want to use and then click Next.
To add a new parameter to the adapter you selected in Step 1, click Add Another Row. Enter the values for the parameters described in Table 5-9, "Input Parameters for the HTTP Adapter and the OC4J Adapter" and then click Next.
See OracleAS Wireless Administrator's Guide for information on the parameters for the SQL Adapter and WebIntegration Adapter.
To delete an input parameter, select the parameter you want to remove from the adapter implementation of this application and then click Delete. Click Next.
The HTTP adapter retrieves remote content and delivers it as mobile XML.Table 5-10 describes the input parameters for the HTTP adapter.
The Output Parameters screen enables you to select the output parameters for the adapter that you selected in Step 1, or to add output parameters to the application. The Application Creation Wizard queries the adapter definition to determine the parameters that appear in this screen.
|
Note: You do not need to define output parameters for applications using the HTTP adapter and the OC4J adapter. |
Table 5-11 describes the output parameters for adapters.
To select an output parameter, use the radio buttons to select the appropriate output parameter and then click Apply. To delete an output parameter, select the output parameter and click the Delete button.
After you have finished adding or deleting the output parameters for the adapter, click Next. The Confirmation screen appears if OracleAS Wireless has not found a PASection in the application you have created. Review the values listed on the Confirmation screen. If they are correct, click the Finish button to complete the master application.
If the master application contains a PASection, the Create Result Transformer screen appears.
By assigning Async Agent to an application, you create an application that can be accessed by protocols other than HTTP.
To set the values for an Async Agent application, you first select the Async Agent check box. In the Async Command Line Syntax field, enter the text that is returned when a user issues an application help command to the Async Server. In the Delimiter field, enter the delimiter parameters for the Async Agent service.
Complete the Async Application Argument List section as follows:
After you have set the output parameters for the adapter, OracleAS Wireless checks if the input parameters include PASection, the value used by the WIDL adapter to identify the service that is the entry point in the chained service sequence. If the Application Creation Wizard finds a PASection input adapter, it invokes the Result Transformer screen.
The transformer screen enables you to select a transformer for the adapter or add a new one by importing the XSLT stylesheet from your local file system.
To select a transformer for the adapter you selected in Step 1, use the radio buttons and then click Apply. To delete a transformer from the adapter, select the transformer using the Select radio button and click Delete.
PASection that you want to edit. Each panel contains a text editor for entering the XSLT style sheet. You can also import an XSLT style sheet by clicking the import button.
To add a new result transformer:
You have created an application. This master service is not visible to users until the Content Manager publishes an application based upon it to user groups.
The Wireless Web Clipping server enables Wireless Service Administrators to clip and scrape Web content and create Wireless Web Clipping applications that are stored persistently in the Wireless Web Clipping server repository. When a mobile device user requests Wireless Web Clipping application, the HTTP Adapter retrieves the application and delivers it to OracleAS Wireless for processing and delivery to the mobile device.
From the Service Manager, you access the Web Clipping Manager, which enables you to create, edit, delete web clippings, or download the mobile application for the clipping as a Java application or a JSP. You can create a default application based on an existing web clipping. After the mobile application is created, the clipped portion of the web application can be invoked from multiple mobile devices. For more information, see Chapter 13, "Web Scraping".
On the first page of application wizard, you can select Web Clipping Application type. The Web clipping manager page displays after you click Create. Select an existing Web clipping and then click Create Default Application. A new application is created based on the Web clipping.
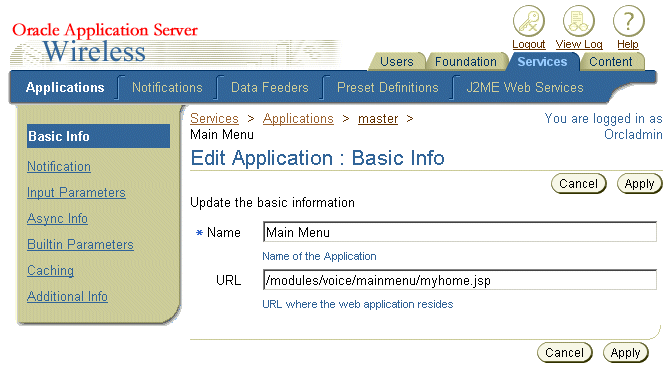
The Edit button in the application browsing screen enables you to edit all the all of the information for an application, from the basic information to the additional information. To edit an application, select an application in the browsing screen and then click Edit. The Basic Info. editing page appears (Figure 5-19), with its fields populated with the values set for the select application. From the left panel of the left panel of the editing screen, you can select the values that you want to edit, such as those for the basic configuration, initialization parameters, input parameters, output parameters, and the Async properties. After you modify a value, click Apply to save your changes. Clicking Cancel sets the values back to their original state. For more information on the parameters that you edit, see Section 5.3.3, "Creating an Application".
When you edit a J2ME application, you can edit the values for the JVM, the profile, and the maximum download size for the device requirement. Figure 5-20 depicts the Basic Info. screen for editing a J2ME application.
To delete an application, select the application from the application browsing screen and then click Delete.
The Service Manager enables you to simultaneously view an application on a phone simulator and in OracleAS Wireless XML or device.
Transformers, in the form of XSLT stylesheets or Java classes, convert the content returned by OracleAS Wireless adapters into the format best suited to a particular platform.
To test an application:
Selecting this result type enables you to see OracleAS Wireless source content in the AdapterResult format, the intermediary format between the source and the target output device. Source content in the AdapterResult format must be converted into SimpleResult format before it can be delivered to a target device. If no text displays in the The Result panel, then no AdapterResult has been produced.
Selecting OracleAS Wireless XML Result displays the source content in OracleAS Wireless' SimpleResult format of the output that is returned by an adapter.
The DeviceTransformer drop-down menu lists the devices in the repository. Selecting a logical device enables you to see the final markup language for that device.
After testing and debugging an application, you can publish the application to your home folder as an application link rather than having the application published through the Content Manager. After you publish the application to your home folder, you can view it through the Device portal.
To publish an application to your home folder, you first select the application from the browsing screen and then click Quick Publish. Enter the name of the application link and then click Create.
The Service Manager's Move function enables you to organize your applications and folders.
To move an application, you first select the folder or application and then click Move. The Move screen appears.Select a new location from the list in the Move screen. Click Move Here.
The Notifications tab of the Service Manager enables you to create, edit and delete notifications (alerts). When you select the Notifications tab, the Browse Notifications screen appears (Figure 5-21), displaying a list of the current notifications. The Browse screen organizes the notifications by name, OID, datafeeder and time values. Table 5-12 describes the elements of the browsing screen.

The Basic Info. screen includes the following parameters:
The Notification Creation Wizard steps you through the creation of a master notification. This wizard, invoked by clicking the Create Notification button in the browsing screen, provides a separate screen for each step of the process.
You define the following configuration parameters for the notification in the Basic Info. screen (Figure 5-21), the first screen in the notification creation wizard. Table 5-13 describes the parameters of the Basic Info. screen.
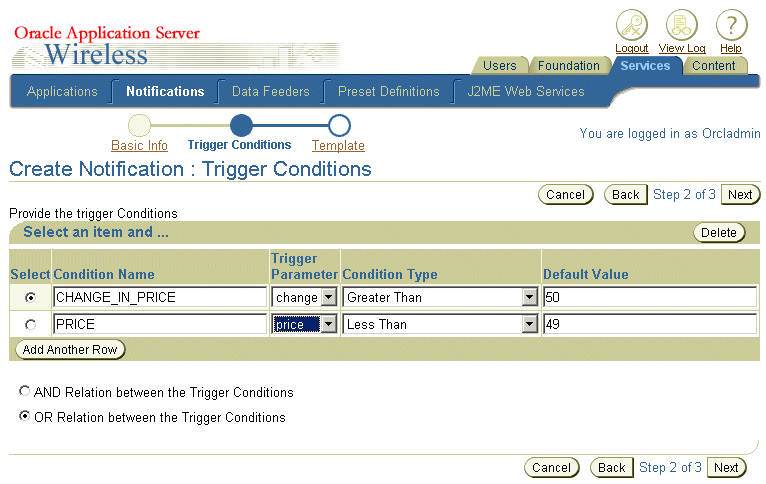
Click Next. The Trigger Conditions screen appears (Figure 5-23).
The Trigger Condition screen enables you to set the conditions that invoke a notification on end users' devices. For example, if you create a notification that alerts users of a stock price, you set the conditions that allow an end user to request a notification when the stock has risen above, or fallen below, a certain price.
Table 5-14 describes the parameters of the Trigger Conditions screen.
| Parameter | Value |
|---|---|
|
Condition Name |
The name of the alert trigger for the notification. The Trigger name, which is limited to 30 characters, must contain only alphanumeric characters and an underscore. In addition, the trigger name cannot start with a numeric character and cannot use SQL reserved words. End users see this label when they subscribe to a notification application. |
|
Trigger Parameter |
The trigger parameter is an element in a data feeder that you define a trigger condition against. For example, if a data feeder for a stock alert service includes an output parameter of stock price, you could select stock price as the trigger parameters for a condition name. For information on setting the output parameters of a data feeder, see Section 5.6.2.4, "Editing the Output Parameters of a Data Feeder". |
|
Condition Type |
The condition, in relation to the value set by the end user, which triggers the notification. |
|
Default Value |
The default value for the parameter. If you specify a default value, OracleAS Wireless does not prompt the user for a value. Default values can be overridden by a value specified by an application created by the Content Manager or, if the parameter is visible to the user, by the user through OracleAS Wireless Customization. |
Select an AND relationship (both conditions must be met) or an OR relationship (any of the conditions must be met).
To select a trigger condition:
To add a new Trigger Condition
If the data type is a number, then the conditions include:
If the data type is text, then the condition types include:
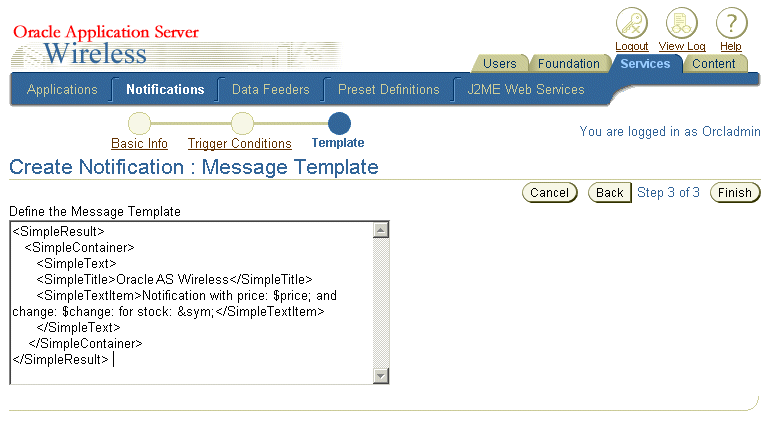
The Message Template screen (Figure 5-24) enables you to create a message template by entering SimpleText stylesheet. In this stylesheet, the data feeder output values are the dynamic values. The following stylesheet represents these values as sym, price and change.
<SimpleResult><SimpleContainer><SimpleText><SimpleTitle>OracleAS Wireless</SimpleTitle><SimpleTextItem>Notification with price: $price; and change: $change: for stock: &sym;</SimpleTextItem></SimpleText></SimpleContainer></SimpleResult>
|
Note: OracleAS Wireless will not commit any of the values that you have entered until you complete the entire wizard. |
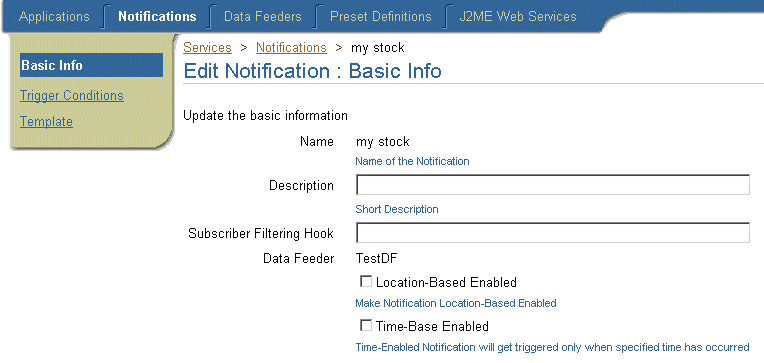
The Edit button in the Browse Notifications screen enables you to edit the basic configuration parameters, trigger conditions, and message template for a notification. To edit a notification, you first select one from the browsing screen and then click Edit. The Basic Info. screen for editing a notification appears, with its fields populated by the values set for the selected notification (Figure 5-25). Click Apply to save your changes. Clicking Cancel sets the values back to their original state. See Section 5.4.1, "Creating a Master Notification" for information on defining the parameters for the notification.
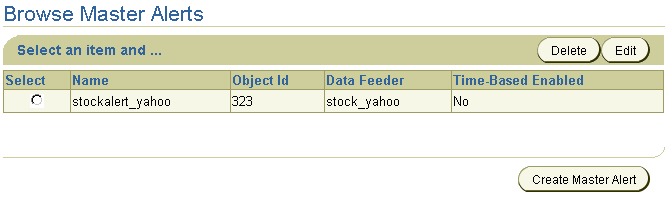
The Alerts tab of the Service Manager enables you to create, edit and delete master alerts. When you select the Alerts tab, the Browse Alerts screen appears, displaying a list of the current master alerts, organized by name, OID, data feeder and time values (Figure 5-26). Table 5-15 describes the elements of the browsing list for the master alerts.
The Master Alert Creation Wizard steps you through the creation of a master alert. This wizard, invoked by clicking the Create Master Alert button in the Browse Master Alerts screen, provides a separate screen for each step of the process. The master alert becomes active once the System manager starts the both alert engine process and the data feeder engine process.
You enter the basic configuration parameters for the master alert in the Basic Info. screen, the first in the master alert creation sequence (Figure 5-27).
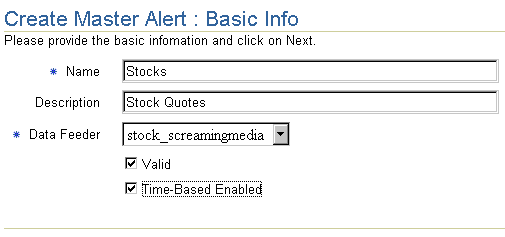
Table 5-16 describes the parameters of the The Basic Info. screen.
Click Next. The Trigger Conditions screen appears (Figure 5-28).
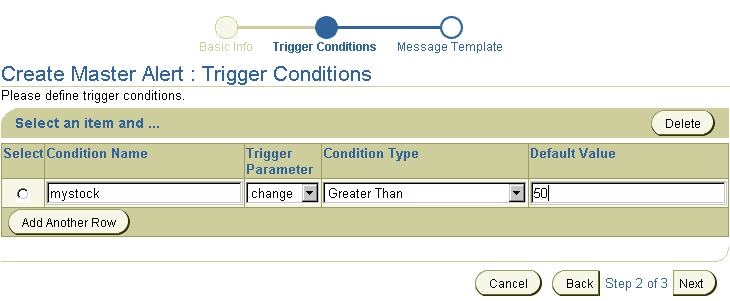
The Trigger Condition screen enables you to allow end users to set the conditions that invoke an alert on end users' devices. For example, if you create an alert notifying users of a stock price, you can to set the alert conditions that allow an end user to request a notification when the stock has risen above, or fallen below, a certain price. Table 5-17 describes the parameters of the Trigger Condition screen
| Parameter | Value |
|---|---|
|
Condition Name |
The name of the alert trigger for the master alert. The Trigger name must contain only alphanumeric characters and underscore and must be within 30 characters. In addition, the trigger name cannot start with a numeric character and cannot use SQL reserved words. End users see this label when they subscribe to an alert service. |
|
Trigger Parameter |
The trigger parameter is an element in a data feeder that you define a trigger condition against. For example, if a data feeder for a stock alert service includes an output parameter of stock price, you could select stock price as the trigger parameters for a condition name. For information on setting the output parameters of a data feeder, see Section 5.6.2.4, "Editing the Output Parameters of a Data Feeder". |
|
Condition Type |
The condition, in relation to the value set by the end user, which triggers the alert. |
|
Default Value |
The default value for the parameter. If you specify a default value, OracleAS Wireless does not prompt the user for a value. Default values can be overridden by a value specified by an application created by the Content Manager or, if the parameter is visible to the user, by the user through OracleAS Wireless Customizing. |
To select a trigger condition:
To add a new Trigger Condition
If the data type is a number, then the conditions include:
If the data type is text, then the condition types include:
The Message Template screen (Figure 5-29) enables you to either import a message template or provide a hook. The data feeder output values are the dynamic values in the SimpleText stylesheet. The following stylesheet represents these values as &price and &change.
<SimpleText> Stock Alert for [&sym;]: Price: &price; Change: &change;</SimpleText>
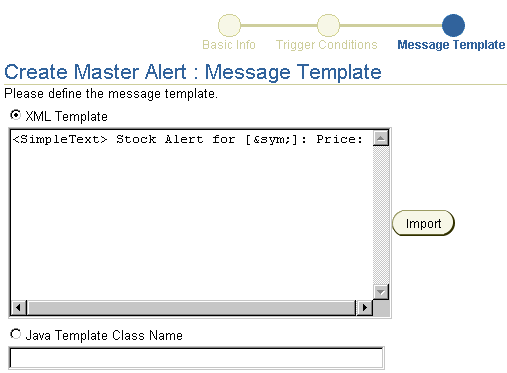
To import a message template:
|
Note: OracleAS Wireless will not commit any of the values that you have entered until you complete the entire wizard. |
To create a message template by providing a programming hook:
The Edit button in the Browse Master Alerts screen enables you to edit the basic configuration parameters, trigger conditions, and message template for a master alert.
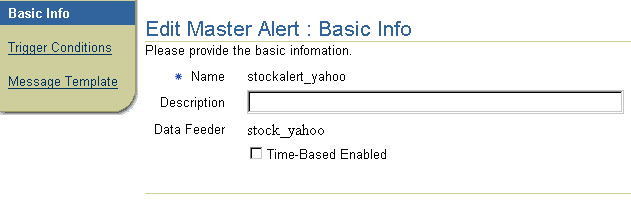
To edit the basic configuration parameters of a master alert, select a master alert from the browsing screen and then click Edit. The Basic Info. screen for editing a master alert appears, with its fields populated by the values set for the selected master alert (Figure 5-30). Edit the basic configuration values as needed. See Section 5.5.1.1, "Step 1: Entering the Basic Configuration Parameters for the Master Alert" for more information on the basic configuration parameters of a master alert. Click OK to save your changes. Clicking Cancel sets the values back to their original state and returns you to the Browse Master Alerts screen.
The Service Manager's Data Feeder tab (Figure 5-31) enables you to create, edit, and delete data feeders, OracleAS Wireless objects that download data from an internal or external content source and converts that data into a common format for OracleAS Wireless mobile alerts.

Clicking the Data Feeders tab displays the browse data feeders screen, which lists the current data feeders. Table 5-18 describes the elements of the data feeder list.
The Data Feeder Creation Wizard enables you to create a data feeder. This wizard, invoked by clicking the Create Data Feeder button in the Browse Data Feeders screen, steps you through the creation of a data feeder by providing a separate screen for each phase of the process. Once you create a data feeder, you can assign it to a master alert. A data feeder (and consequently the alert that derives its content using the data feeder) cannot become active until a user with the System Manager starts the data feeder process.
The Basic Info screen of the Data Feeder Creation Wizard (Figure 5-32) enables you enter the basic properties for the data feeder.
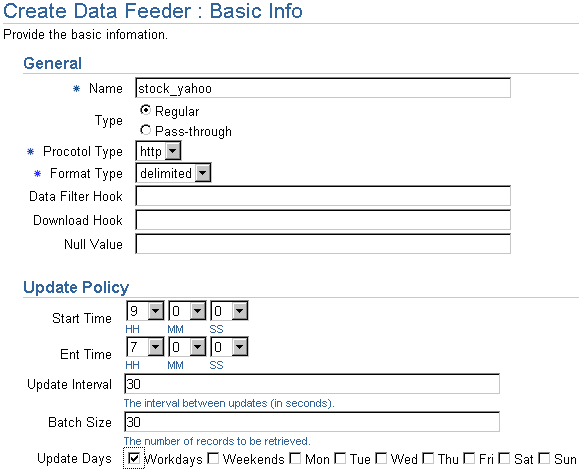
Table 5-19 describes the parameters of the The Basic Info. screen of the Data Feeder Creation Wizard.
Click Next. The Init Parameters screen appears, displaying init parameters for the protocol type you selected.
The Initialization (Init) Parameters screen displays the initialization parameters specific to the protocol and format type you selected in Section 5.6.1.1. Table 5-20 describes these init parameters.
To enter the init parameters for a data feeder using the HTTP protocol and the XML format type:
To enter init parameters for a data feeder using the HTTP Protocol and the delimited format:
To enter the init parameters for a data feeder using the HTTP protocol and the fixed column format:
To enter the init parameters for a data feeder using the file protocol and the XML format:
To enter the init parameters for a data feeder using the file protocol with the delimited format:
To enter the init parameters for a data feeder using the file protocol and the fixed column format:
To enter the init parameters for a data feeder using the FTP protocol and the XML format:
To enter the init parameters for a data feeder using the FTP protocol and the delimited format:
To enter init parameters for a data feeder using the FTP protocol and the fixed column format:
To enter the init parameters for a data feeder using the SQL protocol and the XML format:
To enter the init parameters for a data feeder using the SQL protocol and the delimited format:
To enter the init parameters for a data feeder using the SQL protocol and the fixed column format:
To enter the init parameters for a data feeder using the application protocol and the XML format:
To enter the init parameters for a data feeder using the application protocol and the delimited format:
To enter init parameters for a data feeder using the application protocol with the fixed column format:
The Input Parameters enables you to enter the input parameters for the data feeder. The input parameters screen displays the input parameters specific to the format type you selected in Section 5.6.1.1. Table 5-21 describes the input parameters of the data feeder.
To enter the input parameters:
The Output Parameters screen enables you to enter the output parameters for the data feeder. The output parameters screen displays parameters specific to the format type you selected in Section 5.6.1.1. The output parameters (described in Table 5-22) are the retrieved data from the content provider; you set alerts on the output parameters of a data feeder.
To enter the input parameters:
The Edit button in the Browse Data Feeder screen enables you to edit the basic configuration, init parameters, input parameters, and output parameters of a data feeder.
To edit the basic configuration of a data feeder:
To edit the init parameters of a data feeder:
To edit the output parameters of a data feeder:
To edit the output parameters of a data feeder:
Preset definitions enable users to personalize applications by entering their own input parameters. When a user requests an application, the application loads the user-defined input parameters, (or presets). Typically, the application may list these presets for the user, who must select an item to execute the application.
.
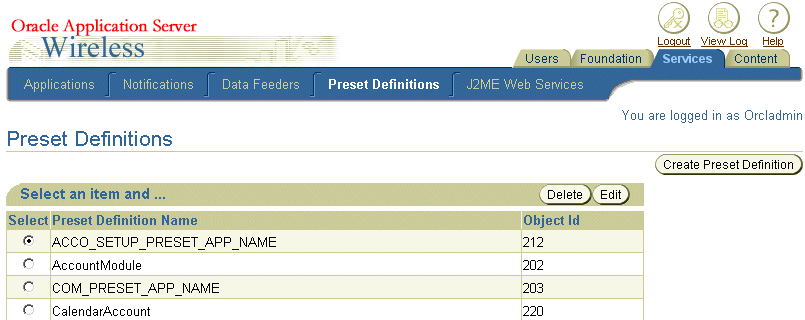
When selected, the Preset Definitions tab defaults to the Browse Preset Definitions Screen, which displays a list of the current preset definitions (Figure 5-33). From this screen, you can create, edit, and delete a preset definition. The Browse Preset Definitions screen includes the following parameters.
| Parameter | Description |
|---|---|
|
Preset Definition Name |
The name of the Preset Definition. |
|
Object ID |
The Object ID stored in the database. |
The Service Manager enables you to create a preset definition, a template which enables users to add values to each pre-defined preset definition. When users invoke an application, they select a value from any of the preset definitions as an input parameter.
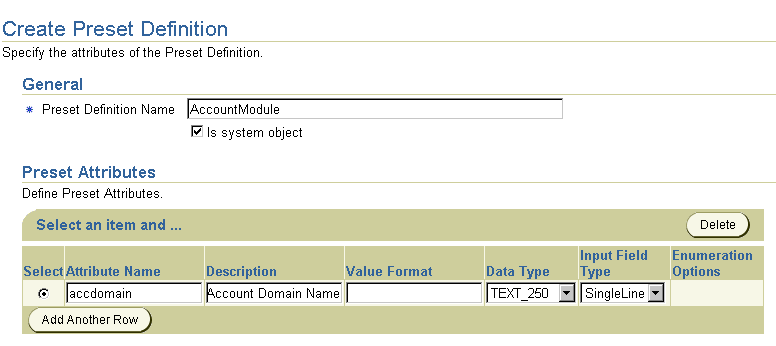
To create a new preset definition, click the Create Preset Definition button in the browsing screen. The Create Preset Definition screen appears (Figure 5-34). In this screen, you enter a unique name for the preset definition. In addition, you select Is System Object if this preset definition is not intended for users of the Wireless Customization Portal. Typically, preset definitions display in the Customization Portal to enable users to create their own preset values. You can complete the preset definition at this point by clicking Finish, or you can add preset attributes, as described in Section 5.7.1.1.
Preset attributes enable you to define the relation of input parameters that an end user can enter and save on the OracleAS Wireless server. You click the ADD button in the Create Preset Screen to add an attribute to the table. In the blank row that appears, you define the following parameters, described in Table 5-24.
| Parameters | Value |
|---|---|
|
Attribute Name |
A name for the preset attribute. |
|
Description |
An optional description of the preset attribute. |
|
Value Format |
For text, enter anything that meets the regular expression
For numbers, enter anything that meets the formats for |
|
Column Type |
A drop down list that includes the following:
|
|
Input Field Type |
Select from among the following preset types:
|
Click Finish after you have added the preset. Clicking Cancel clears all values and returns you to the Browse Preset Definitions screen.
You can add several rows of preset attributes to define relationships, such as Name, Street Address, Phone Number.
To edit a preset definition, select a the preset definition from the browsing screen and then click Edit. The Edit Preset Definition screen appears. Edit the preset definition as needed. See Section 5.7.1.1, "Adding Preset Attributes" for information on Preset Descriptors. Click OK to commit your changes. The Browse Preset Definitions screen reappears.
You can edit, add, or delete a preset attribute enumeration option by using the Edit Preset Descriptor Enumeration Options screen.
To edit a preset descriptor enumeration option:
A J2ME Web Service is a service hosted by the J2ME proxy server, one that is invoked from a J2ME MIDlet running on a J2ME device.
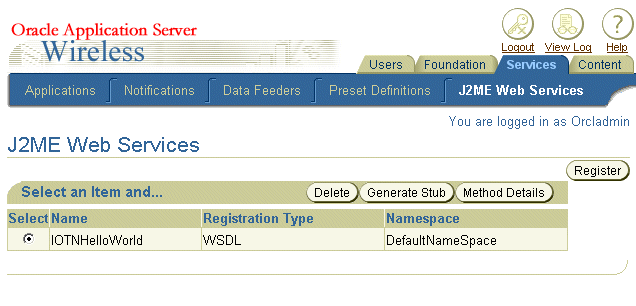
You can register a J2ME web service by either specifying the WSDL (Web Service Definition Language) URL, the URL to the JAR file, or the local JAR file. After you register the J2ME Web Service, you download the J2ME stub class and use it with your J2ME MIDlet. From the J2ME Web Services browsing screen of the Service Manager (Figure 5-35), you can view the details of the Web service methods.
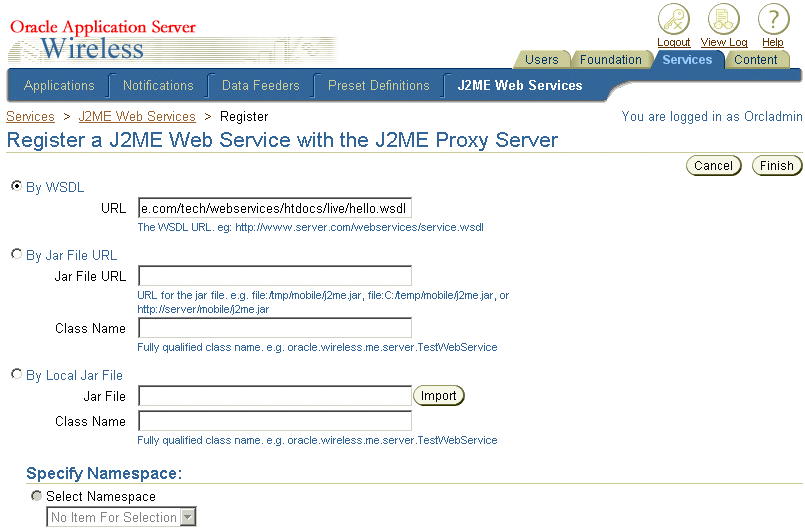
You can register a J2ME Web service based on a normal Web service. To do this, you first click Register in the browsing screen. The Register a J2ME Web Service screen appears (Figure 5-36) in which you select the By WSDL option and enter the URL for the normal Web service's WSDL.
You can also base a J2ME Web service on a normal Java class, which is packaged in a JAR file. This Java class can be situated on a Web site for downloading or located on the OracleAS Wireless Web server. To register a J2ME Web service, select the By Jar File URL option (depicted in Figure 5-36) and then enter either the URL of the Web site where the JAR can be downloaded, the Web site URL, or URL to the JAR file on the OracleAS Wireless Web server. You must also identify the class name of the Java class which is packaged in the JAR file.
The By Local JAR File option enables you to register a J2ME Web Service using a JAR file located on your client machine, which you then upload to the OracleAS Wireless server. To do this, select the By Local JAR File option and then click the Import button. From the Import window, use the Browse function to find and then select the JAR file. Click Import to upload the local JAR file.When using this option, you must also specify the class name of the Java class which is packaged in the local JAR file.
The J2ME proxy server stores J2ME web services by namespace to avoid naming conflicts. So when you register a J2ME Web service, you can either select an existing namespace or enter a new namespace. After you select the registration option and enter the namespace, click Finish to register the J2ME Web service.
You must include the J2ME stub class in your MIDlet so that you can use the J2ME Web service within that MIDlet.
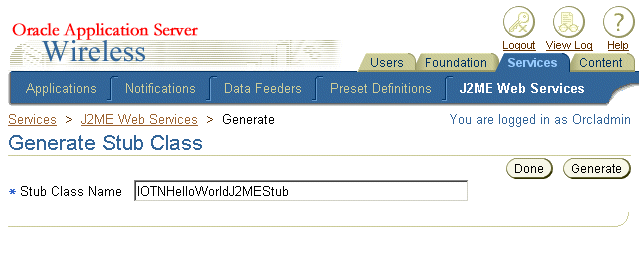
To include the stub class, you select a J2ME Web service from the browsing page then click Generate Stub. In the Generate Stub Class screen (Figure 5-37), you enter the stub class name. OracleAS Wireless bases the generated the stub class on this name. After you download the stub class, you compile it with your MIDlet.
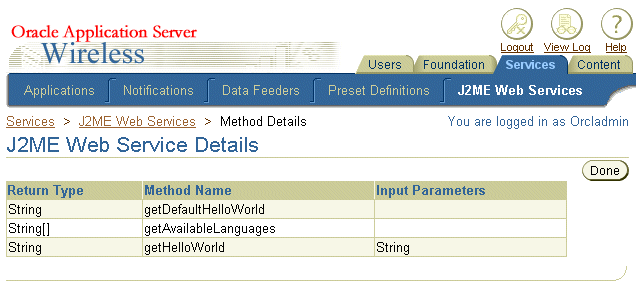
You can view the Web service method details of a Web service after you register the J2ME Web Service with the J2ME proxy server. To view the method details, select a J2ME web service from the browsing page and then click the Method Details button. The J2ME Web Service Details screen appears (Figure 5-38), displaying method details by name, return type and parameter types.
Refer Section 12.2 in Chapter 12, "J2ME Development and Provisioning" for information on coding a J2ME Web service.
|
|
 Copyright © 2003 Oracle Corporation. All Rights Reserved. |
|