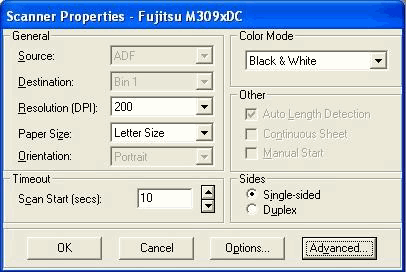
| Source |
Specify whether you would like the scanner to scan via the Automatic Document Feeder (ADF) or the Flatbed (for scanners that have both). |
| Destination |
If your scanner supports this option, choose the output bin to which you want papers directed after scanning. |
| Resolution |
Select the resolution at which you want images scanned when this profile is used. The resolutions available depend on the selected scanner. Resolution is the fineness or coarseness, measured in dots per inch (dpi), of an image as it is scanned. A higher resolution results in a better image; however, more storage space is required for high resolution image files. |
| Paper Size |
Select the paper size of documents that will be scanned using this profile. Available paper sizes depend on the selected scanner. |
| Orientation |
Select the orientation of pages that will be scanned. You can choose Portrait or Landscape. |
| Time Out |
The number of seconds to wait until beginning scanning the first page in the batch. For example, you might use this to allow time to adjust paper and feeder settings. |
| Color Mode |
Select the mode in which you want pages scanned. You can choose Black & White (the default), Color, or Grayscale. Keep in mind that scanning using the Color and Grayscale modes creates images with a much larger file size than scanning using the Black & White mode. |
| Autolength Detection |
This field, along with the Continuous Sheet field, is used to scan extra long images; the options are available only if your scanner supports long scanning. To scan extra long images, both fields must be checked, the width selected in the Paper Size field must match the width of the long paper to be scanned, and the Orientation field must be set to Portrait. |
| Continuous Sheet |
(See the Autolength Detection field.) |
| Manual Start |
Select this field to delay scanning until the scanner's start button is pressed. (This option requires that your scanner have a manual start button.) |
| Sides |
Specify if you want pages scanned on one side (single-sided) or both the front and back sides (duplex). Duplex scanning must be supported by the scanner. |
| Options, Advanced |
Display additional advanced options. Advanced settings are specific to the selected scanner. |


