|
|
This section contains information on the following subjects:
This section will help you to quickly get started using the Advanced Registration Flow feature using the bundled ALPBM Web Service endpoint that is configured to work with the ALBPM Process Engine. However, this feature is highly extensible and can be tailored to suit your environment.
The Event Manager is a component embedded within ALER that manages event subscriptions, event persistence, event filtering, and event delivery. Web Service endpoints can subscribe to the Event Manager's Subscription Manager and the asset registration events that are generated within ALER are delivered to the Web Service endpoints.
The following diagram shows the different components that are involved.
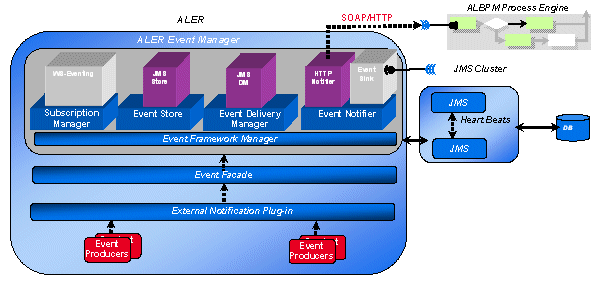
The Event Manager uses an embedded version of Apache ActiveMQ JMS Server that is enabled by default. The embedded JMS server is configured to run out-of-the-box without any additional configuration. However, you can also configure the Event Manager to use an external Java-based message broker, such as Weblogic Server JMS or IBM MQSeries.
For more information on configuring the Event Manager, see Configuring the ALER Event Manager.
After ALER is installed, configure the Event Manager as follows.
cmee.eventframework.enabled=true property in the eventing.properties file in the <ALER Domain>\WEB-INF\classes directory. cmee.eventframework.delivery.sleep and cmee.eventframework.store.sleep property values can also be tuned to control the overall performance of ALER and the Web Service endpoints. These properties directly impact the number of events that get triggered per second by the Event Manager. For example, If a faster response is required for testing purposes, the default cmee.eventframework.store.sleep value of 7200 seconds should be changed to a reasonable testing amount.log4fl.properties file in the <ALER Domain>\WEB-INF\classes directory. # eventing subsystem
log4j.category.com.bea.infra.event.core= debug,eventingLog,stdout
log4j.category.com.bea.infra.event.dm= debug,eventingLog,stdout
log4j.category.com.bea.infra.event.facade= debug,eventingLog,stdout
log4j.category.com.bea.infra.event.notifier= debug,eventingLog,stdout
log4j.category.com.bea.infra.event.store= debug,eventingLog,stdout
log4j.category.com.bea.infra.event.sub= debug,eventingLog,stdout
| Note: | By default the Subscription Manager is configured to work out-of-the-box with the ALBPM Process Engine if the ALBPM Process Engine is running on the same machine as ALER. You can skip this step if this is the case because the default settings are ready to run. |
As shown below, the following information may need to be changed within the EndPointEventSubscription.xml file under <ALER Domain>\WEB-INF\classes directory, depending on the requirement:
eventNotifier.jar located in <aler Webapp path>/WEB-INF/lib for the available operations.Follow these steps to make sure that events are triggered after the configuring the Event Manager.
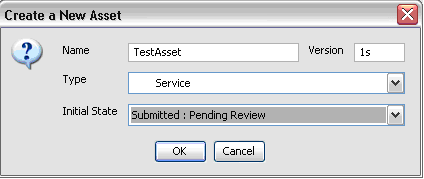
For information on using the ALER Asset Editor, refer to the ALER Registrar Guide.
| Note: | The Asset Type should be Service. |
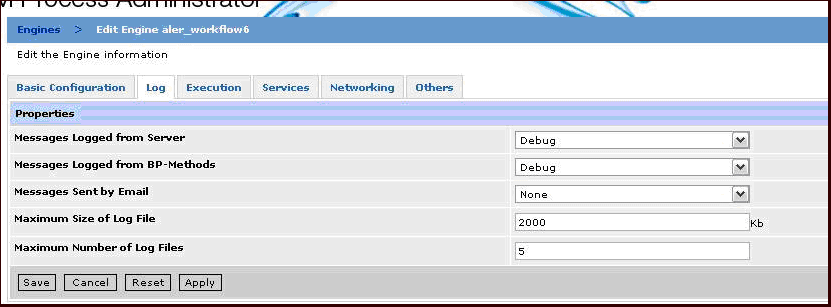
After the Event Manager is ready to send events, the ALBPM Process Engine needs to be configured and be ready to process the events. When ALER is installed, it provides an option to install and configure the Process Engine. This section assumes that the Process Engine was successfully installed before following these steps.
To launch the ALBPM Admin Center, double-click the albpmadmcenter.exe file in the <ALBPM Enterprise Home>\bin directory.
ALER features pre-bundled Advanced Registration Flows that are deployed to the Process Engine. When events are triggered within ALER, they are delivered to the Process Engine and execute the Advanced Registration Flows that attempt to automate ALER processes, such as asset submission, acceptance, registration, and other governance process.
For more information about the available Advanced Registration Flows, see Configuring Advanced Registration Flows.
Follow these steps after the ALBPM Process Engine is installed.
workflow.xml) file using the Generate Workflow Config tool (config_gen.bat). This tool connects to ALER and creates a bootstrapping file that can be customized. For more information about generating the workflow.xml file, see Generating the Workflow Config File. workflow.xml file to the <ALBPM Enterprise Edition>/enterprise/server/aler_engine directory.workflow.xml file using the XML editor of choice.<alerconnection>
<uri>http://server01.amer.bea.com:7005/aler/services/FlashlineRegistry </uri>
<registrar>
<user>admin</user>
<password>admin</password>
</registrar>
</alerconnection>
The URI must use the following format: http://<host>:<port>/<aler web app name>/services/FlashlineRegistry
workflow.xml file, locate the assetType settings for the "Service" asset type, as shown here.<assetType name="Service" community="_CHANGE_COMMUNITY_" id="154">
<allTabs>
<allTabs>
<tab name="Oveview"/>
<tab name="UDDI: Business Entity"/>
<tab name="Taxonomy"/>
<tab name="Architecture"/>
</allTabs>
   <assetType name="Application" community="_CHANGE_COMMUNITY_" id="154"  autoAccept="true">
     <allTabs>
     <allTabs>
       <tab name="Oveview"/>
       <tab name="UDDI: Business Entity"/>
       <tab name="Taxonomy"/>
       <tab name="Architecture"/>
     </allTabs>
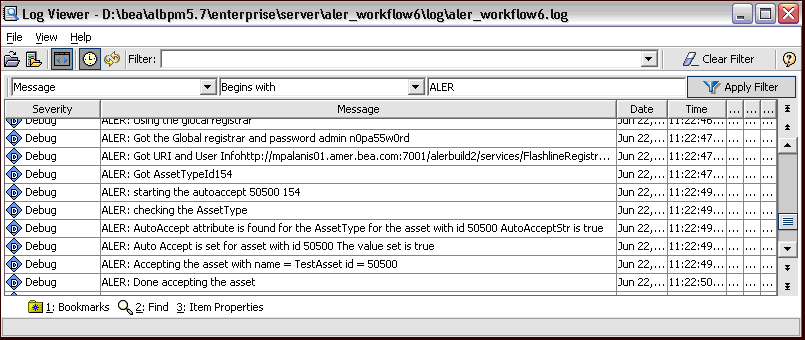
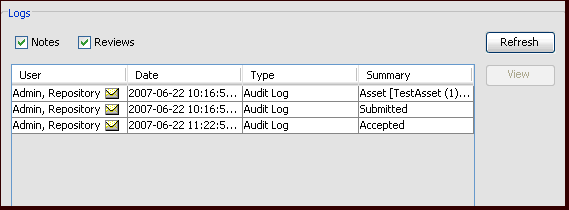
Now the ALBPM Process Engine is configured to automatically accept any asset of type "Service."
workflow.xml changes.workflow.xml file without restarting the ALBPM Process Engine. For more information about refreshing the workflow.xml file, see Refreshing the Workflow Config File.Once the ALBPM Process Engine is configured and running, follow these steps to process an asset submission event.
For information on using the ALER Asset Editor, refer to the ALER Registrar Guide.
| Note: | The Asset Type should be Service. |
<ALBPM Enterprise Home>\bin directory.


|