


|
This section contains information on the following subjects:
| Tip: | Before you begin, you should read Getting Started with Advanced Registration Flows to quickly get started using the Advanced Registration Flow feature using the bundled ALPBM Web Service endpoint that is configured to work with the ALBPM Process Engine. |
ALER bundles pre-built ALBPM flows that attempt to automate ALER asset submission, acceptance, registration and other governance process. This section discusses the configuration that is required before starting the ALBPM Process Engine to process the asset events that are triggered by ALER. For more information about configuring the Process Engine to trigger flows, see Configuring the ALER Event Manager.
The flows are also designed to be flexible and can be customized using the Workflow Configuration file (workflow.xml). This section also discusses each flow in detail and gives examples of how to tailored to suit your environment.
This section explains how to create and customize a Workflow Configuration XML file.
Generate the workflow.xml file using the Generate Workflow Config tool (config_gen.bat). This tool connects to ALER and creates a bootstrapping file that can be customized. For more information about generating the workflow.xml file, see Generating the Workflow Config File.
> config_gen.bat URI User Password ConfigDir
URI = ALER URI, using the following format: http://<host>:<port>/<aler web app name>/services/FlashlineRegistry
For example:
http://localhost:7001/alerbuild/services/FlashlineRegistryUser = ALER user namePassword = ALER passwordConfigDir = the directory where the workflow.xml file will be created| Note: | If a file already exists, it will be renamed to workflow.xml.bak. |
workflow.xml file to the <ALBPM Enterprise Edition>/enterprise/server/aler_engine directory.workflow.xml file using the XML editor of choice.The Workflow Configuration file will load the ALER connection and registrar information from the following XML data.
<alerconnection>
  <uri>http://localhost.7001/aler/services/FlashlineRegistry</uri>
  <registrar>
    <user>admin</user>
    <password>n0pa55w0rd</password>
  </registrar>
</alerconnection>
The Security Encrypt Password tool (runWfSecurity.bat) allows you to encrypt the registrar passwords that are stored in the Workflow Config file. The tool recursively scans the file and encrypts all the password elements it encounters.
For more information see Encrypting Your Passwords.
The Advanced Registration Flows are designed with a flexible framework where asset events can be wired to one or more flows that will be executed when an event is triggered, as illustrated in Figure 5-1.
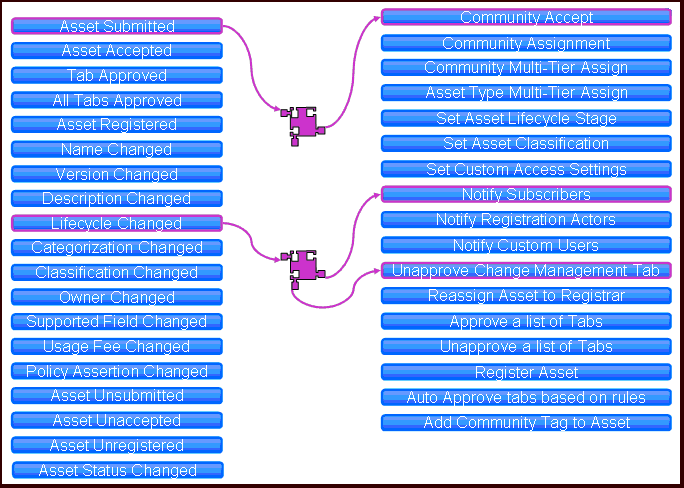
| Note: | All the events are wired to pre-defined flows out-of-the-box. The wirings only need to be changed if customizations or new flows are designed. |
The wiring of asset events to flows is configured within the Workflow Configuration file. For example, the following configuration snippet shows that when an "Asset Submitted" event is triggered, it in turn triggers a flow to automatically accept the asset based on rules that are configured in the Workflow Configuration file.
  <!--Community Flows-->
  <state name="urn:com:bea:aler:events:type:AssetSubmission">
    <action>CommunityAccept</action>
  </state>
  <!--The Multi_tier Flows-->
  <state name="urn:com:bea:aler:events:type:AssetAccepted">
    <action>MultiTier_Tier1_Assign</action>
  </state>
  <state name="urn:com:bea:aler:events:type:AssetTabApproved">
    <action>MultiTier_NextTier_Assign</action>
  </state>
  <!--Asset Registration Status Flows-->
  <state name="urn:com:bea:aler:events:type:AssetAllTabApproved">
    <action>AllTabApproved_Register</action>
  </state>
This example configuration wires the following events to various flows. The <action> element contains the name of the flow that will be executed.
Some of the flows take parameters that are needed as input. Different parameters are passed to different flows. For example, the ChangeCAS (Change Custom Access Settings) flow takes <customAccessSettings> as a parameter. Here is a sample wiring when an asset is registered, where the flow automatically assigns MyCAS and MyCAS2 custom access settings.
  <state name="urn:com:bea:aler:events:type:AssetRegister">
    <action>ChangeCAS</action>
  <customAccessSettings>
    <customAccessSetting>MyCAS</customAccessSetting>
    <customAccessSetting>MyCAS2</customAccessSetting>
  </customAccessSettings>
  </state>
This section describes how the Advanced Registration flows can automate the manual asset acceptance and registration process done using the ALER Asset Editor. For information on using the ALER Asset Editor and the asset registration process, refer to the ALER Registrar Guide.
| Note: | Do not enable the "Community Acceptance" or the "Automated Acceptance" flows if repository users submit assets via the "Submit an Asset" link. This configuration is not currently supported in ALER. |
The Community flow provides a way to automate the asset acceptance, assignment, and registration process by allowing the configuration of automated assignment rules and also introduces the notion of federated registrars among different authorities. Rather than spamming many registrars across all communities (through the system registrar notification), you could limit the system registrar to one or a few individuals, and let the Automatic Acceptance flow accept assets on behalf of a registrar-of-record for the community. The Community flow feature can distribute asset submissions to those with the authority to approve them for the community.
The Community flow can be used to address the following scenarios:
The Communities are configured within the flow configuration and Asset Types, Producing Projects, etc., can point to a Community.
The following flowchart demonstrates how a Community for an asset is located by the flow, as well as how the rules for automatic acceptance are located by the flow.
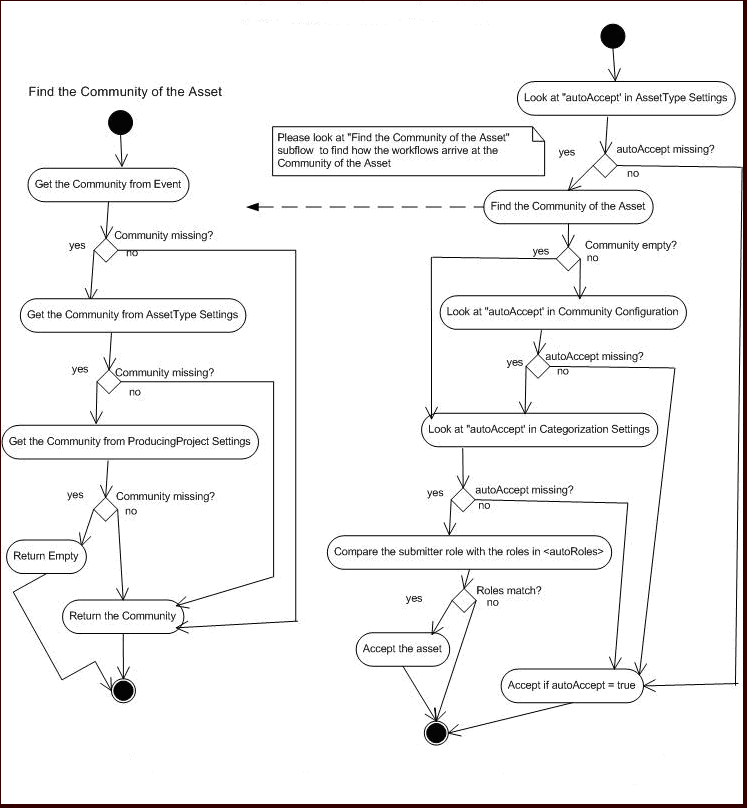
| Note: | The same flowchart applies for automatic Registration. Simply substitute autoRegister for autoAccept. |
Define the community for a project using the <producingProjectSettings> element. The following example demonstrates creating a project named "Registry" for the "SOA Center of Excellence" community, and with an ID of "40000".
<producingProjectSettings>
   <producingProject name="Registry" community="SOA Center of Excellence
   id="40000"/>
</producingProjectSettings>
Define the community for an Asset Type using the <assetType> element. The following example demonstrates creating an asset type named "Application" for the "SOA Center of Excellence" community, and with an ID of "158".
  <assetType name="Application" community="SOA Center of Excellence
  id="158">
    <allTabs>
The following example demonstrates how to set the "SOA Center of Excellence" community to automatically accept assets.
<communities name="SOA Center of Excellence autoAccept="true">
| Note: | Do not enable the "Community Acceptance" or the "Automated Acceptance" flows if repository users submit assets via the "Submit an Asset" link. This configuration is not currently supported in ALER. |
If the AssetSubmitted event is wired to the Community flow, then the <approvers> element lists the approvers that will be assigned by the Community flow automatically.
  <communities name="Java" autoAccept="true">
    <approvers>
      <alerid>5003</alerid>
      <alerid>5004</alerid>
    </approvers>
For instructions on using the <alerid> in Tab Approval flows, see Using an <alerid> for Tab Approvals.
Multi-tier assignment is the same as the Multi-Tier flow but it operates within the Community. For more information on the Multi-tier flow, see Multi-tier Automatic Assignment Flows.
| Note: | The tabs that are provided within the Multi-tier configuration of a community should be the common tabs that exist in all the asset types. |
The following example demonstrates how to set the "SOA Center of Excellence" community to automatically accept and register assets.
  <communities name="SOA Center of Excellence autoAccept="true"
   autoRegister="true">
The Registrar user name and password is required to accept, assign, and register assets. The Community flow will load the registrar information from the Community that the asset belongs to. If an asset does not belong to a community or if the registrar information is not found in the community, then the global registrar will be used by the Community flow.
The following is the order of precedence in getting the Community tag by the Community flows, as illustrated in Figure 5-1:
Besides using the Community flows to automatically accept and register assets, the following rules can be used to accept and register assets, as illustrated in Figure 5-1.
| Note: | Do not enable the "Community Acceptance" or the "Automated Acceptance" flows if repository users submit assets via the "Submit an Asset" link. This configuration is not currently supported in ALER. |
The autoAccept and autoRegister flag within the AssetType element can be used to automatically accept or register assets.
  <assetType name="Application" autoAccept="true" autoRegister="true"
  id="158">
    <allTabs>
      <tab name="Oveview"/>
      <tab name="Application Lifecycle"/>
    </allTabs>
By default the flows do not look for the autoAccept and autoRegister flags, since the look-up may affect performance. However, this can be enabled by using the <action> flag.
As shown in this example, the <action> flag must be set to true if the flows should use the Categorization settings. If not, the Categorization settings will be ignored.
  <catgorizationTypeSettings action="true">
    <catgorizationType name="AssetFunction" type "100">
      <catgorizations name="Application Adapters" autoAccept="false"/>
      <catgorizations name="Customer Information Acquisition" autoAccept="false"/>
      <catgorizations name="eCommerce Frameworks" autoAccept="false"/>
    </catgorizationType>
The submitter role can be used to automatically accept or register the asset. If the role specified in the following configuration matches the submitter role, then the asset will be automatically accepted.
  <automation>
    <autoRoles>
      <role>admin</role>
      <role>accesAdminstrator</role>
    </autoRoles>
    <autoApprovalTabs>
      <tab name="Documentation"/>
    </autoApprovalTabs>
  </automation>
In some cases, there will be more than one rule that matches for a given event trigger, so there is a hierarchy for how each rule is evaluated by the Automated Acceptance and Automated Registration flows for acceptance, registration, etc., as illustrated in Figure 5-1. The flow will scan for the following piece of metadata and as soon as it encounters the one in the following precedence, it will break and use the settings in that metadata.
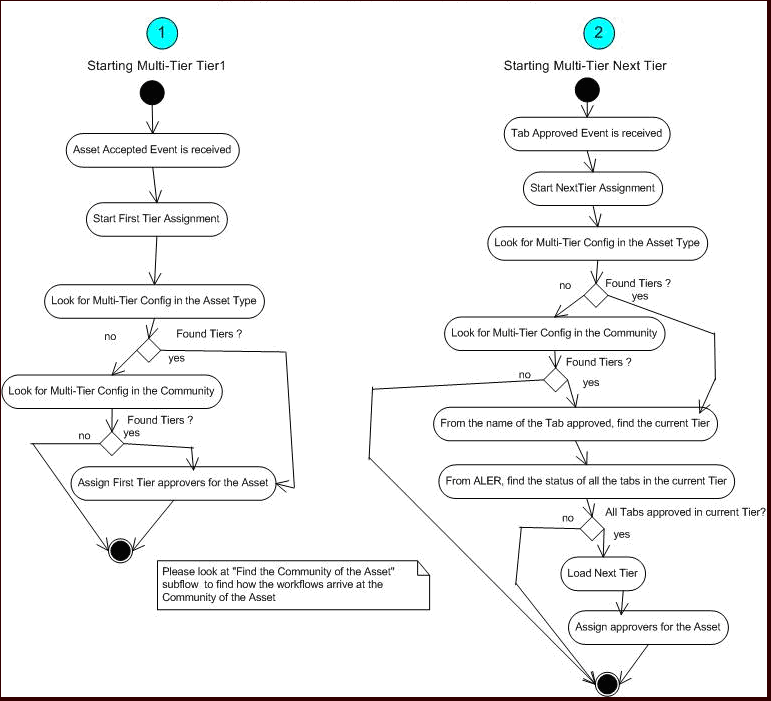
Multi-tier flows structure the asset tab approval process in multiple steps called tiers. Asset approval tabs can be grouped in tiers, and the Mult-tier flow tracks each tier to verify whether all the tabs are approved by the designated approvers. As soon as the last tab in a tier is approved, the Mult-tier flow starts the next tier by assigning the asset to the next level of designated approvers.
The following flowchart demonstrates the flow of the Mult-tier process.
When the workflow.xml file is generated, the following XML section is created under the <allAssetSettings> section. These are all the users that are created in ALER.
  <alerUsers>
    <user name="admin" alerid="99"/>
    <user name="allpriv" alerid="50000"/>
    <user name="nopriv" alerid="50001"/>
    <user name="tier1" alerid="50002"/>
    <user name="tier2" alerid="50003"/>
    <user name="mrsmith" alerid="50004"/>
  </alerUsers>
As the Workflow Administrator, you need to identify the user(s) by name that you want to use for approving the asset tabs and use the corresponding <alerid>. Then you can use that <alerid> in the Workflow XML, such as in the following Multi-tier approval flow:
  <tiers>
    <tier name="Tier1">
      <approvers>
        <alerid>50001</alerid>
      </approvers>
      <tabs>
        <tab name="Overview"/>
        <tab name="Technical"/>
        <tab name="Documentation"/>
      </tabs>
  </tier>
The following example demonstrates how the Multi-tier flow is configured for tab approvers in the "SOA Center of Excellence" community to automatically accept tabs.
  <communities name="SOA Center of Excellence autoAccept="true">
    <tiers>
      <tier name="Tier1">
        <approvers>
          <alerid>5002</alerid>
        </approvers>
        <tabs>
          <tab name="Overview">
          <tab name="Taxonomy">
        </tabs>
      </tier>
      <tier name="Tier2">
        <approvers>
          <alerid>5003</alerid>
        </approvers>
        <tabs>
          <tab name="Architecture">
        </tabs>
      </tier>
    </tiers>
  </communities>
| Note: | Tabs that are provided within the Multi-tier configuration of a Community should be the common tabs that exist in all the Asset Types. |
The following example demonstrates how the tabs of an asset type of "Application" are configured for multi-tier approval.
  <assetType name="Application" id="158">
    <allTabs>
      <tab name="Oveview"/>
      <tab name="Application Lifecycle"/>
      <tab name="License Information"/>
      <tab name="Certification Tracking"/>
      <tab name="Taxonomy"/>
      <tab name="Documentation"/>
      <tab name="Relationships"/>
      <tab name="Support"/>
      <tab name="Cost Categories"/>
      <tab name="Ownership"/>
      <tab name="Technology Stack"/>
      <tab name="Operational Information"/>
      <tab name="Miscellaneous"/>
    </allTabs>
    <tiers>
      <!--Please change "_CHANGE_TIER1_NAME_" to the name of the Tier-->
      <!--Example:- "Tier1"-->
      <tier name="Tier1">
        <approvers>
          <alerid>99</alerid>
        </approvers>
        <tabs>
        <!--Please change "_CHANGE_TABNAME_" to the name of the Tab-->
        <!--Example:- "Documentation"-->
          <tab name="Overview">
          <tab name="Taxonomy">
        </tabs>
      </tier>
    </tiers>
Metadata flows are a group of flows that take one or more actions when a metadata element of an asset changes. The Metadata element that changes will trigger an event that is wired to one or more flows. For instructions on how to wire an event to a flow, see Wiring Asset Events to Flows.
These are some of the use cases where Metadata Change Flows may apply:
Following are the states that are available that can be wired to Metadata Change flows.
| Note: | Besides these events, any categorization changes can be wired, including the custom categorization. |
  <state name="urn:com:bea:aler:events:type:MetaDataChange:name">
  <state name="urn:com:bea:aler:events:type:MetaDataChange:version">
  <state name="urn:com:bea:aler:events:type:MetaDataChange:description">
  <state name="urn:com:bea:aler:events:type:CategorizationChanged:
  assetLifecycleStage"/>
  <state name="urn:com:bea:aler:events:type:CategorizationChanged:classification">
  <state name="urn:com:bea:aler:events:type:MetaDataChange:supported">
  <state name="urn:com:bea:aler:events:type:MetaDataChange:organizationalOwnership">
  <state name="urn:com:bea:aler:events:type:MetaDataChange:usageFee">
These are the pre-defined flows that can be wired to actions. These flow names should appear as content inside the <action> element to indicate that this is the action that should take place when the event occurs. Note that any element other than <action> are parameters used by specific flows.
ChangeCAS - applies one or more Custom Access settings to an assetChangeAssetLifecycle - sets the Asset Lifecycle Stage of an assetChangeClassification - sets the classification of an assetReAssignAssetToRegistrar - assigns the asset to RegistrarAddCommunityTag - saves the "Community" of an asset to ALERNotifySubscriber - notifies the Subscribers about the Metadata ChangeNotifyRegistrationActors - notifies the Registrar, Subscribers, Owners, etc., about the Metadata ChangeNotifyCustomUser - notifies configured custom users about the Metadata ChangeUnapproveChangeManagementTab - triggers the Change Management processResetChangeManagementTab - resets the "Reason for reassignment" field in the Change Management tab as soon as the Change Management tab is approvedCommunityAccept - invokes the Community Accept Flow used when an asset is submittedCommunityAssign - invokes the Community Assign Flow used when an asset is acceptedMultiTier_Tier1_Assign - invokes the Multi-Tier Flow used when an asset is acceptedMultiTier_NextTier_Assign - invokes the Multi-Tier Flow used when a tab is approvedApproveTabAction - approves one or more tabUnapproveTabAction - unapproves one or more tabAutoApproveTabAction - approves one or more configured tab based on the role of the submitterAllTabsApproval_Register - invokes the flow to register the asset when all the tabs are approvedReAssignAssetToRegistrar - Assigns the asset to the Registrar for approval. The flow uses the Community Registrar if one is configured. If not, it uses the Global Registrar.ResetFlowState - Resets the State information used by the Timer based flows. This is useful in cases where a Timer flow is tracking the Unsubmitted assets and when the state changes from Unsubmitted to submitted, so the State information can be reset. If not reset, then if the asset goes back to Unsubmitted, the workflows use the same state that was previously set. This is not always desirable and the ResetFlowState action can be used in appropriate events or states to reset the state information.UnRegisterAssetAction - Unregisters the Asset if the asset is in registered state.
This sample configuration specifies that when an asset is registered, it invokes two flows by the names of "NotifySubscriber" and "ChangeCAS." Note that the element <customAccessSettings> is a parameter to the flow ChangeCAS, which tells the flows the names of the CAS that should be applied.
  <state name="urn:com:bea:aler:events:type:AssetRegister">
    <action>NotifySubscriber</action>
    <action>ChangeCAS</action>
    <customAccessSettings>
      <customAccessSetting>MyCAS</customAccessSetting>
      <customAccessSetting>MyCAS2</customAccessSetting>
    </customAccessSettings>
  </state>
  <state name="urn:com:bea:aler:events:type:AssetUnAccept">
    <action>NotifySubscriber</action>
    <action>ChangeClassification</action>
    <classification>Approved</classification>
  </state>
It is also possible to invoke a flow not only when a metadata element changes, but also when it takes a specific value. For example, when the "Asset Lifecycle Stage" metadata element of an asset changes from "Build" to "Release," you may want to apply one set of Custom Access Settings, where as when the value changes from "Plan" to "Build," you may want to apply a different set. Here is an example:
  <state name="urn:com:bea:aler:events:type:CategorizationChanged:AssetLifecycleStage" value="Stage 4 - Release">
    <action>ChangeCAS</action>
    <customAccessSettings>
      <customAccessSetting>MyCAS</customAccessSetting>
    </customAccessSettings>
  </state>
  <state name="urn:com:bea:aler:events:type:CategorizationChanged:AssetLifecycleStage" value="Stage 3 - Build">
    <action>ChangeCAS</action>
    <customAccessSettings>
      <customAccessSetting>MyCAS2</customAccessSetting>
    </customAccessSettings>
  </state>
Sets the classification of an asset. ChangeClassification uses the following element to set the classification.
  <state name="urn:com:bea:aler:events:type:AssetRegister">
    <action>ChangeClassification</action>
    <classification>Approved</classification>
  </state>
Applies one or more Custom Access Settings to an asset. ChangeCAS uses the following element to set the custom access settings.
  <state name="urn:com:bea:aler:events:type:AssetRegister">
    <action>ChangeCAS</action>
    <customAccessSettings>
      <customAccessSetting>MyCAS</customAccessSetting>
      <customAccessSetting>MyCAS2</customAccessSetting>
    </customAccessSettings>
  </state>
Sets the Asset Lifecycle stage of an asset. ChangeAssetLifeCycle uses the following element to set the asset life cycle.
  <state name="urn:com:bea:aler:events:type:AssetRegister">
    <action>ChangeAssetLifeCycle</action>
    <assetLifeCycle>Stage 3 - Build</assetLifeCycle>
  </state>
The ApproveTabAction flow approves one or more tabs of an asset. The following configuration, approves the "Overview" and "Taxonomy" tabs.
  <state name=?urn:com:bea:aler:events:type:MetaDataChange:name?>
    <action>ApproveTabAction</action>
    <approveTabs>
      <tab name=?Overview?>
      <tab name=?Taxonomy?>
   </approveTabs>
  </state>
The following element configures the list of tabs to be unapproved by the UnapproveTabAction flow.
  <state name="urn:com:bea:aler:events:type:MetaDataChange:name">
    <action>UnApproveTabAction</action>
    <unapproveTabs>
      <Tab name="Overview">
      <Tab name="Taxonomy">
    </unapproveTabs>
  </state>
The AutoApproveTabAction flow approves tabs based on the role of the submitter. For example, the following element under <allAssetSettings> configures the list of tabs that need to be automatically approved based on the role of the submitter. The roles that are acceptable are also configured.
  <automation>
    <autoRoles>
      <role>admin</role>
      <role>accesAdminstrator</role>
    </autoRoles>
    <autoApprovalTabs>
      <tab name="Documentation"/>
    </autoApprovalTabs>
  </automation>
Here is the configuration for invoking the flow:
  <state name="urn:com:bea:aler:events:type:AssetRegister">
    <action>AutoApproveTabAction</action>
  </state>
When any metadata element of an element changes, you may want the asset to go through a "Change Management" approval process, which involves following.
This flow resets the "Reason for reassignment" field in the Change Management tab as soon as the Change Management tab is approved.
  <state name="urn:com:bea:aler:events:type:AssetTabApproved">
    <action>MultiTier_NextTier_Assign</action>
    <action>ResetChangeManagementTab</action>
  </state>
Notifies configured custom users about the metadata change. The email addresses of the users are configured inside the <customNotification> element under <allAssetSettings>, as shown below:
  <allAssetSettings>
    <notification timerInterval="id">
      <customNotification>
        <emailAddress>smith@bea.com</emailAddress>
      </customNotification>
    </notification>
A metadata change flow can be executed based on the approval of a specific tabs, as follows:
  <state name="urn:com:bea:aler:events:type:AssetTabApproved" value ="Overview">
    <action>MultiTier_NextTier_Assign</action>
    <action>ChangeAssetLifecycle</action>
    <assetLifecycle>Stage 3 - Build</assetLifecycle>
  </state>
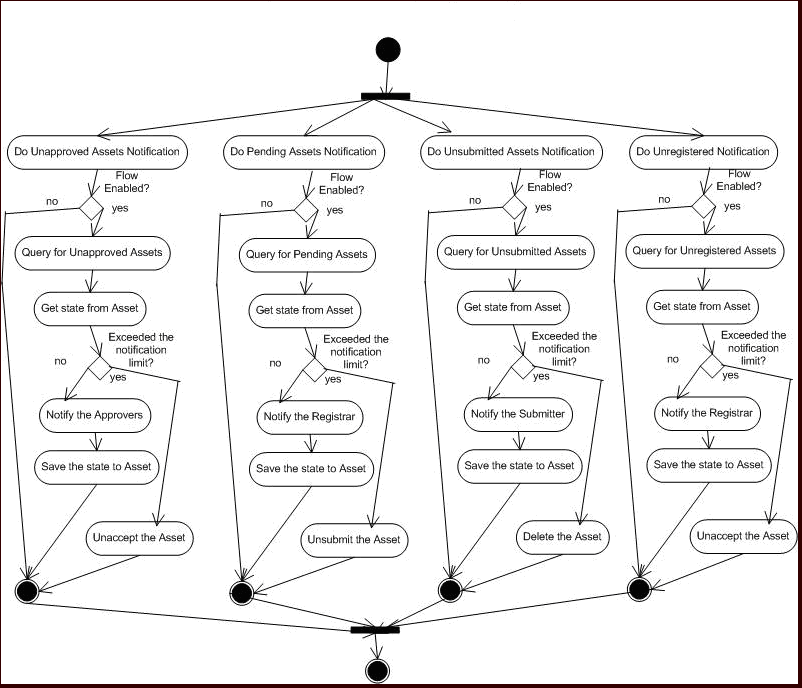
The Time-based Escalation flows track assets in various states and notifies all interested parties. The following section explains how to configure the Time-based Escalation flows. There are four different kinds of Time-based Escalation flows and each one can be configured individually, as described in the following sections.
Open the workflow.xml configuration file and locate the <notification> element.
  <notification timerInterval="1d">
    <numTimesNotify>10</numTimesNotify>
    <daysBeforeNextNotification>2</daysBeforeNextNotification>
"1d", which means the flows will be triggered once a day. However for testing purposes, you can set it to "1m" or "5m" to trigger the flows every minute or every five minutes. Also, each time this field is changed, the Event Engine needs to be restarted, unlike the other field changes that can be refreshed using the refresh tool.| Note: | If the timerInterval element is configured in minutes to trigger flows in minute intervals for testing purposes, then the specified interval for daysBeforeNextNotification will also be interpreted in minutes. |
The following flowchart demonstrates the flow of the Time-based Escalation flows.
This flow tracks assets that are in an "unsubmitted" status and sends notification to the owners to take action.
<owner_resubmit action="false" days="0" regressOnInaction="true" queryOperator="eq"/>
action="true" enables the flow and action="false" disables the flow.days="10" tracks the assets that reached unsubmitted status 10 days ago. The Time-based Escalation flows use the current date and subtracts the value from this attribute.regressOnInaction="true" regresses the asset on inaction. For example, unsubmitted assets may be deleted.queryOperator="eq" uses the equals operator when the date is used for querying. Other possible values are "lte", "gte", etc.This flow tracks assets that are in an "unaccepted" status and sends notification to the registrar to take action.
<registrar_accept action="false" days="0" regressOnInaction="true" queryOperator="eq"/>
action="true" enables the flow and action="false" disables the flow.days="10" tracks the assets that reached unsubmitted status 10 days ago. The Time-based Escalation flow use the current date and subtracts the value from this attribute.regressOnInaction="true" regresses the asset on inaction. For example, submitted assets may be unsubmitted.queryOperator="eq" uses the equals operator when the date is used for querying. Other possible values are "lte", "gte", etc.This flow tracks assets that are in an "unapproved" status and sends notification to the approvers to take action.
<assignees_approve action="false" days="0" regressOnInaction="true" queryOperator="eq"/>
action="true" enables the flow and action="false" disables the flow.days="10" tracks the assets that reached unsubmitted status 10 days ago. The Time-based Escalation flow use the current date and subtracts the value from this attribute.regressOnInaction="true" regresses the asset on inaction. For example, accepted assets may be unaccepted.queryOperator="eq" uses the equals operator when the date is used for querying. Other possible values are "lte", "gte", etc.This flow tracks the assets that are in an "unregistered" status and sends notification to the approvers to take action.
<registrar_register action="false" days="0" regressOnInaction="true" queryOperator="eq"/>
action="true" enables the flow and action="false" disables the flow.days="10" tracks the assets that reached unsubmitted status 10 days ago. The Time-based Escalation flow use the current date and subtracts the value from this attribute.regressOnInaction="true" regresses the asset on inaction. For example, accepted assets may be unaccepted.queryOperator="eq" uses the equals operator when the date is used for querying. Other possible values are "lte", "gte", etc.
The Validation Expiration flows track the expired assets prior to the expiration date, as well as on the date of expiration, and sends warning notifications to all interested parties. After X number of days of expiration, the flows unregister the assets. After Y number of days of expiration, the flows deactivate the assets. After Z number of days of expiration, the flows delete the assets.
  <notification timerInterval="1d">
    <numTimesNotify>10</numTimesNotify>
    <daysBeforeNextNotification>2</daysBeforeNextNotification>
timerInterval attribute configure the time interval that the flows will be triggered. This should be set to "1d", which means the interval is one day. However for testing, this can be set to "1m" or "5m" to trigger every minute or every 5 minutes. Also, every time this field is changed, the Event Engine needs to be restarted, unlike the other field changes that can be refreshed using the refresh tool.numTimesNotify element specifies how many times the notifications should be sent by the Validation Expiration flow.daysBeforeNextNotification element specifies how many days need to elapse in between the notifications.<expiration>
<expiration_warning action="false" days="10" owner="false" subscriber="false" contact="99"/>
<unregister_after_expire action="true" days="10" queryOperator="eq"/>
<inactive_after_expire action="true" days="10" queryOperator="eq"/>
<delete_after_expire action="true" days="10" queryOperator="eq"/>
</expiration>
The following flowchart demonstrates the flow of the Time-based Escalation flows.
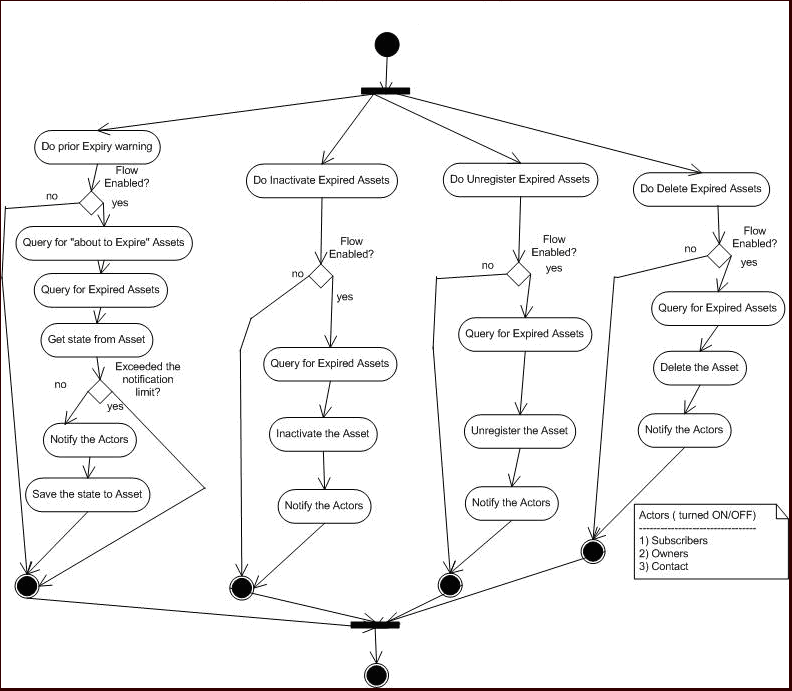
The following line enables the warning notification and determines who should receive the notifications.
<expiration_warning action="false" days="10" owner="false" subscriber="false" contact="99"/
| Note: | The days element configures the number of days prior to the expiration that the warning should be sent. |
The following line enables the Metadata Change flow to unregister the asset after 10 days of expiration.
<unregister_after_expire action="true" days="10" queryOperator="eq"/>
The following line enables the Metadata Change flow to inactivate the asset after 10 days of expiration
<inactive_after_expire action="true" days="10" queryOperator="eq"/>
The following line enables the Metadata Change flow to delete the asset after 10 days of expiration:
<delete_after_expire action="true" days="10" queryOperator="eq"/>
The Automated Registration Flows automatically send email notifications under many circumstances. There are five new email templates for the new flows. The email templates are stored within ALER and the flows invoke an ALER API by passing name/value pairs that are then substituted by ALER.
Administrators can customize the email subject, body, etc., the same way as other email templates. The following are the templates that are used by the Advanced Registration Flows:
<%asset.reg.status%> has remained unchanged for more than <%action.pending.days%> days. For more information about email templates, refer to the ALER Administration Guide.


|