| Oracle® Business Activity Monitoring Installation Guide 10g (10.1.3.1.0) Part Number B28988-02 |
|
|
View PDF |
| Oracle® Business Activity Monitoring Installation Guide 10g (10.1.3.1.0) Part Number B28988-02 |
|
|
View PDF |
This chapter includes the following topics:
This section summarizes the overall steps required for installing Oracle Business Activity Monitoring. Refer to the specific instructions in this guide for each part of the installation.
Table 2-1 Installation Overview
| Step | For More Information See . . . |
|---|---|
|
Check that you have the system requirements and required supporting applications installed. |
"Hardware System Requirements" "Software System Requirements" |
|
If deinstalling and upgrading to a different, version, ensure that you create backup copies of any customized configuration files, the Active Data Cache, and the Enterprise Link Repository (using |
"Deinstalling Oracle Business Activity Monitoring" See Also: Oracle BAM Enterprise Link Utilities User's Guide for instructions on using |
|
Choose a Windows account for the services. Note: Do not use the |
"Choosing a Windows Account for the Services" |
|
Install Microsoft IIS. |
"Installing Microsoft Internet Information Services" |
|
Run the Oracle Business Activity Monitoring installation. |
"Installing Oracle Business Activity Monitoring" |
|
Run the Enterprise Link installation. |
|
|
If you are using Windows Server 2003, complete the required configuration for Windows Server 2003. |
"Required Configuration for Microsoft Windows Server 2003" |
|
Start all of the Oracle Business Activity Monitoring services. |
|
|
Open the Enterprise Link Admin application, and ensure that there is a repository user named BAM. |
"Completing Configuration and Setup" |
|
In Enterprise Link Admin, click the Servers tab and register the server running the Data Flow Service. Enter the host name running the Data Flow Service and click Register. Make any necessary Data Flow Service configuration parameter adjustments. |
"Completing Configuration and Setup" "Performance Configuration Settings" |
|
Start Administrator and configure the Message Center. |
"Starting the Web Applications" "Configuring the Message Center in Administrator" |
This section contains the following topics:
Before installation, some prerequisites must be met on the Oracle Business Activity Monitoring and Enterprise Link host system. The installation program checks the following prerequisites to be sure they are met before an installation can proceed.
Processor X86, CPU at least 1 GHz, and Physical Memory at least 1GB: See "Hardware System Requirements" for more information.
Operating System and Windows Service Pack: See "General Software Requirements" for more information.
Admin User: See "Choosing a Windows Account for the Services" for more information.
IIS Installed: See "Installing Microsoft Internet Information Services" for more information.
Notes:
If Microsoft Clustering is installed in Windows 2000 Advanced Server, make sure that IIS is installed before starting the Oracle Business Activity Monitoring installation.If you are installing Oracle Business Activity Monitoring in Microsoft Windows 2003, make sure that the ASP.NET component of IIS is installed. See "Installing Microsoft Internet Information Services" for more information.
.NET Framework 1.1 and Service Pack 1 installed: This is installed automatically by the InstallShield wizard if it is not detected on the system. A restart is requested after the .NET installation, after which the InstallShield wizard starts up where it left off.
ORACLE_HOME and TNS_ADMIN environment variables not set
Caution:
Account information required in the Oracle Business Activity Monitoring setup script is case-sensitive. Be certain that you enter the account information using the same case that is stored on the domain server.The setup program asks for a user name and password for the Oracle Business Activity Monitoring services. You must use a domain user name and password that is part of the Administrators group. This is a Windows account and not part of Oracle Business Activity Monitoring security. Do not use the system account. Do not use a local user account. As an option, instead of the Administrators group, the user can be a member in a group called Pre-Windows 2000 Compatible Access. This group has permission to read the user and group information, but not to modify or delete this information. This applies to Windows Server 2000 and later, but not to Windows NT 4 domains.
Internet Information Service (IIS) must be installed before running the Oracle Business Activity Monitoring installation. The Oracle Business Activity Monitoring server installation must be able to stop and restart the IIS service, or the installation cannot be completed.
Note:
If Microsoft Clustering is installed in Windows 2000 Advanced Server, make sure that IIS is installed before starting the Oracle Business Activity Monitoring installation.Go to Control Panel > Add or Remove Programs, and on the left frame, click Add/Remove Windows Components.
Perform the following steps based on the operating system you are using:
| On... | Perform These Steps... |
|---|---|
| Windows Server 2003 |
|
| Windows Server 2000 |
|
Click Details to display the Internet Information Services window.
Select the check boxes for the following components:
Common Files
Documentation
IIS snap-in
WWW Service
Click OK to return to the Windows Components Wizard window.
Click Next.
If prompted, provide the Windows CD location.
Click Finish.
If any clients requests have been sent to the IIS server while you were performing these steps, then end the aspnet_wp.exe process for Windows 2000 or the w3wp.exe process for Windows 2003 Server in Task Manager. Note that since you just completed installation, a request is unlikely.
This section contains the instructions for installing Oracle Business Activity Monitoring and Enterprise Link. It contains the following topics:
To install the Oracle Business Activity Monitoring software:
Log in with a Windows account under which to install and run Oracle Business Activity Monitoring services. This account must be a member of the Administrator group and you must enter the account information using the same case that is stored on the domain server. See "Choosing a Windows Account for the Services" for more information.
Ensure that the Oracle database services are running.
Run setup.exe from the Oracle BAM CD 1 CD-ROM.
The InstallShield wizard starts and displays the Welcome page.

Click Next.
If the Prerequisite Failure or Warning step appears, confirm that the prerequisites for installing Oracle Business Activity Monitoring have been met.
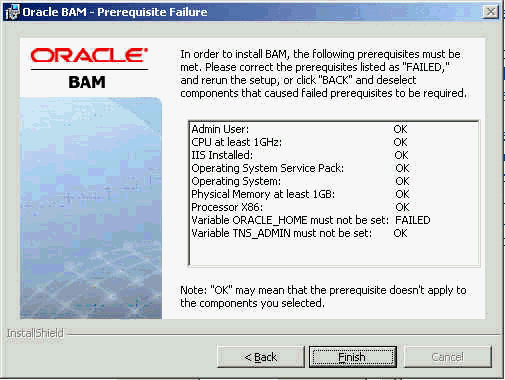
If there are any prerequisites that have not been met they will be noted in the wizard. Cancel the installation and return to it once the prerequisites are met.
If you are installing on an uncertified operating system for demonstration purposes, you can proceed with the installation. See "Installation Prerequisites" for more information.

On the Installation and Log Directory step, click Change if you want to choose a different directory, and click Next.
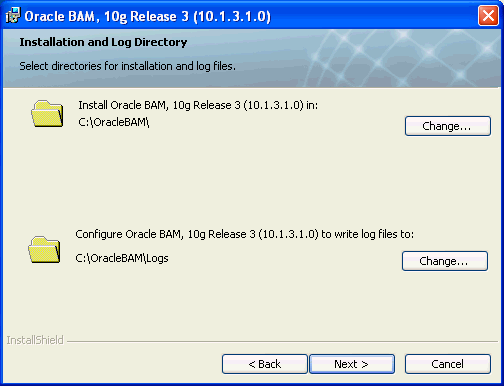
The default directories are C:\OracleBAM\ and C:\OracleBAM\Logs\. If you choose to change the defaults, you must select different directories from where you installed Oracle Business Activity Monitoring Enterprise Link.
On the Select Components to Install and Configure step, select the items you want to install and click Next.
If you are not installing a particular component at this time, click the component icon and select This feature will not be available.
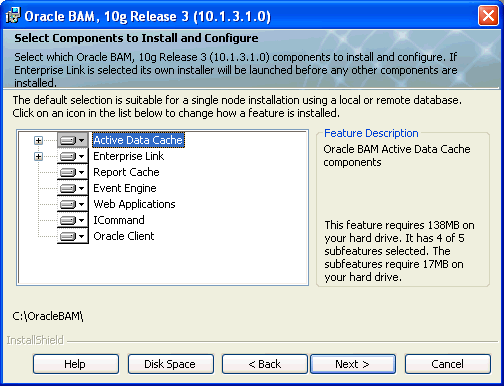
The following items can be selected for installation:
Active Data Cache, including Build or upgrade an ADC, Sample Data Objects, Active Data Cache Service, ADC Utilities, and ADC Clustering Support. Selecting ADC Clustering Support even if you are not using it does not cause any problems.
Enterprise Link components, including Enterprise Link MSMQ Web service and Plan Monitor (MSMQ Web service must be installed on the same host on which you installed Microsoft Internet Information Services).
Note:
Enterprise Link must be installed on any host on which a Plan Monitor is running.Report Cache
Event Engine
Web Applications (this must be installed on the same host on which you installed Microsoft Internet Information Services)
ICommand, the command-line utility
Oracle Client (required if Active Data Cache, Enterprise Link, or ICommand are selected)
Note:
To install multiple Plan Monitors for increased performance, see "Installing Multiple Plan Monitors" for more information.The installer prompts you to insert theOracle BAM CD 2 CD-ROM.
Once you insert the CD, the Oracle Universal Installer will start and install the Oracle Data Access Client (ODAC).
Notes:
If an ODAC is already installed prior to the Oracle Business Activity Monitoring installation, you must edit your system PATH variable so that the Oracle Business Activity Monitoring ODAC home (C:\OracleBAM\ClientForBAM\bin) appears before other Oracle home paths.If the ODAC installation fails you will see an error dialog indicating that you must fix errors logged in C:\OracleBAM\ClientForBAM\cfgtoollogs\oui, but you must check C:\program files\Oracle\Inventory\logs\installActiondate instead, since the former log location will not be present.
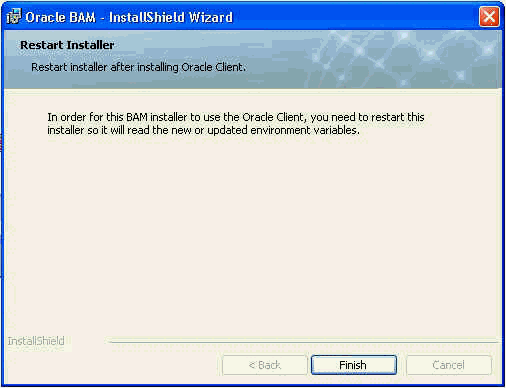
Once the ODAC installation is complete, click Finish, and restart the Oracle Business Activity Monitoring installer as instructed by running setup.exe from the Oracle BAM CD 1 CD-ROM.
On the Configure Windows Services step enter DOMAIN\user_name and the user password. See "Choosing a Windows Account for the Services" for more information.

Services installed on this host run as the domain user configured in this step.
Select whether you want the Oracle Business Activity Monitoring services to start automatically or manually, and click Next.
On the Configure location of Oracle BAM step, enter the host name or the IP address where each component is to be installed, even if it is not being installed at this time, then click Next.
If you configure IIS to run on a port other than 80 you can include the port number after the Web Applications host name. This will save you some postinstall configuration. For example:
server_name.domain:port_number

Fully qualified server names including domain name may be required depending on your organization's security policy settings.
On the Database Connect Information step, enter the following information, then click Next:
sys password. Enter the password for the Oracle sys account.
Hostname and Port. Enter the database host name and port number.
Service Name. Enter the database service name (default orcl). A domain suffix may be required on the database service name. To find the exact string you should use, start SQL*Plus and enter the command show parameter service_name.

On the Database User Creation step, enter the passwords for the Oracle Business Activity Monitoring and Enterprise Link database users, and click Next.

The orabam and orasagent user names are defaults, but you can change the user names in this step.
Note the account information in a safe location. You will enter the Enterprise Link database user information when you install Enterprise Link.
Click Install to begin installing the components.
If you chose to install Enterprise Link, the InstallShield wizard for Enterprise Link will start. Complete the Enterprise Link installation as described in "Installing Enterprise Link".
Once the installation is complete, click Finish, and click Yes if you are prompted to restart the computer.
Once the installation is complete, you must configure additional items before you can use Oracle Business Activity Monitoring applications and build reports. See "Postinstall Configuration" for information.
To install Enterprise Link:
Click Next when the Welcome screen appears.

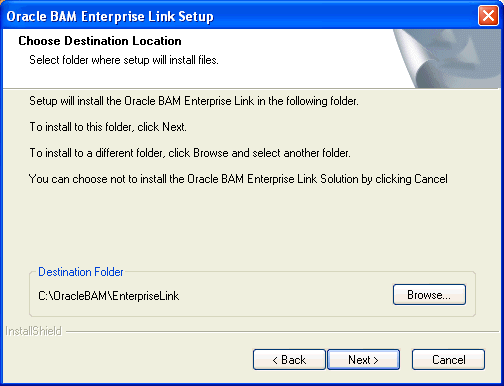
On the Choose Destination Location step, click Browse to select the destination folder for installation, and click Next.
On the Select Components step, select the check boxes to indicate which of the components to install, and click Next.

The following options are selected:
Server
Load Server
Designer/Administrator
Design Studio
Admin Tool
Help Files
Repository - Build or Upgrade
On the DFS Information step, enter the port number for the Data Flow Service and the name of the host where you want the Data Flow Service to run.

In most cases, you do not need to change the port number.
Select a communication protocol for connections between the clients and the Data Flow Service, and click Next.
The options include TCP/IP (default and recommended) or Named Pipes.
On the Enterprise Link Repository Information step, enter the following information in the fields, and click Next.
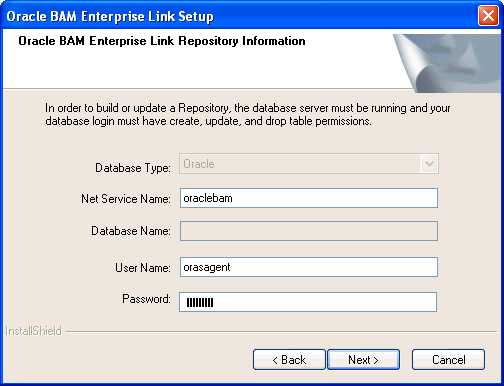
Net Service Name. Enter oraclebam (default). The net service name is created automatically during the Oracle Business Activity Monitoring setup.
User Name and Password. Enter the Enterprise Link database user account information (default orasagent) you configured in the Database User Creation step of the Oracle Business Activity Monitoring install wizard.
On the Build or Upgrade Repository step, indicate whether to build or upgrade a repository, and click Next.
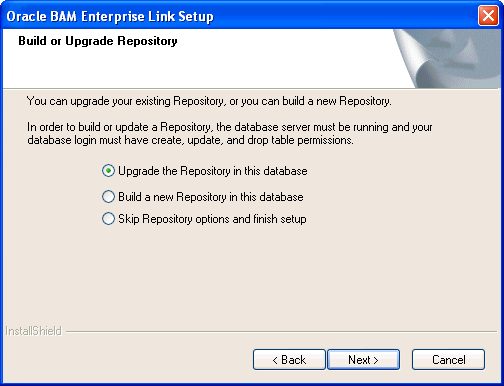
Your choices are:
Upgrade the Repository in this database. For upgrade installations only. To retain these definitions, upgrade your repository. Do not build a new repository. This option only appears if a repository is already created. If you choose this option be sure to leave the password field for the sa account blank in the next screen.
Build a new Repository in this database. Choose this option for new installations. This creates a new repository in the database specified in the Repository Information dialog.
Note:
Any existing repository data is lost, as building a new repository deletes all definitions stored in the current one.Skip Repository options and finish setup. This is an advanced feature. If you are unsure about it, do not select it.
On the Confirm Product Selection step, confirm the settings. To accept the settings, click Next. To make changes, click Back.
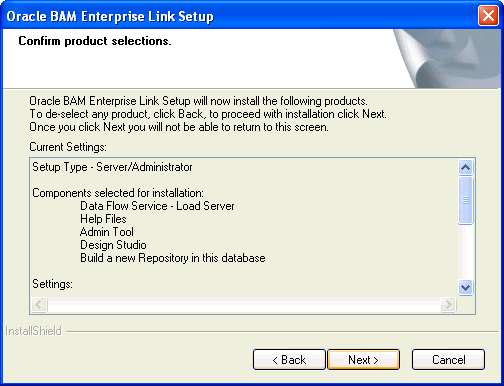
The Enterprise Link software is installed.
Click Finish when the installation is complete.
Return to the Oracle Business Activity Monitoring InstallShield Wizard and complete the Oracle Business Activity Monitoring install steps.
Once the Oracle Business Activity Monitoring software installation is complete, and the host has restarted, open the Service control panel and verify that the Oracle BAM Data Flow Service started.
If the Data Flow Service does not start, see the following sections in Chapter 4, "Troubleshooting":
Complete the instructions in the following sections once you are finished installing the Oracle Business Activity Monitoring software.
To run Oracle Business Activity Monitoring Suite on Microsoft Windows Server 2003 hosts, additional configuration must be completed. Follow the configuration order described in these instructions.
Go to the IIS Manager, expand the server name, and select Web Service Extensions.
Select the extension name ASP.NET 1.1 and check Set extension status to Allowed.
Select Active Server Pages, and click the Allow button.
Select Server Side Includes, and click the Allow button.
To complete the configuration and setup:
Before starting the applications, start all of the Oracle Business Activity Monitoring services. See "Starting the Services" for more information.
Ensure that the user account that is used for the Oracle BAM Data Flow Service is the same account used for the other services. Ensure that the World Wide Web Publishing service for the Web server is running.
Open the Enterprise Link Admin application (username SA, no password), and ensure that there is a repository user named BAM with no password that has all rights for creating Plans and viewing the Data Flow Editor.
The installation attempts to create this user automatically.
In Enterprise Link Admin, click the Servers tab.
Click Register New to register a server running the Data Flow Service. Enter the host name running the Data Flow Service and click Register. Make any necessary Data Flow configuration adjustments. See "Performance Configuration Settings" for additional details.
Start the Oracle Business Activity Monitoring Administrator application and configure the Message Center.
Open http://<host>:<http port>/oraclebam, where host is the name of a Web server, and click Administrator.
See "Starting the Web Applications" and "Configuring the Message Center in Administrator" for more information.
Start the Oracle Business Activity Monitoring Architect application and create Enterprise Message Sources and data objects.
See the Oracle Business Activity Monitoring Architect User's Guide for instructions.
Use Enterprise Link Design Studio to create and run Data Flow Plans that load Oracle Business Activity Monitoring data objects.
See the Oracle BAM Enterprise Link, Getting Started Guide; Oracle BAM Enterprise Link Design Studio User's Guide; and Oracle BAM Enterprise Link Transforms Reference Guide for instructions.
Before accessing the Oracle Business Activity Monitoring applications, you must start the Oracle Business Activity Monitoring services.
Before starting the services, ensure that you start the Oracle database service and the TNS Listener service.
To start the Oracle Business Activity Monitoring services in the proper order click the Start menu button on the Microsoft Windows task bar, and select All Programs > Oracle BAM > Start Oracle BAM.
If you must start the services individually from Control Panel > Services, start the services in the following order:
OracleTNSListener
OracleService (Database)
Oracle BAM Data Flow Service
Oracle BAM Active Data Cache Service
Oracle BAM Report Cache Service
Oracle BAM Event Engine Service
Oracle BAM Plan Monitor Service
To start the Web applications:
Go to http://<host>:<http port>/oraclebam, where host is the name of a Web server.
Click the buttons to start the applications: Active Viewer, Active Studio, Architect, and Administrator. Buttons are disabled if a user is not assigned a role that has access to that application.
Note:
Always use the start page to start Web applications. Do not start Web applications from a direct URL to the application. This ensures that caching works correctly. Also, do not uselocalhost in the URL instead of the host name.You must configure the Message Center and related accounts to enable e-mail alerting.
To configure the Message Center settings:
Open Administrator in Microsoft Internet Explorer.
Select Message Center management from the drop-down list.
Several entries are blank the first time you install the Oracle Business Activity Monitoring applications.
Click Edit.
Leave the Collaboration Server Name field empty.
The collaboration server is not supported.
Leave the default port number provided.
Enter the e-mail server host name in the SMTP Server Name field.
The e-mail server must have the capabilities to send e-mail to other SMTP servers that users specify in their Personalize settings.
Enter a valid e-mail account (that the SMTP server acknowledges) that is used by the Event Engine in the E-mail Account for Alerting field.
Click Save.
Restart the Event Engine service to make the changes effective.
Oracle Business Activity Monitoring users must have e-mail settings that work with the Message Center settings. Users can edit these settings on the Personalize tab in Active Studio.
To edit user settings:
Open Administrator in Microsoft Internet Explorer.
Select Login management from the drop-down list.
Click a user name and click Edit or click Create to create a new user.
Specify the settings for the user account to receive messages from the Message Center.
Click Save.
Clustering software can monitor an application running on one node and restart it on another node if a failure occurs. Nodes are computers that are part of a cluster, although the cluster appears as a single system to other computers outside the cluster. Shared disk storage is used by the clustering software to store the state of the cluster. This provides high availability of an application to users. Additional Microsoft software is required to enable clustering.
Before using clustering, a shared storage network must exist between all nodes in the cluster. There must be hard drives that all nodes can see, but only one can be accessed at a time. Once the nodes are arranged, ensure that you can see each hard disk from each node. After you install Microsoft Clustering Services, only one node can read and write those drives at a time. To use Active Data Cache clustering services, there must be a Cluster Name and Cluster IP Address resource associated with the cluster. You must install the Oracle Business Activity Monitoring Suite to the same location, for example, C:\OracleBAM, on each node in order to use clustering.
The Oracle Business Activity Monitoring data files must be installed to the shared storage network, rather than to an individual node's hard drive. This must be completed manually as described in the following instructions.
To install and enable the Active Data Cache Service with clustering services:
Run the installation with the Clustering Services option selected. This option is listed under the Active Data Cache option in the tree.
Ensure that the Active Data Cache Service is stopped before you perform the next step.
Run the following DOS command on any node, where install_path is the location where you installed Oracle Business Activity Monitoring Suite, for example, C:\OracleBAM. You only have to run this command on one of the nodes. It takes effect for every host in the cluster.
cluster.exe restype "Oracle Business Activity Monitoring Active Data Cache" /create /dll:"install_path\ADCClusterResourceType.dll"
Open the Cluster Administrator in the Administrative Tools section of the Windows Control Panel. Active Data Cache is listed under the section Resource Types.
After you choose your cluster group, usually the default name, Cluster Group, highlight it in the Cluster Administrator. Right-click and select New, and then select Resource from the submenu.
In the dialog, specify a name and description, and select Oracle BAM Active Data Cache in the Resource Type drop-down list.
Only check the Run this resource in a separate Resource Monitor check box if:
You installed the Active Data Cache Service to a production cluster
You want to ensure that failures in the Oracle Business Activity Monitoring clustering software do not affect your other clustered applications.
Click Next.
Choose the possible owner nodes for the Active Data Cache Service. In most cases, all nodes should be selected. Click Next.
Add the following dependencies: Cluster Name, Cluster IP Address, and the disk drive that contains the Active Data Cache files (for example, Disk E).
Click Finish.
Right-click the new resource and select Bring Online to start the Active Data Cache Service.
The Active Data Cache Service clustering software writes extensive information to the Windows cluster log, located in the Windows directory at \cluster\cluster.log. You can check this log file if the cluster appears to be failing, or to monitor the activity of the Oracle Business Activity Monitoring clustering software.