6 Extending the Functionality of the CA Top Secret Connector
The following optional procedures that you can perform to extend the functionality of the connector for addressing your business requirements can be divided into the following stages:
-
Removing Attributes Mapped for Target Resource Reconciliation
-
Adding Admin Multivalued Attributes for Provisioning and Reconciliation
-
Configuring the Connector for Provisioning to Multiple Installations of the Target System
-
Configuring the Generation of Single-Use Passwords for the Reset Password Operation
Adding Custom Fields for Target Resource Reconciliation
Note:
You must ensure that new attributes you add for reconciliation contain only string-format data. Binary attributes must not be brought into Oracle Identity Manager natively.
By default, the attributes listed in Table 1-4 are mapped for reconciliation between Oracle Identity Manager and the target system. If required, you can add new attributes for target resource reconciliation.
To add a custom field for reconciliation, you must first update the connector reconciliation component you are using, and then update Oracle Identity Manager. This section discusses the following topics:
Adding Custom Fields for Full Reconciliation for CA Top Secret Connector
You can add custom fields for full reconciliation by specifying a value for the SingleValueAttributes attribute of the Top Secret Reconcile All Users scheduled task. See Performing Full Reconciliation for more information.
To add a custom field for scheduled task reconciliation:
-
Log in to Oracle Identity System Administration.
-
In the left pane, under System Management, click Scheduler.
-
Search for and open the Top Secret Reconcile All Users scheduled task as follows:
-
In the left pane, in the Search field, enter
Top Secret Reconcile All Usersas the search criterion. Alternatively, you can click Advanced Search and specify the search criterion. -
In the search results table on the left pane, click the scheduled job in the Job Name column.
-
-
Add the custom field to the list of attributes in the
SingleValueAttributesscheduled task attribute. -
Click Apply.
Adding Custom Fields to Oracle Identity Manager
After adding the custom field to either the VOYAGER_ID.properties file (if using real-time reconciliation) or the Top Secret Reconcile All users scheduled task (if using scheduled task reconciliation), you must add the custom field to the Oracle Identity Manager components.
To update Oracle Identity Manager with the custom field:
-
Log in to the Oracle Identity Manager Design Console.
-
Add the custom field to the list of reconciliation fields in the resource object as follows:
-
Expand Resource Management and then double-click Resource Objects.
-
Search for and open the OIMTopSecretResourceObject resource object.
-
On the Object Reconciliation tab, click Add Field.
-
In the Add Reconciliation Field dialog box, enter the details of the field.
For example, if you are adding a Top Secret attribute called "Description", then enter
Descriptionin the Field Name field and select String from the Field Type list. -
Click Save and close the dialog box.
-
Click Create Reconciliation Profile. This copies changes made to the resource object into MDS.
-
Click Save.
-
-
Add the custom field on the process form as follows:
-
Expand Development Tools and then double-click Form Designer.
-
Search for and open the UD_IDF_TOPS process form.
-
Click Create New Version, and then click Add.
-
Enter the details of the field.
For example, if you are adding the Description field, then enter
UD_IDF_TOPS_DESCRIPTIONin the Name field, and then enter the rest of the details of this field. -
Click Save and then click Make Version Active.
-
-
Create a reconciliation field mapping for the custom field in the provisioning process as follows:
-
Expand Process Management and then double-click Process Definition.
-
Search for and open the OIMTopsProvisioningProcess process definition.
-
On the Reconciliation Field Mappings tab of the provisioning process, click Add Field Map.
-
In the Add Reconciliation Field Mapping dialog box, from the Field Name field, select the value for the field that you want to add.For example, from the Field Name field, select Description.
-
Double-click the Process Data field, and then select UD_IDF_TOPS_DESCRIPTION.
-
Click Save and close the dialog box.
-
Click Save.
-
-
If you are using Oracle Identity Manager release 11.1.2.x, then create a new UI form and attach it to the application instance to make this new attribute visible. See Creating a New UI Form and Updating an Existing Application Instance with a New Form for the procedures.
-
If you are adding a custom attribute or custom dataset, then set values for the _configAttrs_, _configDNames and _configDatasets_ properties in the tops.properties file.
Adding Custom Multivalued Fields for Reconciliation
To add a custom multivalued field to reconciliation, you must first update the IDF reconciliation component you are using, and then update Oracle Identity Manager.
Adding Custom Multivalued Fields for Full Reconciliation
You can add custom multivalued fields for full reconciliation by specifying a value for the multiValuedAttributes property of the Top Secret Reconcile All Users reconciliation scheduled task. See Top Secret Reconcile All Users for more information.
To add a custom field for scheduled task reconciliation:
-
Log in to Oracle Identity System Administration.
-
In the left pane, under System Management, click Scheduler.
-
Search for and open the Top Secret Reconcile All Users as follows:
-
On the left pane, in the Search field, enter Top Secret Reconcile All Users as the search criterion. Alternatively, you can click Advanced Search and specify the search criterion.
-
In the search results table on the left pane, click the scheduled job in the Job Name column.
-
-
Add the custom field to the list of attributes in the
MultiValuedAttributes property. -
Click Apply.
Adding Custom Multivalued Fields to Oracle Identity Manager for CA Top Secret Connector
After adding the custom multivalued field to either the VOYAGER_ID.properties file (if using real-time reconciliation) or the Top Secret Reconcile All users scheduled task (if using scheduled task reconciliation), you must add the custom multivalued field to the Oracle Identity Manager components.To update Oracle Identity Manager with the multivalued field:
-
Log in to the Oracle Identity Manager Design Console.
-
Create a form for the multivalued field as follows:
-
Expand Development Tools and double-click Form Designer.
-
Create a form by specifying a table name and description, and then click Save.
-
Click Add and enter the details of the field.
-
Click Save and then click Make Version Active. Figure 6-1 shows the multivalued field added on a new form.
Figure 6-1 Multivalued Field Added on a New Form for CA Top Secret Connector
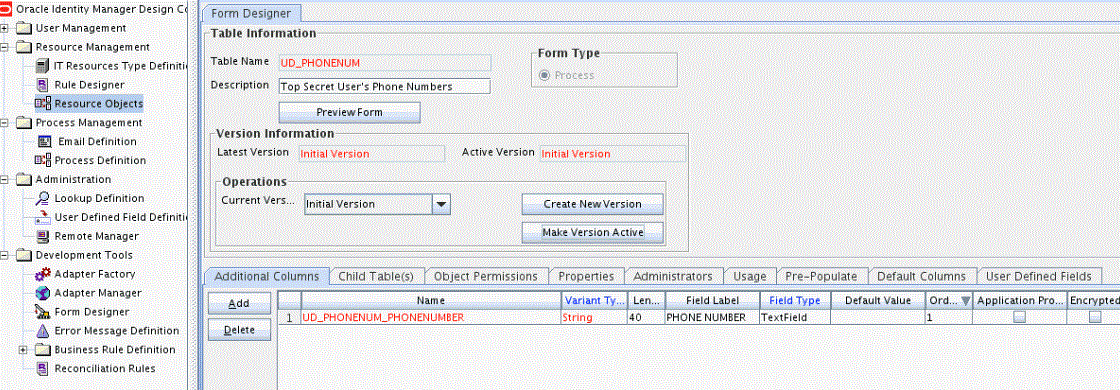
Description of "Figure 6-1 Multivalued Field Added on a New Form for CA Top Secret Connector"
-
-
Add the form created for the multivalued field as a child form of the process form as follows:
-
Search for and open the UD_IDF_TOPS process form.
-
Click Create New Version.
-
Click the Child Table(s) tab.
-
Click Assign.
-
In the Assign Child Tables dialog box, select the newly created child form, click the right arrow, and then click OK.
-
Click Save and then click Make Version Active. Figure 6-2 shows the child form added to the process form.
Figure 6-2 Child Form Added to the Process Form for CA Top Secret Connector
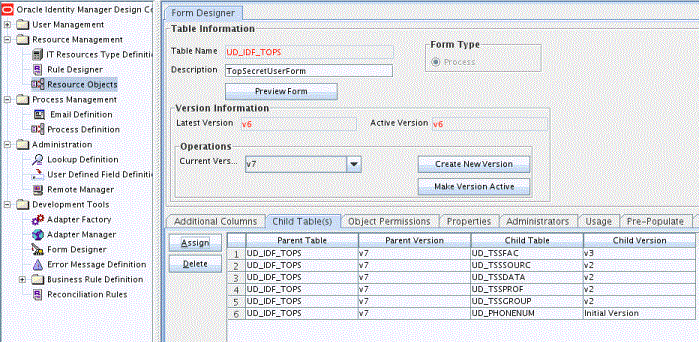
Description of "Figure 6-2 Child Form Added to the Process Form for CA Top Secret Connector"
-
-
Add the new multivalued field to the list of reconciliation fields in the resource object as follows:
-
Expand Resource Management and then double-click Resource Objects.
-
Search for and open the OIMTopsResourceObject resource object.
-
On the Object Reconciliation tab, click Add Field.
-
In the Add Reconciliation Field dialog box, enter the details of the field.
For example, enter
phoneNumberin the Field Name field and select Multi-Valued Attribute from the Field Type list. -
Click Save and close the dialog box.
-
Right-click the newly created field and select Define Property Fields.
-
In the Add Reconciliation Fields dialog box, enter the details of the newly created field.
For example, enter
phonenumberin the Field Name field and select String from the Field Type list. -
Click Save and then close the dialog box. Figure 6-3 shows the new reconciliation field added in the resource object.
Figure 6-3 New Reconciliation Field Added in the Resource Object for CA Top Secret Connector
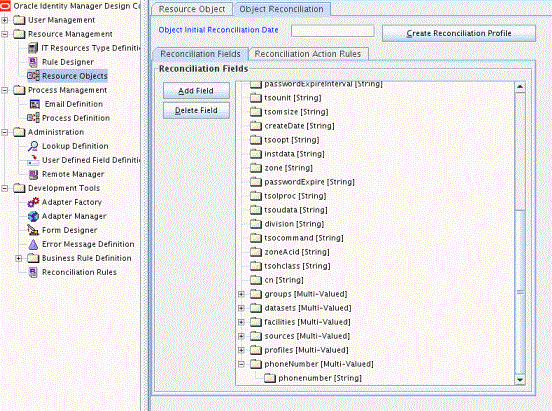
Description of "Figure 6-3 New Reconciliation Field Added in the Resource Object for CA Top Secret Connector" -
Click Create Reconciliation Profile. This copies changes made to the resource object into MDS.
-
-
Create an entry for the field in the
AtMap.Topslookup definition, as follows:-
Expand Administration and then double-click Lookup Definition.
-
Search for the AtMap.TOPS lookup definition.
-
Click Add and enter the Code Key and decode values for the field. The Code Key value is the name of the process form field that you created for the multivalued custom field in Step 3.3.d. The Decode value is the name of the target system field.
For example, enter
UD_PHONENUM_PHONENUMBERin the Code Key field and then enterphonenumberin the Decode field. Figure 6-4 shows the lookup code added to the lookup definition.Figure 6-4 Entry Added in the Lookup Definition for CA Top Secret Connector
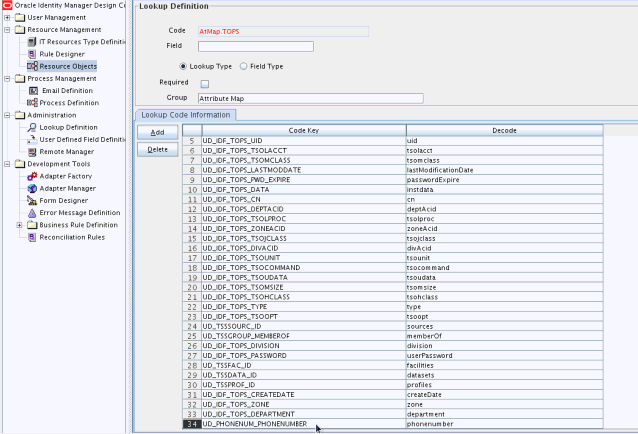
Description of "Figure 6-4 Entry Added in the Lookup Definition for CA Top Secret Connector" -
Click Save.
-
-
Create a reconciliation field mapping for the new multivalued field as follows:
-
Expand Process Management and then double-click Process Definition.
-
Search for and open the OIMTopsProvisioningProcess process definition.
-
On the Reconciliation Field Mappings tab of the provisioning process, click Add Table Map.
-
In the Add Reconciliation Table Mapping dialog box, select the field name and table name from the list, click Save, and then close the dialog box.
-
Right-click the newly created field and select Define Property Field Map.
-
In the Field Name field, select the value for the field that you want to add.
-
Double-click the Process Data field, and then select UD_PHONENUM_PHONENUMBER.
-
Select Key Field for Reconciliation Field Matching and click Save. Figure 6-5 shows the new reconciliation field mapped to a process data field in the process definition.
Figure 6-5 New Reconciliation Field Mapped to a Process Data Field for CA Top Secret Connector
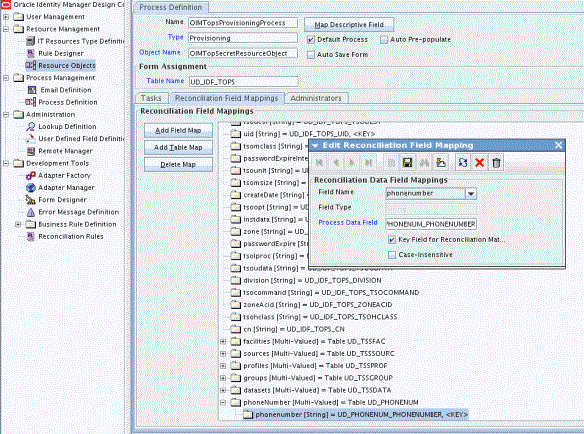
Description of "Figure 6-5 New Reconciliation Field Mapped to a Process Data Field for CA Top Secret Connector"
-
Adding Custom Fields for Provisioning
By default, the attributes listed in Table 1-4 are mapped for provisioning between Oracle Identity Manager and the target system. If required, you can map additional attributes for provisioning.
The connector does not support the use of custom attributes in CREATE USER operations that is, TSS CREATE. Instead, custom attribute modifications should be sent in an MODIFY USER operation that is, TSS ADDTO/REPLACE/REMOVE after the user has been provisioned a resource.
To add a new attribute for provisioning:
-
Log in to the Oracle Identity Manager Design Console.
-
Add the new attribute on the process form as follows:
If you have added the field on the process form by performing Step 4 of Adding Custom Fields to Oracle Identity Manager, then you need not add the field again. If you have not added the field, then:
-
Expand Development Tools.
-
Double-click Form Designer.
-
Search for and open the UD_IDF_TOPS process form.
-
Click Create New Version, and then click Add.
-
Enter the details of the attribute.
For example, if you are adding the Description field, enter UD_IDF_TOPS_DESCRIPTION in the Name field, and then enter the rest of the details of this field.
-
Click Save and then click Make Version Active.
Note:
OMVS and NETVIEW attributes must not be added to the AtMap.TOPS lookup definition as they are not supported for create provisioning operations.
-
-
To enable update of the attribute during provisioning operations, create a process task as follows:
-
Expand Process Management, and double-click Process Definition.
-
Search for and open the OIMTopsProvisioningProcess process definition.
-
Click Add.
-
On the General tab of the Creating New Task dialog box, enter a name and description for the task and then select the following:
Conditional
Required for Completion
Disable Manual Insert
Allow Cancellation while Pending
Allow Multiple Instances
-
Click Save.
-
Go to the Integration tab and click Add.
-
In the Handler Selection dialog box, select Adapter, click adpMODIFYTOPSUSER, and then click the Save icon.
The list of adapter variables is displayed on the Integration tab.
-
To create the mapping for the first adapter variable:
Double-click the number of the first row.
In the Edit Data Mapping for Variable dialog box, enter the following values:
Variable Name:
Adapter return valueData Type:
ObjectMap To:
Response codeClick the Save icon.
-
To create mappings for the remaining adapter variables, use the data given in the following table:
Table 6-1 Values for the Variables, Map To, Qualifier, and Literal Value lists for each variable
Variable Number Variable Name Map To Qualifier Second
idfResource
Process Data
LDAP_SERVER
Third
uid
Process Data
LoginId
Fourth
attrName
String Literal
Enter the LDAP attribute name in the Literal Value field.
Example: description
Table 1-5 for a list of unmapped user attributes and their LDAP Gateway attribute names.
Fifth
attrValue
Process Data
Select the process form field from the drop-down list.Example: DESCRIPTION
-
On the Responses task, click Add to add at least the SUCCESS response code, with status C. This ensures that if the custom task is successfully run, then the status of task is displayed as Completed in Oracle Identity Manager.
-
Click the Save icon in the Editing Task dialog box, and then close the dialog box.
-
Click the Save icon to save changes to the process definition.
-
-
Create a new UI form and attach it to the application instance to make this new attribute visible. See Creating a New UI Form and Section Updating an Existing Application Instance with a New Form for the procedures.
Removing Attributes Mapped for Target Resource Reconciliation
The reconAttrs property contains the list of target system attributes that are mapped for real-time reconciliation. This property is found in the VOYAGER_ID.properties file. If you want to remove an attribute mapped for real-time reconciliation, then remove it from the reconAttrs property.
The SingleValueAttributes and MultiValuedAttributes properties contain the list of target system attributes that are mapped for scheduled task reconciliation. These properties are found in the Top Secret Reconcile All Users and Top Secret Reconcile All LDAP Users scheduled tasks. If you want to remove an attribute mapped for scheduled task reconciliation, then remove it from the SingleValueAttributes or MultiValuedAttributes property.
Adding Admin Multivalued Attributes for Provisioning and Reconciliation
To manage fine grained-administrative privileges to a user from Oracle Identity Manager, you can add Admin attributes for provisioning and reconciliation.
Configuring the Connector for Provisioning to Multiple Installations of the Target System
You can configure the connector for multiple installations of the target system. You can also configure the connector for a scenario in which multiple logical partitions (LPARs), which are not associated with the first LPAR, are configured in the target system.
For each installation of the target system, you create an IT resource and configure an additional instance of the LDAP Gateway.
To configure the connector for the second installation of the target system:
Note:
Perform the same procedure for all installations of the target system.
-
Create an IT resource based on the OIMLDAPGatewayResourceType IT resource type.
-
Copy the current LDAP_INSTALL_DIR directory, including all the subdirectories, to a new location on the Oracle Identity Manager computer.
Note:
In the remaining steps of this procedure, LDAP_INSTALL_DIR refers to the newly copied directory.
-
Extract the contents of the LDAP_INSTALL_DIR/dist/idfserver.jar file.
-
In the beans.xml file, change the value of the port in the <property name="port" value="xxxx"/> line to specify a port that is different from the port used for the first instance of the LDAP Gateway. The default port number is shown in the following example:
<bean id="listener" class="com.identityforge.idfserver.nio.Listener">
<constructor-arg><ref bean="bus"/></constructor-arg>
<property name="admin"><value>false</value></property>
<property name="config"><value>../conf/listener.xml</value></property>
<property name="port" value="5389"/>
</bean>
When you change the port number, you must make the same change in the value of the idfServerPort parameter of the IT resource that you create by performing Step 1.
-
Save and close the beans.xml file.
-
Open the LDAP_INSTALL_DIR/conf/tops.properties file and set values for the following parameters:
-
_host_= Enter the IP address or host name of the mainframe.
-
_port_= Enter the port number for the second instance of the Provisioning agent.
-
_agentPort_= Enter the port number for the second instance of the Reconciliation agent.
Note:
The value of the _agentPort_ parameter must not be the same as that of the first instance if a second LPAR, which is not associated with the first LPAR, is configured in the target system. This value can be the same as the value of the idfServerPort parameter if you have two mainframe servers with CA Top Secret running on each server.
-
-
Save and close the tops.properties file.
-
Delete the LDAP_INSTALL_DIR/etc/VOYAGER_ID.properties file.
-
In a Linux or Solaris environment, if there are not enough socket file descriptors to open up all the ports needed for the server, then:
-
In a text editor, open the run script from the LDAP_INSTALL_DIR/bin directory.
-
Add the following line in the file:
-Djava.nio.channels.spi.SelectorProvider=sun.nio.ch.PollSelectorProvider
-
Save and close the file.
-
Note:
When you perform provisioning in Identity Self Service, you can specify the IT resource corresponding to the CA Top Secret installation to which you want to provision the user.
Configuring the Generation of Single-Use Passwords for the Reset Password Operation
You can create and configure an adapter that generates single-use passwords when the Reset Password operation is performed.
To create the adapter:
Customizing Log File Locations
The name and log locations of the main LDAP gateway log file (idfserver.log) and the CFILE XML error log file (idf.xml.error.log) can be modified by adding additional arguments to the LDAP gateway server STARTUP command. These arguments are optional, and you can include one, both, or neither in the STARTUP command.
Handling Pioneer Error Messaging Exceptions in the Gateway
The error handling routines let you configure what error messages to look for when deciding that a request sent to Pioneer has succeeded or failed. Use these instructions to configure error handling.
Enable or Disable the Ability to Examine the Pioneer SAF Code
Some commands will return SAF codes whenever a command fails.
check-return-codes property to the tops.properties file (created in Setting Connection Properties) and set its value to yes.
Note:
Warning codes may also show up as codes greater than 0 depending on the type of mainframe environment that you are using. Ensure to check for false positives with testing before determining whether this is an appropriate capability to turn on before deploying to a production environment.Configuring Custom Error Messages
Many commands will require parsing out the return value looking for error messages. The error handling has been expanded to include a configuration file that allows for extending the set of error messages you might encounter.
Each error message which is being searched, is defined as a regex signature.
The Topsecret connector comes with a default signatures file, errorMsgSignatures.xml, that you can extract from within the LDAP_INSTALL_DIR/dist/idfserver.jar compilation file. The errorMsgSignatures.xml file is located in the com/identityforge/idfserver/backend/tops/repository/ directory of the idfserver.jar compilation file.
You can add, overwrite, or disable the defaults in favor of custom messages.
To do so, in the LDAP_INSTALL_DIR/conf directory, create a new XML file representing the messages to add, replace, or disable. For example, create a new XML file LDAP_INSTALL_DIR/conf/custom-tops-error-sig-file.xml and add your custom messages. Then, in the LDAP_INSTALL_DIR/conf/tops.properties file, add a reference to the newly created XML file by setting a value for the errormsg-sig-file property. For example:
errormsg-sig-file=../conf/custom-tops-error-sig-file.xml
Restart the LDAP gateway for the changes to take effect. At runtime, the contents of the custom signature file are merged into the default signatures file and the overrides or additions will be applied.
The following are examples of custom signatures:
Example 1: Suppose you create a new XML file LDAP_INSTALL_DIR/conf/custom-tops-error-sig-file.xml in the LDAP_INSTALL_DIR/conf directory with the following entries:
<?xml version="1.0" encoding="utf-8"?>
<Signatures>
    <Signature id="custom1" regex="^C4R541E .*" enabled="yes"/>
    <Signature id="custom2" regex="^ICH02005I .*" enabled="yes"/>
    <Signature id="custom3" regex="^IKJ56701I .*" enabled="yes"/>
</Signatures>
In this example, the first signature looks for C4R541E located at the beginning of the returned message from Pioneer. If found, it would get flagged as an error and the message returned.
The second signature looks for ICH02005I located at the beginning of the returned message from Pioneer. If found, it would get flagged as an error and the message returned. Modify as needed for example, signature 3 regex="^IKJ56701I .* to indicate. If found, it would get flagged as an error and the message returned.
In the preceding example, the enabled="yes" entry implies that the messages defined in the regex patterns must not be considered as errors.
LDAP_INSTALL_DIR/conf/custom-tops-error-sig-file.xml in the LDAP_INSTALL_DIR/conf directory with the following entries:
<?xml version="1.0" encoding="utf-8"?>
<Signatures>
    <Signature id="custom1" regex="^ICH\d{5}I .*" enabled="yes">
        <Exception regex="^ICH01432I .*"/>
        <Exception regex="^ICH05555I .*"/>
        <Exception regex="^ICH01024I .*"/>
    </Signature>
    <Signature id="custom2" regex=".*INVALID DEPARTMENT.*" enabled="yes"/>
    <Signature id="e2" enabled="no"/>
</Signatures>
In this example, the first signature looks for the ICHxxxxxxI pattern located at the beginning of the returned message from Pioneer. If found, it then examines the exceptions defined. If the message begins with ICH01432I or ICH05555I, then it is marked as a warning and ignored. Otherwise, it is flagged as an error and the message returned.
The second signature looks for INVALID DEPARTMENT to show up anywhere in the returned message. If found, then it is flagged as an error and the message returned.
The third signature is an example of disabling an existing default signature. All default signatures start with e in the id attribute followed by a number. By referencing the id, the default signature's regex, enablement flag, and or exceptions can be replaced with a custom override. The enabled="yes" entry implies that the messages defined in the regex patterns must not be considered as errors.
At any given point in time, locate and open the errorMsgSignatures.xml file to obtain the list of default signatures currently deployed.
Note:
Given that according to the CA Top Secret manual, "I" type messages are technically classified as informational and not error related, you need to make sure that it truly is a failure on the mainframe rather than something whereby the account gets created and Oracle Identity Manager considers it failed. We explicitly called out this SAF code as a warning as that is what the original implementation was doing.