| Oracle® Retail Back Office User Guide Release 14.1 E54470-01 |
|


 Previous |
 Next |
Store Operations provides communication and activity between Oracle Retail Back Office and Point-of-Service and enables you to perform daily functions associated with store opening and closing and register and till maintenance. The operations performed in Back Office affect the status of the store as well as the registers and tills at Point-of-Service. For more information on daily operations at Point-of-Service, see the Oracle Retail Point-of-Service User Guide.
The following topics are discussed in this chapter:
Some of the functions performed during opening and closing stores is determined by the values assigned to parameters and system settings. For information on setting parameters, see "Parameter Maintenance" in Chapter 7. For information on the available parameters and system settings, see the Oracle Retail POS Suite Configuration Guide.
Opening the store includes defining the business date, setting the opening cash fund for the day, opening registers, and opening tills. The store must be open in order for the store employees to perform transactions.
|
Note: Registers and tills may be opened at any point during the day. |
The Start of Day function must be performed before registers and tills can be opened.
To run Start of Day:
Click the Store Ops tab.
Click the Store subtab.
Click the Start of Day left navigation link.
|
Note: If the store is already open, you are not allowed to run the start of day operation. |
Enter the new business date and click Next. The Operating Fund Count screen is displayed. See "Counting Operating Funds". Once the system accepts the amount, the store is successfully opened and you can continue with other store operations.
On the Operating Fund Count screen, you enter the amount of the store operating fund for the start or end of the business day. To enter the count:
Enter the cash amount of the store operating fund.
To enter the amount for the start of the business day:
If the Count Operating Funds at Start of Day parameter is set to No, you are not asked to enter an amount.
If the Count Operating Funds at Start of Day parameter is set to Summary, enter an amount.
If the Count Operating Funds at Start of Day parameter is set to Detail, enter an amount for each type of currency and click Refresh Total.
To enter the amount for the end of the business day:
If the Count Operating Funds at End of Day parameter is set to No, you are not asked to enter an amount.
If the Count Operating Funds at End of Day parameter is set to Summary, enter an amount.
If the Count Operating Funds at End of Day parameter is set to Detail, enter an amount for each type of currency and click Refresh Total.
Click Next.
If the cash amount is not what the system expects, a Count Error Notice is displayed. To accept the amount, click Yes. To enter the count again, click No.
Otherwise, opening or closing the store can continue.
A register must be opened before a till can be assigned to it. Registers can be opened at any time during the day.
To open registers:
Click the Store Ops tab.
Click the Register subtab.
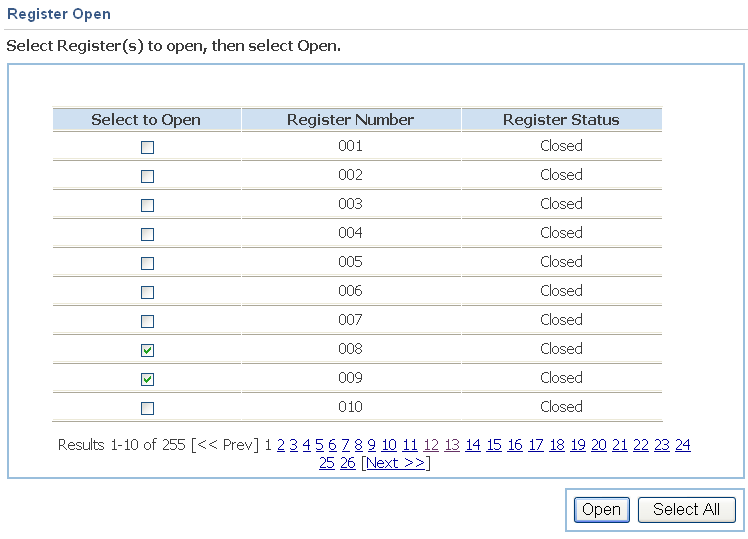
Click the Open Registers left navigation link. The Register Open screen is displayed. For each register, the register number and current status of the register are displayed.
Select the registers to open by selecting the check box next to each register number or click Select All to select all the registers shown on the screen.
|
Note: When you click Open, only the registers that are selected on the currently displayed page are opened. If you select registers on the screen and then click a page number to display another set of registers, any selections on the previously displayed page are cleared. |
To open the selected registers, click Open. The register status changes to Open.
To view more registers, click a page number link at the bottom of the screen. Then to open more registers, repeat Steps 4 and 5.
A register must be open before the till can be opened. Tills can be opened in Oracle Retail Back Office or Point-of-Service.
To open a till in Oracle Retail Back Office:
Click the Store Ops tab.
Click the Till subtab.
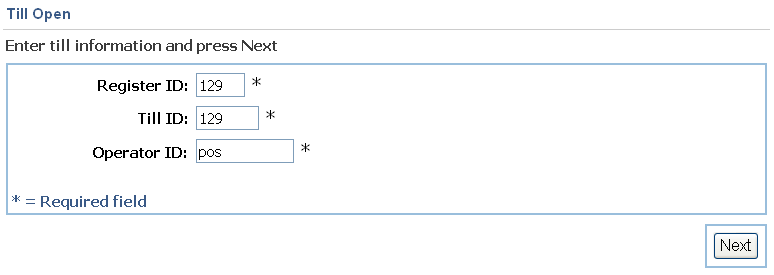
Click the Open Till left navigation link. The Till Open Screen is displayed.
Enter the register ID, till ID, and operator ID for the till to be opened.
Click Next. Depending on the Count Float at Open parameter, a currency count may be required.
If the setting is No, you are not asked for a currency count.
If the setting is Summary, the Summary Float Count screen is displayed. Enter the float amount and click Next.
If the setting is Detail, the Detail Currency Count screen is displayed. Enter the amount for each currency and click Next. For more information, see "Setting the Detail Currency Count".
If the count was done and the amount is not what the system expects, a Count Error Message is displayed. To accept the amount, click Yes. To re-enter the amount, click No.
The Till Function Successful screen is displayed. Click Enter. The till is opened.
The store should be closed at the end of every workday. Store financials are closed for the day and are then reset when the store is next opened. To close the store, all registers must be closed and all tills reconciled.
At the completion of reconciling tills, closing registers, and end of day processing, reports are displayed that document the counts made at each of those points. The reports can be printed or exported. For more information on printing and exporting reports, see Chapter 3.
Reconciling a till means counting the funds in a specific till and comparing the count with the expected amount. A till can be reconciled at any time during the day. By default, a till can only be reconciled in Oracle Retail Back Office. For information on reconciling tills in Oracle Retail Point-of-Service, see the Oracle Retail Point-of-Service User Guide.
Tills must be closed in Oracle Retail Point-of-Service before they can be reconciled. Refer to the Oracle Retail Point-of-Service User Guide for information on closing tills.
To reconcile a till:
Click the Store Ops tab.
Click the Till subtab.
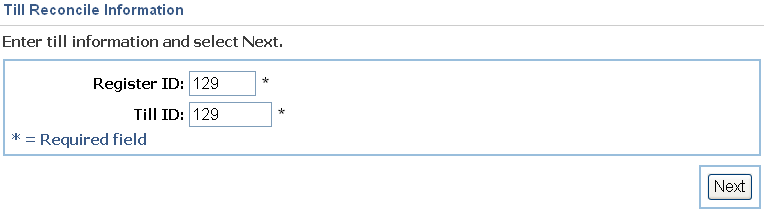
Click the Reconcile Till left navigation link. The Till Reconcile Information screen is displayed.
Enter the register ID and till ID in the given fields.
|
Note: You are prompted if the till is not yet closed or if the till has already been reconciled. |
Click Next. Depending on the setting for the Count Float at Reconcile parameter, do one of the following:
If the setting is No, you are not asked for a currency count.
If the setting is Summary, the Summary Float Count screen is displayed. Enter the float amount and click Next.
If the setting is Detail, the Detail Currency Count screen is displayed. Enter the amount for each currency and click Next. See "Setting the Detail Currency Count".
If the count was done and the amount is not what the system expects, a Count Error Notice message is displayed. To accept the amount, click Yes. To re-enter the amount, click No.
Click Next. Depending on the setting for the Count Till at Reconcile parameter, do one of the following:
If the setting is No, you are not asked for a currency count.
If the setting is Summary, the Count Reconcile Summary screen is displayed.
If the setting is Detail, the Count Reconcile Detail screen is displayed.
For more information on these screens, see "Setting the Detail Till Count".
If the count was done and the amount is not what the system expects, a Count Error Notice message is displayed. To accept the amount, click Yes. To re-enter the amount, click No.
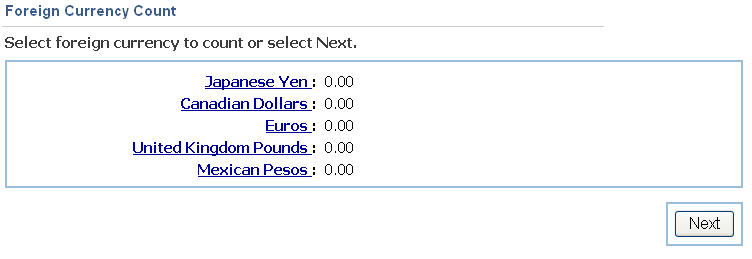
If the system is configured for foreign currency, the Foreign Currency Count screen is displayed. See "Setting the Foreign Currency Count".
If the system accepts the till count, the Till Reconcile Successful message is displayed. A transaction number is assigned to the till reconcile and the till data is saved.
Reports are displayed that can be printed or exported:
For the reports dependent on the Count Float at Reconcile and Count Till at Reconcile parameters, see "Till Reports".
The Till Summary Report is also displayed. For an example, see Appendix A.
The Summary Float Count screen is used to enter the float amount under the following conditions:
When a till is being opened and the Count Float at Open parameter is set to Summary.
When a till is being reconciled and the Count Float At Reconcile parameter is set to Summary.
You enter the float amount and click Next.
The Foreign Currency Count screen is used to enter a count of foreign currency during a bank deposit or till reconcile. It is only displayed if any transactions were tendered using foreign currency.
To set the foreign currency count:
Click the link for the foreign currency to be counted.
The Count Reconcile Detail screen for the selected currency is displayed. See "Setting the Detail Till Count".
When you are done counting foreign currency, click Next.
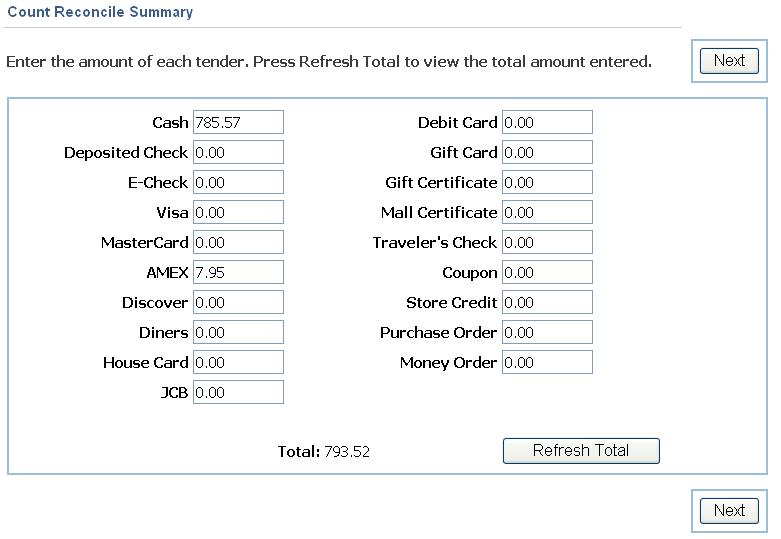
The Count Reconcile Summary screen is used to enter the count for each tender when the Count Till at Reconcile parameter is set to Summary.
Enter an amount for each type of tender. To see an updated total, click Refresh Total. When you have finished entering amounts, click Next.
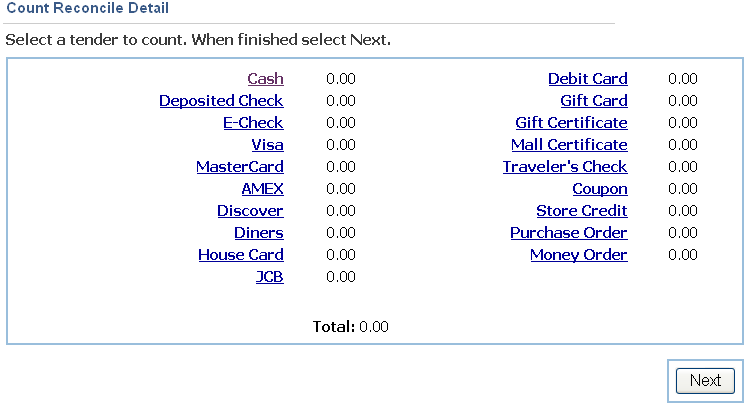
The Count Reconcile Detail screen is used to enter a detailed count for each tender when the Count Till at Reconcile parameter is set to Detail.
To count a tender, click the link for the tender. If cash is selected, the Detail Currency Count screen is displayed. See "Setting the Detail Currency Count". For any other type of tender, a detail screen is displayed. See "Setting the Tender Detail". When you have entered all the counts, click Next.
Closing a register means setting that register status to Closed when the register is not in use. All tills at a register must be reconciled before that register can be closed. Registers must be closed one at a time.
To close registers:
Click the Store Ops tab.
Click the Register subtab.
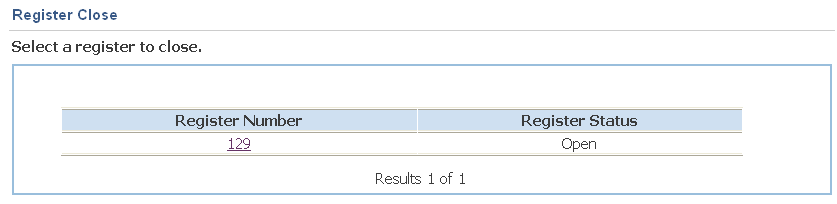
Click the Close Registers left navigation link. The Register Close screen is displayed.
|
Note: If all registers are closed, the Register Close screen displays Results 0-0 of 0. |
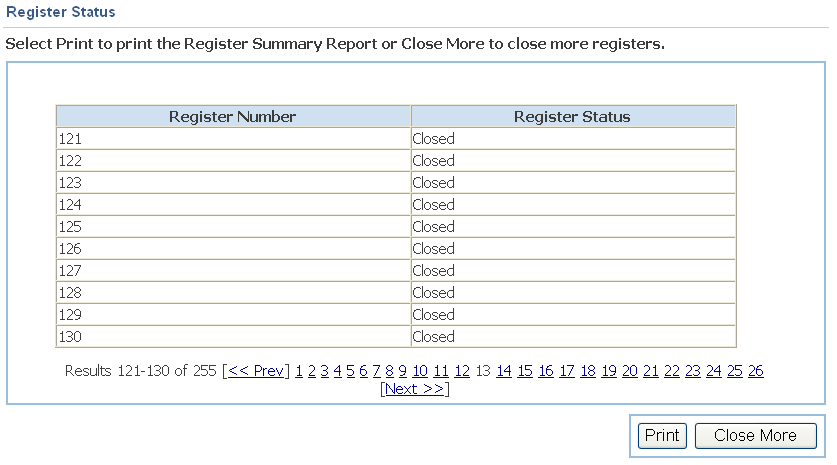
To close the register, click the register number link. The Register Status screen is displayed. See "Checking the Register Status".
The Register Status screen shows the list of registers selected to be closed and the status of each register.
To print this Register Summary report, click Print. To close another register, click Close More.
The End of Day function closes the store for the day and sets the store's financial status for the current business date. After End of Day is run, no more financial transactions can be performed for that business date. All registers must be closed before you can run the End of Day function and close the store. If one or more registers are open, a message prompts you to close all registers before End of Day can run successfully.
To run End of Day:
Click the Store Ops tab.
Click the Store subtab.
Click the End of Day left navigation link.
If suspended transactions exist, you can cancel or complete those transactions. The Suspended Transaction report is displayed. See "Suspended Transactions Report".
The Operating Fund Count screen is displayed. See "Counting Operating Funds".
The system displays the Store financial totals summary collected from Oracle Retail Point-of-Service. The summary includes amounts for starting float, ending float, till loans, and till pickups.
To accept the end of day summary, click Next. The store is successfully closed.
To view the Store Summary report, click Enter. For an example, see Appendix A. The report can be printed or exported. To return to the Start of Day screen, click Done.
The following type of reports are available when closing the store:
Summary Reports
For information on summary reports, see Appendix A.
Reports can be printed or exported. For information on printing and exporting reports, see Chapter 3.
|
Note: Reports are not displayed in the default locale for the application. Dates are displayed in MM/DD/YYYY format. Time is displayed in HH:MM format. |
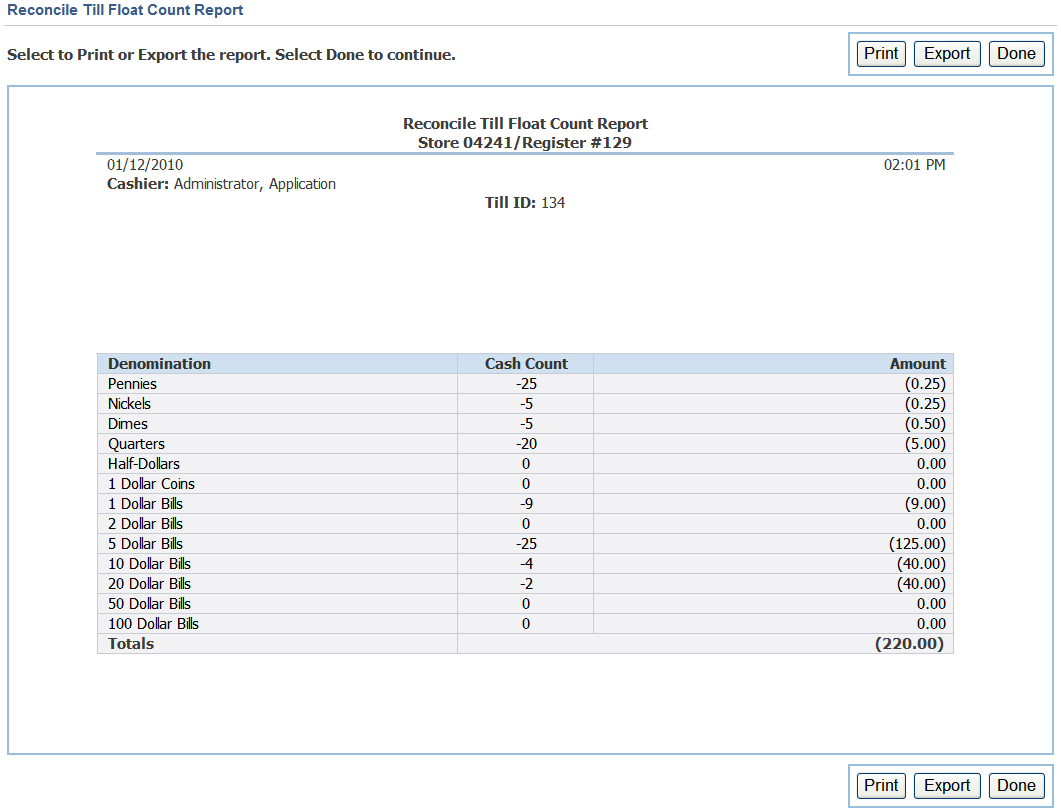
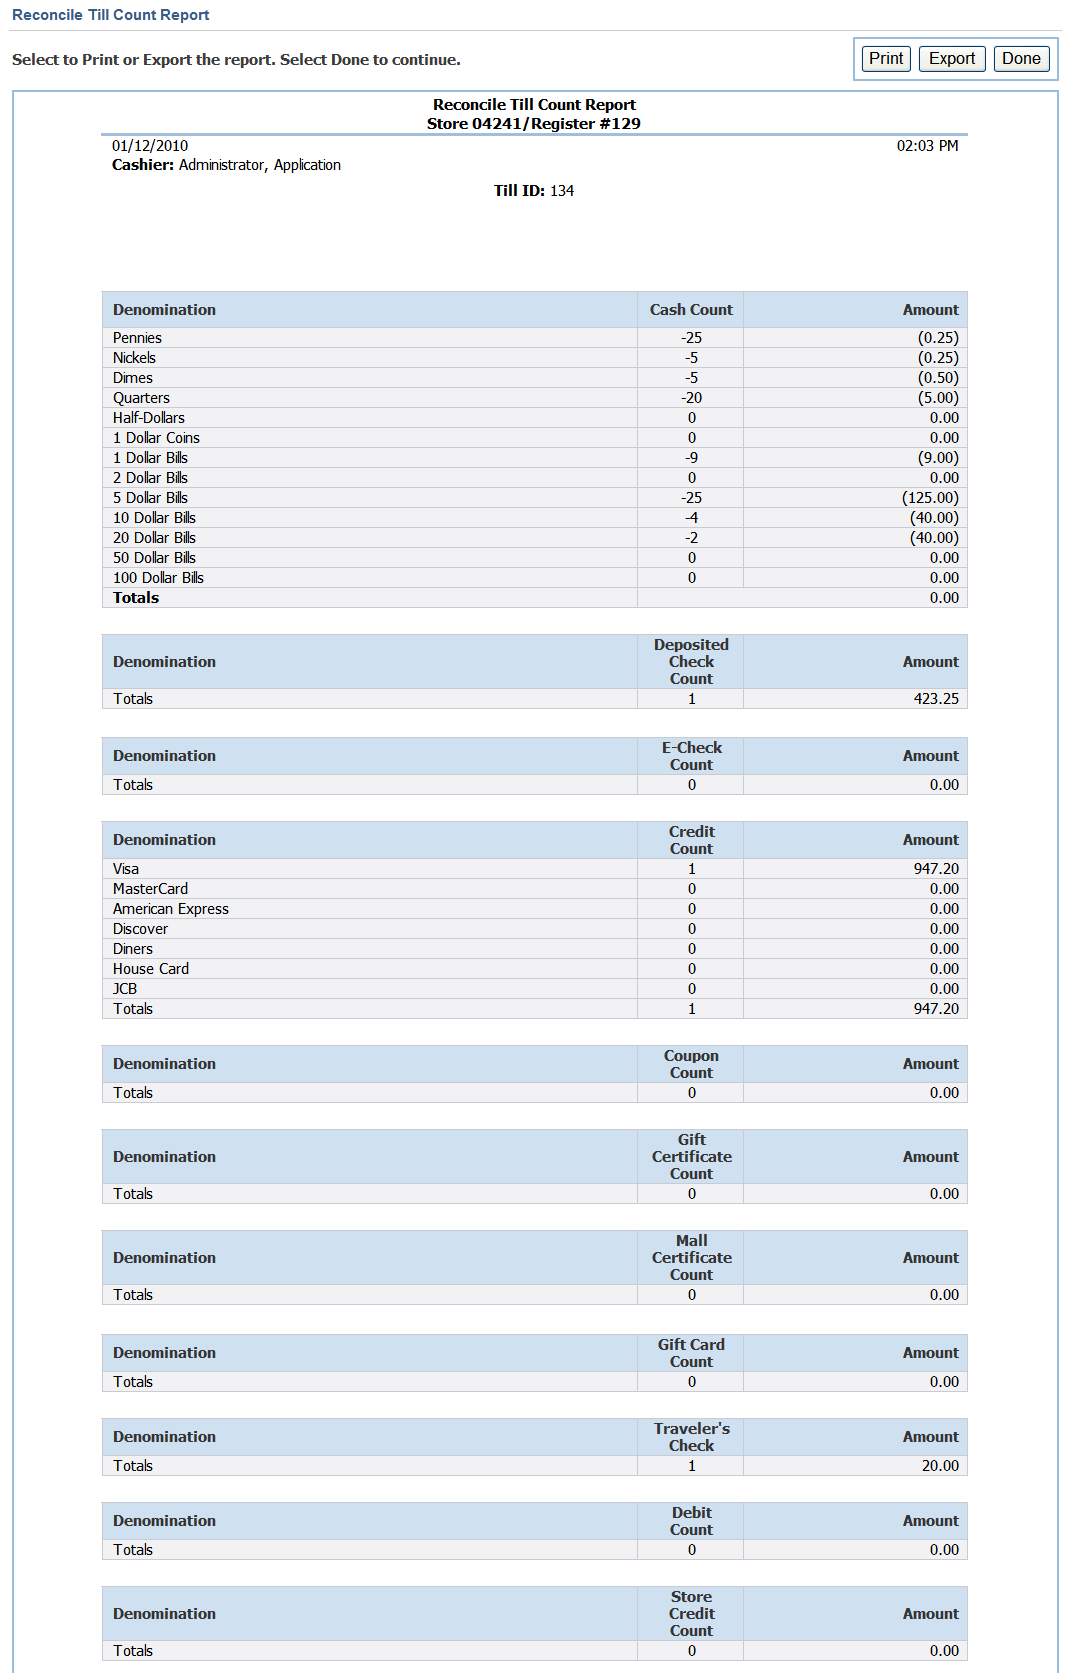
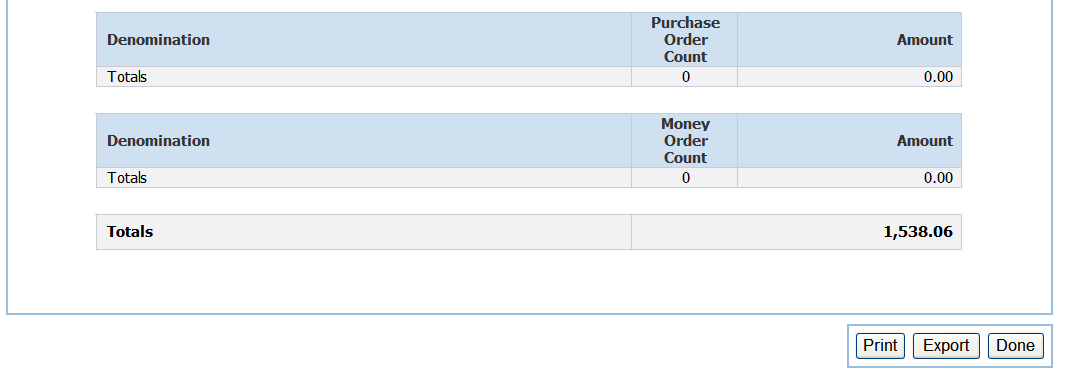
The till reports display financial information about a till at till reconcile. The Count Till at Reconcile and Count Float at Reconcile parameters determine which reports are displayed. For more information on the parameters, see the Oracle Retail POS Suite Configuration Guide.
Summary reports show counts and totals for each denomination. Detail reports show the count and total for each type of tender defined for a denomination. For example, a summary report shows totals for all credit cards. A detail report shows the count and amount for each type of credit card.
When Count Till at Reconcile is set to Summary and Count Float at Reconcile is set to No, the summary version of the Reconcile Till Count Report is displayed.
When Count Till at Reconcile is set to Detail and Count Float at Reconcile is set to No, the detail version of the Reconcile Till Count Report is displayed.
When Count Float at Reconcile is set to Summary, the summary version of the Reconcile Till Float Count Report is displayed.
When Count Float at Reconcile is set to Detail, the detail version of the Reconcile Till Float Count Report is displayed.
If Count Till at Reconcile is set to No, the Reconcile Till Count Report is not displayed.
If Count Float at Reconcile is set to No, the Reconcile Till Float Count Report is not displayed.
The following Figures show examples of the detail versions of the Reconcile Till Float Count Report and Reconcile Till Count Report. The summary versions of each of these reports show only the totals for each denomination.
This report is displayed when end of day processing is performed for a store and suspended transactions exist. All transactions that are currently suspended are included in the report. For a detailed description of the report, see "Suspended Transactions" in Chapter 3.
The Bank Deposit function creates a bank deposit and displays a report detailing individual totals that make up the deposit. The store must be open in order to perform a bank deposit, but it may be performed at any time during the day. The type of count performed depends on the setting for the Count Deposit Tender parameter. The parameter can either be set to Summary or Detail. Follow the set of steps for the appropriate setting:
For a Summary count, see "Creating a Summary Bank Deposit".
For a Detail count, see "Creating a Detail Bank Deposit".
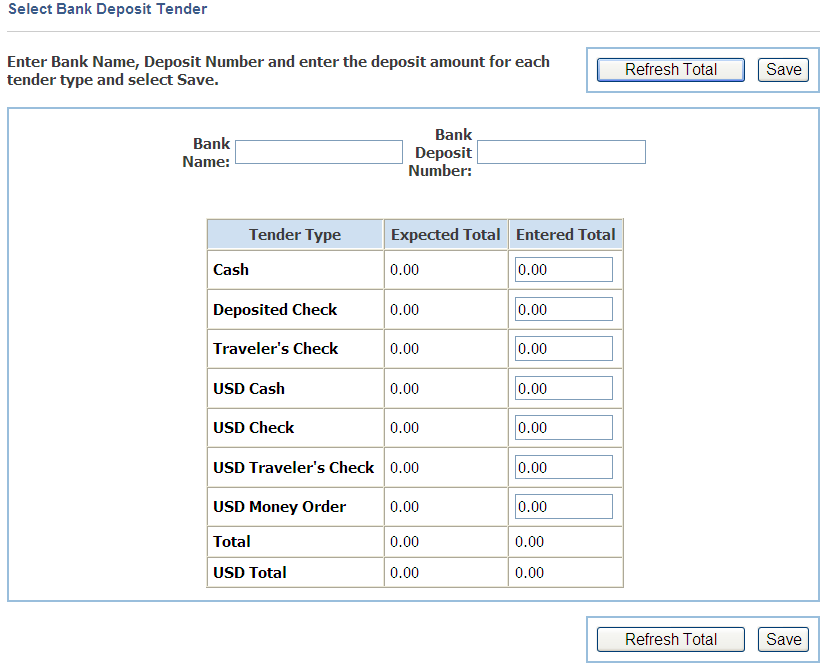
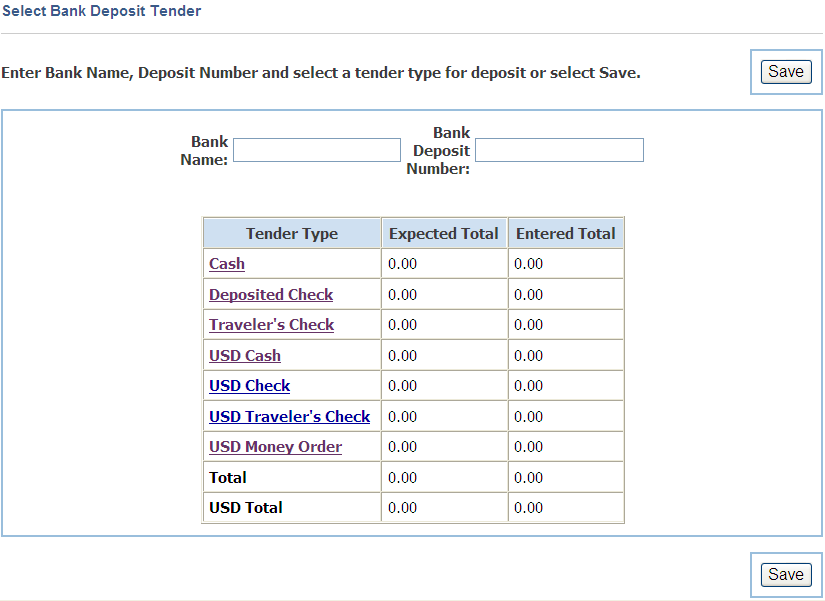
When the Count Deposit Tender parameter is set to Summary, the Select Bank Deposit Tender screen is used to enter the total amounts for deposit for each tender type.
To create a summary bank deposit:
Click the Store Ops tab.
Click the Store subtab.
Click the Bank Deposit left navigation link. The Select Bank Deposit Tender screen is displayed.
Enter the name of the bank and deposit number.
In the Bank Deposit Tender screen, enter the total for each type of currency in the given fields.
Click Refresh Total.
To save the total, click Save. A report is displayed. See "Store Bank Deposit Report".
When the Count Deposit Tender parameter is set to Detail, the Select Bank Deposit Tender screen is used to select a tender type and then enter detailed information for the deposit. Only one tender type may be selected at a time. On this screen, you also calculate the amount for deposit.
To create a detail bank deposit:
Click the Store Ops tab.
Click the Store subtab.
Click the Bank Deposit left navigation link. The Select Bank Deposit Tender screen is displayed.
Enter the name of the bank and deposit number.
To select a tender type for deposit, click the tender type name. The Detail Currency Count screen is displayed.
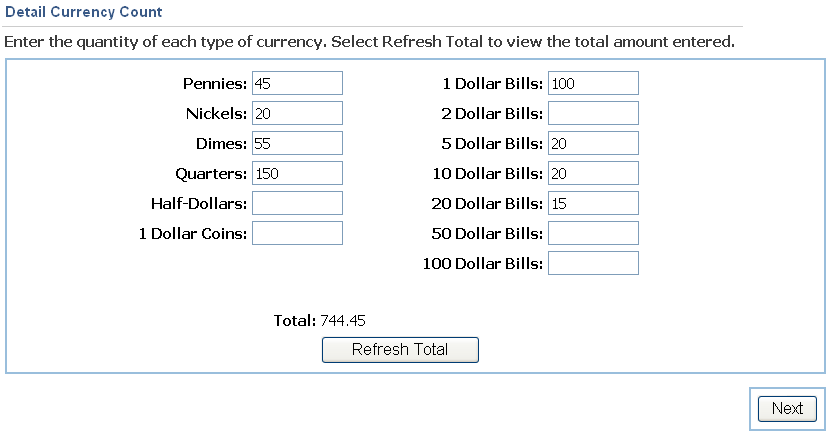
Enter the quantity of each type of tender.
To count cash, see "Setting the Detail Currency Count".
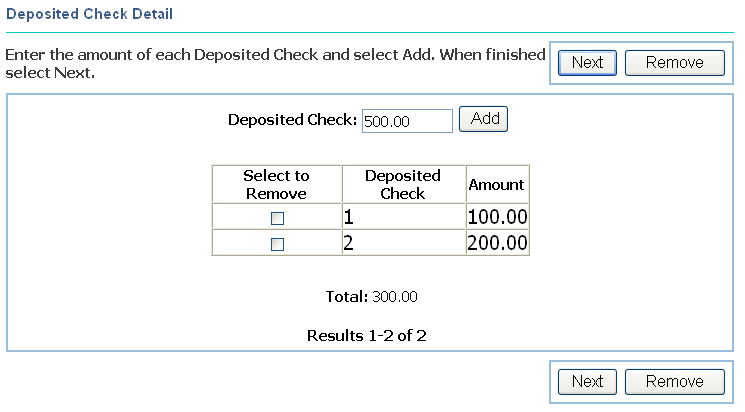
To count checks, see "Setting the Tender Detail".
Select another tender type or save the bank deposit. To save the bank deposit, click Save. A report is displayed. See "Store Bank Deposit Report".
The Detail Currency Count screen to used to count cash for a bank deposit, till reconcile, and till open. For each type of currency, enter the count. To view the total amount entered, click Refresh Total. When you are done entering counts, click Next.
The Detail screen is used to count tender for a bank deposit or till reconcile. All entries and the total amount of all the entries are displayed.
Enter an amount for the tender and click Add. To remove an entry, select the check box in the Select to Remove column next to the amount and click Remove. When you are done entering amounts, click Next.
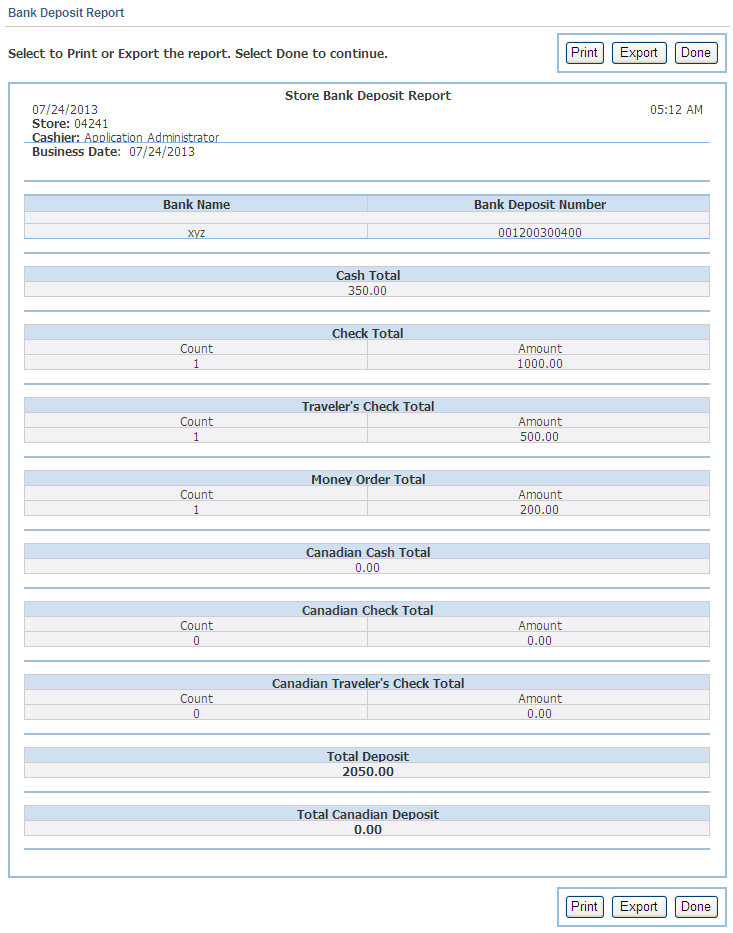
When a bank deposit is saved, the Store Bank Deposit report is displayed.
This report contains the following information:
Date and time the bank deposit was created.
Store where the bank deposit was created.
User ID of the cashier who created the bank deposit.
Name of the bank and the deposit number.
Total amount for each type of tender and a count of the tender.
Total amount of the deposit.
To export the report, click Export. To print the report, click Print. To return to the Select Bank Deposit Tender screen, click Done.