| Oracle® Retail Point-of-Service User Guide Release 14.1 E54472-02 |
|


 Previous |
 Next |
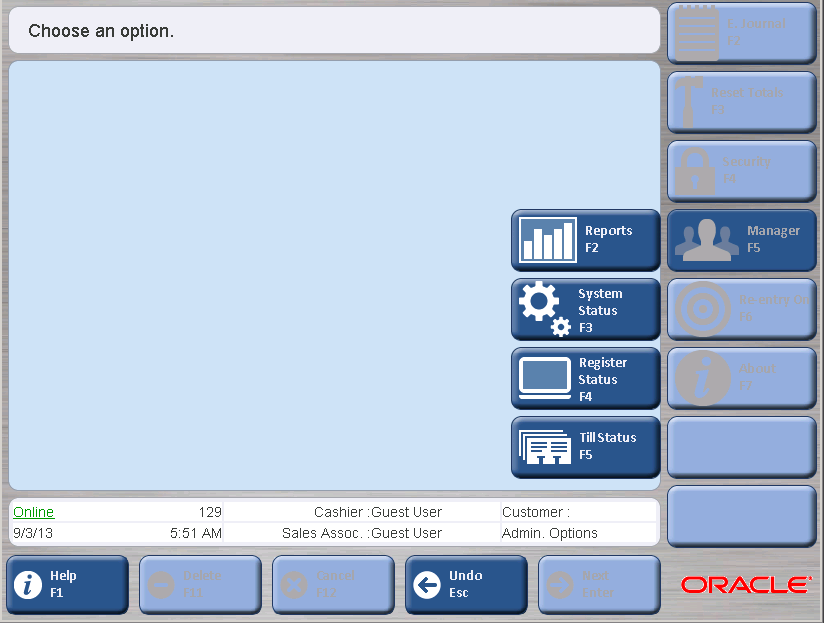
Manager Options enable you to access information about a register or check the status of a device, register, or till. These reports are only for the register that you are working on. You can access the Manager Options screen two ways:
On the Sell Item screen, press More/F9 and then Manager/F6.
On the Main Options screen, press Administration/F4. You are prompted to log in. See "Logging In and Out" in Chapter 1 for more information. After logging in, press Manager/F5. The navigation buttons for the manager options appear.
The following functions are described in this chapter:
Reports provides a way to track sales and statistics for a till, register, store, and orders on a daily basis. A report can be printed at any time with the displayed data. A preview of the report can also be displayed before printing the report.
To access a report:
Press Reports/F2. The Report Options screen appears. Table 7-1 shows the different types of reports, the corresponding function key, the input data required to generate the report, and a description of each report.
Print or view the report:
To print the report, press Print/F2.
To view the report, press Preview/F3. The report appears. To then print the report, press Print/F2.
Table 7-1 Report Options
| Function Key | Report Name | Input Data | Description |
|---|---|---|---|
|
Summary |
Date Type (store, register, or till) Till or register number |
A summary report can be printed for a store, register, or till. This report covers all tender information (in and out) by type, a transaction summary, a house account enrollment summary, and a statistical summary. Note: These reports appear in the United States locale, not in the default locale for the application. For more information, see Appendix A. |
|
|
Department Sales |
Starting Business Day Ending Business Day |
A department sales report can be printed for a given date range. This report summarizes amount of nontaxable and taxable sales by department. |
|
|
Associate Productivity |
Starting Business Day Ending Business Day |
An associate productivity report can be printed for a given date range. This report summarizes an associate's amount of nontaxable and taxable sales. |
|
|
Hourly Productivity |
Starting Business Day Ending Business Day |
An hourly productivity report can be printed for a given date range. This report summarizes sales, returns, net sales, and percent of net total by the hour. |
|
|
Queued Transactions |
<none> |
A queued transaction report can be printed to show the number, type, and date and time of queued transactions. |
|
|
Suspended Transactions |
<none> |
A suspended transaction report can be printed to show the number, cashier ID, till ID, reason code, and total of suspended transactions for the current business day. |
|
|
Order Status |
Status Starting Business Day |
An order status report can be printed for the selected status and a given date range. The report shows the status, order number, date of the transaction, and the amount of the orders. |
|
|
Orders Summary |
Starting Business Day Ending Business Day |
An orders summary report can be printed for a given date range. The report summarizes the number of orders by status and the amount of each order type. |
|
|
Bill Pay Summary |
Starting Business Day Ending Business Day |
An bill pay summary report can be printed for a given date range. The report summarizes the bill payment transactions and shows the total amount of bill payments. |
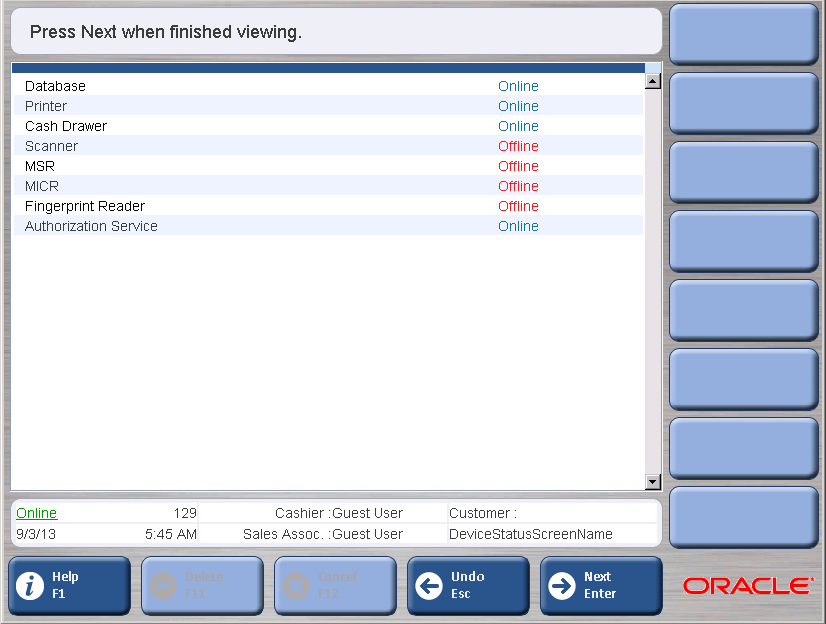
System status enables you to view the last reported status of hardware devices.
To check device status:
Press System Status/F3. The Device Status screen appears. The list of devices and/or databases and their online/offline status appears. The status text is shown in red for offline and green or black for online.
When finished viewing the information, press Next/Enter to return to the Admin Options screen.
Register Status enables you to view the status of the register.
To check register status:
Press Register Status/F4. The Register Status screen appears. The list of registers and their online/offline status appears.
When finished viewing the information, press Next/Enter to return to the Admin Options screen.
The register status fields are described in Table 7-2.
Table 7-2 Register Status Fields
| Field | Description |
|---|---|
|
Store ID |
Unique identifier for a store. |
|
Business date |
Date to which all new transactions entered on the register are posted. |
|
Store status |
Status can be open or closed. |
|
Register ID |
Unique identifier for the register. |
|
Register status |
Status can be open, closed, or suspended. |
|
Current till ID |
Unique identifier for the till. An alphanumeric character ID up to 3 characters long. |
|
Current till status |
Status can be open, closed, or suspended. |
|
Accountability |
Determines when one or more operators can be assigned to a till on a given business day. Accountability is either register or cashier. Cashier means only one operator can be assigned to a till. Register means one or more operators can be assigned to a till. |
|
Cashiers |
An operator of the till. |
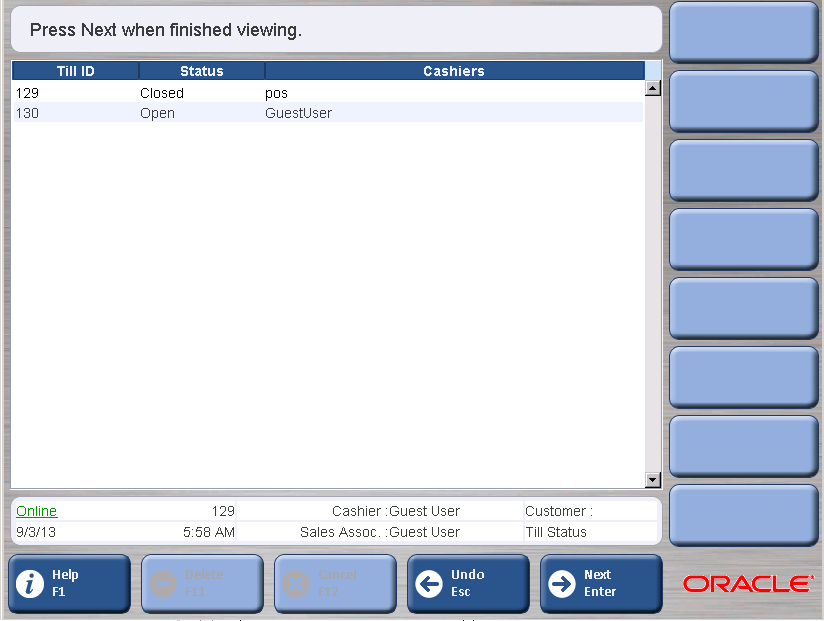
Till Status enables you to view the status of tills. It displays an entry for all tills that have been opened in the current register on the current business day.
To check till status:
Press Till Status/F5. The Till Status screen appears. The list of open tills and their status appears.
When finished, press Next/Enter to return to the Admin Options screen.
The till status fields are described in Table 7-3.