

|
This chapter provides an overview of the portal and the administrative tasks you perform to manage portal users and documents. It includes the following topics:
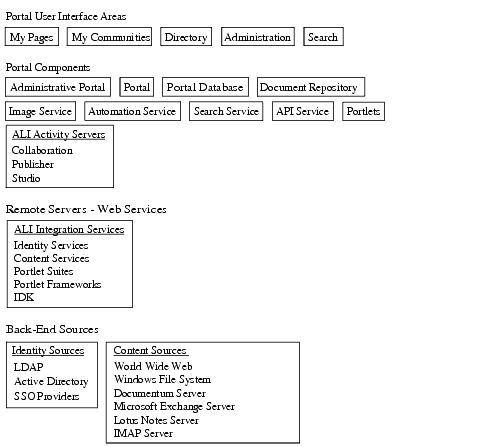
The following table describes the portal components you must install and configure before you can use the procedures provided in this guide to manage portal users and documents.
|
The portal enables end users to access portal content via My Pages, community pages, the Knowledge Directory, and search. The portal also enables some administrative actions, such as setting preferences on portlets or managing communities.
For information on installing the portal, refer to the Installation and Upgrade Guide for AquaLogic Interaction. For information on advanced portal configuration, see Configuring Advanced Properties and Logging.
|
|
|
The Image Service serves images and other static content for use by the AquaLogic User Interaction system.
For information on installing the Image Service, refer to the Installation and Upgrade Guide for AquaLogic Interaction.
Whenever you extend the base portal deployment to include additional components, such as portal servers or integration products, you may have to install additional Image Service files. For information on installing the Image Service files for those components, refer to the documentation included with the component software.
|
|
|
The Search Service returns content that is indexed in the AquaLogic User Interaction system from the portal, Collaboration, and Publisher. Content that is indexed in the AquaLogic User Interaction system includes documents, portlets, communities, and users as well as many other AquaLogic User Interaction objects.
For information on installing the Search Service, refer to the Installation and Upgrade Guide for AquaLogic Interaction. For information on advanced Search Service configuration, see Configuring Advanced Properties and Logging.
|
|
|
The Automation Service runs jobs that perform tasks such as crawling documents into the Knowledge Directory, synchronizing groups and users with external authentication sources, and maintaining the search collection.
For information on installing the Automation Service, refer to the Installation and Upgrade Guide for AquaLogic Interaction. For information on configuring Automation Service jobs, see Automating Administrative Tasks.
|
|
|
The Document Repository Service stores content uploaded into the portal, such as images or documents uploaded into Collaboration or Publisher.
For information on installing the Document Repository Service, refer to the Installation and Upgrade Guide for AquaLogic Interaction. For information on managing the portal Knowledge Directory that resides on the Document Repository Service, see Configuring Content Sources
|
|
The WWW Content Service enables the manual upload (or automatic crawling) of document records into the Knowledge Directory from WWW locations. The Content Upload Service enables the manual upload (or automatic crawling) of document records from an internal network. It may be particularly useful if some users do not typically have access to the internal network (for example, if you are running an extranet). |
|
AquaLogic Interaction Integration Services enable integration with third-party applications/repositories. AquaLogic Interaction Integration Services include a set of Identity Services and Content Services:
Content Services scan third-party systems/applications for new content, categorizing links to third-party content in the organized, searchable structure of the portal's Knowledge Directory. This allows customers to streamline costs by publishing and leveraging third-party content within the portal. The following sources can be scanned with AquaLogic Interaction Content Services: |
|
Portlets provide portal users customized tools and services as well as information. Portlets allow you to integrate applications, tools, and services into your portal, while taking advantage of portal security, caching, and customization.
For information on portlets, see Extending Portal Services with Portlets.
|
|
Figure 2-1 provides a high-level summary of the portal components and content sources that portal administrators manage to enable the portal user experience. All components except for the back-end sources are summarized in the preceding table and described in detail in this guide. For information on installing and using the back-end sources, refer to documentation included with the component software.

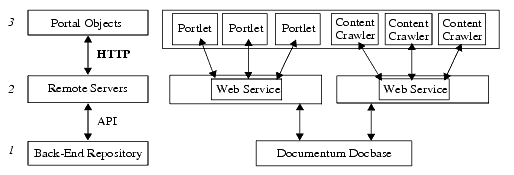
Many of the objects in the portal utilize Web services, which are components that run on a logically separate computer from the one that runs the portal and communicate with the portal via HTTP. We refer to this separate computer as a remote server. The Web services architecture allows multiple types of remote services (identity services, content services, portlets) to share a logical remote server, making it easier to manage the computers that make up the portal.
Figure 2-2 shows how multiple portal objects can be set up with the same Web service.

In addition, you create the specific objects that use the Web service by configuring additional administrative preferences and user preferences. In this case, you create multiple portlet and content crawler objects by configuring portlet-specific and content crawler-specific settings.
As you see in Figure 2-2, Web services allow you to share settings (sometimes rather complex settings) among the objects created from those services. In the case of portlets and content crawlers, Web services allow you to create templates that business users can customize to implement specific functionality based on specific preferences.
In addition, Web services enable you to create composite applications that utilize functionality from multiple Web services. For example, you might have several Web services accessing an application that requires user credentials. Rather than creating a separate configuration page for each Web service and requiring users to specify the same information multiple times, you can create a link to these shared settings, allowing users to specify the information only once for all of these Web services.
For more information on configuring administrative and user preferences for the objects that use Web services, refer to the BEA AquaLogic User Interaction Development Center ( http://dev2dev.bea.com/aluserinteraction/).
For information on settings specific to a particular kind of Web service described in this guide, refer to the documentation for the particular Web service.
AquaLogic Interaction provides many ways to secure your portal and its content:
In addition to the security available through the portal, you must also secure your hardware and back-end systems (for example, your portal and user databases) to fully protect your portal. You should follow all security guidance provided in your hardware and software documentation.
You must also create strong passwords not only for administrators, but for all portal users and you must advise everyone to keep their passwords safe.
This section describes the user interface for portal browsing users.
The following topics provide an overview of basic portal user interface features and options:
You define your user interface by configuring the default experience definition and any additional experience definitions. An experience definition is a portal object that contains a collection of settings that determine what users see when they use the portal. Users can be associated with many experience definitions. For information on configuring experience definitions, see Configuring Experience Definitions.
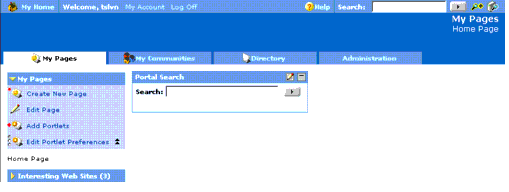
Figure 2-3 shows the main portal areas, which are summarized in this section.

The following table summarizes the purpose of the main portal areas.
The following table summarizes portal display options.
The portal includes navigation schemes that allow you to select the menu layout and core navigation structure most appropriate for your bandwidth constraints, browser requirements, design needs, deployment size, and end-user expectations. You can also create your own navigation schemes, using the existing code as a starting point. For information on customizing navigation and other user interface elements, see the BEA AquaLogic User Interaction Development Center ( http://dev2dev.bea.com/aluserinteraction/).
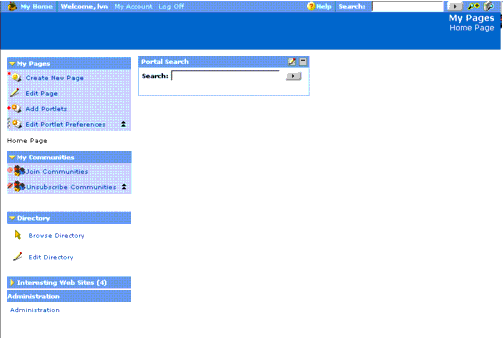
The navigation schemes included with the portal can be divided into horizontal and vertical groups, based on the alignment of the navigational elements. In horizontal navigation, links to My Pages, communities, the Knowledge Directory, Administration, and any mandatory links you specify appear at the top of the page in drop-down menus, maximizing the space available for portlets. In vertical navigation, links appear on the left side of the screen.
Any navigation scheme (except the No Navigation scheme) can include mandatory links to Web sites, user profiles of portal experts, documents from the portal Knowledge Directory, and pages in communities. These links display in the navigation scheme under a category (like My Pages, My Communities, or Directory) with the name of your choosing. You might want to use these links to promote new portlets, communities, or important documents.
The following navigation options are specified in experience definitions.
This navigation scheme uses standard HTML controls to place navigational elements in drop-down menus. Because it does not use JavaScript for rendering menus, this option is bandwidth-efficient.

This navigation scheme uses horizontal tabs at the top for the main portal areas, which, when clicked, display links on the left to the options available within that portal area. This scheme is similar to the navigation for sites such as Amazon.com and MSN.

This navigation scheme lists all available links unless the user minimizes particular elements. It is very easy to use, because users see all links without additional clicks. Because it does not use JavaScript for rendering menus, this option is bandwidth-efficient. However, if users join a large number of communities, they have to scroll to see some of the links.

This navigation scheme displays only the mandatory links (which you specify in the experience definition) using the same menu style used in Horizontal Drop-Down Navigation. Users can see only their home page (the page that displays when they log in) and any areas for which you have created mandatory links. However, they can still access documents through search and might be able to access other areas if those areas are available through portlets. You might use this scheme if you want to severely limit portal access to users. For example, you might want a group of customers to access only a particular community to learn about a new product.

This navigation scheme displays no navigation, but includes the top bar. However, there is a link to Administration if the user has access. As with the Mandatory Links Only navigation scheme, users can access portal content and areas through search and portlets.

This navigation scheme uses horizontal tabs and JavaScript-based drop-down menus to access navigation elements. Clicks, not mouse-overs, display the menus. The drop-down menus expand both vertically and horizontally, but cover only the portal's banner to avoid covering the portlets. If a user belongs to more communities than can fit in the allotted space, a vertical scroll bar appears in the drop-down. You can configure the extent of the vertical and horizontal tiling of the drop-down menus.

Low Bandwidth and Accessibility Navigation is used by low bandwidth and accessibility modes of the portal. This navigation is used by those modes no matter which navigation is selected by the experience definition for standard mode.
Portlet-Ready Navigation disables all navigation areas except the header and footer. The top bar, which includes the search box, is also disabled. This navigation scheme is only used when navigation is controlled by portlets (usually header or footer portlets) using navigation tags. Navigation tags provide developers a faster, easier way to customize navigation than modifying the other available navigation schemes.
For more information on navigation tags, see the BEA AquaLogic User Interaction Development Center ( http://dev2dev.bea.com/aluserinteraction/).
Branding customizes the look of your portal, experience definitions, and communities, through the use of headers and footers. For example, you probably want to add your company logo and tagline to the header and you might want to add contact information or copyrights to the footer.
When you create or edit a branding portlet, you set up the properties, HTML, and default values for the portlet. Experience definition and community administrators can then add these branding portlets to their experience definitions or communities. Community administrators can additionally customize the portlets to fit their needs if they have the proper permissions.
| Note: | You cannot change the property values for branding portlets in experience definitions. Therefore, branding portlets in experience definitions always display the default property values. |
The security set in the Portlet Editor allows users to view the portlet or add it to their community pages. With the proper permissions, users can go into the Community Editor, on the Header and Footer page, click the name of the branding header or footer portlet, and edit the default property values to change portlet content (for example: text, images, or color) without changing the portlet's overall design.
If you have administrative rights to the Publisher administrative folder, you can create or edit a branding portlet:
| Note: | For more information on branding, refer to the AquaLogic Interaction Publisher documentation. |
Users can choose a locale to determine:
For example, if you choose British English, the portal language is English and dates appear in the DD/MM/YYYY format; in American English, the portal language is English and dates appear in the MM/DD/YYYY format.
For information on localizing objects, refer to Localizing Your Portal..
Experience definitions provide multiple user experiences within a single portal. Experience definitions do not pre-configure the portal experience with portlets. Multiple guest users, with unique My Pages, can be created and associated with different experience definitions. Each guest user can experience a different experience definition depending on rules you create.
Experience definitions and experience rules allow you to configure the following:
| Note: | If you disable the Knowledge Directory, users cannot browse document folders, but they can still search for portal documents. |
| Note: | To create an experience definition, a user must have Admin access to the folder that will contain the experience definition. |
To create an experience definition:
Users can be directed to experience definitions in three ways:
Experience rules are applied first, followed by folder association. If users are not matched with any experience rule or folder association, they see the default experience definition, which is created during installation.
To create an experience definition rule:
To associate an experience definition to users created in a specific folder:
New users are created in the experience definition folder using one of the methods above, and therefore they see the experience definition interface when they log in.
For information on the procedures for adding users to the portal, see Managing Portal Users and Groups.
This section describes the user interface for portal administrative users and summarizes the tools administrators use to manage the portal. It includes the following topics:
The Administration section of the portal displays administrative objects and utilities you use to perform portal administration tasks. All procedures in this guide begin with "Click Administration" to display the Administration section of the portal.
When you click Administration, the portal displays the Administrative Objects Directory. Figure 2-10 shows an administrative folder (Portal Resources), the Create Object drop-down list, and the Select-Utility drop-down list (expanded).

The folders displayed in the Administrative Objects Directory and the utilities available through the Create Object drop-down list and the Select Utility drop-down list depend on activity rights associated with the user name you used to log in to the portal. For information on configuring activity rights for administrator groups and users, see Managing Portal Users and Groups.
The following table describes the objects you can create with the Create Object drop-down list.
The following table describes the administrative utilities provided in the Select Utility drop-down list.
The following table summarizes administration utilities provided in the <PT_HOME>/ptportal/6.1/bin directory of the host computer for the portal, and in the portal administrative interface.
|
|
The Portal Environment utility sets the portal environment for tools in the <PT_HOME>/ptportal/6.1/bin directory.
<PT_HOME>/ptportal/6.1/bin/portalenv.sh -h |
|
The Migration Wizard manages import packages that enable you to migrate portal objects to new host portals, such as migration from a development environment to a QA environment or production environment, or from a remote server host computer to the portal host computer.
The command-line interface (CLI) of the Migration Wizard enables you to import migration packages from the command line.
<PT_HOME>/ptportal/6.1/bin/ptmigration.sh -h
<PT_HOME> specifies the installation root for the installation of the portal, for example
C:\bea\alui or /opt/bea/alui.
For information on object migration, see Migrating, Backing Up, and Restoring Portal Objects.
|
|
The graphical user interface (GUI) version of the AquaLogic Interaction Logging Utilities provides an X-windows GUI that enables you to troubleshoot any system errors that might occur when you deploy your portal.
<PT_HOME>/ptlogging/6.0/bin/ptspy.sh |
|
The Installation Verification utility allows you to verify connectivity for installation components and the portal database.
<PT_HOME>/ptportal/6.1/bin/portalenv.sh -h |
|
|
For information modifying Automation Service defaults, see Configuring the Automation Service.
|
|


|