17 Working with the Lists Service
Use the task flows provided through the Lists service to create, publish, and manage lists. Create lists from prebuilt templates or create your own custom lists. When you create a list, it becomes available for adding to any page in the group space in which it was created.
This chapter describes how to use the features offered through the Lists service. It contains the following sections:
This chapter is for users interested in creating, populating, revising, importing, exporting, and removing lists and filtering list data.
The WebCenter Spaces application administrator has the authority to expose or hide a particular service's task flows. Tasks discussed in this chapter are not available to you if the relevant service is hidden.
Note:
For information about WebCenter Spaces seeded user roles, see Oracle Fusion Middleware Administrator's Guide for Oracle WebCenter.17.1 What You Should Know About the Lists Service
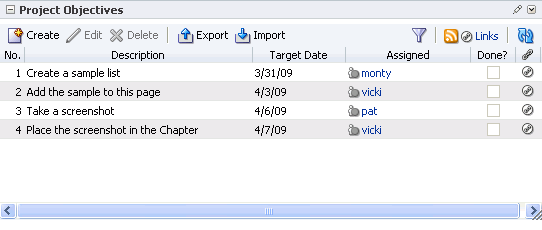
The Lists service provides a means of creating, publishing, and managing lists (Figure 17-1).
Lists are useful for so many things, like tracking issues, capturing project milestones, publishing project assignments, and much more. The lists you create in WebCenter Spaces can be simple, single-column lists or more complex tables. For example, you can start with a list of team members, and then include columns for contact information, project role, and links to relevant documents, such as any plans or proposals associated with a team member.
The Lists service is exclusive to the WebCenter Spaces application, and, within the application, lists are scoped to group spaces. That is, you can create lists only in group spaces. You cannot create or post lists in personal spaces. The lists you create in a group space are unique to that group space. One group space cannot consume the lists created in another group space.
Create and populate lists using the Lists service's two task flows: List Manager (create and populate) and List Viewer (populate).
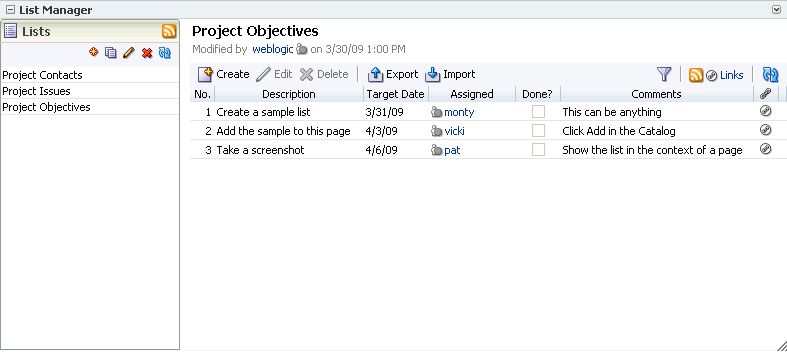
Use the List Manager task flow (Figure 17-2) to create and revise lists and list data and to view all of a group space's current lists.
The List Manager provides templates for rapid creation of lists and tools for designing and revising list structure. If you prefer, you can create a list from the beginning, adding and configuring all the columns yourself. (See Section 17.2.2, "Creating and Managing Lists.")
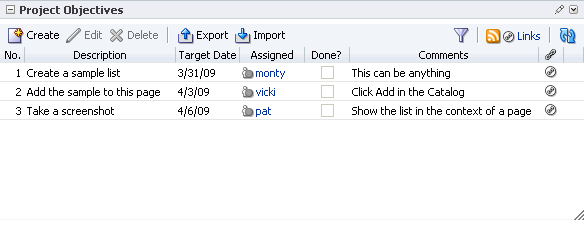
The List Viewer task flow (Figure 17-3) provides a means of placing a particular list on a group space page.
The List Viewer provides easy access to all the tools required for creating new list rows, revising list data, importing/exporting list data, filter list data, obtaining a list RSS feed, and linking to other WebCenter Spaces objects from the list or from a list row.
Additionally, the List Viewer provides access to customization and personalization tools that enable you to control the look of a particular list instance and the data it shows. For example, use list personalization and customization settings to provide a transparent band of color at specified intervals to list rows or columns or to apply filters to list data. (See Section 17.2.4, "Personalizing and Customizing Lists.")
Note:
For information about the differences between customization and personalization, see Section 17.2.4, "Personalizing and Customizing Lists."Use the List Manager and the List Viewer to add and revise list data throughout the life of the list (see Section 17.2.3, "Adding and Managing List Data"). Add and revise content directly within the task flows, or use the list Export/Import feature to send list data to an Excel 2007 file, revise it there, and then import it back into the original list in WebCenter Spaces. (See Section 17.2.5, "Exporting a List to a Spreadsheet and Importing an Exported Spreadsheet.")
Both the List Manager and individual group space lists (which are each rendered in a List Viewer task flow) are available through the Oracle Composer Catalog:
-
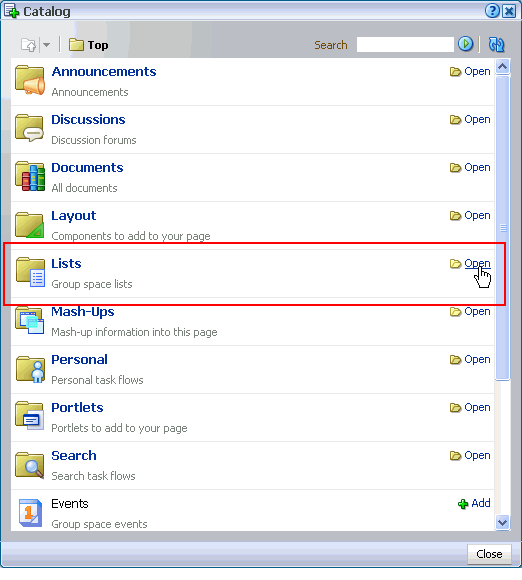
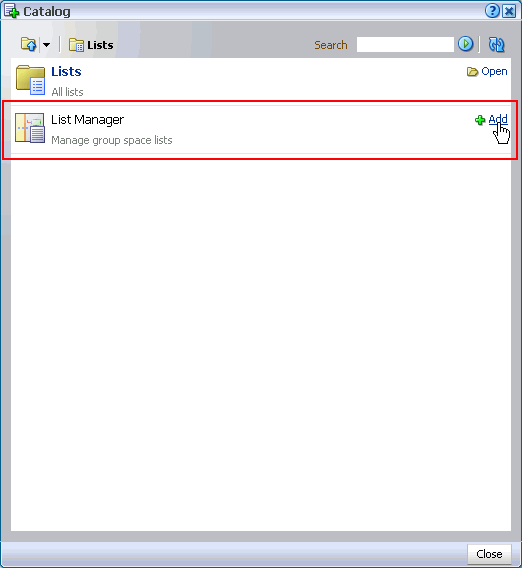
The List Manager is located under the Lists folder (Figure 17-4).
To access the List Manager, click the Open link next to the Lists folder (or click the Lists folder name). The List Manager is shown with an Add link next to it (Figure 17-5).
Click the Add link next to the List Manager to add it to the current page (see Section 7.1.3, "Adding Task Flows to a Page").
In addition to its availability in the Oracle Composer Catalog, the List Manager is exposed in every group space on a dedicated Lists page. If this page is not displayed by default when you navigate to a particular group space, you can open it through the Manage Pages dialog box. For more information, see Section 2.4, "Hiding, Showing, Opening, and Closing Pages."
-
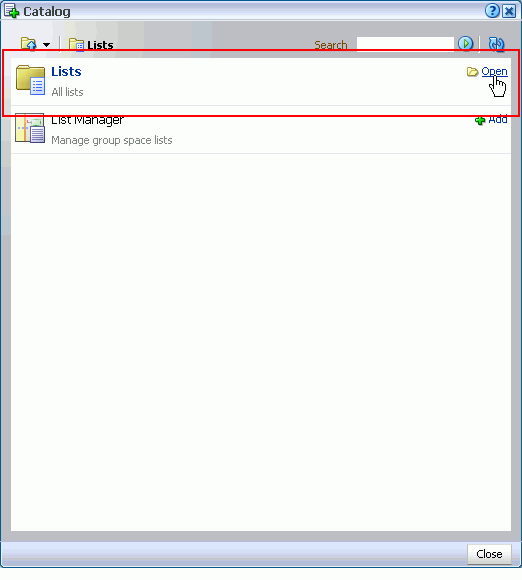
Individual group space lists are located under Lists in the Lists folder in the Oracle Composer Catalog (Figure 17-6).
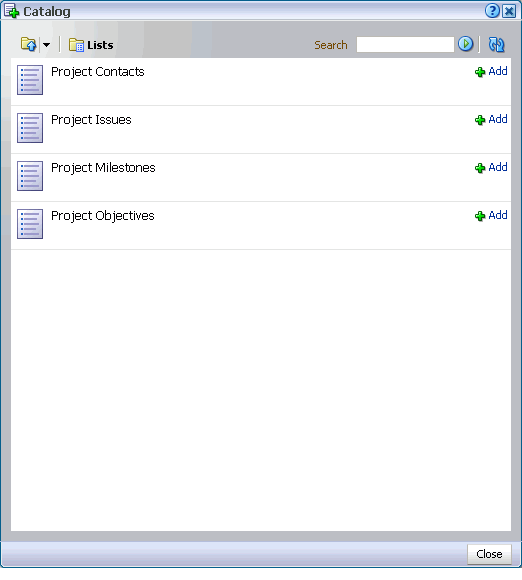
Click the Open link next to Lists to view and select individual group space lists (Figure 17-7).
Click the Add link next to a list to add it to the current page (see Section 7.1.3, "Adding Task Flows to a Page"). The list is rendered within a List Viewer task flow.
Through its tight integration with the Links service, the Lists service provides the opportunity to associate other WebCenter Spaces items with an entire list or an individual list row. Linking enables you to associate documents, notes, and URLs with a list or a list row. For more information, see Chapter 16, "Working with the Links Service."
The Lists service additionally provides RSS feeds for all lists and for individual lists. For information about the Lists service and RSS, see Chapter 28, "Working with the RSS Service."
17.2 Working with Lists Service Task Flows
This section provides information about using the features available through the List Viewer and List Manager task flows. It contains the following subsections:
17.2.1 Viewing Lists
Provided you have sufficient access permission, you can view all of the lists associated with a particular group space on that group space's Lists page. Additionally, you can view all of a group space's lists in the List Manager task flow. The List Viewer task flow displays an individual list.
Note:
For illustrations of Lists service task flows, see Section 17.1, "What You Should Know About the Lists Service."This section describes how to view lists on the Lists page.
To view a list on the Lists page:
-
Log in to Oracle WebCenter Spaces.
For information about logging in, see Section 2.2.1, "Logging In to a WebCenter Application."
-
Go to the group space that contains the list you want to view.
For information about navigating to a group space, see Section 2.4.4, "Opening Group Spaces."
-
Click the Lists tab to bring the Lists page forward.
If the Lists tab is not available, open the Manage Pages dialog box and select the Lists page for display. When the tab appears, click it to bring the page forward. For more information, see Section 2.4, "Hiding, Showing, Opening, and Closing Pages."
Alternatively, go to a group space page that contains a List Manager task flow that displays the list you want to revise.
-
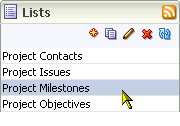
From the Lists panel, select the list you want to view (Figure 17-8).
Figure 17-8 Selecting a List to View in the List Manager
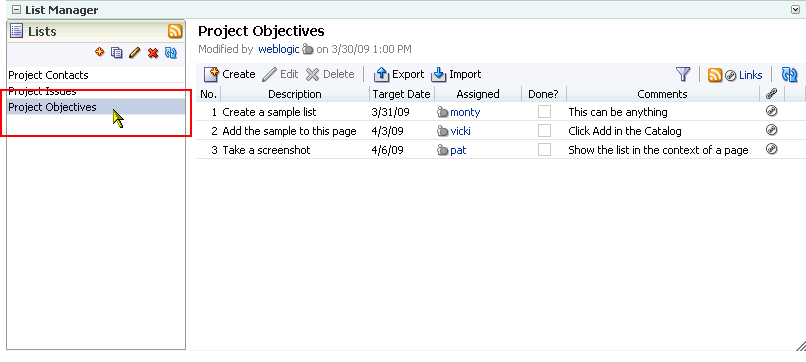
Description of "Figure 17-8 Selecting a List to View in the List Manager"
List details display to the right.
Tip:
All lists come with a Refresh icon, which you can click to refresh the display of list data.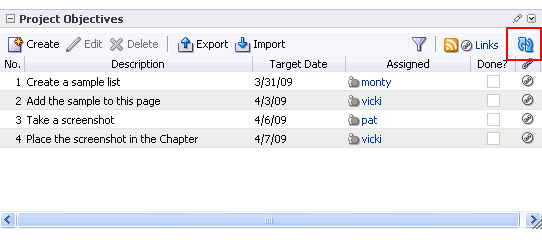
17.2.2 Creating and Managing Lists
The List Manager is a list creation environment that provides all the tools required to create meaningful lists (Figure 17-9).
This section describes how to create, edit, copy, and delete lists in the List Manager. It includes the following subsections:
17.2.2.1 Creating a List
Create lists rapidly with a list template, or create a custom list from the beginning. List templates provide preset columns, which you can use "as-is" or as a starting point for developing a custom list.
WebCenter Spaces provides three list templates:
-
Objectives—with the default columns Title and Description
-
Milestones—with the default columns Date, Description, and Status
-
Issues—with the default columns Subject, Assigned To, Comments, Closed
Additionally, you can create custom lists (Custom List) that have the number of columns you choose (up to 30) with whatever column titles you provide.
Note:
If you plan to create lists, your assigned application role must include Create permission. If you plan to view lists, your role must include View permission. Out of the box, the roles Participant and Moderator have these permissions. For information about WebCenter Spaces seeded user roles, see Oracle Fusion Middleware Administrator's Guide for Oracle WebCenter.To create a list:
-
Log in to Oracle WebCenter Spaces.
For information about logging in, see Section 2.2.1, "Logging In to a WebCenter Application."
-
Go to the group space where you want to create a list.
For information about navigating to a group space, see Section 2.4.4, "Opening Group Spaces."
-
Click the Lists tab to bring the Lists page forward.
If the Lists tab is not available, open the Manage Pages dialog box and select the Lists page for display. When the Lists tab appears, click it to bring the page forward. For more information, see Section 2.4, "Hiding, Showing, Opening, and Closing Pages."
Alternatively, go to a group space page that contains a List Manager task flow.
-
In the Lists toolbar, click the New List icon (Figure 17-10).
-
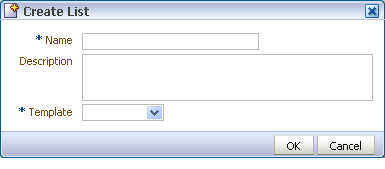
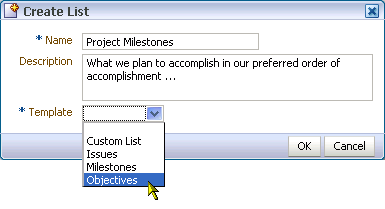
In the resulting Create List dialog box (Figure 17-11), enter a name for the list in the Name field.
-
Optionally, in the Description field enter a description of the list.
In a completed list, the description appears between the list title and list data.
-
From the Template menu (Figure 17-12), select a template or select Custom List to omit using a template.
Choose from:
-
Custom List—To create a list without using a template.
-
Issues—To create a list of, for example, project issues. By default, this template provides the columns Subject, Assigned To, Comments, Closed.
-
Milestones—To create a list of, for example, project milestones. By default, this template provides the columns Date, Description, and Status.
-
Objectives—To create a list of, for example, project objectives. By default, this template provides the columns Title and Description.
-
-
Click OK.
The new list appears in the List Manager column of lists (Figure 17-13).
You may now revise default list columns and add new columns to the list by clicking the Edit icon. See Section 17.2.2.2, "Editing List Structure." For a custom list, you must add columns to the list before you can add rows.
17.2.2.2 Editing List Structure
When you edit list structure, you can revise everything about the list. For example, you can change column details; remove, add, and rearrange columns; and rename or redescribe the list.
This section describes the various tasks you can perform while editing a list structure. It contains the following subsections:
17.2.2.2.1 Renaming a List and Revising a List Description
o rename a list and revise a list description:
-
Log in to Oracle WebCenter Spaces.
For information about logging in, see Section 2.2.1, "Logging In to a WebCenter Application."
-
Go to the group space where you want to rename a list or revise a list description.
For information about navigating to a group space, see Section 2.4.4, "Opening Group Spaces."
-
Click the Lists tab to bring the Lists page forward.
If the Lists tab is not available, open the Manage Pages dialog box and select the Lists page for display. When the Lists tab appears, click it to bring the page forward. For more information, see Section 2.4, "Hiding, Showing, Opening, and Closing Pages."
Alternatively, go to a group space page that contains a List Manager task flow.
-
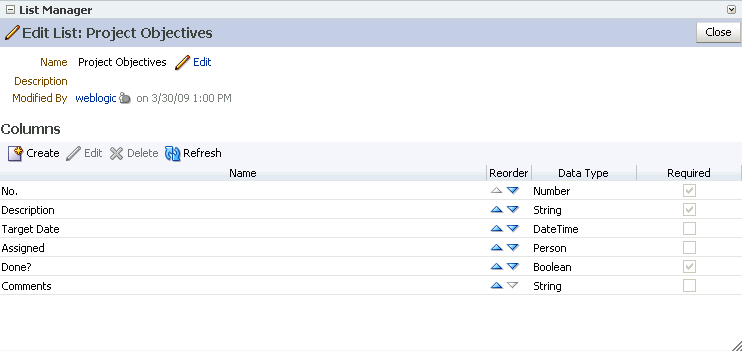
In the Lists panel, select the list you want to change and click the Edit List icon (Figure 17-14).
The List Manager enters Edit List mode (Figure 17-15).
-
Click the Edit link to the right of the Name field.
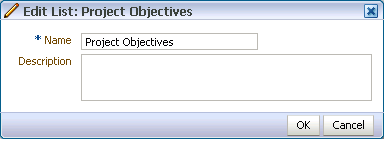
The Edit List dialog box opens (Figure 17-16).
-
Revise the List name and description.
-
Click OK to close the dialog box and save your changes.
-
Click the Close button in Edit List mode to return to the List Manager default mode.
17.2.2.2.2 Adding Columns to a List
This procedure is useful when you create a custom list or you want to alter a default list structure. This section describes how to add columns to lists. A list supports up to 30 columns.
To add columns to a list:
-
Log in to Oracle WebCenter Spaces.
For information about logging in, see Section 2.2.1, "Logging In to a WebCenter Application."
-
Go to the group space where you want to add columns to a list.
For information about navigating to a group space, see Section 2.4.4, "Opening Group Spaces."
-
Click the Lists tab to bring the Lists page forward.
If the Lists tab is not available, open the Manage Pages dialog box and select the Lists page for display. When the Lists tab appears, click it to bring the page forward. For more information, see Section 2.4, "Hiding, Showing, Opening, and Closing Pages."
Alternatively, go to a group space page that contains a List Manager task flow.
-
In the Lists panel, select the list to which to add columns and click the Edit List icon (Figure 17-17).
The List Manager enters Edit List mode (Figure 17-18).
-
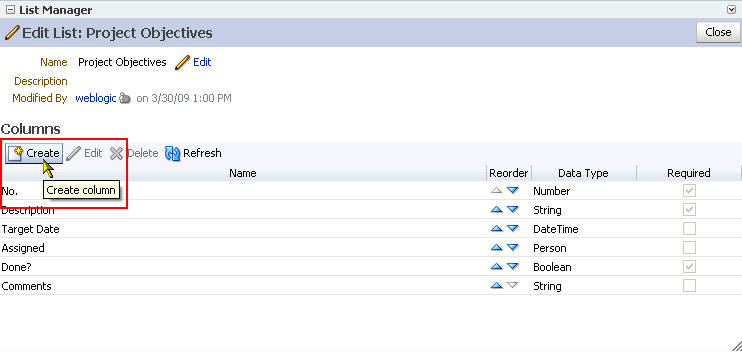
Under Columns, click the Create button (Figure 17-19).
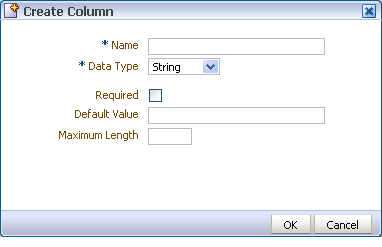
The Create Column dialog box opens (Figure 17-20).
-
In the Name field, provide a name for this column.
-
From the Data Type drop down menu, select the type of data you want to enter in this column.
The data type you select affects which column detail fields display in the dialog box (see Table 17-1 and Table 17-2).
Note:
The data type you select also affects the type of validation that is run on column data when you and other authorized users add list rows.Table 17-1 lists and describes the data types available to list columns, and provides the additional details that display for each type.
Table 17-1 Data Type Selections for List Columns
Data Type Description Comments Requires column entries to be text strings
Additional column details include:
-
Required
-
Default Value
-
Maximum Length
Requires column entries to be numbers
Additional column details include:
-
Required
-
Format
-
Default Value
-
Minimum Value
-
Maximum Value
For Format, select from:
-
Number—an unformatted number; decimal separator is based on the currently selected locale. See Section 3.3.1, "Choosing Your Preferred Display Language."
-
Currency—value is formatted as a currency value; the currency symbol and decimal separator are based on the currently selected locale. See Section 3.3.1, "Choosing Your Preferred Display Language."
-
Percent—value is formatted as a percentage; the value 0.6 is formatted as
0.6%; the value 60 is formatted as60%.
The Number data type supports numbers from ±1.79769313486231570e+308 with 14 to 15 significant digits.Foot 1
Requires column entries to be dates in the format specified in a given user's WebCenter Spaces preferences
Additional column details include:
-
Required
-
Format
-
Default Value
For Format, select from:
-
Date—For requiring a date.
-
Time—For requiring a time.
-
Date and Time—For requiring a date and a time.
The Default Value field includes a date picker, which you can use to select a default date in the correct format. The current date has a box around it, for example, May 8th in the following figure.
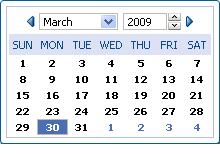
This field does not require leading zeroes, for example, it does not require 05/04/2007. Instead, you can use 5/4/2007.
Requires column entries to be either
TRUEorFALSE.Additional column details include:
-
Default Value
TRUEorFALSEis rendered as a check box. Checked equalsTRUE; cleared equalsFALSE.Requires column entries to be valid user names
Additional column details include:
-
Required
-
Default Value
The Default Value field includes a Find user icon, which you can use to locate and select a default user. Click the Find user icon, and in the resulting dialog box, enter—minimally—two consecutive characters from the name of your search target (the search term do finds both condoleeza and doug). Click the Search button, and all names in your company LDAP directory that match your search criteria appear in the results area. Select a user, and click OK to populate the Default User field with your selection.
The list column contains a presence indicator next to the user name.
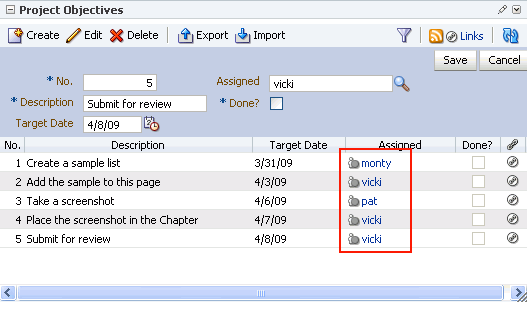
Click the presence indicator to open a context menu with options for making contact with the person instantly. For more information, see Section 22.2.1, "Viewing the Status of Other Users."
Footnote 1 Number data-type columns adhere to the range and precision specified for the 8 byte IEEE 754 double data type. When the maximum number of significant digits is exceeded, the number is rounded.
-
-
After you select a data type, enter values for the remaining fields.
Table 17-2 lists the possible remaining fields and their associated data types.
Table 17-2 Column Details That May Follow the Data Type Detail
Column Detail Description Associated Data Type(s) Select this check box to require that data is entered in this column.
String, Number, DateTime, Person
Use this pick list to specify the format for column values. See Table 17-1 for more information.
Number, DateTime
Optionally, provide a default value for the column entry.
All data types
Enter the maximum number of characters for this column entry. This includes spaces.
String
Indicate the lowest number that can be entered in this column.
Number
Indicate the highest number that can be entered in this column.
Number
-
Click OK to save your changes and exit the dialog box
-
Click Close to exit List Edit mode.
17.2.2.2.3 Revising List Column Details
You can revise every detail of a list column. That is, you can rename the column, change the column data type, require a value, or remove a value requirement. Keep in mind, however, if you change a column data type, any values currently entered in the list column are either converted to the new data type or removed irrevocably.
For example, if you move from a String data type to a Number data type, values that can be converted to a number are retained; other values are removed. Before any values are removed by the change, you are asked for confirmation. In contrast, if you move from a Number data type to a String data type, all values are retained.
Note:
Validation occurs only on data entry. If a user changes column details after values have been entered for the column, the existing values are not affected (that is, validated) even if they do not meet the new column detail conditions on the columns.If you want to validate new list data, you can export the list data to an Excel spreadsheet and then import it. On import, all rows are validated. The rows that fail validation are noted. You can fix invalid rows in the spreadsheet and import again. For more information, see Section 17.2.5, "Exporting a List to a Spreadsheet and Importing an Exported Spreadsheet."
To revise list column details:
-
Log in to Oracle WebCenter Spaces.
For information about logging in, see Section 2.2.1, "Logging In to a WebCenter Application."
-
Go to the group space where you want to revise list column details.
For information about navigating to a group space, see Section 2.4.4, "Opening Group Spaces."
-
Click the Lists tab to bring the Lists page forward.
If the Lists tab is not available, open the Manage Pages dialog box and select the Lists page for display. When the Lists tab appears, click it to bring the page forward. For more information, see Section 2.4, "Hiding, Showing, Opening, and Closing Pages."
Alternatively, go to a group space page that contains a List Manager task flow.
-
In the Lists panel, select the list you want to change and click the Edit List icon (Figure 17-21).
The List Manager enters Edit List mode (Figure 17-22).
-
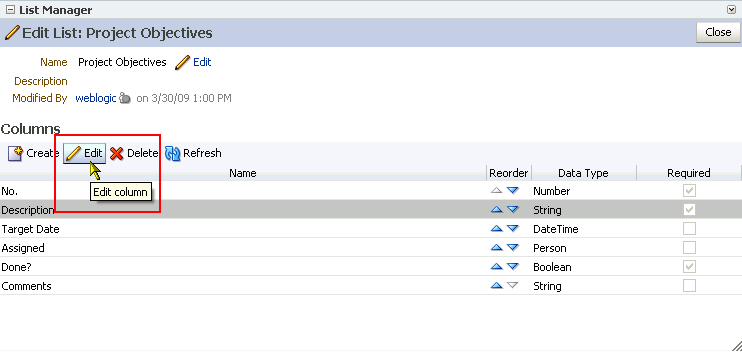
Under Columns, select the list column you want to revise and click the Edit button (Figure 17-23).
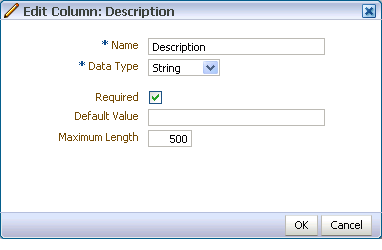
The Edit Column dialog box opens (Figure 17-24).
-
Edit column details as you prefer.
For information about column details, see Section 17.2.2.2.2, "Adding Columns to a List."
-
Click OK to save your changes and close the dialog box.
-
Click the Close button to exit Edit List mode.
17.2.2.2.4 Rearranging List Columns
You can rearrange list columns in the list structure, affecting all instances of a list, by clicking rearrange icons or by dragging and dropping. This section describes how.
Note:
For information about rearranging column order of a particular list instance in your view or everyone's view, see Section 17.2.4.3, "Changing Column Order on a List Instance."To rearrange list columns:
-
Log in to Oracle WebCenter Spaces.
For information about logging in, see Section 2.2.1, "Logging In to a WebCenter Application."
-
Go to the group space where you want to rearrange list columns.
For information about navigating to a group space, see Section 2.4.4, "Opening Group Spaces."
-
Click the Lists tab to bring the Lists page forward.
If the Lists tab is not available, open the Manage Pages dialog box and select the Lists page for display. When the Lists tab appears, click it to bring the page forward. For more information, see Section 2.4, "Hiding, Showing, Opening, and Closing Pages."
Alternatively, go to a group space page that contains a List Manager task flow.
-
In the Lists panel, select the list you want to change and click the Edit List icon (Figure 17-25).
The List Manager enters Edit List mode (Figure 17-26).
-
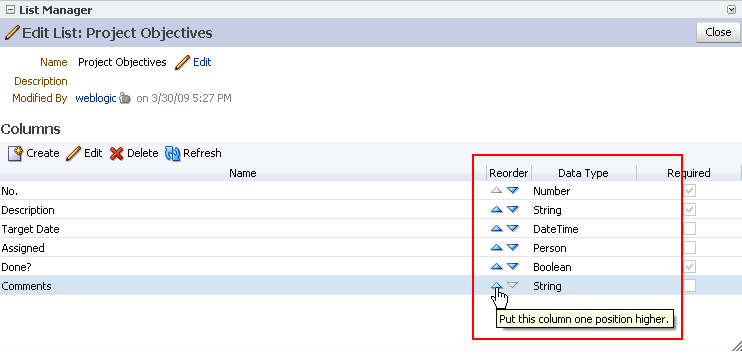
Under Columns, click an icon under the Reorder column to move a column higher or lower in the order of columns (Figure 17-27).
Moving a column higher causes it to render further to the left in column display order. Moving a column lower causes it to render further to the right.
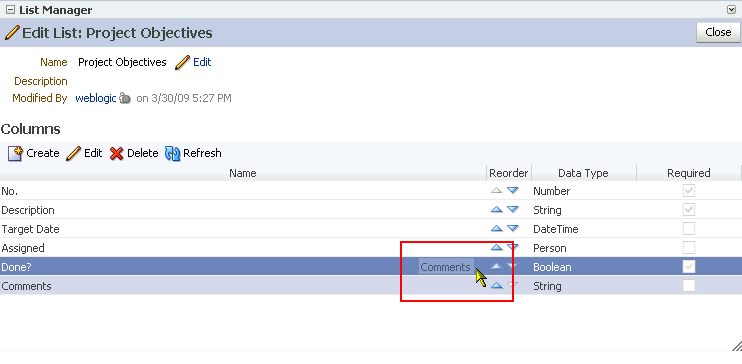
Alternatively, drag and drop a column higher or lower in the column hierarchy (Figure 17-28).
-
Click the Close button to exit Edit List mode.
17.2.2.2.5 Deleting a List Column
-
Log in to Oracle WebCenter Spaces.
For information about logging in, see Section 2.2.1, "Logging In to a WebCenter Application."
-
Go to the group space where you want to delete list columns.
For information about navigating to a group space, see Section 2.4.4, "Opening Group Spaces."
-
Click the Lists tab to bring the Lists page forward.
If the Lists tab is not available, open the Manage Pages dialog box and select the Lists page for display. When the Lists tab appears, click it to bring the page forward. For more information, see Section 2.4, "Hiding, Showing, Opening, and Closing Pages."
Alternatively, go to a group space page that contains a List Manager task flow.
-
In the Lists panel, select the list you want to change and click the Edit List icon (Figure 17-29).
The List Manager enters Edit List mode (Figure 17-30).
-
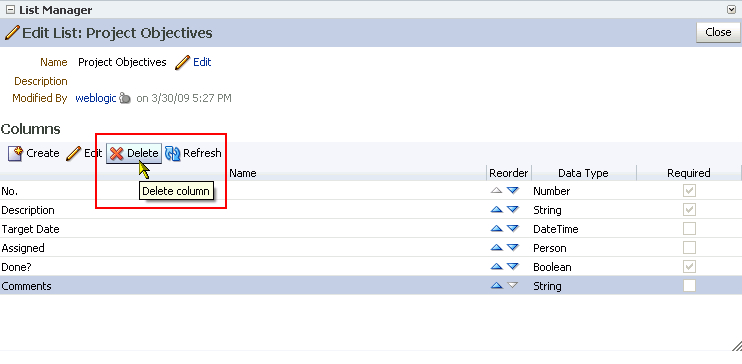
Select a list row, and click the Delete button (Figure 17-27).
-
In the resulting confirmation dialog box, click the Delete button to complete the deletion.
17.2.2.3 Copying a List
You can use an existing list as a template simply by copying it. First, copy the list, and then edit the copied list as you like.
To copy a list:
-
Log in to Oracle WebCenter Spaces.
For information about logging in, see Section 2.2.1, "Logging In to a WebCenter Application."
-
Go to the group space that contains the list you want to copy.
For information about navigating to a group space, see Section 2.4.4, "Opening Group Spaces."
-
Click the Lists tab to bring the Lists page forward.
If the Lists tab is not available, open the Manage Pages dialog box and select the Lists page for display. When the tab appears, click it to bring the page forward. For more information, see Section 2.4, "Hiding, Showing, Opening, and Closing Pages."
Alternatively, go to a group space page that contains a List Manager task flow.
-
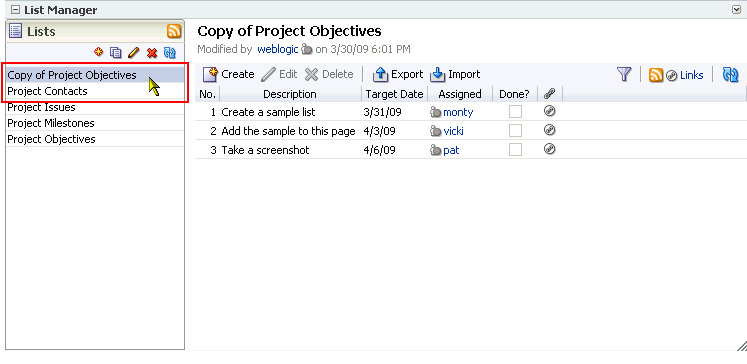
In the Lists panel, select the list you want to copy (Figure 17-32).
Figure 17-32 Selecting a List to Copy in the List Manager
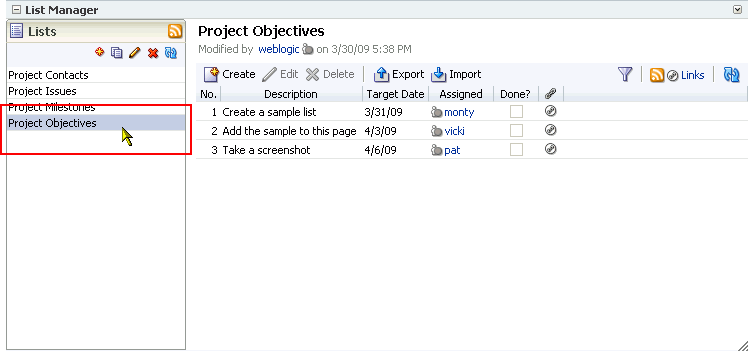
Description of "Figure 17-32 Selecting a List to Copy in the List Manager"
-
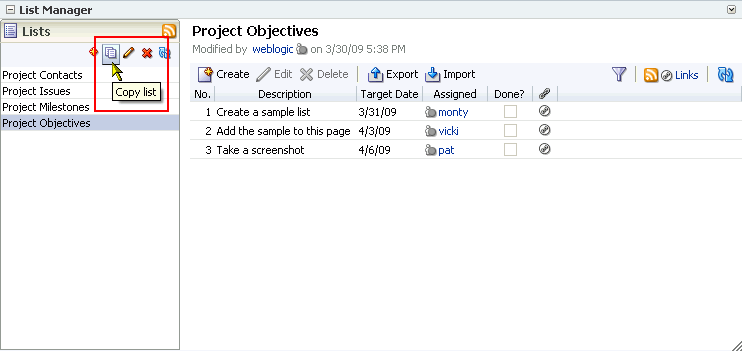
Click the Copy List icon (Figure 17-33).
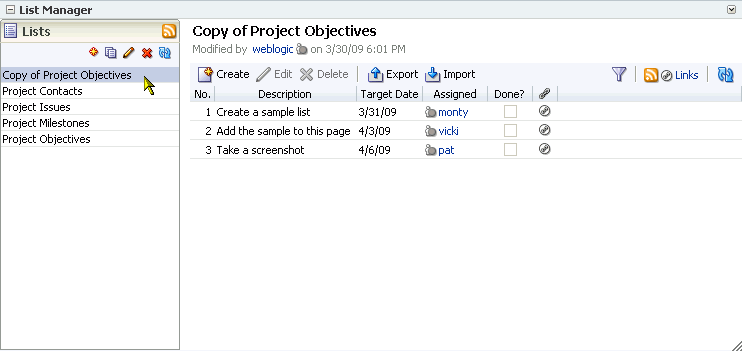
A copy of the list becomes available for selection in the Lists panel (Figure 17-34).
For information about changing the list name or description, see Section 17.2.2.2.1, "Renaming a List and Revising a List Description." For information about revising list structure, see Section 17.2.2.2, "Editing List Structure."
17.2.2.4 Deleting Lists
-
Log in to Oracle WebCenter Spaces.
For information about logging in, see Section 2.2.1, "Logging In to a WebCenter Application."
-
Go to the group space that contains the list you want to delete.
For information about navigating to a group space, see Section 2.4.4, "Opening Group Spaces."
-
Click the Lists tab to bring the Lists page forward.
If the Lists tab is not available, open the Manage Pages dialog box and select the Lists page for display. When the tab appears, click it to bring the page forward. For more information, see Section 2.4, "Hiding, Showing, Opening, and Closing Pages."
Alternatively, go to a group space page that contains a List Manager task flow.
-
In the Lists panel, select the list you want to delete (Figure 17-35).
To select multiple lists, use Ctrl-click; to select a range of lists, use Shift-click.
Figure 17-35 Selecting a List to Delete in the List Manager
Description of "Figure 17-35 Selecting a List to Delete in the List Manager"
-
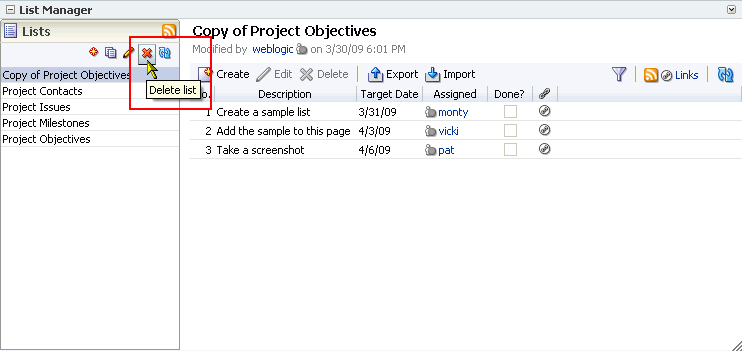
Click the Delete List icon (Figure 17-36).
-
In the resulting dialog box, click the Delete button.
After confirmation, the deleted list is removed from the Lists panel.
17.2.3 Adding and Managing List Data
When you have a list structure (see Section 17.2.2, "Creating and Managing Lists"), you can add data to the list. This section describes how to add, edit, and delete list data. It includes the following subsections:
17.2.3.1 Adding a List Row
This section describes how to add data to a list. When you add data to a list, new rows are positioned in the list according to whichever column is currently controlling list sorting (for more information, see Section 17.2.4.2, "Sorting and Resizing List Columns").
To add data to a list:
-
Log in to Oracle WebCenter Spaces.
For information about logging in, see Section 2.2.1, "Logging In to a WebCenter Application."
-
Go to the group space that contains the List Viewer task flow that displays the list you want to populate with data.
For information about navigating to a group space, see Section 2.4.4, "Opening Group Spaces."
Alternatively, go to the Lists page or a List Manager task flow and select the list you want to revise.
-
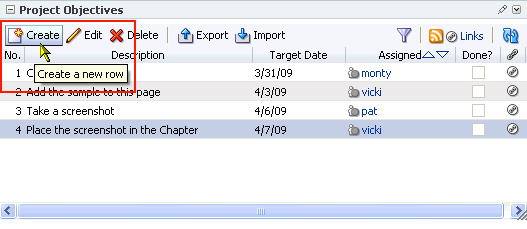
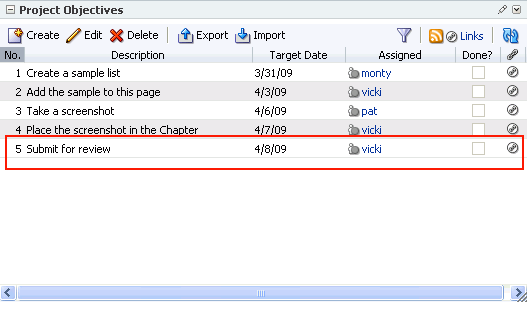
Click the Create button above the list (Figure 17-37).
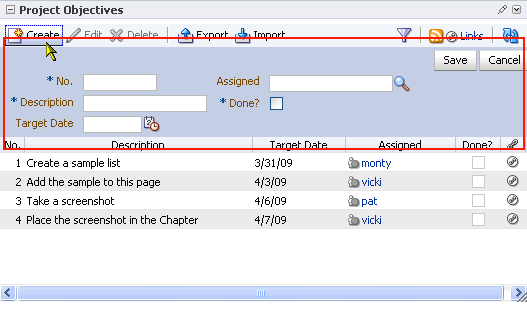
The create list row panel opens between the list toolbar and the list rows (Figure 17-38).
-
Add data to the panel fields.
Fields vary according to the list columns and the types of values those columns require. See Section 17.2.2.2.2, "Adding Columns to a List," for more information.
-
When you finish adding field values for one row, click the Save button.
The create list row panel closes, and the list refreshes to display the newly added row (Figure 17-39).
-
Repeat steps 3 through 5 to add more data.
17.2.3.2 Editing a List Row
-
Log in to Oracle WebCenter Spaces.
For information about logging in, see Section 2.2.1, "Logging In to a WebCenter Application."
-
Go to the group space that contains the List Viewer task flow that displays the list you want to populate with data.
For information about navigating to a group space, see Section 2.4.4, "Opening Group Spaces."
Alternatively, go to the Lists page or a List Manager task flow and select the list you want to revise.
-
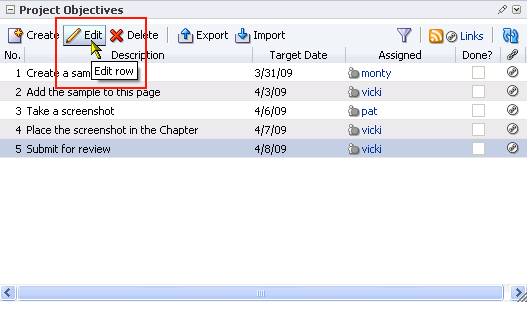
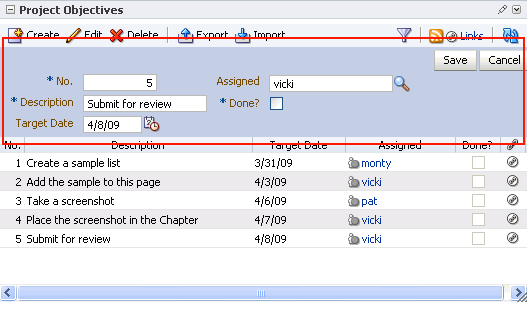
Select the row that contains the details you want to edit, and click the Edit button (Figure 17-40).
Row details display at the top of the list in the edit list row panel (Figure 17-41).
-
Edit the details, and then click Save to save your changes and close the panel.
17.2.3.3 Deleting List Rows
You can delete one or multiple list rows in one operation. This section describes how.
To delete one or multiple list rows:
-
Log in to Oracle WebCenter Spaces.
For information about logging in, see Section 2.2.1, "Logging In to a WebCenter Application."
-
Go to the group space that contains the list data you want to delete.
For information about navigating to a group space, see Section 2.4.4, "Opening Group Spaces."
-
Go to the list that contains the row(s) you want to delete.
-
Select one or more rows to delete.
In Windows, use Ctrl-click to select multiple rows. In UNIX, simply click multiple rows. In both operating systems, use Shift-click to select a range of rows.
-
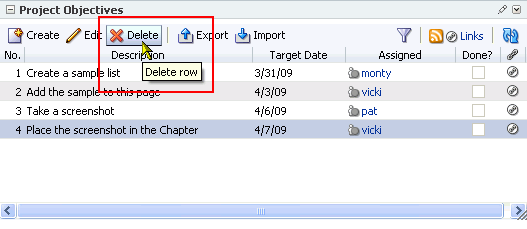
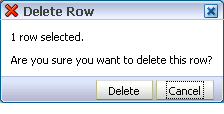
Click the Delete button above the list (Figure 17-42).
A confirmation dialog box opens, specifying the number of selected rows (Figure 17-43).
-
Click Delete.
The list refreshes with the deleted row(s) removed.
17.2.4 Personalizing and Customizing Lists
You can personalize your own view of a list instance, or you can customize a list instance, affecting everyone's view. Personalizations involve changes made in page view mode; while customizations involve changes made in page edit mode (that is, in Oracle Composer). Everyone can personalize their own view of a list; but page edit privileges are always required for list customization.
While customizations affect everyone's view of a list instance, your own personalizations are layered over list customizations. For example, someone may customize a list containing columns A, B, and C, so that column C is first in list column order (C, A, B). You can then personalize the list so that column A is first in list column order in your personal view of the same list instance (A, B, C).
Note:
In page edit mode, you see only customizations. In page view mode, you see personalizations layered over customizations. If the same property is set in both customization and personalization, the personalized value takes precedence. For more information about personalization and customization, see Section 7.2, "Customizing and Personalizing Page Content."Personalizations and customizations are persisted across user sessions. When you make a change to a list, such as a column resize, such a change remains in effect until you revise it.
This section describes various personalizations and customizations you can make to a list instance. It contains the following subsections:
17.2.4.1 Filtering List Data
The Lists service provides data filtering options for your personal view of a list instance and for everyone's view of the instance. Filtering provides a means of limiting the display of list data to those rows that match your filtering criteria.
Temporary, personal filtering (also called ad hoc filtering) is available with both the List Viewer and List Manager task flows. Custom filtering that affects everyone's view of a list instance is available only with the List Viewer task flow.
This section describes the processes of applying ad hoc, permanent personal, and permanent list filters. It contains the following subsections:
17.2.4.1.1 Applying an Ad Hoc Filter to a List Instance
Use ad hoc list filtering to easily find a particular list entry or group of entries in a list instance. This section describes how.
Note:
Ad hoc list filtering applies only to String data-type values. Columns that use other data-types, such as Date and Number, are not used in ad hoc filtering. For example, if you have dates displayed in formatdd-mon-yy and you filter on jan, you do not see rows with dates in January.To apply an ad hoc filter to a list instance:
-
Log in to Oracle WebCenter Spaces.
For information about logging in, see Section 2.2.1, "Logging In to a WebCenter Application."
-
Go to the list that contains the data you want to temporarily filter.
-
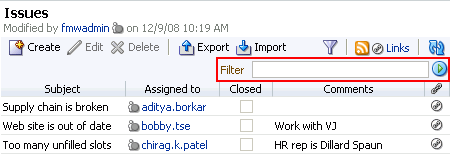
Click the Filter Rows button in the List toolbar (Figure 17-44).
The Filter field opens (Figure 17-45).
-
Enter your filtering criteria in the Filter field, and click the Filter icon to execute the filter (Figure 17-46).
All row details that match the filtering criteria are shown (Figure 17-47).
-
Click the Filter Rows button again to hide the Filter field and remove the temporary filter.
17.2.4.1.2 Applying a Permanent, Personal Filter to a List Instance
In addition to an ad hoc filter, you can apply a permanent personal filter to your view of a list instance. We use the term permanent to convey the fact that you can keep your list filtered in a particular way as long as you like. It is still possible to remove such a filter. This section describes how to apply and remove a permanent personal filter.
To apply or remove a permanent filter on your view of a list instance:
-
Log in to Oracle WebCenter Spaces.
For information about logging in, see Section 2.2.1, "Logging In to a WebCenter Application."
-
Go to the List Viewer task flow that contains the data you want to permanently filter.
-
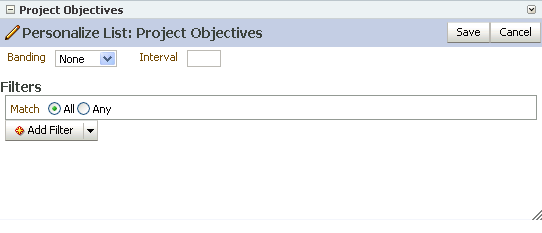
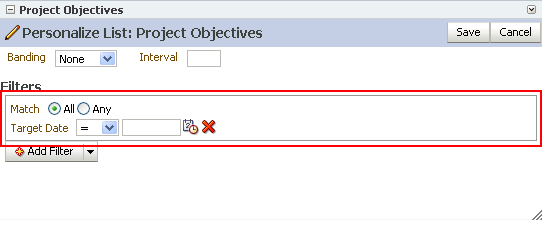
Click the Personalize icon on the task flow header (Figure 17-48).
The List Viewer enters Personalize List mode (Figure 17-49).
-
Select an option next to Match.
Matching enables you to specify how rigorously the filtering criteria you define on the list should be applied.
Choose from:
-
All—To specify that list data must match all of the filtering criteria you specify.
-
Any—To specify that list data must match one or more of the filtering criteria you specify.
-
-
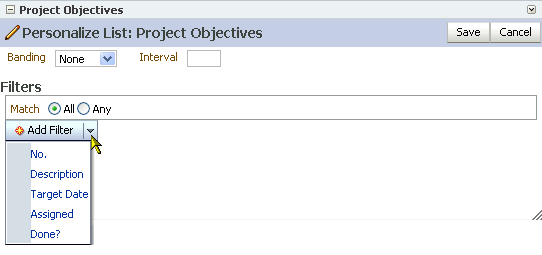
From the Add Filter menu, select a list column against which to apply your filtering criteria (Figure 17-50).
The filtering criteria that display depend on the data type of the selected column. For example, Figure 17-51 displays filtering criteria for a DateTime data type.
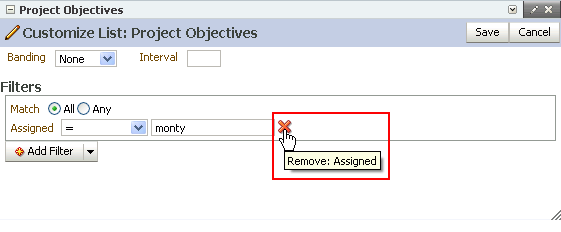
The Delete icon next to a filter provides a quick way to remove the associated filter. You can apply one or multiple filters per list column.
Table 17-3 illustrates and describes the filtering operators you can apply to the different list data types.
Table 17-3 Filtering Operators for List Data Types
Data Type and Filtering Operators Description 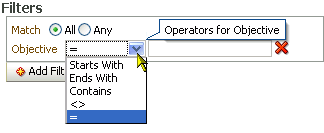
Use String data type filtering operators to specify that String values in the selected column must:
-
= —Match the characters you specify
-
Starts With—Start with the character(s) you specify
-
Ends With—End with the character(s) you specify
-
<>—Contain any String other than the one you specify
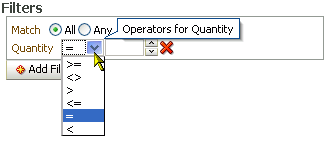
Use Number data type filtering operators to specify that Number values in the selected column must be:
-
= —Equal to the value you specify
-
>= —Equal to or higher than the value you specify
-
<>—Higher or lower than the value you specify
-
>—Higher than the value you specify
-
<= —Equal to or lower than the value you specify
-
<—Lower than the value you specify
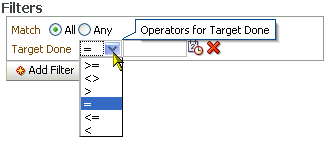
Use DateTime data type filtering operators to specify that DateTime values in the selected column must be:
-
= —The same as the date or date and time that you specify
-
>= —More recent or the same as the date or date and time that you specify
-
<>—Any date or date and time other than the value you specify
-
>—More recent than the date or date and time that you specify
-
<= —Preceding or matching the date or date and time that you specify
-
<—Preceding the date or date and time that you specify

Use Boolean data type filtering operators to specify that Boolean values in the selected list column must:
-
= —Match the value you specify
-
<>—Not match the value you specify
The Boolean value is expressed as a check box. A checked box means TRUE or YES; a cleared box means FALSE or NO.
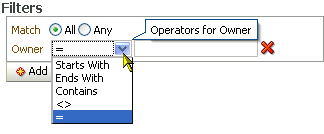
Use Person data type filtering operators to specify that Person values in the selected list column must:
-
= —Match the user name you specify
-
Starts With—Start with the character(s) you specify
-
Ends With—End with the character(s) you specify
-
<>—Contain any user name other than the one you specify
-
-
Click Save to save your filtering criteria and return to the list.
The list is refreshed, now displaying data that matches your filtering criteria.
17.2.4.1.3 Removing a Permanent, Personal List Filter
To remove a permanent, personal list filter:
-
Log in to Oracle WebCenter Spaces.
For information about logging in, see Section 2.2.1, "Logging In to a WebCenter Application."
-
Go to the List Viewer task flow from which you want to remove personal filtering.
-
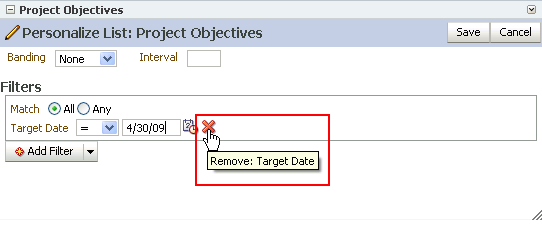
Click the Personalize icon on the task flow header (Figure 17-52).
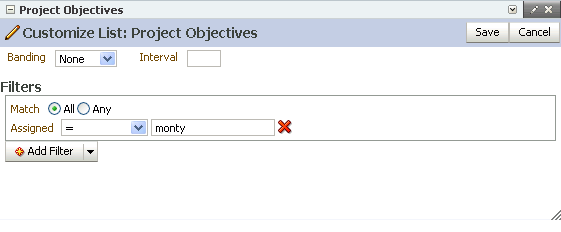
The List Viewer enters Personalize List mode (Figure 17-53).
-
Click the Remove icon next to the filtering criteria you want to remove (Figure 17-54), and then click Save.
List data is refreshed, now displaying any data previously hidden by a filter.
17.2.4.1.4 Applying Filters to Everyone's View of a List
If you want the list filters you create to apply to all users' views of a particular list instance, simply create the filters in page edit mode.
Note:
For information about removing a filter from everyone's view of a list instance, see Section 17.2.4.1.5, "Removing Filters from Everyone's View of a List."To apply filters to everyone's view of a list:
-
Log in to Oracle WebCenter Spaces.
For information about logging in, see Section 2.2.1, "Logging In to a WebCenter Application."
-
Go to the List Viewer task flow that contains the data you want to filter from everyone's view.
-
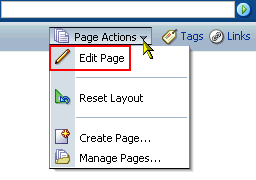
From the Page Actions menu, select Edit Page (Figure 17-55).
The page opens in Oracle Composer.
-
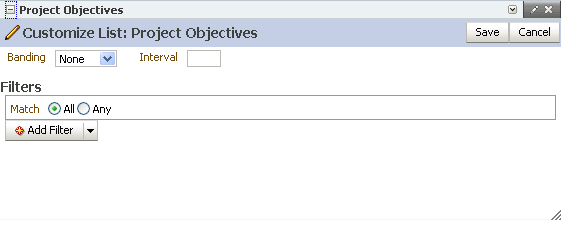
Go to the task flow instance you want to filter, and click the Edit icon on the task flow header (Figure 17-56).
The List Viewer enters Customize List mode (Figure 17-57).
-
Create and apply filtering criteria as described in Section 17.2.4.1.2, "Applying a Permanent, Personal Filter to a List Instance."
-
Click Close to exit Oracle Composer.
17.2.4.1.5 Removing Filters from Everyone's View of a List
To remove a filter from everyone's view of a list:
-
Log in to Oracle WebCenter Spaces.
For information about logging in, see Section 2.2.1, "Logging In to a WebCenter Application."
-
Go to the List Viewer task flow from which you want to remove a filter from everyone's view.
-
From the Page Actions menu, select Edit Page (Figure 17-58).
The page opens in Oracle Composer.
-
Go to the task flow instance from which you want to remove a filter, and click the Edit icon on the task flow header (Figure 17-59).
The List Viewer enters Customize List mode (Figure 17-60).
-
Click the Remove icon next to the filters you want to remove (Figure 17-61), and then click Save.
List data is refreshed, now displaying all unfiltered data.
17.2.4.2 Sorting and Resizing List Columns
When you first add data to a list, it may wrap, depending on the default column width. It's a simple matter to drag the column to provide more room for column text. In addition to widening columns, you can control the sort order of list columns by clicking sort icons in each column's header.
Note:
To resize list columns, the list must contain at least one row.When you sort list data or resize list columns in page view mode (personalization), such changes affect only your view of a list instance. When you sort list data or resize list columns in page edit mode (customization), all users' views of the list instance are affected.
A second instance of a list is not affected by the customizations or personalizations you make to the first instance. For example, imagine that you have placed the Issues list on both the Sales page and the What's New page. If you resize Issues list columns on the Sales page, they are not also simultaneously resized on the What's New page.
This section describes how to sort and resize list columns in your view of a list instance and in everyone's view. It contains the following subsections:
17.2.4.2.1 Sorting and Resizing Columns in Your View of a List
To sort list data and resize list columns:
-
Log in to Oracle WebCenter Spaces.
For information about logging in, see Section 2.2.1, "Logging In to a WebCenter Application."
-
Go to the list where you want to sort data or resize columns.
-
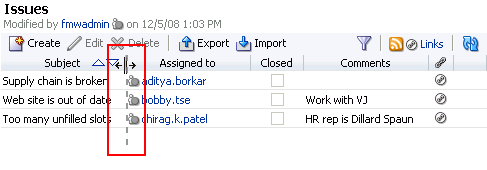
To resize a column, click and hold on a column splitter, and drag it to make the column wider or narrower (Figure 17-62).
Tip:
After you personalize a list by resizing list columns in page view mode, select a list row. This triggers a server request, which is required to make your personalization persist across your browser sessions.If you navigate away from the page without performing such a server request in the list view, the column size is lost and reverts back to the previous size when you return to the page.
-
To sort list data, go to the column you want to use to control the sort, roll your mouse over the column header, and click the Sort Ascending icon to sort the list in ascending order (1, 2, 3, a, b, c); or click the Sort Descending icon to sort the list in descending order (c, b, a, 3, 2, 1) (Figure 17-63).
17.2.4.2.2 Sorting and Resizing Columns in Everyone's View of a List
To sort and resize list columns in everyone's view of a list instance, you must first enter page edit mode. This section describes how:
-
Log in to Oracle WebCenter Spaces.
For information about logging in, see Section 2.2.1, "Logging In to a WebCenter Application."
-
Go to the page that contains the list instance you want to change.
-
From the Page Actions menu, select Edit Page (Figure 17-64).
-
To resize a column, click and hold on a column splitter, and drag it to make the column wider or narrower (Figure 17-65).
-
To sort list data, go to the column you want to use to control sort order, roll your mouse over the column header, and click the Sort Ascending icon to sort the list in ascending order (1, 2, 3, a, b, c); or click the Sort Descending icon to sort the list in descending order (c, b, a, 3, 2, 1) (Figure 17-63).
-
In Oracle Composer, click Close to exit page edit mode.
17.2.4.3 Changing Column Order on a List Instance
You can rearrange the order of list columns in your own view and in everyone's view of a list instance by dragging a column and dropping it to the desired position. The difference between personalization and customization in this case is the page mode in effect when you make such a change. Personalizations, which affect only your view of a list instance, occur in page view mode, while customizations, which affect all users' views of a list instance, occur in page edit mode.
Note:
For information about rearranging the column order in the list structure, affecting all instances of a particular list, see Section 17.2.2.2.4, "Rearranging List Columns."This section describes how to change column order in your view and everyone's view of a list instance. It contains the following subsections:
17.2.4.3.1 Changing Column Order in Your View of a List Instance
To change column order list columns in your own view of a list instance:
-
Log in to Oracle WebCenter Spaces.
For information about logging in, see Section 2.2.1, "Logging In to a WebCenter Application."
-
Go to the page that contains the list instance you want to change.
-
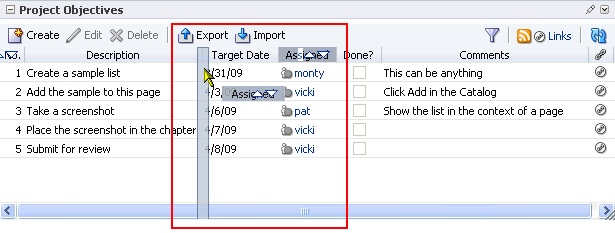
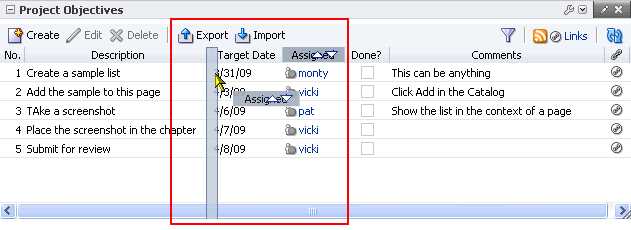
Click and hold on a list column title, and drag and drop it to the desired location (Figure 17-67).
-
Repeat step 3 until you have columns arranged in the desired order.
17.2.4.3.2 Changing Column Order in Everyone's View of a List Instance
Given sufficient permission, you can customize a particular list instance by rearranging that instance's column order. This section describes how.
To change column order in everyone's view of a list instance:
-
Log in to Oracle WebCenter Spaces.
For information about logging in, see Section 2.2.1, "Logging In to a WebCenter Application."
-
Go to the page that contains the list instance you want to change.
-
From the Page Actions menu, select Edit Page (Figure 17-68).
-
Click and hold on a list column title, and drag and drop it to the desired location (Figure 17-69)
-
Repeat step 4 until you have columns arranged in the order you intend.
-
In Oracle Composer, click Close to exit page edit mode.
17.2.4.4 Applying Color Banding to List Rows
Color banding refers to a transparent overlay of color applied at specified intervals to list rows or columns. When you define color banding on a list, you specify whether to apply color banding and how often to apply it.
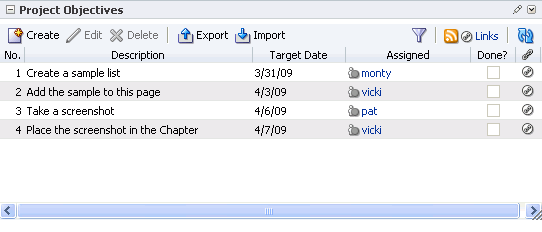
You can easily enhance the readability of a list by applying row or column color banding (Figure 17-70).
You can apply color banding to your personal view of a list instance or to everyone's view of a list instance. This section describes how. It contains the following subsections:
17.2.4.4.1 Applying Color Banding to Your Personal View of a List
You can apply color banding to list rows or to list columns. This section describes how.
To apply color banding to your personal view of a list instance:
-
Log in to Oracle WebCenter Spaces.
For information about logging in, see Section 2.2.1, "Logging In to a WebCenter Application."
-
Go to the List Viewer task flow that contains the list you want to personalize with color banded rows or columns.
-
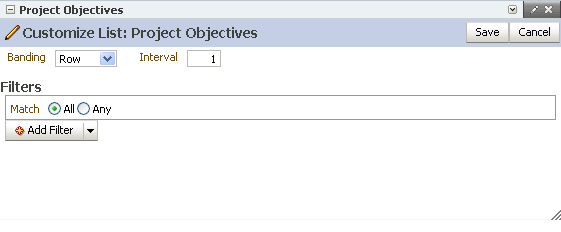
Click the Personalize icon on the task flow header (Figure 17-71).
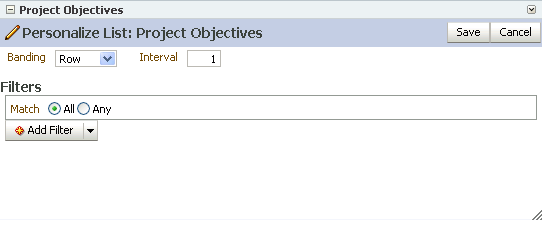
The List Viewer enters Personalize List mode (Figure 17-72).
-
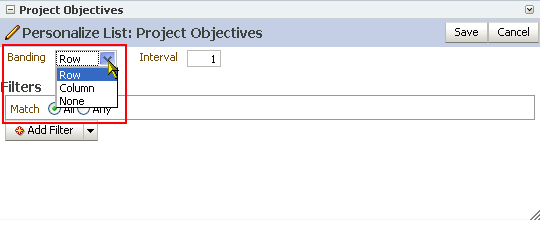
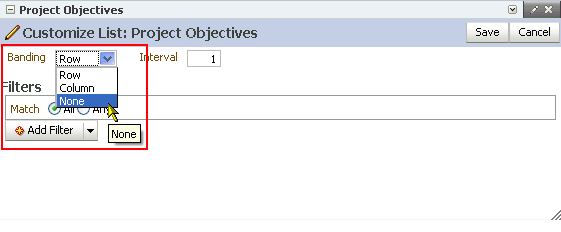
From the Banding pick list, select a banding style for the list instance (Figure 17-73):
Choose from:
-
Row—To specify color banding on list rows.
-
Column—To specify color banding on list columns.
-
None—To turn color banding off.
-
-
In the Interval field, enter the number of rows or columns to skip between color bands.
For example, when you apply color bands to rows, a value of
1applies a color band to the second row, fourth row, sixth row, and so on. Figure 17-74 illustrates an interval value of1. -
Click Save to save your settings and return to the list.
List data is refreshed, now reflecting your color banding settings.
17.2.4.4.2 Removing Personal Color Banding
To remove personal color banding from a list:
-
Log in to Oracle WebCenter Spaces.
For information about logging in, see Section 2.2.1, "Logging In to a WebCenter Application."
-
Go to the List Viewer task flow that contains the list from which you want to remove color banding.
-
Click the Personalize icon on the task flow header (Figure 17-75).
The List Viewer enters Personalize List mode (Figure 17-76).
-
From the Banding pick list, select None (Figure 17-77):
-
Click Save to save your settings and return to the list.
List data is refreshed, now showing no color banding.
17.2.4.4.3 Applying Color Banding to Everyone's View of a List Instance
When you want your color banding settings to affect everyone's view of a particular list instance, follow the steps in this section.
To apply color banding to everyone's view of a list instance:
-
Log in to Oracle WebCenter Spaces.
For information about logging in, see Section 2.2.1, "Logging In to a WebCenter Application."
-
Go to the List Viewer task flow that contains the list you want to customize with color banded rows or columns.
-
From the Page Actions menu, select Edit Page (Figure 17-78).
The page opens in Oracle Composer.
-
Go to the List Viewer task flow instance you want to customize, and click the Edit icon on the task flow header (Figure 17-79).
The List Viewer enters Customize List mode (Figure 17-80).
-
Configure color-banding settings as described in Section 17.2.4.4.1, "Applying Color Banding to Your Personal View of a List."
-
Click Close to exit Oracle Composer.
17.2.4.4.4 Removing Color Banding from Everyone's View of a List
To remove color banding from everyone's view of a list instance:
-
Log in to Oracle WebCenter Spaces.
For information about logging in, see Section 2.2.1, "Logging In to a WebCenter Application."
-
Go to the List Viewer task flow that contains the list from which you want to remove color banding from everyone's view.
-
From the Page Actions menu, select Edit Page (Figure 17-81).
The page opens in Oracle Composer.
-
Go to the List Viewer task flow instance you want to customize, and click the Edit icon on the task flow header (Figure 17-82).
The List Viewer enters Customize List mode (Figure 17-83).
-
From the Banding pick list, select None (Figure 17-84).
-
Click Save to save your changes and exit Customize List mode.
The list refreshes, with color banding removed.
-
Click Close to exit Oracle Composer.
17.2.5 Exporting a List to a Spreadsheet and Importing an Exported Spreadsheet
The Lists service provides a means of exporting and importing lists. If you have View access to the list, you can export it to a Microsoft Excel 2007 format (.xlxs) and revise list data in Excel. If you have Edit access to the list, you can import the revised list back into WebCenter Spaces.
This section describes how to export and import lists and provides information about additional software that may be of use in this process. It contains the following subsections:
17.2.5.1 What You Should Know About Exporting and Importing Lists
Use list export and import to add and revise list rows in a Microsoft Excel spreadsheet. List structure is preserved during export and import, as are any links you may have associated with the list or list rows.
If, in WebCenter Spaces, you add a link to a row of an exported list, then import the list, the link is preserved. When you export a list with links, only the list is exported, not the links. The list takes with it identifiers that preserve the association of the list with its links. However, if you delete a link on a row in WebCenter Spaces, the link is not restored when the list is imported.
After you export a list, other changes to content in WebCenter Spaces are overwritten when you import the list. Before content is overwritten, a confirmation dialog box provides you with an opportunity to stop the import and preserve the WebCenter Spaces changes.
Importing a spreadsheet cannot be used to create a list or modify list structure. You can import a spreadsheet only into the list from which it was exported. However, you can export a rowless list to a spreadsheet, add rows in Excel, and then import it.
You must take care when you export a list not to revise list structure in Excel nor in WebCenter Spaces. You cannot import a spreadsheet if the list structure is changed in WebCenter Spaces after export. You can add and remove list rows in the spreadsheet; such changes are reflected in the list on import.
Adding and removing list columns in the spreadsheet does not affect the list structure. Consequently, when you import a spreadsheet with columns that were removed through Excel, the import succeeds. The columns continue to appear in the imported list; though the deleted column data does not.
When you export a list from WebCenter Spaces, the exported spreadsheet file is in Microsoft Excel 2007 format (.xlsx). To import a spreadsheet, it must also be in this format. If you have Excel 2007 installed, you may export list data to a spreadsheet, edit and save the data in Excel 2007, and then import the spreadsheet.
If you have an older version of Excel installed, you may still use the export/import spreadsheet feature by installing the Microsoft Office Compatibility Pack for Word, Excel, and PowerPoint 2007 File Formats.
You can find the compatibility pack at the following location:
You can find instructions for using the compatibility pack at the following location:
http://support.microsoft.com/kb/924074
The compatibility pack enables you to save spreadsheets in .xlsx format directly in Excel versions 2000 and 2003. It enables you to convert Excel 2002 spreadsheets in .xlsx format through Windows Explorer.
Note:
It is possible to open a spreadsheet in .xlsx format directly in Excel in read-only mode and then save the file in .xls format from Excel. However, this conversion results in data loss that does not occur with the compatibility pack. The resulting file is missing data that is required to import the spreadsheet. Thus a subsequent import of the spreadsheet fails even after conversion back to .xlsx format.To convert to .xls after export, right-click the exported spreadsheet (an .xlsx file) in Windows Explorer, select Save As, and choose the Microsoft Office Excel 97-2003 Worksheet (*.xls) in the Save as type dialog box. Open the .xls file in Excel, edit, and save.
To convert the .xls spreadsheet to .xlsx before import, right-click the spreadsheet (an .xls file) in Windows Explorer, select Save As, and choose the Microsoft Office Excel 2007 Workbook (*.xlsx) in the Save as type dialog box. Now you can import the new .xlsx file.
17.2.5.2 Exporting a List to a Spreadsheet
When you have, minimally, View access to a list, you can export the list to a Microsoft Excel 2007 formatted file (.xlsx). Exporting enables you to use your Excel skills to easily add to and revise list data. Controls for exporting lists are available in both the List Viewer and List Manager task flows.
To export a WebCenter Spaces list:
-
Log in to Oracle WebCenter Spaces.
For information about logging in, see Section 2.2.1, "Logging In to a WebCenter Application."
-
Go to the group space that contains the list data you want to export.
For information about navigating to a group space, see Section 2.4.4, "Opening Group Spaces."
-
Go to the list you want to export.
-
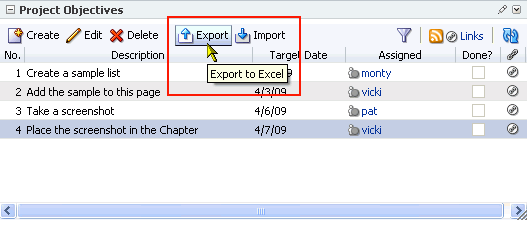
Click the Export button above the list (Figure 17-85).
-
Follow your browser's prompts to save the exported .xlsx file to your local file system.
Note:
If you are using Excel 2007, then you can either open the file directly in Excel or save it to the file system. If you are using Excel 2000, then you must save the file to the file system and convert the file in Windows Explorer using The compatibility pack.According to the Microsoft support Web site (
http://support.microsoft.com/kb/924074), you can now use Excel 2002 and 2003 to create, open, edit, and save files to the Excel 2007 (*.xlsx) format.The list is saved as an .xlsx file. The file name is the list name, with underscores used in lieu of character spaces. For example,
my listbecomesmy_list.xlsx.
17.2.5.3 Importing an Exported Spreadsheet
After you have revised list data and saved it in Excel 2007 (*.xlsx) format, you can import it using controls available in both the List Viewer and List Manager task flows. To import list data, you must have, minimally, Edit permission on the list.
To import an exported list:
-
Log in to Oracle WebCenter Spaces.
For information about logging in, see Section 2.2.1, "Logging In to a WebCenter Application."
-
Go to the group space that contains the list you want to import.
For information about navigating to a group space, see Section 2.4.4, "Opening Group Spaces."
-
Go to the list you want to import.
-
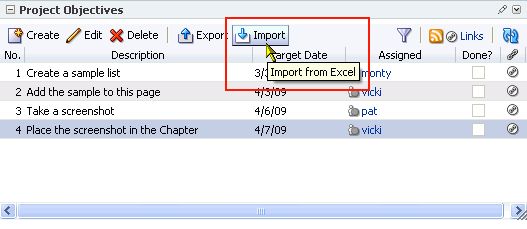
Click the Import button above the list (Figure 17-85).
-
In the Import from Excel dialog box (Figure 17-87), click the Browse button and navigate to and select the revised list file.
The file must be in Excel 2007 format (*.xlsx).
-
Click Import.
The list is refreshed, now displaying the revised data. List data is validated on import. If any rows contain validation errors, such errors are presented in a dialog box and the import is terminated. You can correct validation errors in the spreadsheet and import again.
17.3 Setting Lists Service Task Flow Properties
List service task flows have associated properties, which users with sufficient privileges can access in Oracle Composer. Use properties to adjust task flow appearance and data on a single task flow instance and to wire task flows to each other and to page parameters and page definition variables.
Note:
For information about wiring pages and components, see Chapter 8, "Wiring Pages, Task Flows, Portlets, and UI Components".List service Component Properties are presented on five tabs:
-
Parameters
-
Display Options
-
Style
-
Content Style
-
Events
Not all components provide the same properties; consequently, not all components display all five tabs.
All properties on the Parameters and Display Options tabs provide access to an editor, which you can use to select or specify a variable value in lieu of a constant value. Click the Edit icon next to a property field to open the editor (Figure 17-88).
Use the editor to select predefined values, under Choose a value, or to enter a value or an Expression Language expression, under Type a value or expression. The editor provides a test feature, which you can use to validate your selection or entry. For more information about using the editor and for access to a table of common EL expressions, see Section 7.4.5, "Using Expression Language (EL) Expressions with Component Properties."
Many properties are common to all task flows. Additionally, the method for accessing task flow properties is the same from task flow to task flow. Common task flow properties and how to access them are discussed in Section 7.4, "Setting Properties on Page Content."
Some properties are unique to the task flow type. Those properties unique to Lists service task flows are listed and described in Table 17-4. Note that list Parameter values are set automatically and should not be changed.
Table 17-4 Parameters of Lists Service Task Flows
| Property | Description | Associated Task Flow |
|---|---|---|
|
A unique identifier within the scope for the list to display Either |
Lists (List Viewer) |
|
|
A unique identifier within the scope for the list customization This value is set automatically. Do not edit this value. |
Lists (List Viewer) |
|
|
A boolean value representing whether to display the list name and description If no value is present, the list name and description are not shown. Values include true and false. This value is set automatically. Do not edit this value. |
Lists (List Viewer) |
|
|
A unique identifier for the scope containing the list If no value is present, the current scope is used. This value is set automatically. Do not edit this value. |
Lists (List Viewer) |
|
|
A unique identifier for the list to display Either List ID or Local List ID must have a value. This value is set automatically. Do not edit this value. |
Lists (List Viewer) |
