

|
This chapter provides an overview of visitor entitlements. Visitor entitlements allow you to define who can access the resources in a portal application and what they can do with those resources. This access is based on the role assigned to a portal visitor, allowing for flexible management of the resources. Use the WebLogic Portal Administration Console to configure visitor entitlements.
Visitor entitlement roles dynamically determine what access privileges a portal visitor has based on username, group membership, user profile properties, session and request attributes, and date and time functions. For example, the Gold Member role could be assigned to certain visitors because they are part of the frequent flyer program and have flown more than 50,000 miles in the previous year. This role is dynamically assigned to visitors when they log in to the site.
As another example, if you have an Employee Review portlet, you can create a visitor entitlement role called Managers and assign only managers to this role. Only logged in portal visitors who are assigned that role can view the Employee Review portlet.
| Note: | If no visitor entitlement roles exist, the default behavior is to allow access to the portal and portal resources to all visitors. Content management entitlements are an exception to this policy. If there are no entitlements set on content management components, then those components are not accessible to visitors. |
This chapter includes the following sections:
Visitor entitlement roles dynamically determine what access privileges a portal visitor has based on username, group membership, user profile properties, session and request attributes, and date and time functions.
Perform the following steps to create a new visitor entitlement role:
| Note: | You can also change the scope of the role, or set the scope to enterprise level, as described in Using Web-Application or Enterprise-Application Scoped Roles for Entitlements on Portal Resources. |
The new visitor entitlement role appears in the resource tree.
You can now define the role by adding users to the role, adding groups to the role, or using expressions. For more information, see Adding Users, Groups, and Conditions in Visitor Entitlement Roles.
After you define the visitor entitlement role, you can set entitlements on portal resources, content management resources, and groups.
Once you create visitor roles in the WebLogic Portal Administration Console, you can add users and groups to them. You can also create conditions, based on user profile properties, session and request attributes, dates, and times, that determine who is assigned a visitor entitlement role.
When you add a user to a visitor role, you grant that visitor access to the resources in a portal application and determine what they can do with those resources. This section describes how to add one or more users to a visitor role.
For optimal performance, if you have a large number of users you want to add to a role, either:
Perform the following steps to add one or more users to a visitor entitlement role:
| Tip: | If you are using an SQL authentication provider, be aware that user names are case sensitive. For example, user Bob is different than user bob. |
Any users you have added now appear in Users in Role section in the Details and Users in Role tabs.
When you add a group to a role, you grant the members (users) in that group—and users in any sub-groups of that group—access to all of the visitor entitlements attributed to that role.
Perform the following steps to add a group to a visitor role:
| Tip: | If you are using an SQL authentication provider, be aware that group names are case sensitive. For example, group Managers is different than group managers. |
| Tip: | Roles can sometimes be mapped directly to groups. The difference between groups and roles is that group membership is statically assigned by a server administrator, while role membership is dynamically determined based on information including the username, group membership, user profile properties, session and request attributes, and date and time functions. Roles can also be scoped to specific WebLogic resources within a single application in a WebLogic Server domain, while groups are always scoped to an entire WebLogic Server domain. |
| Note: | If a list of groups is not displayed, make sure you have built a group hierarchy tree for the authentication provider. If you do not see a list of groups after building a group hierarchy tree, the authentication provider might not allow read access. To see if your authentication provider allows read access, view the authentication provider details, as described in Viewing Authentication Provider Details. |
| Note: | You can activate a text field for group name entry for authentication providers that do not allow read access. |
Any groups you have added now appear in the Groups in Role section in the Details and Groups in Role tabs.
You can use expressions to set conditions, in addition to username and group membership, that dynamically determine membership in a visitor entitlement role. Conditions specify the values of user profile properties, session and request attributes, dates, and times.
For example, you can define a role with the following expression: If a logged-in user has the administrator property set to true and the time is between 9 a.m. and 5 p.m. PST, the user is a role member.
Perform the following steps to add conditions to a visitor role:
Specify a date using the calendar.
Specify a date using the calendar.
Specify a date and time using the calendar.
Specify a time range using the calendars.
Specify a date range using the calendars.
Specify a range of dates and times using the calendars.
To set characteristics, you must specify a Property Set, a Property from the property set, a Value for the property, and the ANY or ALL comparator. Specify a property value from the pull-down menu. You can click Add Another Value to add multiple properties and corresponding values.
Specify WSRP registration properties. For more information, see the Federation Guide.
| Tip: | User profile properties, HTTP session and request properties, and WSRP registration properties are created by developers in Workshop for WebLogic. |
| Note: | If you define roles with expressions whose evaluation changes during the processing of a request, you may need to adjust your portal application cache settings to ensure that the correct role definition is retrieved instead of a cached role. |
You can change who is assigned a role by removing users, groups, and conditions from visitor entitlement roles.
If you want to revoke visitor access to the resources in a portal application associated with a role, you can remove a user from the role.
Perform the following steps to remove one or more users from a visitor entitlement role:
Users you have removed no longer appear in the Users in Role tab or the Users in Role section of the Details tab.
If you want to revoke visitor access to the resources in a portal application associated with a role, you can remove a group from the role.
Perform the following steps to remove one or more groups from a visitor entitlement role:
Groups you have removed no longer appear in the Groups in Role tab or the Groups in Role section of the Details tab.
Perform the following steps to remove one or more conditions from a role:
Conditions you have removed no longer appear in the Role Expressions tab or in the Expressions in Role section of the Details tab.
You can modify an existing expression in a visitor entitlement role, as long as you do not want to change the type of condition. For example, if you created a condition based on a date range, you can change the dates.
You can also add a condition from this tab; see Adding Conditions to Visitor Roles with Expressions for more information. To remove a condition, see Removing Conditions in Visitor Entitlement Roles.
Perform the following steps to modify a role condition:
The modified condition appears in the list of conditions.
Once you have created a role, you can select it in the Visitor Roles tree to see a detailed description of the role.
Perform the following steps to view the details of a visitor entitlement role:
| Note: | To see roles scoped to the enterprise level, or roles in a different web application, set the scope as described in Creating Visitor Entitlement Roles. |
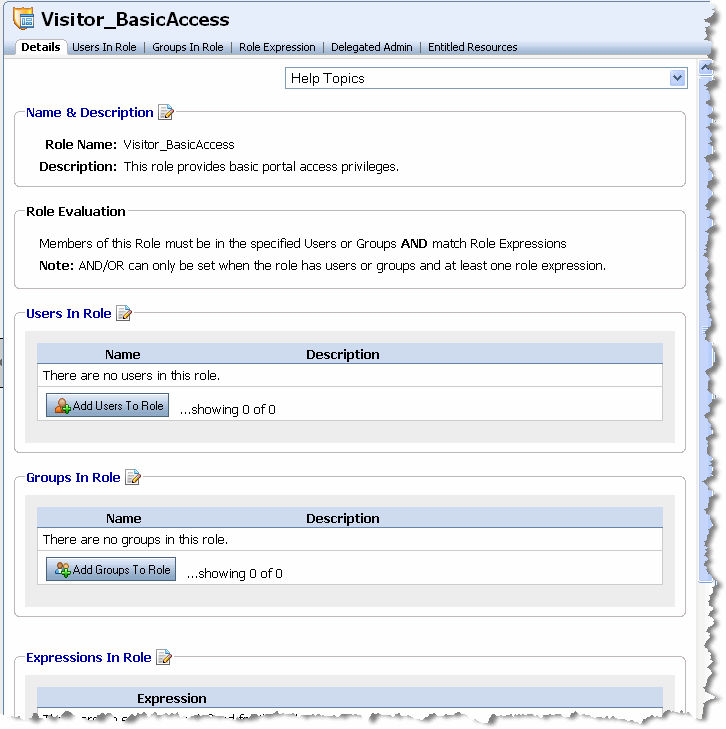
Figure 8-2 shows the Details tab for the Visitor_BasicAccess role.

You can view summary information about a visitor entitlement role to learn what security policies have been created for that role. This is useful because you cannot delete a visitor entitlement role until you remove its access to all resources.
Perform the following steps to view a visitor entitlement role’s policy summary information:
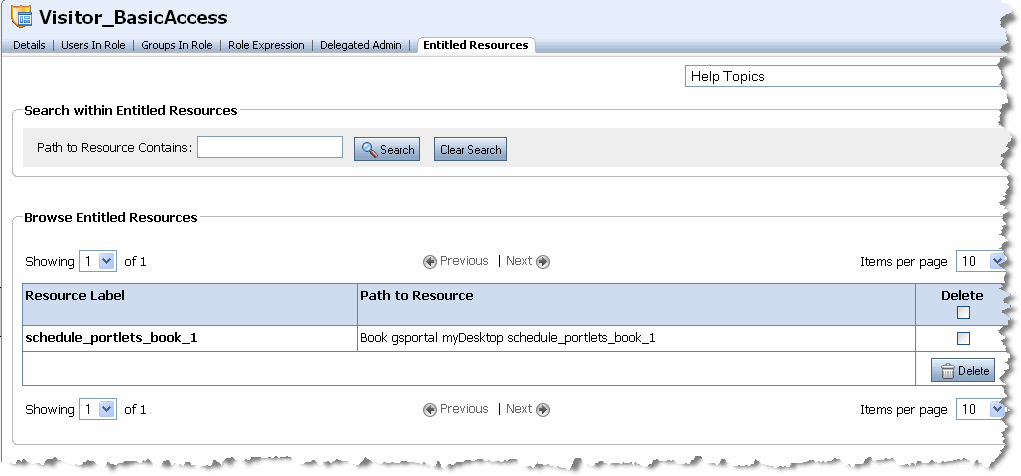
Figure 8-3 shows the Entitled Resources tab.

You can change the name and description of existing visitor entitlement role if there are no policies associated with the role. For information about viewing the policies associated with a role, see Viewing the Entitled Resources.
| Tip: | If there are policies associated with a role, it does not appear as editable in the Details tab. |
Perform the following steps to rename a visitor entitlement role:
The new role name appears in the Visitor Roles tree and the tabs.
Perform the following steps to delete a visitor entitlement role:
If you receive a message that the role cannot be deleted while there are entitled resources associated with it, select the Entitled Resources tab for that role to view, and optionally delete, the resource dependencies. For more information, see Viewing the Entitled Resources.
You can set visitor entitlements in the resource library or the desktop. Within the library, you can entitle specific books, pages, and portlets, or all resources in each of these categories. Within a given desktop you can entitle specific resources, such as a page, book, or portlet in that desktop. You can also entitle an entire desktop.
Visitor entitlements in the portal resource library apply to all instances of the resource in portal applications. However, they do not bar you from setting more local policies in the desktop. If you set a security policy for a resource in a desktop but not in the resource library, it applies only to that instance of the resource. Therefore, if you do not secure a resource within the resource library, you must secure each instance of the resource, wherever it appears in the hierarchy of books and pages in the desktop.
To protect all instances of a specific book, page, or portlet, or all books, pages, or portlets, set the security policies for the resource or resource type in the portal resource library. The library contains the master versions of all portal resources, and the security policies set in the library apply to a resource wherever it appears in the desktop (Portals node).
You can use web-application scoped roles or enterprise-application scoped when setting entitlements on portal resources. If each web application has different requirements for constraints on visitor access, you should typically use web-application scoped roles. However, if you want to use the same roles in multiple web applications within an enterprise application, you can use enterprise-application scoped roles.
Perform the following steps to change the scope of a role:
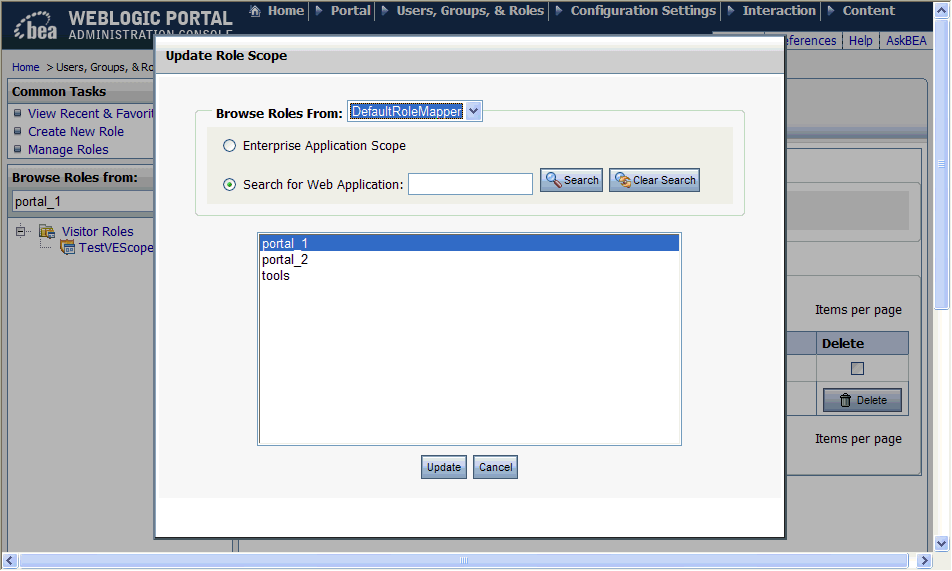
Figure 8-4 shows the Update Role Scope dialog.
| Tip: | When you assign a visitor role to a portal resource, you can choose from global WebLogic Server roles as well as enterprise-application and web-application scoped roles. |
The text following Browse Roles from in the section above the Visitor Roles tree is updated.

Security policies determine what capabilities a visitor entitlement role has for a given portal resource. You can set visitor entitlements in the resource library or in the desktop (Portals node). Within the library, you can entitle specific books, pages, and portlets, or all resources in each of these categories.
| Note: | To protect all instances of a specific book, page, or portlet, or all books, pages, or portlets, set the security policies for the resource or resource type in the portal resource library. The library contains the master versions of all portal resources, and the security policies set in the library apply to a resource wherever it appears in the desktop. |
You can create entitlements to control visitor access to the following types of portal resources in the library:
Each has visitor capabilities that are based on the type of resource, as shown in Table 8 -1.
Table 8-2 describes each visitor capability.
Determines whether the portlet will be offered (shown to a consumer) from the Web application’s WSRP producer for that role. This feature allows producers to control which portlets are offered to specific consumers. For more information on consumer entitlement, see
Consumer Entitlement in the Federated Portals Guide.
|
| Note: | If you create visitor entitlements on a portal resource, these can prevent a portal visitor from seeing a resource they would normally see according to personalization rules. |
Perform the following steps to set visitor entitlements on a portal resource (or resource category) in the library:
You can remove a role from the Roles to Add section by selecting the check box next to the role and clicking Remove Selected.
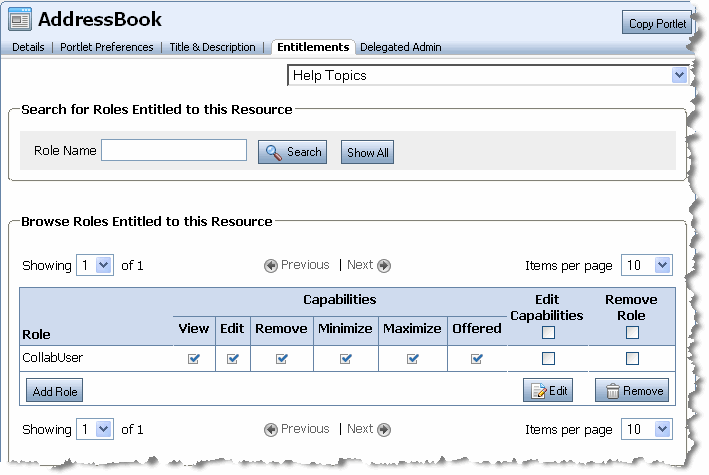
The roles you have added are listed in the Browse Roles Entitled to this Resource section, as shown in Figure 8-5.

Security policies determine what capabilities a visitor entitlement role has for a given portal resource. You can set visitor entitlements on portal resources in the library or the desktop (Portals node). Within a given desktop you can entitle specific resources, such as a page, book, or portlet in that desktop. You can also entitle an entire desktop or community.
| Note: | To protect all instances of a specific book, page, or portlet, or all books, pages, or portlets, set the security policies for the resource or resource type in the portal resource library. The library contains the master versions of all portal resources, and the security policies set in the library apply to a resource wherever it appears in the desktop. |
You can create entitlements to control visitor access to the following types of portal resources in the desktop:
Each has visitor capabilities that are based on the type of resource, as shown in Table 8 -3.
Table 8-4 describes each visitor capability.
Determines whether the visitor can create, read, update, or delete desktops. These settings are designed to allow administrators to control desktop creation through the REST APIs. See the Client-Side Development Guide for information on these APIs.
|
| Note: | If you create visitor entitlements on a portal resource, these can prevent a portal visitor from seeing a resource they would normally see according to personalization rules. |
Perform the following steps to set visitor entitlements on a portal resource in the desktop:
You can remove a role from the Roles to Add section by selecting the check box next to the role and clicking Remove Selected.
The roles you have added are listed in the Browse Roles Entitled to this Resource section.
If you no longer want a visitor role to be assigned to a particular portal resource, you can remove the resource from the visitor entitlement role. You can also change the capabilities of a visitor entitlement role on a portal resource, which is also described in this procedure.
| Tip: | You can also remove a visitor role from a resource from the Entitled Resources tab for that role. From this tab, you can delete a security policy by selecting the check box in the Delete column and clicking Delete. |
Perform the following steps to remove a visitor role from a portal resource or category of portal resource:
The changes you make are reflected in the Browse Roles Entitled to this Resource section.
GroupSpace and other community creators and owners can invite others to join the Community. Visitor entitlements determine whether a creator or owner can view potential members using the Browse options when selecting who to invite. For more information on GroupSpace and how to use invitations in GroupSpace, see the GroupSpace Guide.
The only visitor capability for groups is View access to the group, which determines whether the community owner or creator can see the group and the users in the group.
Perform the following steps to set visitor entitlements on a group:
You can select from enterprise-application scoped roles (not web-application scoped roles).
You can remove a role from the Roles to Add section by selecting the check box next to the role and clicking Remove Selected.
The roles you have added are listed in the Browse Roles Entitled to this Resource section.
If you no longer want visitors assigned to a role to be able to view a particular group, you can remove the visitor entitlement role from the group.
| Tip: | You can also remove a visitor role from a group from the Visitor Entitlements tree. In the Browse Policies section of the Entitled Resources tab for that role, select the check box in the Delete column for that policy and click Delete. |
Perform the following steps to remove a visitor role from a group:
The changes you make are reflected in the Browse Roles Entitled to this Resource section.
Create security policies to determine what capabilities a visitor entitlement role has for a given content management resource.
| Note: | If no visitor entitlement roles exist, the default behavior is to allow access to the portal and portal resources to all visitors. Content management entitlements are an exception to this policy. If there are no entitlements set on content management components, then those components are not accessible to visitors. |
| Tip: | Visitor entitlements on content management resources are used in the GroupSpace Document Library Portlet. For more information, see the GroupSpace Guide. |
You can create entitlements to control access to the following types of content management resources:
Each has visitor capabilities that are based on the type of resource, as shown in Table 8 -5.
| Tip: | The capabilities you assign to a visitor entitlement role determine how the visitor participates in the content workflow. For example, a role that is not granted Publish capabilities cannot transition content to the Published or Retired status. |
The capabilities that can be specified for content are described in Table 8-6.
The capabilities that can be specified for content types are described in Table 8-7.
The capabilities that can be specified for content workflows are described in Table 8-8.
The only capability that can be specified for a repository is the Manage capability. This allows you to modify the properties of the repository.
| Note: | If you create visitor entitlements on a content management resource, these can prevent a portal visitor from seeing content they would normally see according to personalization rules. |
Perform the following steps to set visitor entitlements on content:
- To set entitlements on workflows, select Repositories, and navigate to the workflow.
- To set entitlements on a content type. select Types, and navigate to the content type.
- To set entitlements on content, select Content, and navigate to the content.
- To set entitlements on a repository, select Repository and select the repository.
You can select from enterprise-application scoped roles (not web-application scoped roles).
You can remove a role from the Roles to Add section by selecting the check box next to the role and clicking Remove Selected.
The roles you have added are listed in the Browse Roles Entitled to this Resource section.
If you no longer want visitor capabilities to be available for content, a content type, or a workflow, you can remove visitor entitlements from it. You can also change the capabilities of the visitor entitlement role on the content management resource, which is also described in this procedure.
| Tip: | You can also remove a visitor entitlement role from a content management resource from the Entitled Resources tab for that role. From this tab, you can delete a security policy by selecting the check box in the Delete column and clicking Delete. |
Perform the following steps to remove or edit visitor entitlements on a content management resource:
The changes you make are reflected in the Browse Roles Entitled to this Resource section.
The entitlement engine is called for rules checking during the render phase of an operation, which represents additional system overhead. The entitlements engine is also responsible for managing administrative tasks, which increases that overhead.
The following are recommendations for limiting the performance impact of visitor entitlements:


|