

|
Web services provide an industry-standard way to develop SOA (service-oriented architecture) applications. Such services can be thought of as loosely coupled, distributed units of programming logic that can be re-configured easily to deliver new application functionality, both intra- and extra-enterprise.
Using Web services and BEA AquaLogic Data Services Platform (DSP) allow your applications to better leverage enterprise data assets.
This chapter explains you how to expose data services as standard Web services, and how to create client applications that can obtain the benefits of both Web services and SDOs. It covers these topics:
For more information about Web services, see:
http://download.oracle.com/docs/cd/E13222_01/wls/docs81/webservices.html
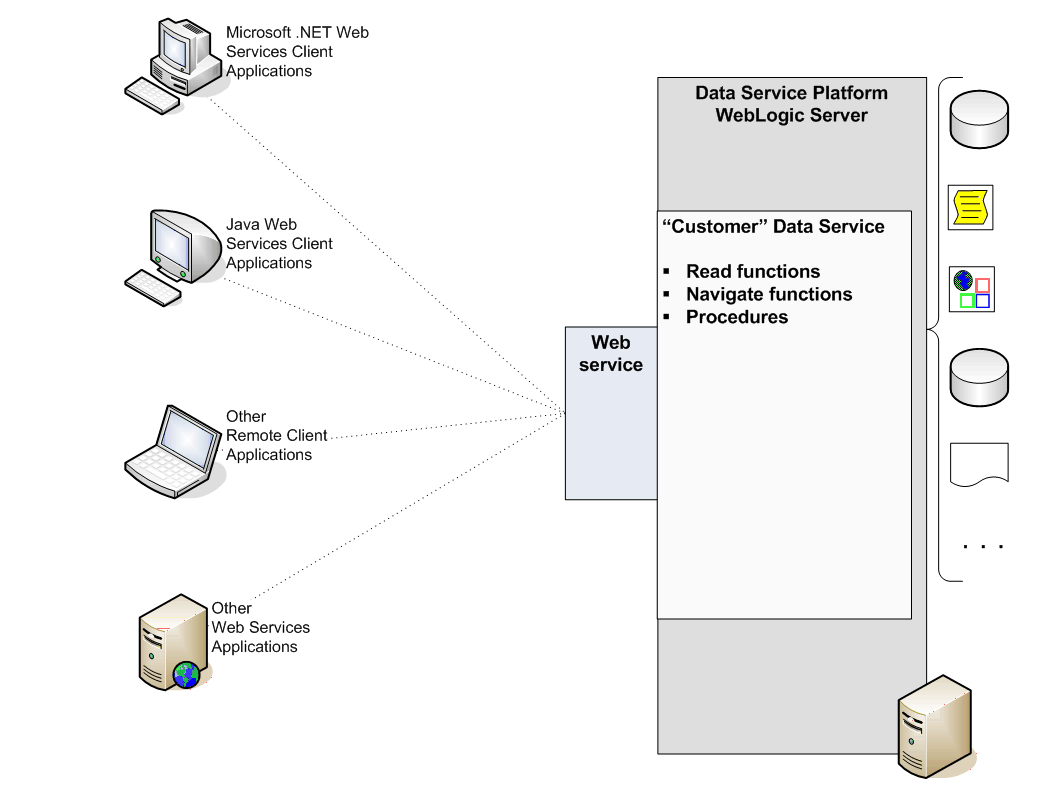
Exposing data services as Web services makes your information assets accessible to a wide variety of client types, including other Java Web service clients, Microsoft ADO.NET and other non-Java applications, and other Web services. Figure 4-1 illustrates the various approaches that client application developers can take to integrating data services and Web services.

| Note: | For information about ADO.NET-enabled Web services and client applications, see Supporting ADO.NET Clients. |
Data services can be integrated with Web services in one of two general ways:
| Note: | For details on working with static and dynamic SDO see Static and Dynamic SDO APIs. |
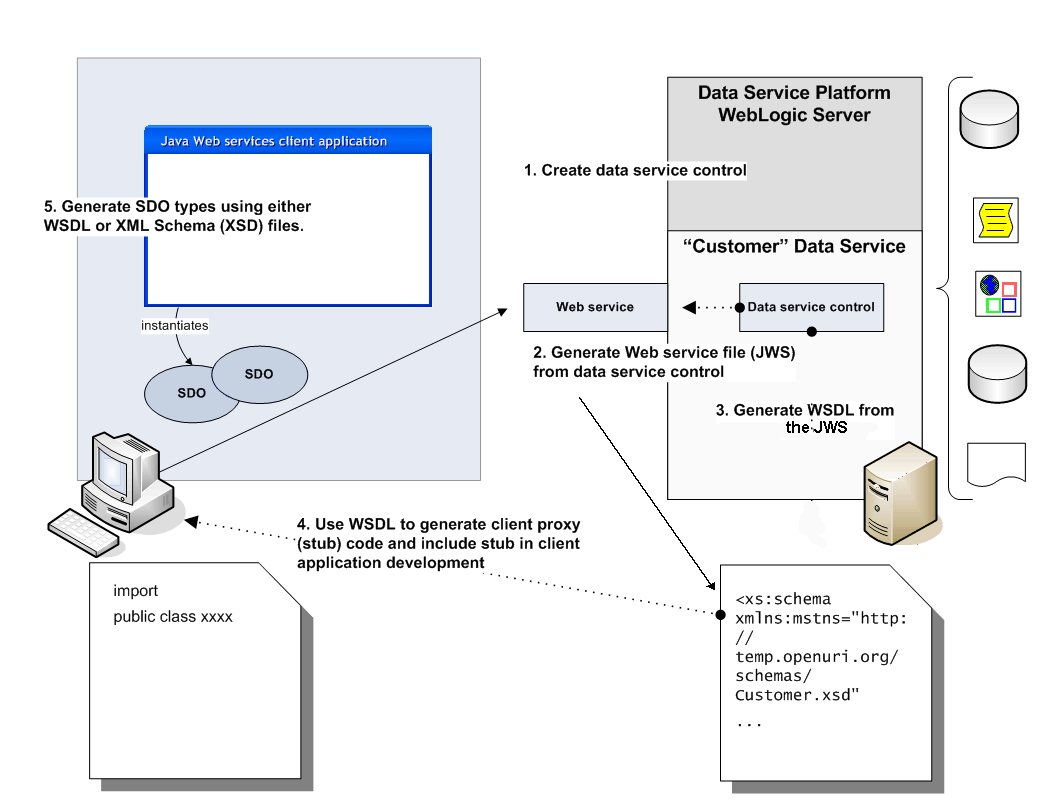
Figure 4-2 shows the end-to-end process — both the server-side and client-side tasks — that expose a DSP-enabled application as a Web service and implement a client application that invokes operations on that service.

DSP-enabled Web service development depends on whether you are working with read-only Web services or Web services which support read-write functionality.
There are two ways to create Web services from data services. By:
Both approaches rely on Data Service controls as the component-based integration mechanism.
You can easily add one or more Data Service controls to a Web service using WebLogic Workshop. Firstcreate a folder for the controls inside the Web service's project folder, and then create the Data Service controls.
You can also create controls during the process of adding them to the Web service but, for simplicity's sake, the instructions in this section assume that you have created the Data Service controls in advance. (See Creating Data Service Controls for more information on creating Data Service controls.)
Leave the checkbox labeled Make This a Control Factory unselected. (This checkbox would cause the Data Service control to be instantiated at runtime using the factory pattern, rather than as a singleton. To use the control in a Web service, it must be a singleton.)
LiquidDataControl.jar file is copied into the Libraries directory of the application. The variable you created in STEP 1 of the dialog displays as a node in the Data Palette, with its functions and procedures listed under the node. It is these functions and procedures that you can now expose to client applications, by adding them to the Web service's callable interface (shown as the left-hand portion of the Web service's Design View in WebLogic Workshop — see Figure 4-5), as described in the next step.
You can test your Web service as described in Testing a Web Service in WebLogic Workshop. After testing, you can deploy your Web service to a production WebLogic Server and use it as you would any other Web service. For information about developing Java-based Web service clients, see Client-Side DSP-Enabled Web Service Development.
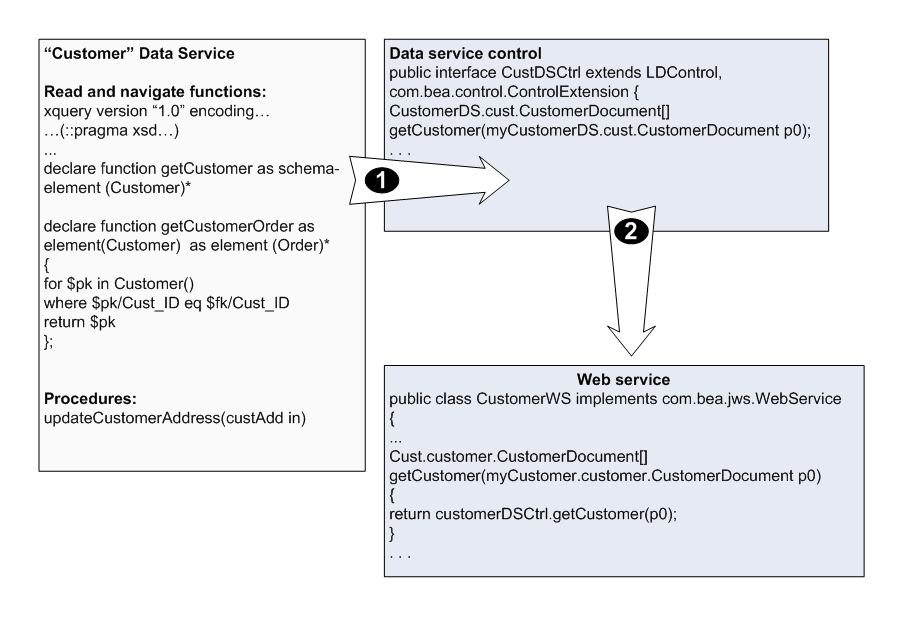
Another way to create a DSP-enabled Web service is by generating stateless Web services from Data Service controls. The generated Web services automatically include operations (method calls) for each of the functions and procedures that the Data Service control comprises.
Follow the instructions in this section to generate and test a stateless Web service. (These instructions assume that you have already created the Data Service control and that WebLogic Workshop is open.)

| Note: | Although WebLogic Workshop by default generates Web services that have the word "Test" embedded in the file names, these are deployable Web services. You can rename the generated Web service to eliminate the word "Test". |
You will see methods (operations) for each of the functions and procedures contained in the Data Service control.
If your Web service must support submits from Java Web service clients, you first need to modify the JWS file before generating the WSDL, as follows:
For instance, if the original signature of the submit() method of the generated JWS looks appears as:
java.util.Properties[] submitCustomerProfile(CustomerProfileDocument doc);
It should be modified to the following:
java.util.Properties[] submitCustomerProfile(DatagraphDocument rootDataObject)
CustomerProfileDocument doc = (CustomerProfileDocument) new    DataGraphImpl(rootDataObject).getRootObject();
return customerData.submitCustomerProfile(doc); //customerData is the DSP control
After you have created the WSDL file, provide it to your client application developers, so they can generate the Web services client interfaces and proxy code necessary (as discussed in Client-Side DSP-Enabled Web Service Development).
By default, WebLogic Workshop creates two operations in its generated Web services that can be used for testing purposes.
 Start from the WebLogic Workshop menu) to deploy and run the Web service using the local runtime. An informational message briefly appears, notifying you that the Web service is running. Shortly, the WebLogic Workshop Test Browser launches, displaying the Test Form.
Continue developing the functionality of the Web service as required, testing as you go along. Once the Web service is complete, you can create the artifacts necessary for client application development, as described in the next section, Client-Side DSP-Enabled Web Service Development.
| Note: | For more information about Web service client applications and WebLogic Server in general, see Invoking Web Services in Programming WebLogic Web Services in WebLogic Server documentation. |
Your client application uses either a static or a dynamic approach to Web services. Both approaches are discussed in this section. The following topics provide brief summaries of the appropriate uses of static and dynamic clients.
A static Web service client requires:
DSP includes the necessary utilities (Java classes and Ant tasks) to generate the following classes for your static Web service client:
A typical static Web service client can use the following code to retrieve a customer's record:
CUSTOMERDocument doc = wssoap.getCustomer("987654");
|
| Note: | The wssoap class is an instance of the generated Web service client proxy class; the doc object is an instance of the generated Static SDO class CUSTOMERDocument. |
A dynamic Web service client requires:
Neither the generated SDO classes, nor the Web service client proxy classes are needed for the Dynamic Web service client.
A typical dynamic Web service client can retrieve a customer's record with the following:
XmlObject param = XmlObject.Factory.parse( "<msg:getCustomer xmlns:msg='http://www.openuri.org/'><CustomerID>987654</CustomerID></msg:getCustomer>");
DataObject doc = (DataObject)call.invoke(new Object[]{param});| Note: | The call class is an instance of the Call interface of the JAX-RPC API. The doc object is an instance of the DataObject interface of the Dynamic SDO API. |
The following general steps are involved in developing a static Web service client for DSP:
You can generate an SDO Web service client using an Ant task (SDO Web Service Client Gen) or through a Java class (WSClientGen). Each approach is described in this section.
The SDOGen Ant task creates an SDO client JAR file that contains the typed classes for working with SDOs. It can use either the XSD files from the data service or the WSDL (assuming the DSP-enabled application has been exposed as a Web service) to generate the SDO classes and compile them into the client JAR file.
The SDOGen Ant task lets you build the necessary SDO client JAR which you can then use in your client application code.
To generate the necessary classes, make sure your classpath includes:
To create a JAR comprising the client classes, execute sdogen at the command prompt as follows:
<taskdef name="sdogen" classname="com.bea.sdo.impl.SDOGenTask" classpath="path/to/wlsdo.jar:path/to/xbean.jar"/>
where path/to is replaced with the location of your JAR files.
This task implicitly defines an Ant FileSet, and supports all FileSet attributes (for example, dir becomes basedir) as well as the nested attributes and elements. Table 4-7 summarizes the attributes used by the sdogen Ant task.
To build a WSDL or XML schema definition (XSD) files in the schemas directory and create a JAR named Schemas.jar, your Ant script would need to include the following:
<sdogen schema="MyTestWS.WSDL" destfile="Schemas.jar" classpath="path/to/wlsdo.jar:path/to/xbean.jar"/> |
where path/to represents the actual location of your JAR files.
Rather than using the SDOGen Ant task, you can use the SDOGen Java class at the command-line to generate SDO client classes from XML schema definition (XSD) files or WSDL files based on data services.
SDOGen is a Java class that extends the XMLBean schema compiler class. See Table 4-8 for other command-line options for the SDOGen utility.
To execute the utility, make sure your classpath includes:
To create a JAR comprising the client classes, execute SDOGen at the command prompt as follows:
java com.bea.sdo.impl.SDOGen [options] xmlschema |
Here are some examples showing use of the SDOGen Web service client generation utility:
The following are examples of using SDOGen with various options (Table 4-8) to obtain different results:
xmltype.jar (the default) based on the WSDL associated with Web service named MyApp running locally you can use:
java com.bea.sdo.impl.SDOGen http://localhost:7001/WebApp/DSCtrls/MyApp.jws?WSDL |
xmltype.jar (the default) based on the WSDL associated with a publicly available Web service, use:
java com.bea.sdo.impl.SDOGen -dl http://198.68.125.17:7001/WebApp/DSCtrls/MyApp.jws?WSDL |
The -dl option permits downloading.
xmltype.jar using an XML schema definition (a XSD file) located in the following directory on your local machine:
|
java com.bea.sdo.impl.SDOGen C:\myApps\xsd_dir |
MySDOClasses.jar file in the c:\test\xsd_dir directory you can use:
java com.bea.sdo.impl.SDOGen -out MySDOClasses.jar C:\test\xsd_dir |
The following instructions enable you to set up your Web service client environment for DSP.
After generating the SDO Web service client classes in a JAR file (SDOClient.jar), set up the classpath for the Web service client using the following JAR files in the following order:
If you are not already familiar with the concept of using a Web service client proxy or JAX-RPC API to invoke Web services, see the following document:
Then, in developing your Web service client, follow these steps:
Alternatively, you can also use the dynamic SDO API to read or modify the data.
See DSP's Data Programming Model and Update Framework for details on handling insertions and deletions using the static and dynamic SDO APIs.
wssoap.submitCustomer(((DataGraphImpl)doc.getDataGraph()).getSerializedDocument());
The following code shows a sample Java static Web services client for DSP:
public class ClientTest {
  public static void main(String[] args) throws Exception {
	SimpleCtrlTest wstest = new SimpleCtrlTest_Impl();
	SimpleCtrlTestSoap wssoap = wstest.getSimpleCtrlTestSoap();
	CUSTOMERDocument doc = wssoap.getCustomer(987654);

	doc.getCUSTOMER().setCUSTOMERNAME("J D");

	wssoap.submitCustomer(((DataGraphImpl)doc.getDataGraph()).getSerializedDocument());
}
Developing your dynamic Web services involves the following:
Set up the classpath for your Web service client using the following JAR files in the following order:
| Note: | The order of files shown above must be maintained. |
There are three aspects to developing a dynamic Web service client. First the client must be created using standard development procedures. Then there are several DSP-specific steps.
Follow the JAX-RPC instructions in JAX-RPC documentation ( http://java.sun.com/webservices/jaxrpc/docs.html) to create the framework for a dynamic Web services client. Essentially this work involves:
To enable the dynamic Web service for Data Services Platform you then need to:
Finally complete development by:
The following code (with comments emphasized) shows a complete Java dynamic Web services client for DSP, including import statements.
import com.bea.sdo.impl.DataGraphCodec;
import com.bea.xml.XmlObject;
import commonj.sdo.DataObject;
import java.io.File;
import java.net.URL;
import javax.xml.namespace.QName;
import javax.xml.rpc.Call;
import javax.xml.rpc.Service;
import javax.xml.rpc.ServiceFactory;
import javax.xml.rpc.encoding.TypeMapping;
import javax.xml.rpc.encoding.TypeMappingRegistry;
import javax.xml.soap.SOAPConstants;
import javax.xml.soap.SOAPElement;

public class TestCodecArray
{
    public static void main(String args[]) throws Exception {

        System.setProperty("javax.xml.soap.MessageFactory", "weblogic.webservice.core.soap.MessageFactoryImpl");

        // Setup the global JAX-RPC service factory
        System.setProperty( "javax.xml.rpc.ServiceFactory", "weblogic.webservice.core.rpc.ServiceFactoryImpl");

        // create service factory
        ServiceFactory factory = ServiceFactory.newInstance();

        // define qnames
        String targetNamespace = "http://www.openuri.org/";

        QName serviceName = new QName(targetNamespace, "org3Test");

        QName portName = new QName(targetNamespace, "org3TestSoap");

        URL wsdlLocation = new URL("http://localhost:7001/ElecWS/controls/org3Test.jws?WSDL");

        // create service
        Service service = factory.createService(wsdlLocation, serviceName);

        // create Codec
        DataGraphCodec dgCodec = new DataGraphCodec(wsdlLocation);

        TypeMappingRegistry registry = service.getTypeMappingRegistry();

        TypeMapping mapping = registry.getTypeMapping( SOAPConstants.URI_NS_SOAP_ENCODING );

        mapping.register( SOAPElement.class,
                         new QName(targetNamespace, "getCustomer"),
                         dgCodec,
                         dgCodec );
        mapping.register( SOAPElement.class,
                         new QName( targetNamespace, "getCustomerResponse" ),
                         dgCodec,
                         dgCodec );
        mapping.register( SOAPElement.class,
                         new QName( targetNamespace, "submitArrayOfCustomer" ),
                         dgCodec,
                         dgCodec );
        mapping.register( SOAPElement.class,
                         new QName( targetNamespace, "submitArrayOfCustomerResponse" ),
                         dgCodec,
                         dgCodec );

        // create call for read
        Call call = service.createCall(portName, new QName(targetNamespace, "getCustomer"));

        XmlObject reqdoc = XmlObject.Factory.parse( "<getCustomer xmlns='http://www.openuri.org/'/>");

        DataObject[] customerdocs = (DataObject[]) call.invoke(new Object[]{reqdoc});


        // user can modify the DataObject here
        DataObject customer = customerdocs[0].getDataObject(0);
        customer.setString("EmailAddress", "BEAarray@BEA.com");

        String dgstring = customer.getDataGraph().toString();
        System.out.println(dgstring);

        // create call for submit
        call = service.createCall(portName, new QName(targetNamespace, "submitArrayOfCustomer"));

        XmlObject submitdoc = XmlObject.Factory.parse(  "<sub:submitArrayOfCustomer xmlns:sub='http://www.openuri.org/'><sub:docs>" +                                                	   dgstring +
                                                        "</sub:docs></sub:submitArrayOfCustomer>");

        Object obj = call.invoke(new Object[]{submitdoc});

        System.out.println(obj);

    }
}


|