Registry Management Locate
Access Registry Management Locate
Registry Management is a set of tasks that the administrator can address through the Registry Console. These tasks are listed in Figure 1
To access the Registry Management console:
Log on as administrator or as a user with privilege to display Manage tab as described in Rules to Display the Manage Tab.
Click the Manage main menu tab.
Select the Registry management link under Manage tab. This returns the screen shown in Figure 1.
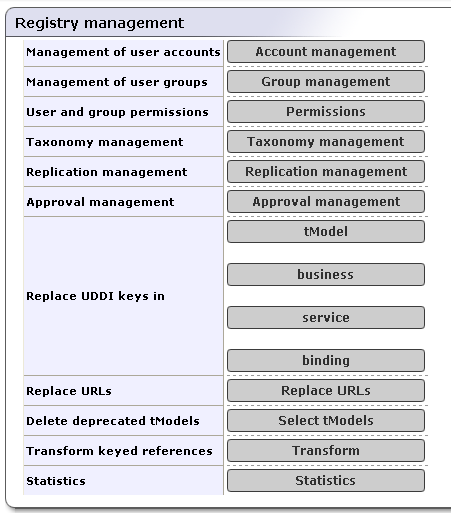
Account Management - Create, edit, and delete user accounts.
Group Management - Create, edit, and delete accounts groups.
Permissions - Set up permissions using the Registry Console
Taxonomy Management - Build and maintain taxonomies via the Registry Console.
Replication Management - Set up a subscription-based replication mechanism under which a slave registry receives notification from a master registry regarding updates and changes. (For more information on replication, please see Replication Management.)
Approval Management - set up requestors and approvers. This button is available only if the approval process is installed. See Installation Guide, Approval Process Registry Installation
Replace UDDI keys - Replace the UDDI keys of businessEntities, businessServices, tModels, and bindingTemplates.
Replace URLs - Replace URL prefixes in the following entities:
tModel - OverviewDoc URL
tModelInstanceInfo - overviewDoc URL and DiscoveryURL
binding template - accessPoint URL
Delete deprecated tModels - This option lets the administrator permanently delete deprecated tModels. A tModel is considered deprecated when it is marked as deleted by its owner. By default, tModels are deleted permanently by users. See Node how to change this behavior.
Transform keyed references - This operation is necessary when type of taxonomy keyValues or the implementation of the taxonomy transformation service have been changed. For more information see, User's Guide, Taxonomy: Principles, Creation and Validation.
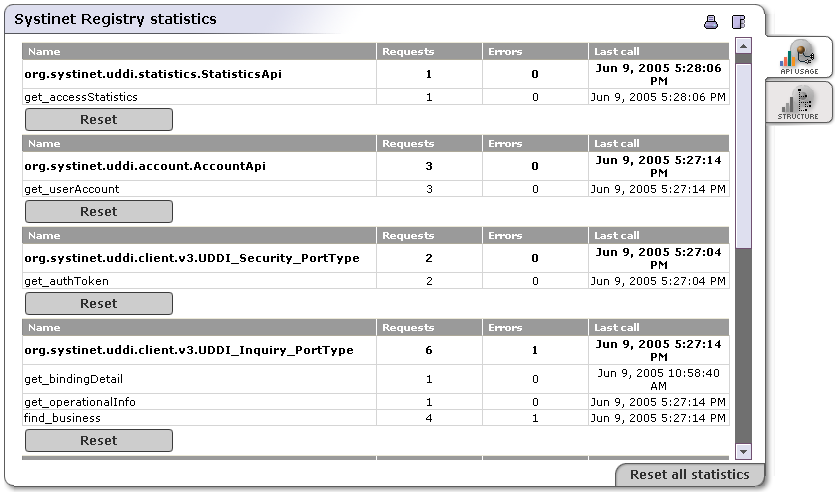
Statistics - This option displays two statistics tabs:
The first tab displays information about the number of accesses made to the various UDDI interface methods. One column displays the total request counts and a count of calls that fail and therefore return exceptions.
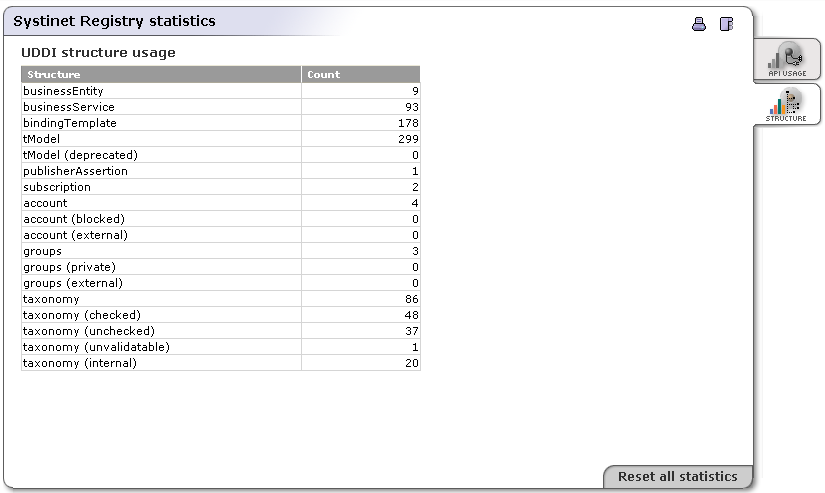
The second one contains counts of the main data structures (businessEntities, businessServices, tModels, bindingTemplates) in the database.
Account Management Locate
The BEA AquaLogic Service Registry administrator manages user accounts using the Registry Console. Use this console whenever you want to disable an account, change limits for a particular account, or take care of general housekeeping.
To access the Account management console:
Log on as administrator.
Click the Registry management link under the Manage tab.
Click the Account management button.
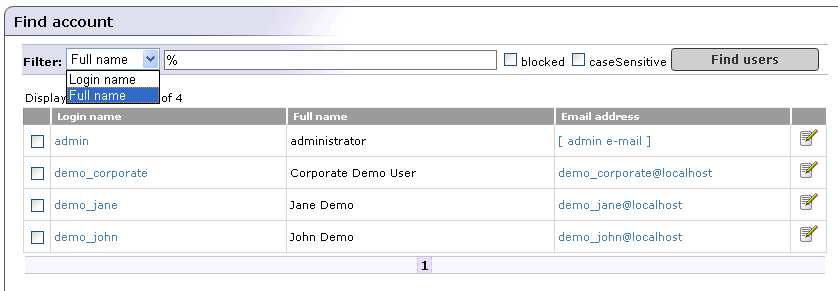
This displays a list of all accounts, as shown in Figure 2.You can search accounts using the Find users button.
Create Account Locate
To create an account:
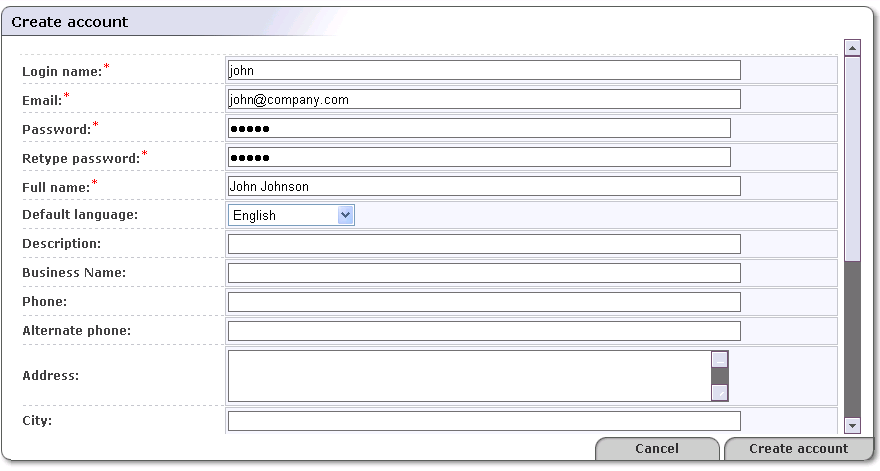
On the Find Account page, click Create Account button. This returns the Create account page shown in Figure 3.
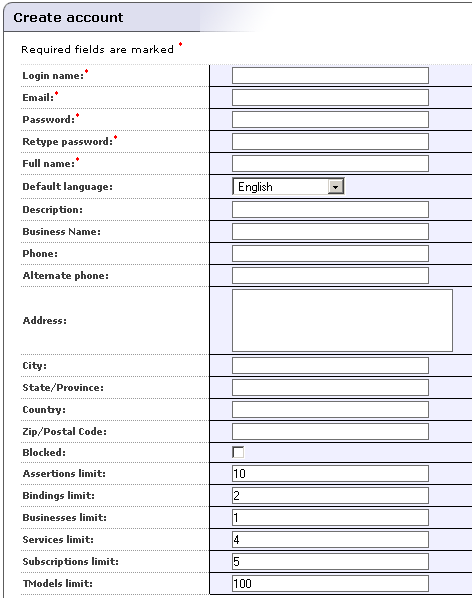
Provide the information shown in . Fields marked with a red asterisk (*) are required.
Field descriptions (self-explanatory fields are omitted):
- Default Language Code
Set the default language to be used during publishing when the language code associated with a particular field is not specified.
- Use the following profile
Profile preference - Select your preferred predefined user profile from this drop down list
- Blocked
Here you can enable/disable a user account. This is the account flag which prevents/permits a user from successfully logging onto the server.
- Limits
These fields (Assertions limit, Bindings limit, Businesses limit, Services limit, Subscriptions limit, andTModels limit) indicate the number of these items allowed by the user. Changing default user limits is discussed in the Accounts section of Registry Configuration.
When finished, click Create account. This returns the Find account page. Note that the list of accounts now includes the account you have just created.
Account Limits Locate
Each user account has the following limits for data saved under the account:
Businesses limit - maximum number of businessEntities the account can hold. (1 by default).
Services limit - maximum number of businessServices in the same businessEntity (4 by default).
bindings limit - maximum number of bindingTemplates in the same businessService (2 by default).
tModels limit - maximum number of tModels the account can hold. (100 by default).
Assertions limit - maximum number of publisherAssertions the account can hold (10 by default).
Subscriptions limit - maximum number of subscriptions an account can hold. (5 by default)
Common users can not change these limits. Only the administrator can change limits for a user or change default limits for newly created users.
The number of businessServices/bindingTemplates are checked against the limit on the user account owning the parent structure, not against the limit of the user processing the save_XXX call. For example, a user U1 owns a businessEntity BE_U1 and provides create ACL right to the user U2. The user U2 saves a new businessService under the BE_U1, total count of businessServices under the BE_U1 (no matter who is the owner) is checked against the service limit of the BE account.
Limit checking is skipped if a user who performs the operation has an ApiManagerPermission with the appropriate permission name and action:
API (permission name)
org.systinet.uddi.client.v3.UDDI_Publication_PortType for skipping limit tests on Publishing V3 API.
org.systinet.uddi.client.v2.Publish for skipping limit tests on Publishing V2 API.
org.systinet.uddi.client.v1.PublishSoap for skipping limit tests on Publishing V1 API.
org.systinet.uddi.client.subscription.v3.UDDI_Subscription_PortType for skipping limit tests on Subscription API.
operation (action)
save_business for skipping businesses limit test on Publishing V1/V2/V3 API
save_service for skipping services limit test on Publishing V1/V2/V3 API
save_binding for skipping bindings limit test on Publishing V1/V2/V3 API
save_tModel for skipping tModels limit test on Publishing V1/V2/V3 API
add_publisherAssertions for skipping assertions limit test on Publishing V2/V3 API
set_publisherAssertions for skipping assertions limit test on Publishing V2/V3 API
save_subscription for skipping subscriptions limit test on Subscription API
For more information see Permissions: Principles. By default, only the administrator has these permissions, and therefore the administrator has an unlimited account.
Edit Account Locate
To edit an account:
On the Find account page shown in Figure 2, click the Edit Account icon (
 ) associated with the account you want to edit.
This returns the Edit account page.
On the Edit account page, provide or change the information in the various fields. These are the same as the fields shown in Figure 4.
Field descriptions (self-explanatory fields are omitted):
- Default Language Code
Set the default language to be used during publishing when the language code associated with a particular field is not specified.
- Blocked
Here you can enable/disable a user account. This is the account flag which prevents/permits a user from successfully logging onto the server.
- Limits
These fields (Assertions limit, Bindings limit, Businesses limit, Services limit, Subscriptions limit, andTModels limit) indicate the number of these items allowed by the user. These are described in detail in the Accounts section of Registry Configuration.
When finished, click the button labeled Save Changes. This returns the Find account page.
Delete Account Locate
To delete an account:
On the Find account page, check the box next to the Login name of the account you want to delete.
Click the Delete Selected button.
If you are certain you want to delete the account, click Yes when prompted. Note that on publication registries and standard installations of BEA AquaLogic Service Registry, all published information associated with the user will be lost.
![[Note]](../images/note.gif) | Note |
|---|---|
If you are using LDAP for storing users, the user account will not be deleted from the LDAP store, because LDAP stores are treated as read-only. The delete account operation will delete an account only from the registry database. | |
Group Management Locate
User groups simplify management of access rights to each UDDI data structure. You can use groups to couple users with similar rights.
The administrator can:
Create and manage user groups
Manage group membership
Create and Manage Groups Locate
To create a new group:
Click on the Manage menu tab. On the Manage tab, select the Registry management link, and then click the Group management button. This returns the Group Management page.
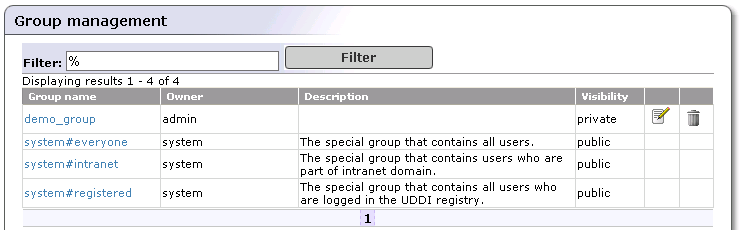
To display all groups on the registry, click Filter. This returns a Group list like the one shown in Figure 5.
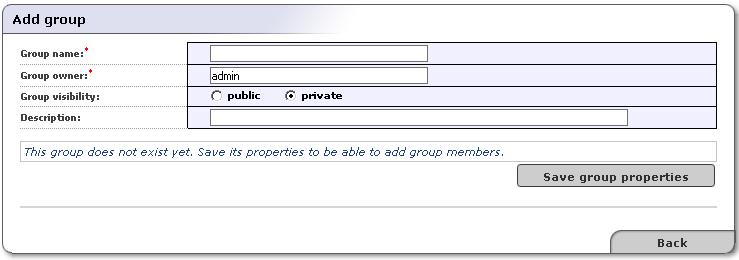
Click the Add Group button. This returns a blank Add group page much like the one shown in Figure 6.
In the edit box labeled Group name, type the name of your group. In the edit box labeled Group owner, type the owner of the group. The default owner is Admin. These two fields are required.
Use the radio buttons labeled public and private to set group visibility.
Both public and private groups are visible to all users in the registry, meaning that all users are able to see which groups exist. Public and private groups differ in that members of public groups are visible to all users of the registry whereas members of private groups are visible only to the owner of the group.
Optionally, Enter a description of the group in the box labeled Description.
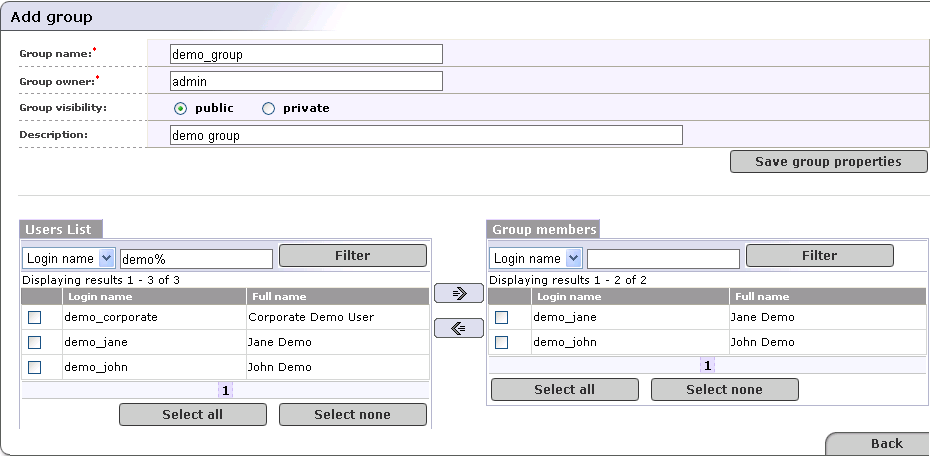
Click the Save group properties button. This returns the Users list and Group members sections shown in Figure 5.
In the Users list section, click Filter to display a list of all of the registry's users.
Use the drop down list in this section to sort users by Login name or Full name.
Use the text box to further filter users. You can use % as wildcard in this field.
Check the boxes next to all members you wish to include, and click the right-pointing arrow (
 ) to move them to the Group
members table.
) to move them to the Group
members table.Group members are updated in the database once you click the arrow buttons.
Manage Group Membership Locate
To add or remove members from a group:
Click on the Manage main menu tab.
Click on the Registry management link. This returns the main Registry Management page.
Click the Group management button. This returns the Group list shown in Figure 5.
Enter your search criteria, then click the Filter button. Click Filter without search criteria to return a list of all groups.
Click the Edit button (
) in the row with the group you want to manage.
This returns the Edit Group page. Specify search criterion
for user accounts, then click the
Filter button.Use the arrow buttons (
and
 ) to add and remove users as shown in Figure 7
Permissions Locate
This chapter describes how you can set permissions using the Registry Console. Before you start to work with permissions, we recommend reading Permissions: Principles to become familiar with permissions principles.
BEA AquaLogic Service Registry uses the same interface for managing both user permissions and group permissions. In this section we discuss user permissions, but group permissions are handled the same way.
Accessing Permission Management Locate
To access permission management:
Log on as Administrator or as a user who has permission to set permissions, as described in Permissions Definitions.
Click the Manage main menu tab. On the Manage tab, select the Registry management link, and then click the Permissions button.
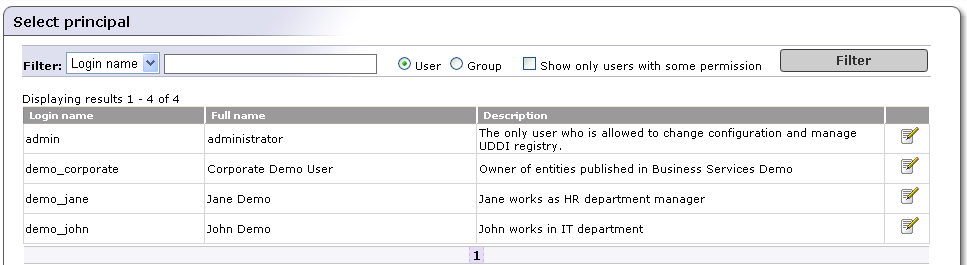
On the initial Select Principal screen, click Filter, without changing the default settings, to view a list of all users (principals).
![[Tip]](../images/tip.gif)
Tip Use the drop down list in this section, labeled Filter: to sort users by Login name or Full name.
Use the text box to further filter users by name. You can use % as wildcard in this field.
Select the radio button labeled User to manage permissions for individual users. Select the button labeled Group to manage group permissions.
Check the box labeled Show only users/groups with some permission to filter out principals who have not already been granted permissions.
This returns the list of users shown in Figure 8.
Click the Edit icon (
) associated with the user or group whose
permissions you wish to set.
Add Permission Locate
To add permissions:
Access permission management as described above in Accessing Permission Management.
On the principal list page shown in Figure 8, click the Edit icon (
) associated with the group or user to whom you
wish to add permissions. On the returned Permissions page,
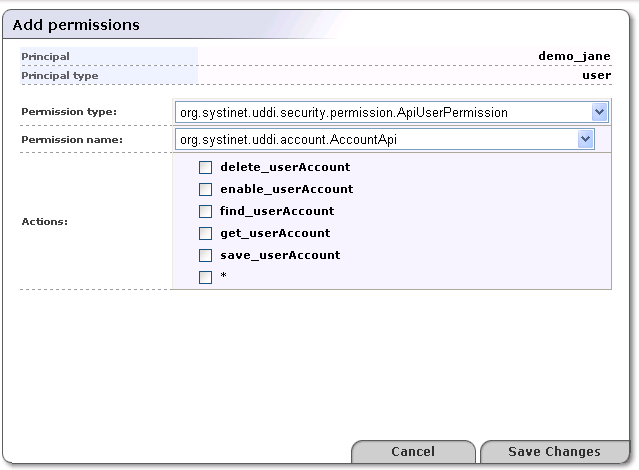
click Add permission. An Add permissions page much like the one shown in Figure 9 will appear.
Select the type of permission from the drop down list labeled Permission type.
From the drop down list labeled Permission name, select the name of the permission to add.
Check the box(es) next to the actions associated with the permission name in order to grant permission to perform those actions. Check the box next to the asterisk (*) to permit all the actions on the list.
Click Save Changes to save the permission.
Editing and Deleting Permissions Locate
To edit a permission:
On the principal list page shown in Figure 8, click the Edit icon (
) associated with the user whose permissions you
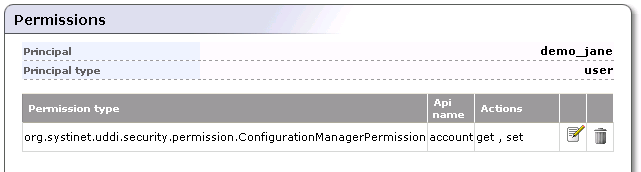
want to edit or delete.If the principal has permissions defined, a permission list like the one shown in Figure 10 will appear.
Click the Edit or Delete icon (
 )
associated with the permission you want to
address.
)
associated with the permission you want to
address.
Assigning Administrator's Permission Locate
If you want to give administrator's permissions to an existing user, you must assign the following permissions types to the user:
org.systinet.uddi.security.permission.ApiManagerPermission
org.systinet.uddi.security.permission.ApiUserPermission
org.systinet.uddi.security.permission.ConfigurationManagerPermission
For each Permission type set all Permission names and all actions using the asterisk (*)
Taxonomy Management Locate
This chapter describes how administrators can build and maintain taxonomies using the Registry Console. Before you start to manage taxonomies, we recommend reading User's Guide, Taxonomy: Principles, Creation and Validation to become familiar with taxonomy principles.
The following tasks are described in this chapter:
Adding a taxonomy - How to add taxonomies BEA AquaLogic Service Registry.
Finding taxonomies - How to locate taxonomies in BEA AquaLogic Service Registry.
Editing taxonomies - How to change taxonomy categorization, compatibilities, and a taxonomy type that is important in range queries comparison.
Editing a taxonomy structure - How to add categories, disable nodes, edit node values, and delete nodes.
To view the Taxonomy management page:
Log on as administrator.
Click the Manage tab under the Main menu, and then click on the Registry management link under the Manage menu tab.
Click Taxonomy management. This returns a blank Taxonomy management page. To view a selection of taxonomies, select a filter from the drop down list labeled Show. Possible filters are:
Favorite taxonomies
Enterprise taxonomies
All taxonomies hide system
All taxonomies including system
This returns a list of taxonomies similar to that shown in Figure 11.
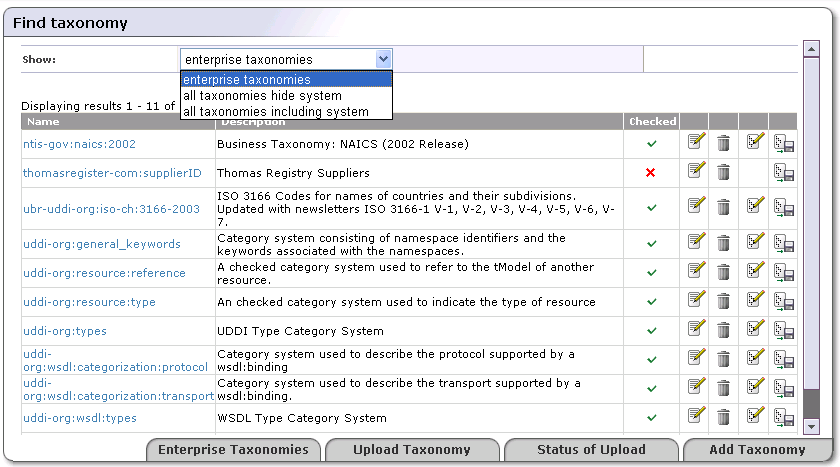
Use the page shown in Figure 11 to search enterprise taxonomies. You can classify taxonomies according to the following overlapping groups:
Enterprise taxonomies - The BEA AquaLogic Service Registry administrator can define which taxonomies will be present in the enterprise taxonomies list. The Enterprise taxonomies button located in the bottom part of Figure 11 allows you to manage a list of enterprise taxonomies for all registry user accounts.
Favorite taxonomies - All registry users can define their list of favorite taxonomies. See User's Guide, favorite Taxonomies for more information on how to manage your list of favorite taxonomies.
System taxonomies - When you edit a taxonomy you can assign whether the taxonomy is a system taxonomy using the check box System taxonomy.
The reason for this taxonomy classification is to make taxonomy management and UDDI entity categorization easier.
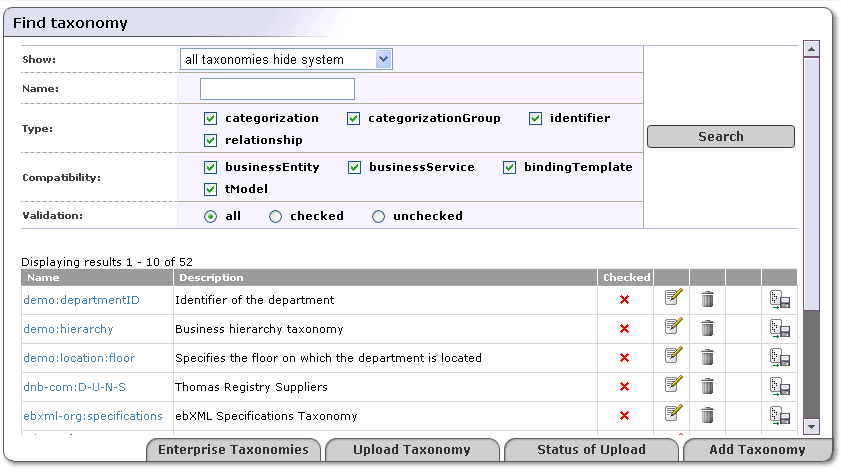
If you want to manage taxonomies which are not in the enterprise taxonomy list, select see all taxonomies including system taxonomies from the drop down list labeled Show. The page shown in Figure 12 will appear. You can search taxonomies using the following criteria: taxonomy name, type, compatibility, and validation.
Adding Taxonomies Locate
You can also add a root for a taxonomy by hand and build it through the Registry Console.
To add a taxonomy:
Click the Add taxonomy button shown in Figure 12.
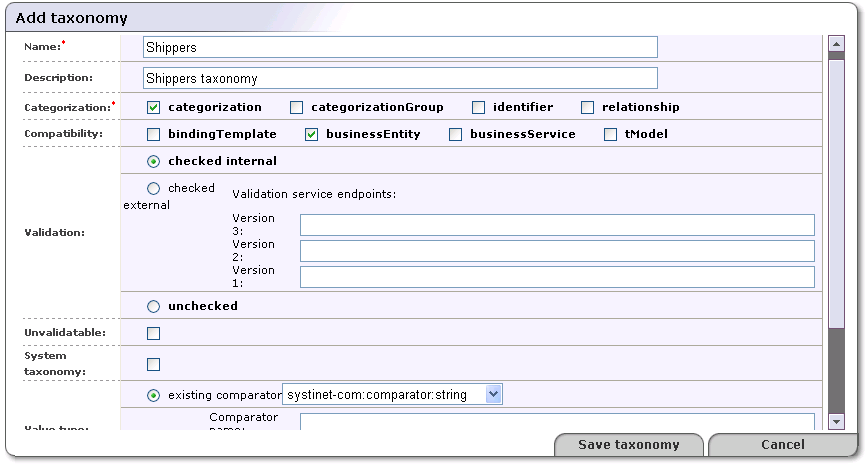
Fill in as many of the fields on the Add taxonomy page, shown in Figure 13, as you require. Only two fields are required to create a taxonomy: Name and Categorization, however the more information you provide, the more useful your taxonomy will be.
In the field labeled Name, name your taxonomy.
Skip the field labeled tModel key. This key is generated when you save the taxonomy.
In the field labeled Description, briefly describe the use of the taxonomy.
Check one or more of the boxes in the section labeled Categorization. Categorizations are discussed in Taxonomy Types.
You may enforce that your taxonomy can be used only within the UDDI structures of your choice. Select one or more of the main UDDI structure types in the section labeled Compatibility.
Validation In this section, specify whether the values in keyedReferences within the taxonomy will be checked or not.
Select checked internal if you want BEA AquaLogic Service Registry to check keyedReferences in which the taxonomy is used against a validation service deployed within BEA AquaLogic Service Registry.
Select checked external if you want BEA AquaLogic Service Registry to check keyedReferences in which the taxonomy is used against a validation service deployed on a remote SOAP stack such as Systinet Server.
If you are using an external validation service, provide at least one Validation service endpoint.
Select unchecked if you do not want BEA AquaLogic Service Registry to perform any checks on values used in keyedReferences in which the taxonomy is used.
Use the box labeled Unvalidatable to mark taxonomies as temporarily unavailable.
Check the box labeled System taxonomy if you want to mark the taxonomy for internal use. Users and administrators can filter System taxomies easily when searching in the Business Service Console.
Select a Value type for keyValues. You can choose from three existing comparators or create a custom comparator. Existing comparators are:
string - keyValues are treated as string values. If keyValues type is unknown then keyValues are treated as strings. The maximum length is 255 characters.
numeric - keyValues are treated as decimal numbers. The value can have maximum 19 digits before the decimal point and maximum 6 digits after the decimal point.
date - keyValues are treated as dates.
If you want to categorize using a custom comparison, you must create a new comparator tModel and implement a transformation service. The Transformation service endpoint must start with the class: prefix. Please see the Types of keyValues and Custom Ordinal Types for more information.
Use the box labeled Add to favorites to mark the taxonomy as either a personal favorite. This is an option available to all users.
Check the box labeled Add to enterprise to mark the taxonomy specific to the particular enterprise or application. For more information, see Enterprise Taxonomies
Click Save taxonomy.
| Note |
|---|---|
Later, you will be able to modify all taxonomy attributes except the validation type. See Editing Taxonomies for attribute descriptions. | |
Finding Taxonomies Locate
To locate a taxonomy in BEA AquaLogic Service Registry:
Log on as administrator.
Click the Manage tab under the Main menu, and then click on the Registry management link under the Manage menu tab.
Click Taxonomy management. This returns a blank Taxonomy management page. Select a filter from the drop down list labeled Show. Possible filters are:
Favorite taxonomies
Enterprise taxonomies
All taxonomies hide system
All taxonomies including system
This returns a list of taxonomies similar to that shown in Figure 11.
On the returned Find taxonomy page, you can further filter the results by
name
type - Types are discussed in Taxonomy Types
compatibility
validation
From the list of taxonomies the fit the filter criteria, select the taxonomy you wish to view by clicking on its name.
Editing Taxonomies Locate
The Registry Console makes it possible to change any taxonomy attribute except the validation type attribute. To edit a taxonomy:
Identify the taxonomy you want to edit as described in Finding Taxonomies.
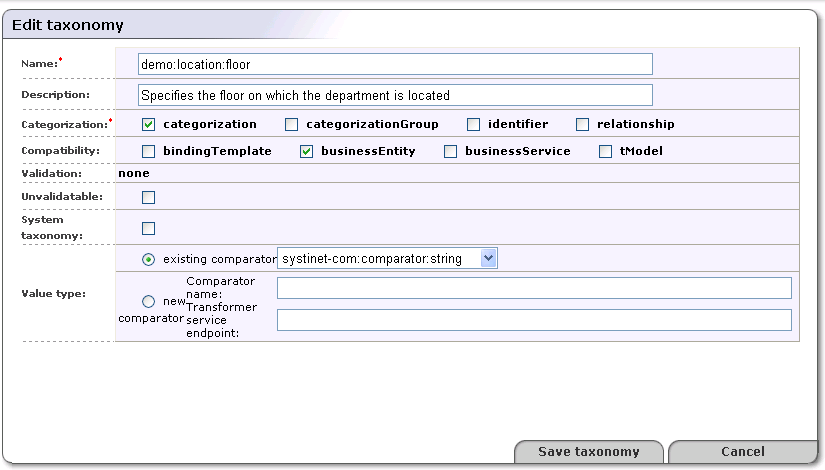
Click on the Edit Taxonomy icon in the Find Taxonomy page shown in Figure 12. This loads the Edit taxonomy page shown in Figure 14.
In the field labeled Name, edit the taxonomy's name.
In the field labeled Description, briefly describe the use of the taxonomy.
Check one or more of the boxes in the section labeled Categorization. Categorizations are discussed in Taxonomy Types.
You may enforce that your taxonomy can be used only within the UDDI structures of your choice. Select one or more of the main UDDI structure types in the section labeled Compatibility.
Validation In this section, specify whether the values in keyedReferences within the taxonomy will be checked or not.
Select checked internal if you want BEA AquaLogic Service Registry to check keyedReferences in which the taxonomy is used against a validation service deployed within BEA AquaLogic Service Registry.
Select checked external if you want BEA AquaLogic Service Registry to check keyedReferences in which the taxonomy is used against a validation service deployed on a remote SOAP stack such as Systinet Server.
If you are using an external validation service, provide at least one Validation service endpoint.
Select unchecked if you do not want BEA AquaLogic Service Registry to perform any checks on values used in keyedReferences in which the taxonomy is used.
Check the box labeled Unvalidatable to mark the taxonomy as temporarily unavailable. When you save a checked taxonomy without a validation service, the taxonomy will be saved with Unvalidatable toggled on.
Select a Value type for keyValues. You can choose from three existing comparators or create a custom comparator. Existing comparators are:
string - keyValues are treated as string values. If keyValues type is unknown then keyValues are treated as strings. The maximum length is 255 characters.
numeric - keyValues are treated as decimal numbers. The value can have maximum 19 digits before the decimal point and maximum 6 digits after the decimal point.
date - keyValues are treated as dates.
If you want to categorize using a custom comparison, you must create a new comparator tModel and implement a transformation service. The Transformation service endpoint must start with the class: prefix. Please see the Types of keyValues and Custom Ordinal Types for more information.
Editing a Taxonomy Structure Locate
While the fields in the Edit Taxonomy page are used for controlling global attributes, the management of nodes within the taxonomy itself is handled by categories. Here you can add nodes, edit node values, and enable or disable them.
| Tip |
|---|---|
Registry Console provides you with unique functionality to manage taxonomy structures using a drag-and-drop wizard. | |
| Note |
|---|---|
Changing taxonomy structure is allowed only for checked taxonomies which are validated by the internal validation service. | |
Adding Categories to a Taxonomy Locate
| Note |
|---|---|
Before we begin assigning names to a taxonomy it is important to consider how the naming system will function. Taxonomy values in UDDI consist of name and value pairs, like entries in a hash table. As with hash table values, the trade-off between economy of space and extensibility must be taken into consideration. Too long a Value string will be wasteful; too small and it will not be extendable. | |
To add a node to a branch or root:
Identify the taxonomy you want to edit as described in Finding Taxonomies.
Click the Edit taxonomy structure icon (
 ) in the
Find taxonomy page as shown in
Figure 12.
) in the
Find taxonomy page as shown in
Figure 12. ![[Important]](../images/important.gif)
Important This icon is only available for checked taxonomies that are validated by the internal validation service. You cannot edit the structure of unchecked taxonomies and checked taxonimies that are validated by other services.
The Edit taxonomy structure page will appear.
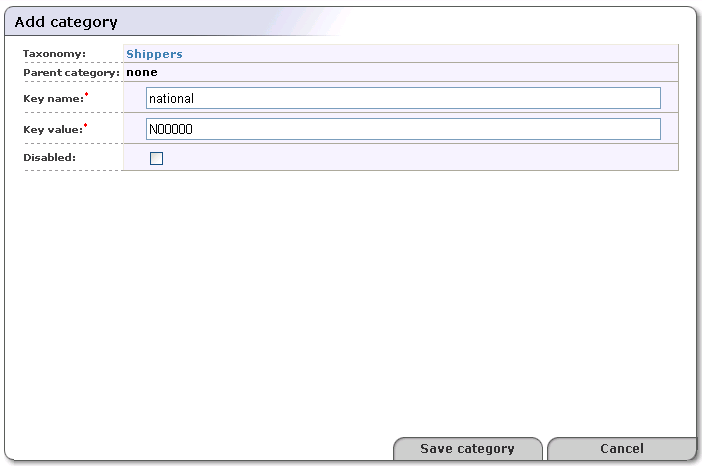
On this page, right-click on the taxonomy's folder icon to display its context menu, and select the Add category action.
This displays the Add category page. Provide the required Key name and Key value, and click Save category.
In the shipping taxonomy example shown in Figure 15, we use a value algorithm that employs an array of six alphanumeric characters:
The first element in the array signifies the first geographic division.
The second and third elements signify further geographic subdivisions where necessary.
The fourth character indicates transport mode.
The fifth character is reserved for an extension to the system allowing a coded category containing a maximum of thirty-six divisions.
The sixth can be used for a weight coding system.
Check the box labeled Disabled to mark the category as either helper or deprecated. Note that disabled categories cannot be used as valid options in keyedReferences.
Click the Save category button. This builds the taxonomy as shown in Figure 16.
Drag-and-Drop Editing Locate
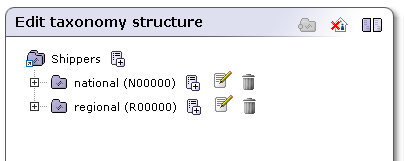
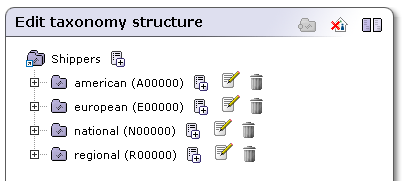
To demonstrate the drag-and-drop functionality, we will extend the Shippers taxonomy from previous section.
Add four non-disabled categories with the following attributes:
Key name: national; Key value: N00000.
Key name: regional; Key value: R00000
Key name: american; Key value: e00000.
Key name: european; Key value: e00000.
The result is shown in Figure 17.
Add a new category {world-wide,W00000} to the same level as all previous taxonomies.
We want to put both the european and american categories under the world-wide category as shown in Figure 18.
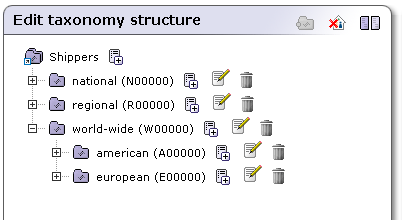
To do so, click on the european category node and drag it to the world-wide category node. Do the same with the american category node. The structures will be displayed as shown in Figure 18.
| Note |
|---|---|
When you drag a category with all child nodes, the child nodes are dragged along with the parent. | |
For taxonomies with many categories you can use two taxonomy
trees and drag categories from the left taxonomy tree and drop
them to the right taxonomy tree. To enable this two-tree
display, click on the Second taxonomy tree
icon ( ).
).
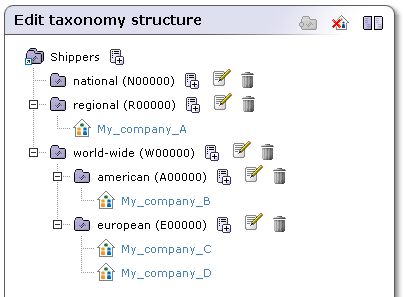
The Edit taxonomy structure also allows you to see UDDI
entities categorized with a category from the taxonomy tree. An
example of displayed business entities categorized with the
Shippers taxonomy is shown in Figure 19. To switch to the
view of categorized UDDI entities, click the house icon
( ).
).
Deleting and Disabling Nodes Locate
There are two policy choices for dealing with categories of entities that cease to be active. Either:
They can be marked as disabled.
They can be deleted entirely from the taxonomy.
To delete a taxonomy node,
Navigate through the taxonomy tree via the Edit taxonomy page.
Right-click on the category node's icon and select the Delete option from its context menu.
Important Because this process is irreversible you will be asked to confirm.
To disable a taxonomy node:
Navigate through the taxonomy tree via the Edit taxonomy page.
Right-click on the category node icon to display its context menu.
Select the Edit category option from the context menu. This returns the Edit category page.
On the Edit category page, check the option labeled Disable.
Click the Save category button.
Uploading Taxonomies Locate
To upload a taxonomy:
Log on as administrator.
Click Manage main menu tab, then click on the link Registry management under the Manage menu tab.
Click the Registry management button. A list of taxonomies like the one shown in Figure 12 will appear.
Click the Upload taxonomy button.
| Note |
|---|---|
The format of data on this page is described in the Persistence Format of the Developer's Guide. | |
Downloading Taxonomies Locate
There are two obvious cases in which you will want to download a taxonomy from the database:
If you are planning to edit the taxonomy, it is good to keep a safe copy for version control. You can either edit the downloaded copy directly, and even manage it through a versioning system, or keep the downloaded copy as the safety copy and edit the taxonomy directly through the Registry Console and save changes directly to the database.
You may wish to replicate the taxonomy for other systems in other departments of your organization. These departments or branches may even tailor the taxonomy for their own purposes.
To download the taxonomy, click the
Download ( ) icon. This returns the system
Save file dialog. The default name for the
destination file is the taxonomy name with a
.xml extension appended. Rename the file if you
choose, then save the taxonomy file as you would any other.
) icon. This returns the system
Save file dialog. The default name for the
destination file is the taxonomy name with a
.xml extension appended. Rename the file if you
choose, then save the taxonomy file as you would any other.
Deleting Taxonomies Locate
If at any point you decide that a taxonomy is no longer necessary,
you can delete it by clicking the Delete
taxonomy icon () in the Find
Taxonomy page.
| Important |
|---|---|
Because this procedure is irreversible you will be asked to confirm your deletion. | |
Replication Management Locate
Selective One-way Replication is a subscription-based replication mechanism under which a slave registry pulls notifications from a master registry regarding updates and changes. The slave registry then replicates this data to itself.
Replication is set up by two subscriptions:
A leading subscription which defines the set of businessEntities being replicated. The subscription filter is a find_business query with no special requirements.
A helper subscription which is used for updating tModels being referenced from replicated businessEntities. The subscription filter is find_tModel by name set to %. This watches for changes on all tModels. The helper subscription is optional.
Each time replication is invoked, the slave registry pulls a set of changed businessEntities and obtains the set of tModels referenced from the changed businessEntities. The tModels from the intersection of the set of referenced tModels and the set of changed tModels (known from the helper subscription) are stored to the slave registry. Then changes to businessEntities are saved.
| Important |
|---|---|
tModels are replicated only if the slave registry does not already contain them. If a tModel is already present in the slave registry, it will not be replicated to the slave registry, even if the tModel has been modified in the master registry. | |
| Important |
|---|---|
Replicated data should not be changed, otherwise changes on entities in the slave registry will be lost when someone changes these entities on the master registry and the replication is automatically processed. Note, too, that replicated data should be stored on an account having administrator's privileges (admin). | |
A replication may fail or produce warning messages. The failure may occur for one of the following reasons:
The master registry is not accessible or connection is broken during data replication.
Saving/Deleting of a subscribed businessEntity on the slave registry fails.
A warning is produced when:
The subscribed businessEntity is not accessible on the master registry. For example because of ACL GET denied permission.
Referenced tModels are not accessible on the master registry.
Saving/Deleting of referenced tModels.
The replication tries to obtain all changes to subscribed data since the last successful replication.
Replication process logs can be found in the REGISTRY_HOME/log/replicationEvents.log file. You can edit the REGISTRY_HOME/conf/log4j.config and make replication logging more detailed by uncommenting following statement:
log4j.category.replication_v3.com.systinet.uddi.replication.v3.ReplicatorTask=DEBUG,replicationLog
Master Registry Setup Locate
To set up the master registry:
If you do not have an account on the master registry, you must create one. It can be a standard account, which can save two subscriptions.
Note The default subscription limit for a new user is five. The BEA AquaLogic Service Registry Administrator may increase the subscriptions limit for the user.
Log into the master registry account.
Create a leading subscription of the replication with the following details:
The subscription filter must be a find_business query.
Set the Notification listener type drop down list to None
The brief option is recommended to reduce the amount of transferred data.
For more information, please see Publishing Subscriptions.
Optionally, you can create a helper subscription for changes to tModels with the following details:
The subscription filter must be findTModel by name, with name set to %.
Set the Notification listener type drop down list to None
The brief option is recommended.
Slave Registry Setup Locate
| Note |
|---|---|
Only the administrator of the slave registry should do this. | |
There are two parts of a slave registry configuration, master and slave registry relevant information.
Master registry information includes the location of master registry endpoints for inquiry, subscription and security APIs, and the username/password pair on the master registry needed to obtain notifications.
Slave registry information includes the username/password pair on the slave registry of the user who will own the replicated data, and the notification interval.
To set up replication:
Log on as Administrator to the slave registry.
Click the Manage main menu tab, then click on the link Registry management under the Manage menu tab.
Click Replication management. This returns a list of replications.
Click Add replication.
Fill in the form under the Master tab as described in Figure 20.
Fill in the form under the Slave tab as described in Figure 21.
Specify permissions for replicated data under the Permissions tab as shown in Figure 22.
Click Save replication.
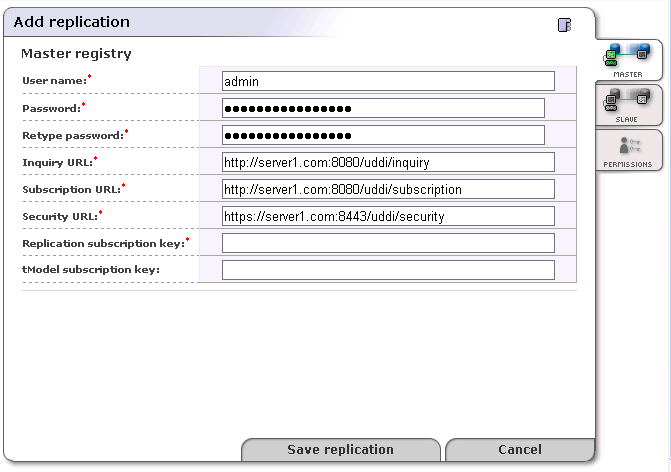
User name - Name of the user who created the replication subscription on the master registry
Password - Password of the user who created this subscription. This password is encrypted in the configuration file.
URLs of Master Registry - All URLs (Inquiry URL, Subscription URL and Security URL) must refer to the same registry. Moreover the URLs must not refer to the slave registry itself, otherwise you can loose some data.
Inquiry URL - Inquiry URL of master registry. For example, http://master.mycompany.com:8080/uddi/inquiry. The inquiry URL is used to obtain full standard UDDI v3 structures.
Note UDDI v2 keys are not included in the UDDI v3 structure and replicated structures differ with regard to v2 keys. To replicate v2 keys, specify the URL of the proprietary inquiry API, which returns extended structures including v2 keys. This extended API has the context /uddi/export. For example, http://master.mycompany.com:8080/uddi/export.
Subscription URL - Master registry's subscription URL. For example, http://master.mycompany.com:8080/uddi/subscription.
Security URL - Master registry's security URL. For example, https://master.mycompany.com:8443/uddi/security.
Replication subscription key - key of the leading (find_business) subscription from the master registry.
tModel subscription key - key of the helper subscription for changes to tModels from the master registry.
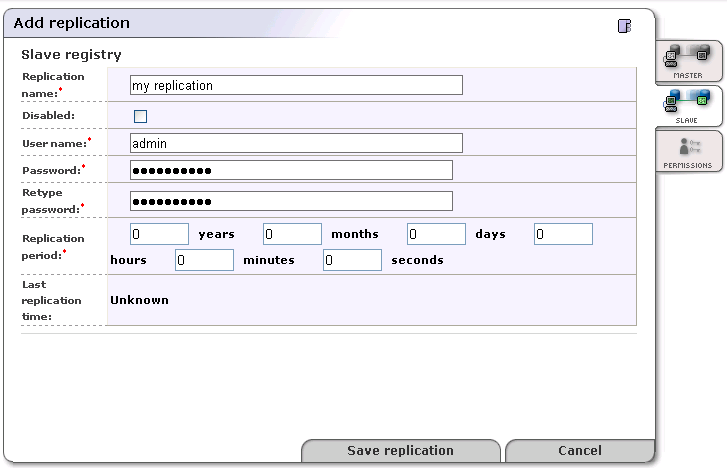
Replication name - Name the replication for better orientation within the list of replications.
Disabled - Check this box to disable replication.
User name - User account name under which replicated data will be stored.
Important The user must have the ApiManagerPermission on org.systinet.uddi.client.v3.UDDI_Publication_PortType API for all * actions to be able to generate keys without having the appropriate keyGenerator. For more information, see User's Guide, Generating Keys. By default, the only user who can do this is the admin.
Replication period - Specify the period between replications by entering the appropriate number in the boxes for years, months, days, hours, minutes, and seconds. The default period is one hour.
Last replication time - The date and time when the last replication occurred.
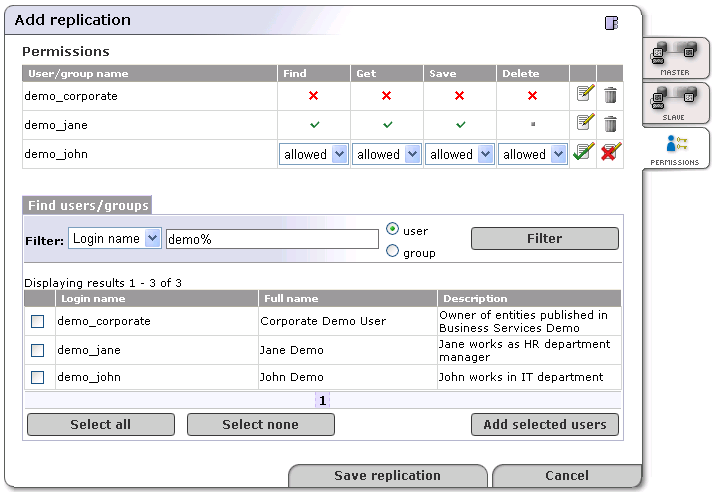
In the page shown in Figure 22, the administrator can set up permissions for replicated data. If you do not enter any data on this page, all users from the slave registry have find and get permissions on replicated data.
To specify permissions on replicated data:
Enter a filter criteria for users or groups, and click Filter.
Check the box in front of users or groups. Then, click the Add selected users button. Selected users or groups will be added to the permissions list.
Click the Edit icon to change permissions for Find, Get, Save and Delete operations
Click the Save replication button.
| Tip |
|---|---|
Use the button Replicate now on the replication page to test the replication settings. | |
Approval Process Management Locate
This chapter describes how administrators can manage the approval publishing process. We will show you how to set up requestors and approvers using the Registry Console. Before you start, we recommend that you read Approval Process Principles.
Loading the Approval Management Page Locate
The tasks described in this section are performed from the Approval management page. To load this page:
Log on as administrator.
Click the Manage main menu tab, then select the Registry management link under the Manage menu tab.
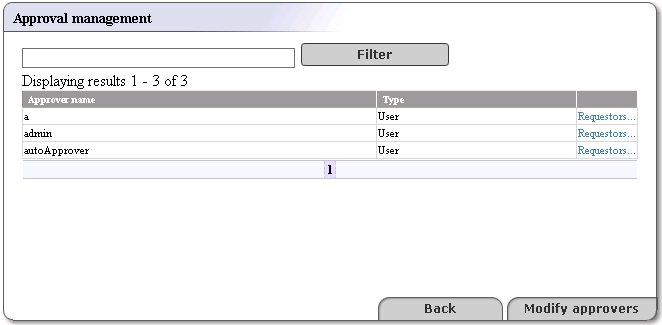
Click Approval management. This returns a list of approvers similar to that shown in Figure 23.
Create Approver Locate
To create an approval contact:
Click the Modify approvers button on the Approval management page shown in Figure 23
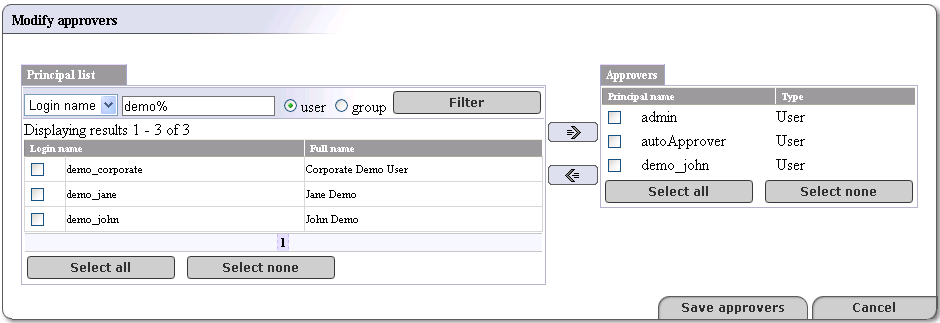
This returns the Modify approvers page as shown in Figure 24
The left side of this page, labeled Principal list is a list of all users and groups on the registry. The administrator may make any name on this list into an approval contact.
The right side, labeled Approvers is a list of all approvers on the registry.
Check the box next to the login name of a user you would like to turn into an approver and click the right-facing arrow (
). If you would like to create an approver from a group,
check the group box and use the right-facing arrow.Click the Save approvers button.
| Tip |
|---|---|
Using the left-facing arrow buttons, you can deselect approvers in the same way. | |
Create Requestor Locate
To create a requestor from a user:
On the Approval management page shown in Figure 23 click the link labeled Requestors next to an Approver type.
This returns the Modify requestors page shown in Figure 25
The Requestors page consists of two lists:
A list of all users and groups on the registry labeled principals
A list of users and groups, labeled Requestors assigned to the selected approver
Select a user or group from the Principals column (or click Select all if you choose), and click the right-pointing arrow (
) to turn the user(s) into
requestors.Click the Save requestors button.
| Tip |
|---|---|
Using the left-pointing arrow button, you can deselect requestors in the same way. | |

Replacing UDDI Keys Locate
Replacing keys of businessEntities, businessServices, tModels, and bindingTemplates is intended to correct errors in keys before entities are commonly used by users.
To access the key replacement page:
Log on as administrator.
Click the Registry management link under the Manage tab.
In the row labeled Replace UDDI keys, click the appropriate button tModel, business, service, or binding.
| Important |
|---|---|
The replace key operation can break digital signatures on changing entity as well as on other entities which reference to the changing entity. | |
Replacing tModel keys Locate
When you replace a tModel key, the key will be updated in the following data structures:
tModel
keyedReferenceGroups
keyedReferences
tModelInstanceInfos
publisherAssertions
addresses
taxonomies
Replacing businessEntity keys Locate
When you replace a businessEntity key, the key will be updated in the following data structures:
businessEntity
services
keyedReferences
Replacing businessService keys Locate
When you replace a businessService key, the key will be updated in the following data structures:
businessService
bindingTemplates
keyedReferences
Replacing bindingTemplate keys Locate
When you replace a bindingTemplate key, the key will be updated in the following data structures:
bindingTemplate
keyedReferences
subscriptions
hostingRedirector
accessPoint with bindingTemplate useType
Registry Statistics Locate
Registry statistics give you information about number of invocations of registry API and number of entities stored in BEA AquaLogic Service Registry. To access the registry statistics page:
Log on as administrator.
Click the Registry management link under the Manage tab.
Click the Statistics button.
The page similar as shown in Figure 26 will appear. On that page you can see number of requests for each API, number of unsuccessful requests and datetime of last API call. You can reset count separately for each API by clicking the Reset button or reset counts for all API by clicking on the Reset all statistics.
You can click on the Structure tab. The page similar as shown in Figure 27 appears. On that page you can see number of UDDI entities stored in BEA AquaLogic Service Registry.