|
|
The core of Studio is the database. A database table can feed one or more portlets, each of which may have more than one way of interacting with the data. For example, a Calendar portlet lets portal users view a calendar, add a new event to the calendar, or click one of the entries in the calendar to see more details on the upcoming event. Another portlet, the Record Lookup portlet can point to the same database table and search for specific events or participants. Once you assign a database table to a portlet, you cannot change the assignment. The portlet will always point to that particular database table.
This chapter instructs you on how to create a database table or point a portlet to an existing database table. It includes the following sections:
You can easily create a database table through the Studio Portlet Wizard, which guides you through every step of creating a database table. Whether you are creating a new portlet or just a database, you use the Studio Portlet Wizard. For more information on creating portlets, see Creating Portlets.
The Choose Template or Web Service dialog box displays.
Each portlet template provides a different portlet structure, interface, and functionality. If you are just creating a database table without a portlet, select any portlet template except Poll, Survey, or Calendar.
For more information on which type of portlet to create, see Choosing Appropriate Studio Portlets.
The Studio Portlet Wizard displays.
For instructions on naming and describing the database table, see Naming and Describing a Database Table.
For instructions on creating database columns for your database table, see Defining the Columns in the Database Table.
For instructions on setting the security of the database, see Securing the Database Tables.
If you want to use an existing database table, see Using an Existing Database Table.
After you select the Studio portlet template and click Edit in the Portlet Editor, the Studio Portlet Wizard displays. For instructions on how to navigate to the Studio Portlet Wizard, see steps 1 to 6 of Creating a New Database Table.
To name and describe the database in the Database General Info page of the wizard:
The purpose of the database table might be obvious to you, but the description clarifies the purpose of the database table to other portlet creators, who may want to create portlets based on this database table as well. In addition, you and other portlet creators might eventually create many database tables, which makes it harder to keep track of what each table contains.
The Database Columns page of the Studio Portlet Wizard displays. For more information on the Database Columns page, see the next section, Defining the Columns in the Database Table.
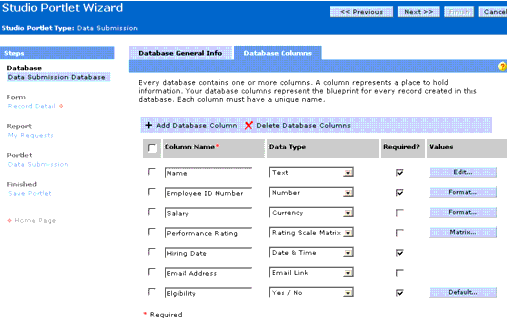
After you click Next >> in the Database General Info page of the Studio Portlet Wizard, add database columns in the Database Columns page of the wizard. Each column holds an item of information that your portlet will store and display. For example, if you create a Record Lookup portlet that acts as a company directory portlet, you might have three columns: first name, last name, and phone number.
You can set the default values for some of the data columns. Not all the columns that you create in the Database Column page are displayed in the portlet. You can later specify which parts of the database table to expose to the portlets and make different sets of data available to different portlets.
For instructions on how to navigate to the Studio Portlet Wizard, see steps 1 to 6 of Creating a New Database Table.
A new row of settings for the column appears.
Database column names cannot be changed after they have been set. Their form and report labels, on the other hand, can be changed.
A data type is a category of data; for example, currency, text, and date & time are different categories of data. You must assign data types to each column. For example, numeric data should be stored with a number data type. Some data types let you set default values for the column. This can be either a pre-specified value or a constrained list of values. For more information about setting default values, see Setting Default Values.
The table below describes the available data types and their corresponding input types. Input types are HTML input devices, such as a drop-down menu, check boxes, and text boxes.
A default value is the answer that automatically fills the text box or is automatically selected. If your users do not agree with the default answer, they can change it. For more information on how to set default values, see Setting Default Values.
Once you delete a column, you cannot reverse your action; there is no undo. The column and all its contents will be permanently deleted. Be aware that more than one portlet could be pointing to the same database table. A database column that is meaningless to one portlet might be important to another portlet. If you do not want your portlet to display certain columns, you should be configuring the Form Display page and the Report Display page of the Studio Portlet Wizard. For more information on configuring what appears in a record entry form of a portlet, see Designing the Appearance of the Record Entry Form; for more information on configuring what appears in the report of a portlet, see Designing the Portlet Report Display.
After you add a data column to a database table, you can set the default values for some data columns. All default values are set in the Database Column page of the Studio Portlet Wizard.
The following data types allow you to create default values:
You can create default values for data columns with Text data types. The default values automatically populate form fields of portlets that point to the data column. For example, you might have a form field in a portlet that asks for the company's name. If you set the default value to BEA Systems, the text box in the Name field of the portlet will already be filled with BEA Systems. The user can change the value in the text box.
After you add a database column for text in the Database Column page of the Studio Portlet Wizard, you can set the default value. For more information on how to get to the Database Column page in the wizard, see steps 1 to 7 of Creating a New Database Table.
To set the default value of a Text data column, do the following in the Database Column page:
A value list limits the values that can be entered into the field. For example, check boxes limit your users' answers to the available check-box selections. One good reason to create a value list is to prevent your users from entering different synonyms for the same term. For example, you might create a value list for the status of the work order that includes: Not Started, In Progress, and Completed. This keeps people from entering many variations of the same status (such as, "done," "Finished," or "complete").
For more information on how to get to the Database Column page in the wizard, see steps 1 to 7 of Creating a New Database Table.
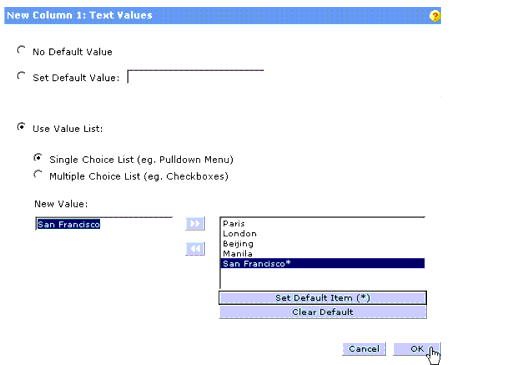
To create a value list to restrict the kind of information that can be entered into the column, do the following in the Database Column page:
The default value is marked with an asterisk (*).
After you create a value list, you can change it to suit your needs.
Rather than creating multiple parallel questions with repeating value lists, you can create an array of questions with only one set of defined answers. For example, you can ask survey participants to rate various skills, using the same rating scale for each skill.
After you add a matrix column in the Database Column page of the Studio Portlet Wizard, you can specify the values of each array in the matrix. For more information on how to get to the Database Column page in the wizard, see steps 1 to 7 of Creating a New Database Table.

To create arrays in a matrix, do the following in the Database Column page:
Each line in the Options list box represents an option item. Repeat this step until you have a complete value list.
After you add a Yes/No column in the Database Column page of the Studio Portlet Wizard, you can select the default value for the column. For more information on how to get to the Database Column page in the wizard, see steps 1 to 7 of Creating a New Database Table.
To set a default yes or no answer, do the following in the Database Column page:
You can set how numbers should be displayed by default. Only number and currency data types can be given a default format.
After you add a number column in the Database Column page of the Studio Portlet Wizard, you can specify the number of digits you want to display after the decimal point and the format for negative numbers. For more information on how to get to the Database Column page in the wizard, see steps 1 to 7 of Creating a New Database Table.
To set the format of the contents of the Number column, do the following in the Database Column page:
For example, if you selected 3 in the drop-down list, this column displays the value "2" as "2.000" or the value "2.3456" as "2.346."
After you add a Currency column in the Database Column page of the Studio Portlet Wizard (for more information on how to get to the Database Column page in the wizard, see steps 1 to 7 of Creating a New Database Table), you can specify how you want the currency values in this column to display. The sample at the top of the Currency Format dialog box gives you a preview of the currency values format.
To set the format of the contents of the Currency column, do the following in the Database Column page:
You do not need to create a new database table each time you create a new portlet; you can easily use an existing database table. For example, you might have a Phone List Entry portlet that allows Human Resources to enter new information into the database; you could use the same database for a Phone List Search portlet, which lets employees search for phone numbers.
The Studio Portlet Wizard guides you through every step of using an existing database table and modifying it to fit the needs of another portlet. But before you edit a database table, remember that any changes to it might affect other portlets that use the database table.
The Choose Template or Web Service dialog box displays.
Each portlet template provides a different portlet structure, interface, and functionality. For more information on which type of portlet to create, see Choosing Appropriate Studio Portlets.
The Studio Portlet Wizard displays.
You can either accept the database table as it is, or you can modify it. Changes that you apply to the existing database might affect other portlets that point to the database. The Portlet Database page lists all portlets that uses the database table. For more information about the database-related pages of the wizard, see the following sections:


|