


|
The portlets that you can create with Studio include a user interface, application logic, and a database. Portlets are modular applications that users can add to their My Pages or community pages. All Studio portlets, except the Report Summary portlet, include an entry form for typing in data and a report that shows a summary of data.
Studio portlets store their data in a database. You can configure each portlet to point to its own database table, or you can have multiple portlets point to one database table. Records added, modified, or deleted in one portlet will affect other portlets that point to the same database table. Once you assign a database table to a portlet, you cannot change the assignment; the portlet will always point to that particular database table. For more information on Studio database, see Creating Studio Database Tables and Managing Studio Database Tables.
You must have Edit access to an administrative folder in the portal in order to create new Studio portlets. Authoring privileges for administrative folders are set in the portal.
This chapter describes the different Studio portlets available, helps you determine what types of Studio portlets to create, and instructs you on how to create each portlet. It includes the following sections:
All Studio portlets either collect or display data. Studio provides seven portlet templates for different business needs, with an eighth one that you can customize. The table below provides an overview of features of the portlets as well as the objects that the portlets use.
Two Studio portlets let you solicit the opinions of your users: the Poll portlet and the Survey portlet. Both portlets are the simplest portlets and neither one requires you to create a database.
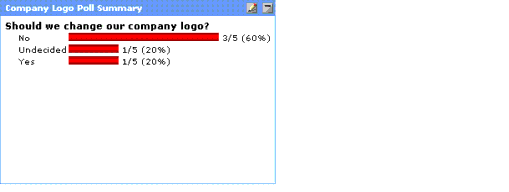
If you want users to cast their votes for a choice, create a poll portlet. After your users select their choices, they can see the aggregated results, but they will not be able to go back and change their vote. Users will not be able to vote more than once. This portlet includes a ballot and a poll results page.
Poll portlets are suitable for gathering for-or-against votes or votes for preferences or options, such as the most valued benefit or the favorite employee lunch plan.
For instructions on how to create a Poll portlet, see Creating Poll Portlets.

To solicit opinions or comments from your users, create a Survey portlet. Unlike the Poll portlet, users who answer the survey cannot see the results; instead, they see a thank-you page. While the Poll portlet is ideal for most single-choice voting, you can use a Survey portlet as a blind poll that lets your users cast votes without seeing the results. You can also set the Survey portlet to allow users to take the survey more than once.
Survey portlets are suitable for customer surveys and feedback questionnaires. This portlet includes a welcome page, a survey page, and a thank-you page. For instructions on how to create a survey portlet, see Creating Survey Portlets.
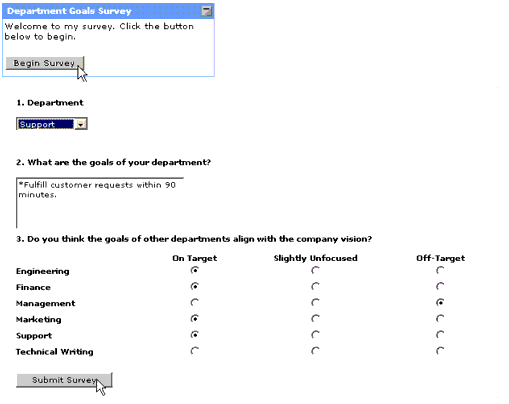
Users with administrator privileges can view the survey results summary as well as all individual responses. For information on administrator privileges, see Security.
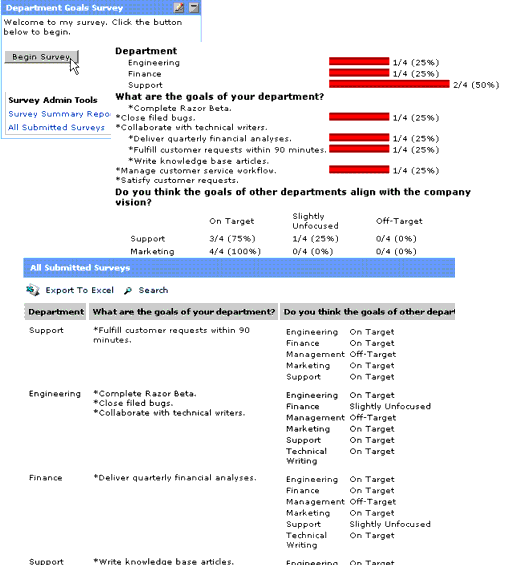
The Calendar portlet lets your users create a calendar for events or scheduling. The portlet includes a calendar and an event entry form that lets your users add an event to the calendar. Your users can view a daily, weekly, or monthly format of the calendar. The portlet includes a calendar, an event details pane, and an event entry form.
To populate the calendar, you can either create new events in the Calendar portlet itself or you can import existing events from a database. Events added and deleted from the Calendar portlet are immediately reflected in the information displayed on every portlet that points to the same database table.
Calendar portlets are suitable for depicting chronological data, such as calendar of events, holidays, seminars and conferences, and vacation plans.
For instructions on how to create a Calendar portlet, see Creating Calendar Portlets.
Two Studio portlets provide means for your users to enter data: the Data Submission portlet and the Record Browser portlet. Both portlets let users add entries to the database and view data, but the Record Browser portlet provides more functionality. The Data Submission portlet only lets users create and view data; while the Record Browser portlet lets users add, modify, and delete records. They can even export the contents of the portlet to Excel. Both portlets can point to the same database table.
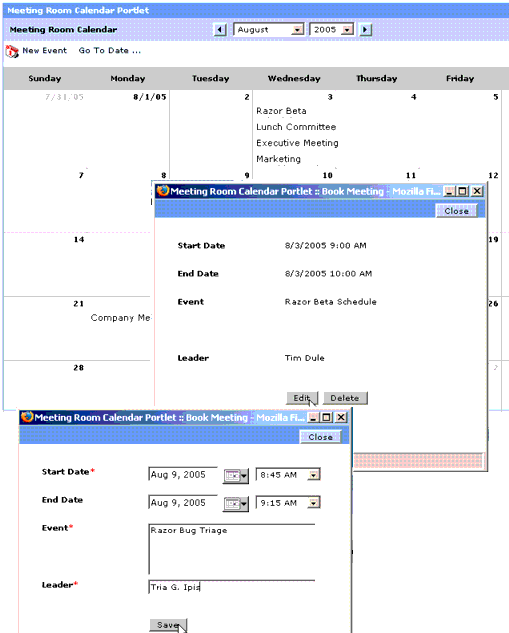
A Data Submission portlet lets your users create records. It is designed primarily for collecting data, and it can accommodate all types of data that the Poll, Survey, and Calendar portlets can. Users can submit a new record through a record entry form, as well as view and edit records they have created. Records added and deleted from the Data Submission portlet are immediately reflected in the information displayed on every portlet that points to the same database table. This portlet includes a form for adding new data and a report of submitted records.
Data Submission portlets are suitable for service requests, work orders, and detailed questionnaires that includes chronological data.
For instructions on how to create a Data Submission portlet, see Creating Data Submission Portlets.
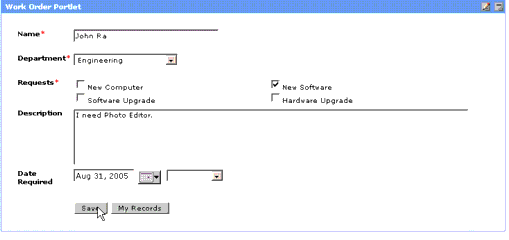
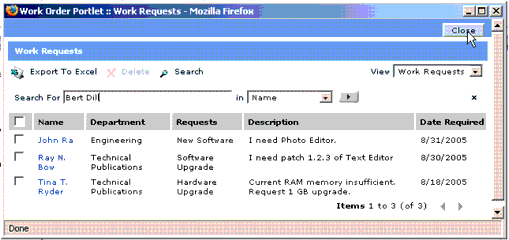
A Record Browser portlet displays a list of records, presented as table rows of data. The data in the portlet is updated whenever your users create, edit, or delete records. Users can also search for a particular record and view other reports that the administrator has made available to them. Users can even export the contents of an entire report and the search results into an Excel spreadsheet.
Record Browser portlets are suitable for a bookmark list (that points to different white papers across projects and teams). This portlet includes a report in a tabular form, a detail form, and a record entry form for editing or adding information. It can also have multiple reports. For instructions on how to create a Record Browser portlet, see Creating Record Browser Portlets.
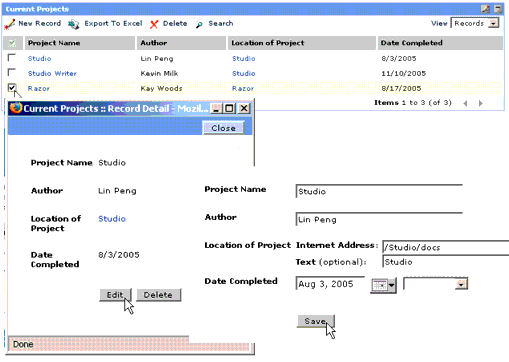
Two Studio portlets provide reports that display data: the Record Lookup portlet and the Record Summary portlet. The Record Lookup portlet allows your users to search for a piece of data in the database; the Record Summary portlet simply displays a summary of collected data. Unlike all other Studio portlets, the Record Lookup and the Report Summary portlets do not provide means for users to add entries (although the Record Lookup allows users to edit pre-existing entries); therefore, you either have to point the portlets to a pre-existing database table that is already populated with data or create a different portlet (such as a Data Submission portlet) that allows your users to add entries into the database table. The data-entry portlet is the means by which your users can populate the database table, and the Record Lookup portlet can search for the entered data.
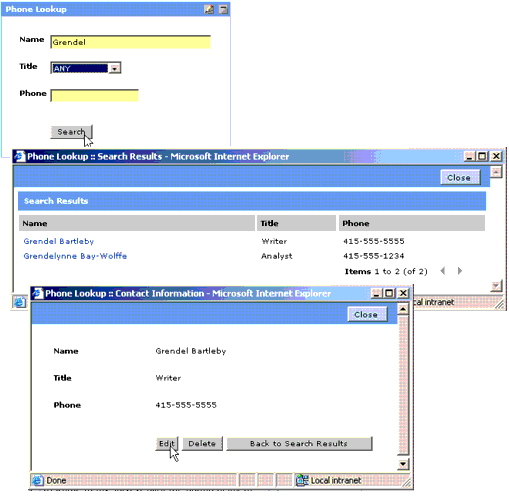
The Record Lookup portlet lets your users search for records based on a set of criteria you specify, and then edit those records. This portlet includes a record search form, a search results page, and a detail pane. The detail pane is launched when your user clicks an item in the search results page.
This portlet is suitable for company directory, inventory catalog, and phone number lookup.
For instructions on how to create a Record Lookup portlet, see Creating Record Lookup Portlets.
The Record Summary portlet lets your users view a report of aggregated records. You can control the layout of the report and select the data to display. This portlet includes a summary report.
The Record Summary portlet is suitable for any summary report, such as a sales report that displays sales totals for each region of your company or an annual expense report for a department.
For instructions on how to create a Record Summary portlet, see Creating Record Summary Portlets.
Studio lets you create portlets. Because various wizards guide you through the creation of your portlet's user interface, application logic, and database, you do not need to know how to program. All portlets are created in the Administration area of the portal.
The Choose Template or Web Service dialog box appears.
Each portlet template provides a different portlet structure, interface, and functionality. For more information on which type of portlet to create, see Choosing Appropriate Studio Portlets.
The Studio Portlet Wizard appears.
The Studio Portlet Wizard closes.
After you set the portlet security to allow users and groups to access the portlet, the portlet can be added to a portal page. It also becomes available in the Studio administrative portlets—Studio Administrator and Studio Database Manager.
For more information about portlet security, see Securing Portlets; for more information about Studio Administrator, see Managing Studio Portlets; for more information about Studio Database Manager, see Managing Studio Database Tables.
After you select the Studio Poll template and click Edit in the Portlet Editor page, the Studio Poll Builder displays. Create a poll with one question, and define a set of answers. For instructions on how to navigate to Studio Studio Poll Builder, see steps 1 to 5 described in Creating Portlets.
After you close the Studio Poll Builder, do not forget to save your portlet through the Portlet Editor by following steps 8 to 11 described in Creating Portlets.
After you select the Studio Survey template and click Edit in the Portlet Editor, the Studio Survey Builder appears. Create a question for your survey. For instructions on how to navigate to the Studio Survey Builder, see steps 1 to 5 described in Creating Portlets.
The Studio Survey Builder displays a preview of your survey.
For more information on the buttons and tools in the preview page, see the online help for Studio.
After you close the Studio Survey Builder, do not forget to save and name your portlet through the Portlet Editor by following steps 8-11 described in Creating Portlets.
After you select the Studio Calendar template and click Edit in the Portlet Editor, the Studio Portlet Wizard displays. For instructions on how to navigate to the Studio Portlet Wizard, see steps 1 to 5 described in Creating Portlets.
For instructions, see Designing Your Record Entry Forms.
For instructions, see Sending Notifications.
If you have created only one Date data column, the Studio Portlet Wizard will automatically select the only Date data column you have created. It will not have a drop-down list.
If you have not created a Date data column to hold information about dates marking the end of the events, click << Previous in the Studio Portlet Wizard until you return to the Database Columns page of the wizard. Create a Date data column for end dates (For more information on creating data columns, see Defining the Columns in the Database Table). After you create the column, click Next >> until you return to the Calendar Display page of the wizard.
This launches the Studio Page Layout Editor. For more information on the Page Layout Editor, see the online help for Studio.
Suppose you have a master database of company events. If you want to create a Marketing Calendar portlet, you would create filters that display only events that relate to Marketing. For instructions, see Creating Filters.
After you close the Studio Portlet Wizard, do not forget to save and name your portlet through the Portlet Editor by following steps 8 to 11 described in Creating Portlets.
After you select the Studio Data Submission template and click Edit in the Portlet Editor, the Studio Portlet Wizard displays. For instructions on how to navigate to the Studio Portlet Wizard, see steps 1 to 5 described in Creating Portlets.
For instructions, see Designing Your Record Entry Forms.
For instructions, see Sending Notifications.
For instructions, see Designing Portlet Reports.
Suppose you have a master database of company sales. If you want to create a Western Region Sales report, you would create filters that select only sales information that relates to your Western regional offices.
For instructions on how to create a filter, see Creating Filters.
For instructions, see Adding Sorting to Reports.
After you close the Studio Portlet Wizard, do not forget to save and name your portlet through the Portlet Editor by following steps 8 to 11 described in Creating Portlets.
After you select the Studio Record Browser template and click Edit in the Portlet Editor, the Studio Portlet Wizard displays. For instructions on how to navigate to the Studio Portlet Wizard, see steps 1 to 5 described in Creating Portlets.
For instructions, see Designing Your Record Entry Forms.
For instructions, see Sending Notifications.
For instructions, see Designing Portlet Reports.
Suppose you have a master database of company sales. If you want to create a Western Region Sales report, you would create filters that select only sales information that relates to your Western regional offices.
For instructions on how to create a filter, see Creating Filters.
For instructions, see Adding Sorting to Reports.
After you close the Studio Portlet Wizard, do not forget to save and name your portlet through the Portlet Editor by following steps 8 to 11 described in Creating Portlets.
After you select the Studio Record Lookup template and click Edit in the Portlet Editor, the Studio Portlet Wizard displays. For instructions on how to navigate to the Studio Portlet Wizard, see steps 1 to 5 described in Creating Portlets.
The portlet does not provide your users a way to enter data, so you need to either use a database table already populated with data or create another portlet that allows users to add records to the database table (such as the Data Submission portlet). For instructions on using an existing database table for the Record Lookup portlet, see Using an Existing Database Table.
This is where users type entries in search fields (such as the "first name" and "last name" fields in a phone directory). For instructions, see Designing Your Record Entry Forms.
For instructions, see Sending Notifications.
After you close the Studio Portlet Wizard, do not forget to save and name your portlet through the Portlet Editor by following steps 8 to 11 described in Creating Portlets.
After you select the Studio Record Summary template and click Edit in the Portlet Editor, the Studio Portlet Wizard displays. For instructions on how to navigate to the Studio Portlet Wizard, see steps 1 to 5 described in Creating Portlets.
The portlet does not provide your users the means to enter data, so you need to either use a database table already populated with data or create another portlet that allows users to add records to the database table (such as the Data Submission portlet). For instructions on using an existing database table for the portlet, see Using an Existing Database Table.
The Studio Page Layout Editor appears. For more information on Studio Page Layout Editor, see the online help for Studio.
After you close the Studio Portlet Wizard, do not forget to save and name your portlet through the Portlet Editor by following steps 8 to 11 described in Creating Portlets.
Some portlets—including the Calendar portlet, Data Submission portlet, and Record Browser portlet—include record entry forms that allow your users to create new records. You can design the appearance of your portlet's record entry form, which is the user interface that enables your users to enter data. The form lets users submit data to be stored as a record in the database table.
To control what form fields appear in your record form, do the following in the Form Display page of the Studio Portlet Wizard (for information on how to access the wizard, see steps 1 to 5 in Creating Portlets):
The input type is the HTML input device (such as select menu and text box) that determines what each field will look like on your portlet's record entry form. Some data types have more than one input type available.
| Caution: | If you have already customized the layout of your entry form, do not add a field to your form by selecting the check box on this page. If you do so, your entry form will revert to the default layout. Instead, add new fields to your form in the Page Layout Editor. |
The entry form displays the fields in the same order that they appear on this page.
The Studio Page Layout Editor appears. For more information on the Studio Page Layout Editor, see the online help for Studio.
After you are done selecting which form fields should appear in the record entry form, you can design its appearance. The Studio Page Layout Editor, which you can access by clicking Edit Form Layout in the Form Display page of the Studio Portlet Wizard (for information on how to access the wizard, see steps 1 to 5 described in Creating Portlets), lets you change the appearance and content of the form. You can resize, add, and delete rows and columns; change the input type; add, delete, and rearrange fields; and format text. Use the toolbar to change the font, font size, font color, and text format. For more details on how to use the Page Layout Editor, see the Studio online help.
After you have finished designing your page layout, click Save and Close. If you want to cancel your changes and not save it, click ![]() on the upper right corner of the window. You cannot undo your actions. If you do not want to accept the changes you make, close the Page Layout Editor and launch it again.
on the upper right corner of the window. You cannot undo your actions. If you do not want to accept the changes you make, close the Page Layout Editor and launch it again.
| Caution: | Do not make changes in the Form Display page of the wizard after you have made changes in the Studio Page Layout Editor. If you do, your entry form will revert to the default layout, and you will lose all the work that you have done in the Page Layout Editor. If you want to make changes, such as adding new fields, do so in the Page Layout Editor. |
You can set up your portlet to e-mail one or more recipients each time a record is created, modified, or deleted through a record entry form.
To set up e-mail notification, do the following in the Form Email Notification page of the Studio Portlet Wizard (for information on how to access the wizard, see steps 1 to 5 described in Creating Portlets):
The notification rules appear.
For example, if you want your users to know that a new record was created through the form, select New Record Created.
Separate one e-mail address from another with commas.
For example, if you select an e-mail column (database field that contains e-mail data) that you created in the Database Column page of the wizard, all addresses within that data column will receive a notification e-mail.
Some portlets—including Data Submission, Record Browser, and Record Lookup—have reports that allow your users to view records. You can design the appearance of your portlet's report, which is the user interface that lets your users view a collection of data at a glance.
To define the content in the portlet report, the portlet appearance, and the buttons displayed in the action bar, peform the following steps in the Report Display page of the Studio Portlet Wizard (for information on accessing the wizard, see steps 1 to 5 in Creating Portlets):
The report displays the fields in the same order that they appear on this page.
This Studio Page Layout Editor displays. For more information on Studio Page Layout Editor, see the online help for Studio.
Suppose you have a master database of company sales. If you want to create a Western Region Sales report, you could create filters that select only sales information that relates to your Western regional offices.
All portlets, except for polls and surveys, can be filtered.
To display only a subset of records or events in the report page of your portlet, create filters. Do the following in the Filters page of the Studio Portlet Wizard (for information on how to access the wizard, see steps 1 to 5 in Creating Portlets):
The comparison operator lets you select the relationship between the content of the database column and the comparison value. The comparison operator and the comparison value restrict what is filtered. For example, you can set the filter to apply to all the data in the "Date" database column that falls on or after ("on or after" is one of the comparison operators for the Calendar portlet) today ("today" is one of the comparison values available for the Calendar portlets).
For more information on comparison operators, see the online help for Studio.
In the example above, where we set the comparison value to "Today," the filter will display all events that occur today and all days after that in the Calendar portlet.
The filters are not nested, so they will be applied in the order displayed.
You can specify the order in which records appear in your portlet's report page by adding sort criteria. Do the following in the Sorts page of the Studio Portlet Wizard (for information on how to access the wizard, see steps 1 to 5 in Creating Portlets):
After you create a Studio portlet, you can define and modify certain aspects of the portlet, such as its width, name, and description in the Portlet Editor. The Portlet Editor displays after you create a portlet object in the administration page. For step-by-step instructions, see steps 1 to 4 in Creating Portlets.
Under the Portlet Type/Size section of the Main Settings page of the Portlet Editor, select the width of the Studio portlet:
You can allow the portlet to be added to both community pages and My Pages or you can restrict the portlet to community pages only. The security settings of a portlet also determines whether or not a portlet can be added to a portal page; for more information, see Securing Portlets.
To select how you want the portlet to be distributed, select one of the following options under the Portlet Type/Size section of the Main Settings page of the Portlet Editor:
If you do not want to display the title of the portlet when it is added to a page (that is, you want to keep title bars from appearing over the portlet), select Suppress Portlet's title bar under the Portlet Type/Size section of the Main Settings page of the Portlet Editor.
You can create a Studio portlet template that other portlet creators can use as a model. The Studio wizards will guide you through the process.
The Studio Portlet Wizard displays.


|