

|
You can control access to Studio data and portlets in two ways: by restricting access to the database and restricting access to the portlet. Access to Studio database tables is configured in the Studio Portlet Wizard; access to portlets is configured in the Portlet Editor.
This chapter includes the following sections:
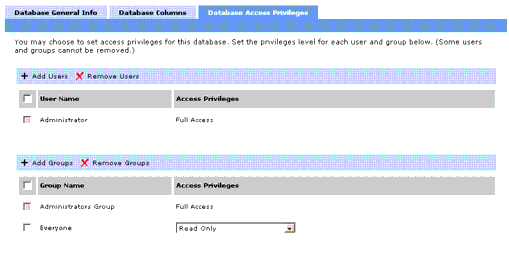
You can control access to database tables by assigning appropriate privileges to different groups of users. For example, you might want to allow only project leaders to delete columns in the database. By default, every member in the Administrator group is given full access to the database, and everyone else is given read-only access to the database.
You can configure access privileges to a database table while you are creating a new portlet in the Studio Portlet Wizard, or you can change access privileges later through the Studio Database Wizard. You can launch the Studio Database Wizard when you click a database table name in the Studio Database Manager portlet.
For instructions on how you can access the Database Access Privileges page in the Studio Portlet Wizard, see Creating Portlets. For more information about editing the access privileges of database tables through the Studio Database Wizard, see Editing Database Tables.

In the Database Access Privileges page of either the Studio Portlet Wizard or the Studio Database Wizard, specify the users and groups who can view, create, edit, and delete records in the database table associated with the portlet. The access privilege determines the level of portlet functionality available to each user. For example, users with the "Create New Records" access privilege can create records and submit them to the database.
To set the access privilege for a user or group of users, perform the following steps in the Database Access Privilege page:
For more information on each access privilege, see Database Access Privileges.
You can specify groups and users who cannot access the database.
To prevent certain users or groups of users from accessing the database table, do the following in the Database Access Privilege page of the Studio Portlet Wizard or Studio Database Wizard:
No one but administrators will be able to access the database table.
Any group or user that you did not explicitly add in this page will not be able to access the database table.
To retract access privileges from user or groups, do the following in the Database Access Privilege page of the Studio Portlet Wizard or Studio Database Wizard:
The table below defines what activities a user or group of users can perform based on each access privilege:
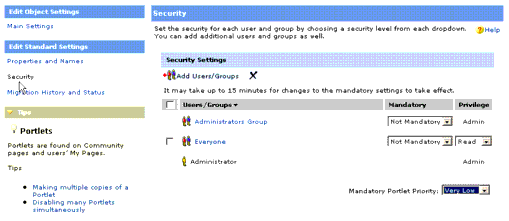
You can control who can access portlets by assigning appropriate privileges to different groups of users. For example, you might want to allow only the management team to view the Sales Report portlet. By default, every member in the Administrator Group is given full access to the portlet.
You can configure the access privileges to a portlet after you save the portlet in the Portlet Editor.

To configure portlet security in the Portlet Editor:
In the Security page of the Portlet Editor, specify the users and groups who can access this portlet and what type of access they have. The access privilege determines the level of portlet functionality available to each user. For example, users with Select access privilege can add portlets to My Pages and community pages.
To allow additional groups to access the portlet:
If you mark this portlet as mandatory, it automatically appears in the user's default My Page. The user will not be able to remove the portlet. If you do not want the portlet to be mandatory, skip to the next step, otherwise:
These users and groups will not be able to remove this portlet from their My Pages.
The priority determines the portlet's placement on the My Page; portlets with higher priority display closer to the upper-left of the My Page than portlets with lower priority.
For more information about the privileges and the rights they bestow to the user or group, see Portlet Privileges.
To retract access privileges from user or groups, do the following in the Security page of the Studio Portlet Wizard:
Portlet privileges bestow an increasing number of rights. Read access provides the least number of rights, while Admin access provides the most rights. Users or groups that are not added to the Security page of the Portlet Editor cannot access the portlet at all. They will not see the portlet even when they search for it.
The table below defines what activities a user or group of users can perform based on each access privilege:


|