While CollabraSuite, BEA Edition may be successfully deployed into any type of WebLogic domain, a portal domain is required if CollabraSuite, BEA Edition is to be deployed inside a WebLogic Portal. If a WebLogic domain has not yet been created at your site, use the WebLogic Configuration Wizard to create one.
In this document, the directory where WebLogic is installed will be referred to as WL_HOME. For example, WL_HOME=C:\bea\weblogic81
The WebLogic domain directory will be referred to as DOMAIN_HOME. For example, DOMAIN_HOME=C:\bea\user_projects\domains\portalDomain
WebLogic 8.1
For WebLogic 8.1, domains must first be created and later extended with CollabraSuite, BEA Edition. Consult BEA's website for directions on Creating a New WebLogic 8.1 Domain. (http://download.oracle.com/docs/cd/E13196_01/platform/docs81/confgwiz/newdom.html).
WebLogic 9.2
In WebLogic 9.2, CollabraSuite, BEA Edition can be installed into a domain at creation time, or added later by extending the domain. Refer to the section Extend WebLogic 9 Domain below for instructions on configuring CollabraSuite, BEA Edition when creating or extending the domain.
Consult BEA's website for directions on Creating a New WebLogic 9 Domain. (http://download.oracle.com/docs/cd/E13179_01/common/docs92/confgwiz/newdom.html)
Extend the Domain
CollabraSuite, BEA Edition is installed into a WebLogic server instance by adding the appropriate configuration to the server's domain. This domain configuration is automated using an extension template containing the CollabraSuite, BEA Edition software. The template can also be used to create the necessary database tables for CollabraSuite, BEA Edition. If you're upgrading an existing installation of CollabraSuite, BEA Edition, refer to the Upgrading CollabraSuite appendix.
Be sure to shut down WebLogic and backup your entire domain directory before applying the extension template to an existing domain. The Configuration Wizard will overwrite all scripts in the domain, removing any local modifications. One strategy for updating an existing domain with local customizations is to first make a copy of the domain. You can then apply the extension template to the copy. When finished with the template, copy the config.xml and the CollabraSuite.ear file back into the original domain. This will allow you to update a domain with CollabraSuite, BEA Edition while preserving any local modifications.
WebLogic 8.1 Domain
The following section describes extending a WebLogic 8.1 domain. If you are using WebLogic 9, skip this section and refer to the next section titled Extend WebLogic 9 Domain.
Run the BEA WebLogic Configuration Wizard.
In Windows, you can use the Start menu to run the Configuration Wizard. For other platforms, you can execute the Configuration Wizard script located in the WebLogic installation directory:
% cd $WL_HOME/common/bin
% ./config.sh &
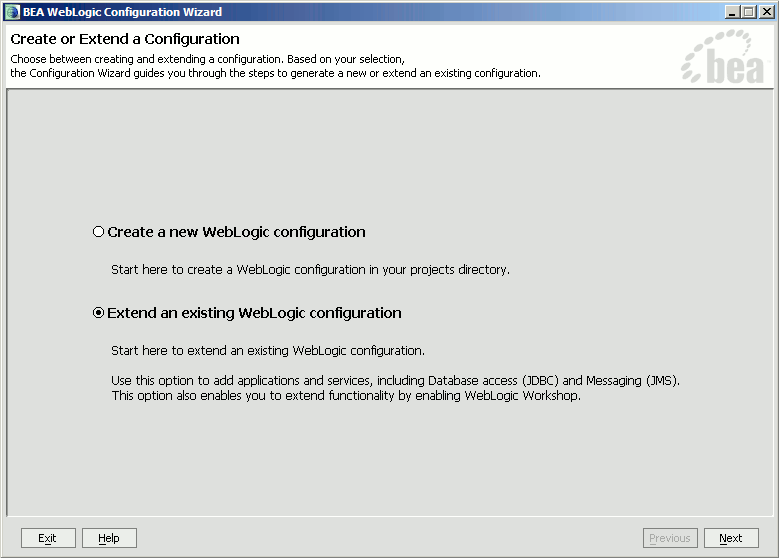
Extend an existing WebLogic configuration.
Choose Extend an existing WebLogic configuration.
Click Next.
Figure 3-1 Create or Extend Domain
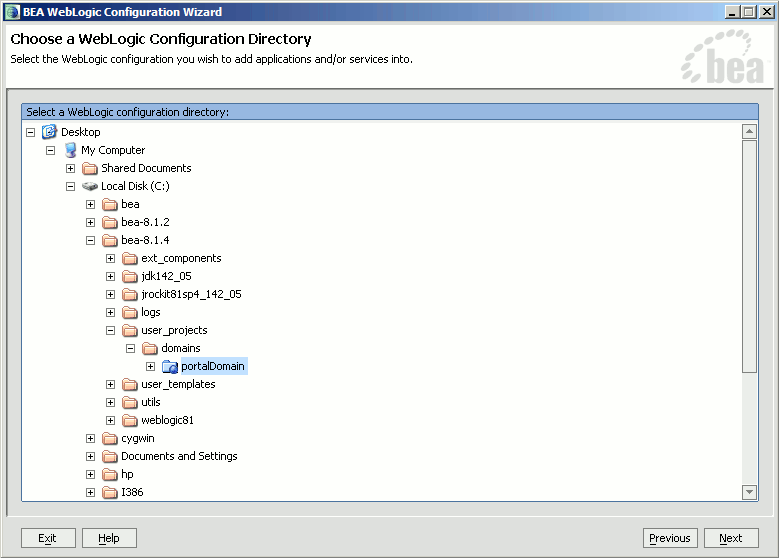
Select the configuration.
Use the tree to select the top level directory of domain you wish to extend with CollabraSuite, BEA Edition functionality.
Click Next.
Figure 3-2 Choose Configuration Directory
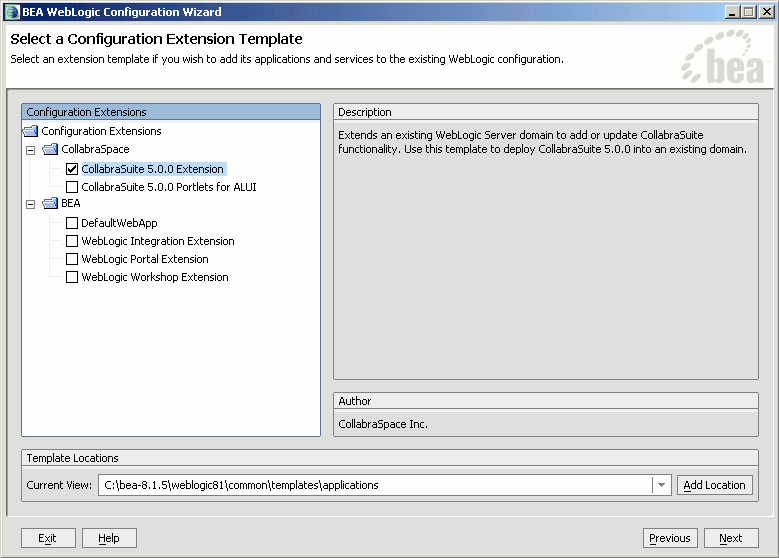
Select the CollabraSuite, BEA Edition extension template.
Check CollabraSuite Extension under Configuration Extensions. Click Next.
Figure 3-3 Select Template
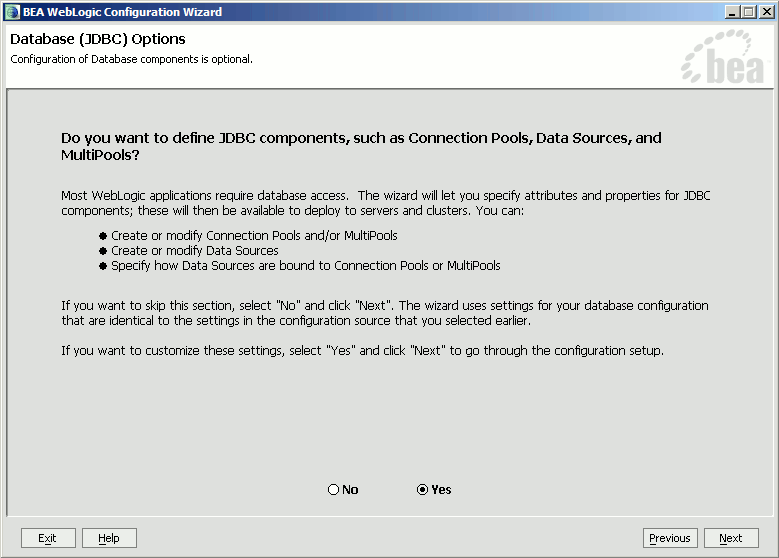
Define JDBC Components.
Click Yes when asked to define JDBC components.
Click Next.
Note:
If using Pointbase, see the Special PointBase Instructions for WebLogic 8.1. If using MySQL, see the Special MySQL Instructions.
Figure 3-4 Database Options
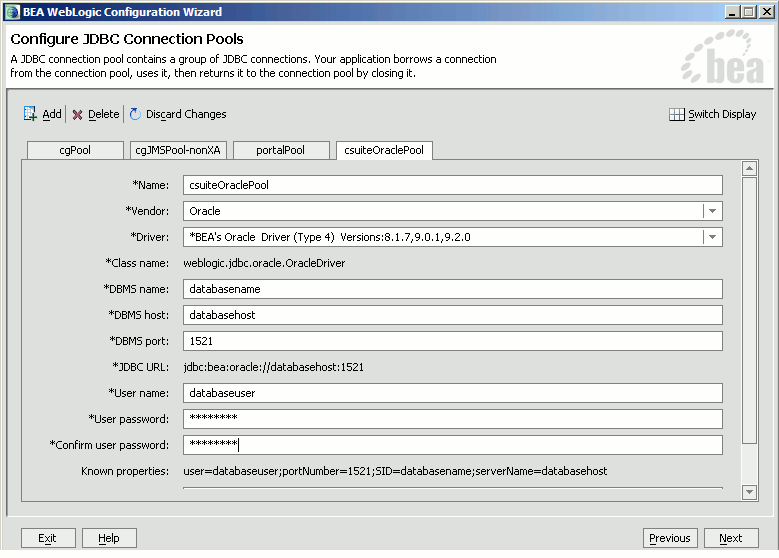
The template provides example CollabraSuite, BEA Edition JDBC connection pools for Pointbase, Oracle, Sybase, MS SQL Server and MySQL. Choose the CollabraSuite, BEA Edition connection pool for the database you will be using and delete the remaining CollabraSuite, BEA Edition pools (those beginning with csuite).
Note:
If they exist, cgPool, cgJMSPool-nonXA and the portalPool should not be deleted.
Fill in the correct values for DBMS name, DBMS host, User name and User password. Supports Local Transactions should not be checked.
Click Next.
Figure 3-5 Connection Pools
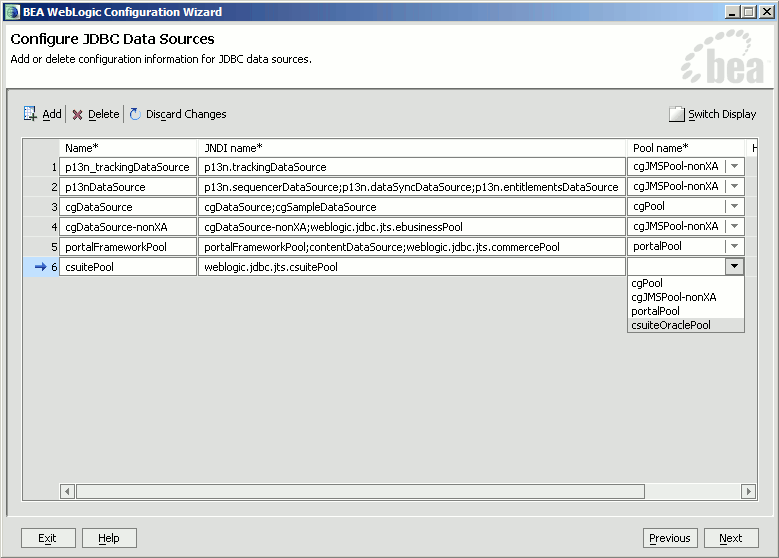
Click Next to skip the Configure JDBC MultiPools page.
For the csuitePool Data Source, select the csuite Connection Pool from the drop down menu.
Click Next.
Figure 3-6 Data Sources
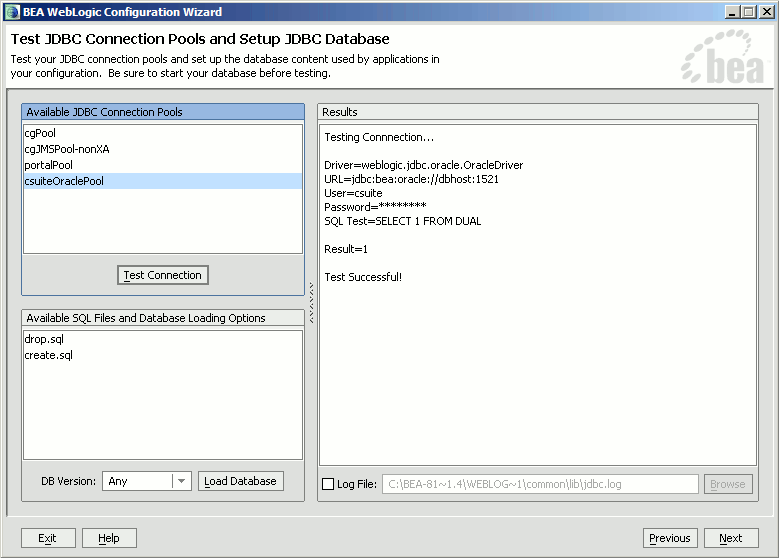
Test JDBC Connection Pools and Settings.
To test the pool, select the csuite Connection Pool and click Test Connection. You should see a successful connection test in the right hand panel.
Figure 3-7 Setup Database
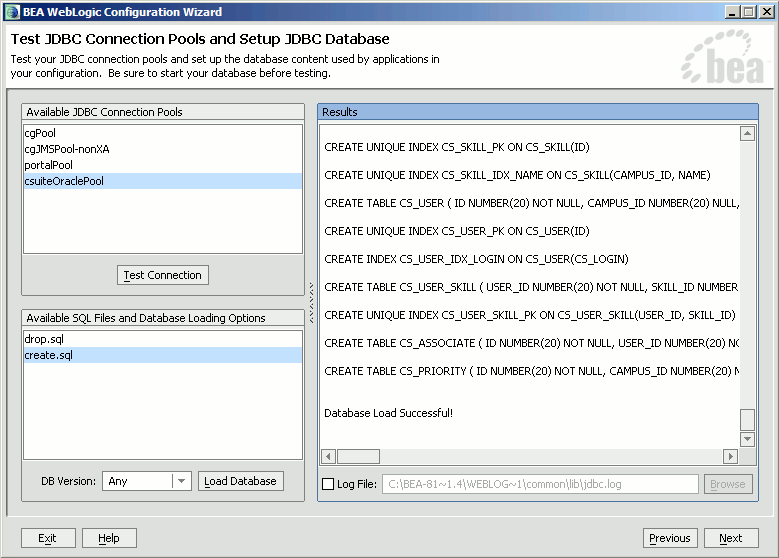
Create the CollabraSuite, BEA Edition Database Schema
If the database schema does not already exist, click on Load Database.
Note:
In WebLogic 8.1, all database scripts are run contrary to the BEA documentation. This will result in any existing CollabraSuite, BEA Edition tables being dropped and recreated, removing any previous CollabraSuite, BEA Edition environment. If upgrading an existing CollabraSuite, BEA Edition environment, please refer to the Upgrading CollabraSuite appendix.
Click Next.
Figure 3-8 Setup Database
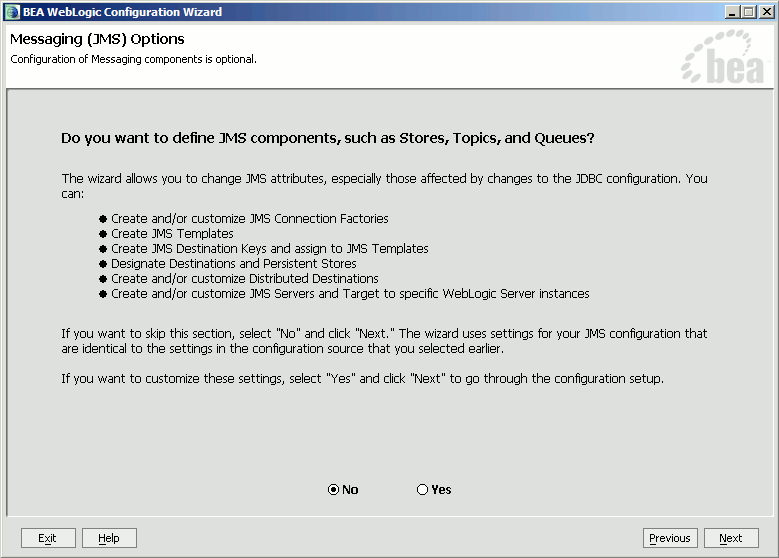
Define JMS Components.
Click No when asked to define JMS components. The JMS configuration should not have to be modified.
Click Next.
Figure 3-9 Messaging Options
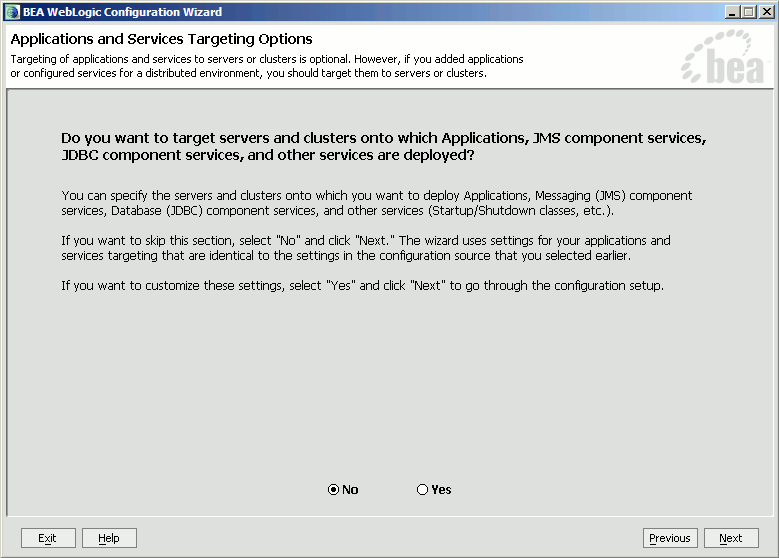
Target Components to Servers.
Click No when asked to target components to servers. The components will be targeted to the server.
Click Next.
Figure 3-10 Target Options
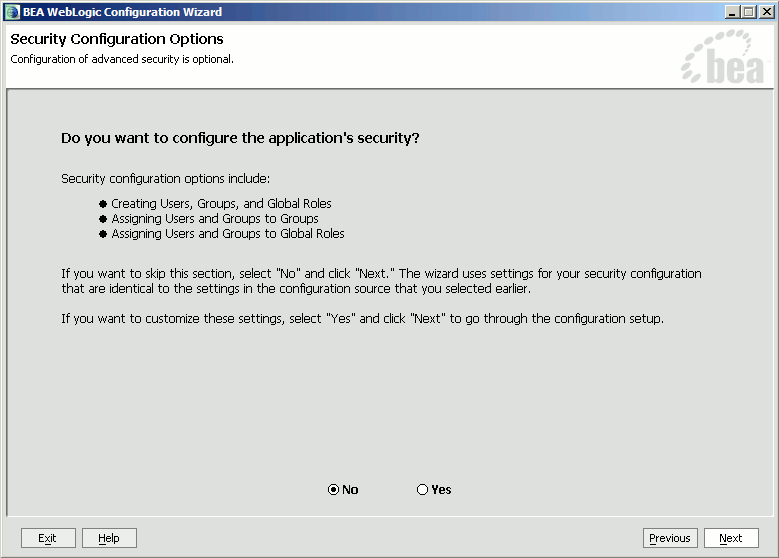
Configure Application Security.
Click No when asked to configure the application's security. The correct groups and roles have already been defined.
Click Next.
Figure 3-11 Security Options
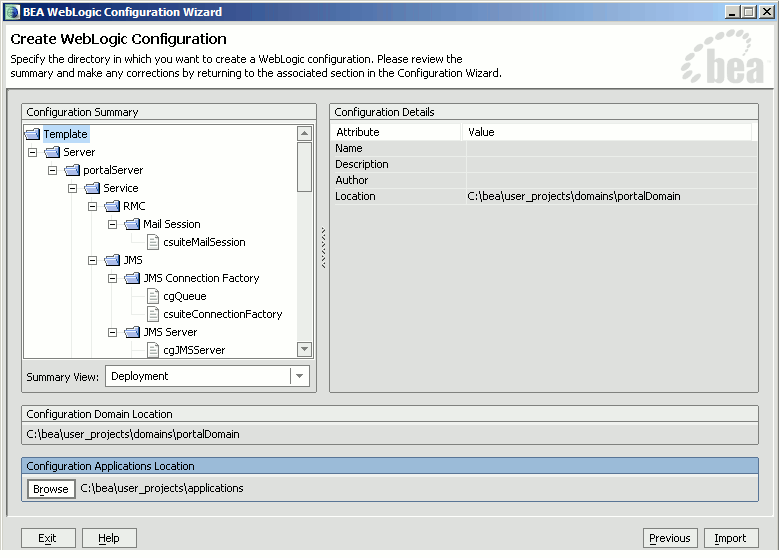
Extend the configuration.
If desired, use Browse to select the directory to place the CollabraSuite.ear.
Note:
If you want to place the EAR under the applications directory located in the domain you may have to create the directory first.
Click Import.
Figure 3-12 WebLogic Configuration
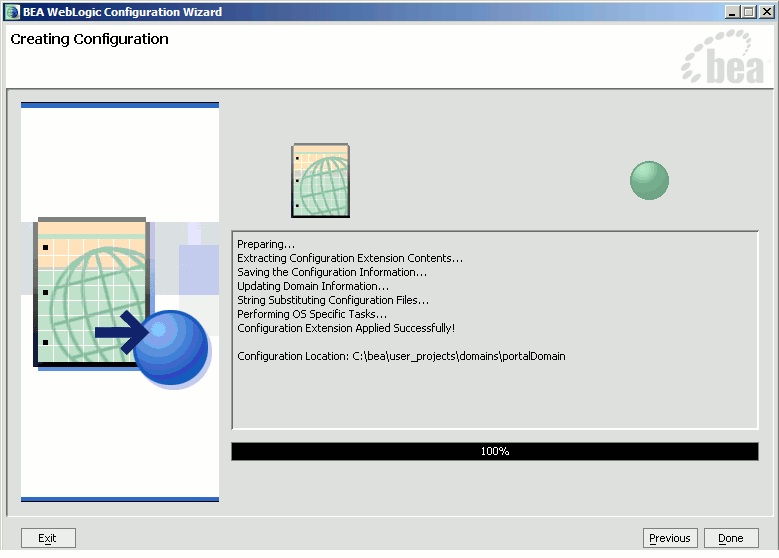
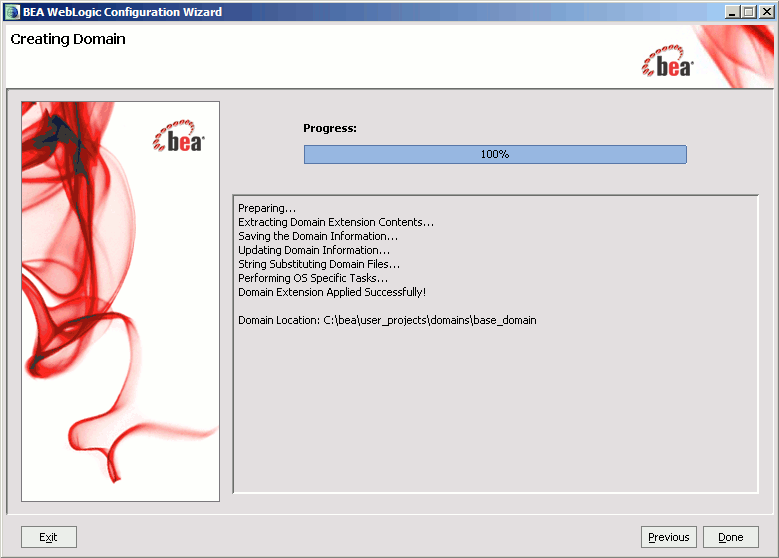
A successful import is indicated in the screen below.
Click Done to exit the Configuration Wizard.
Figure 3-13 Creating Configuration
WebLogic 9.x Domain
This section describes extending a WebLogic 9.x domain. If you are using WebLogic 8.1, skip this section and proceed to the next section titled Finish Extending the Domain.
Run the BEA WebLogic Configuration Wizard.
In Windows, you can use the Start menu to run the Configuration Wizard. For other platforms, you can execute the Configuration Wizard script located in the WebLogic installation directory:
% cd $WL_HOME/common/bin
% ./config.sh &
Extend an existing WebLogic domain.
Choose Extend an existing WebLogic domain.
Click Next.
Figure 3-14 Create or Extend Domain
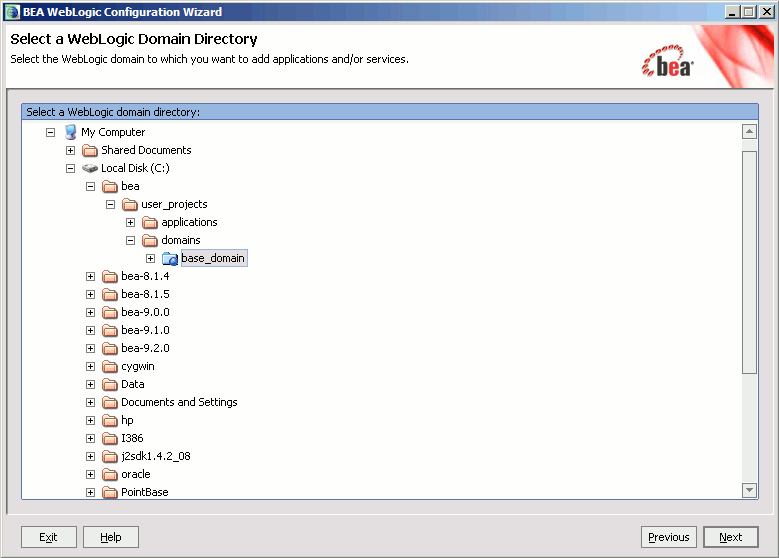
Select the existing configuration.
Use the tree to select the top level directory of the domain you wish to extend with CollabraSuite, BEA Edition functionality.
Click Next.
Figure 3-15 Choose Domain
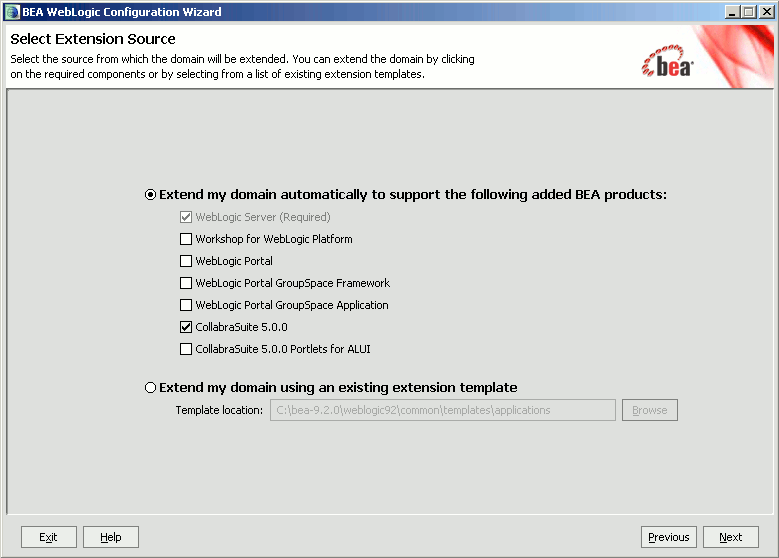
Select the extension source.
Select the appropriate CollabraSuite, BEA Edition template. Choose the CollabraSuite, BEA Edition for ALUI if CollabraSuite, BEA Edition is to be used with AquaLogic User Interaction (ALUI)
Click Next.
Figure 3-16 Select Extensions
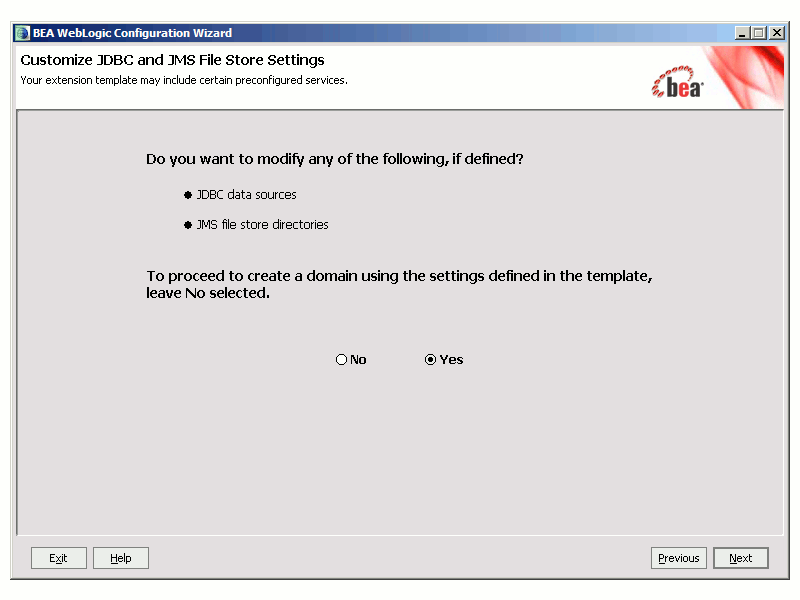
Customize JDBC Settings
Click Yes when asked to modify JDBC data sources.
Click Next.
Note:
If using MySQL, see the Special MySQL Instructions.
Figure 3-17 Customize JDBC
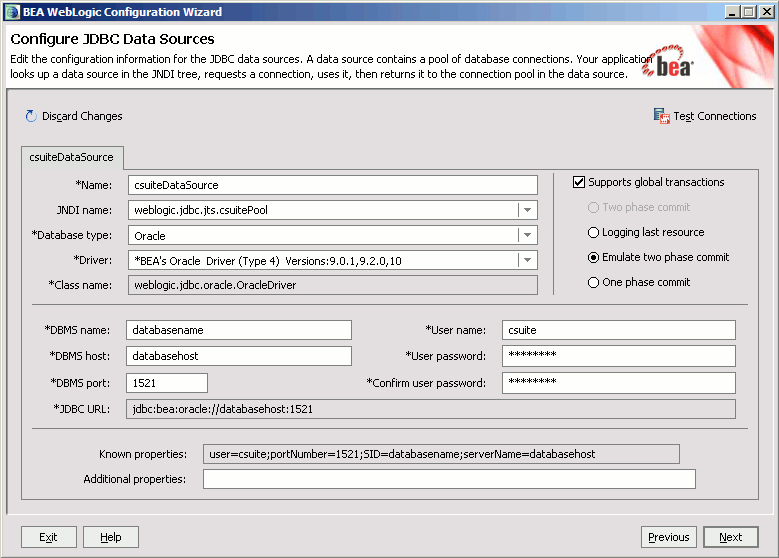
Configure JDBC Data Sources.
Leave the Name and JNDI name fields unchanged.
Fill in the appropriate Database type and Driver.
Note:
Refer to the Supported Configurations Guide for supported databases and drivers.
Fill in the appropriate values for DBMS name, DBMS host, DBMS port, User name and User password.
Check Supports global transactions, then select Emulate two phase commit.
Figure 3-18 Data Source
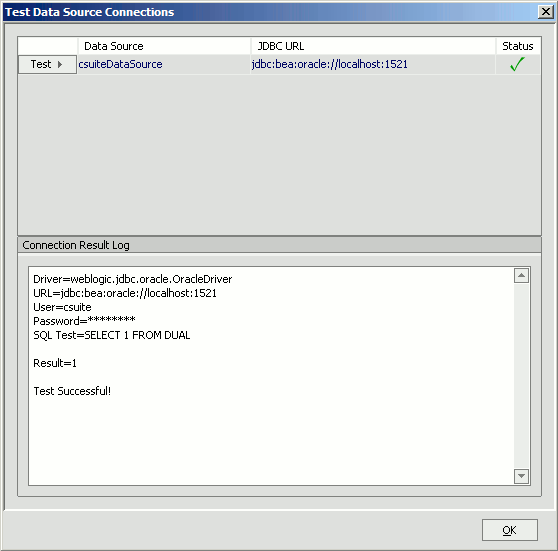
Test the data source by clicking Test Connections.
In the Test Data Source Connections dialog, click the Test button next to the csuiteDataSource. You should see a successful connection test in the lower panel.
Click OK to dismiss the dialog.
Click Next.
Figure 3-19 Test Data Source
Run Database Scripts
If the CollabraSuite, BEA Edition database schema does not already exist, click Run Scripts.
Note:
Any existing CollabraSuite, BEA Edition tables will be dropped and recreated, removing any previous CollabraSuite, BEA Edition environment. If upgrading CollabraSuite, BEA Edition, please refer to the Upgrading CollabraSuite appendix.
Click Next.
Figure 3-20 Setup Database
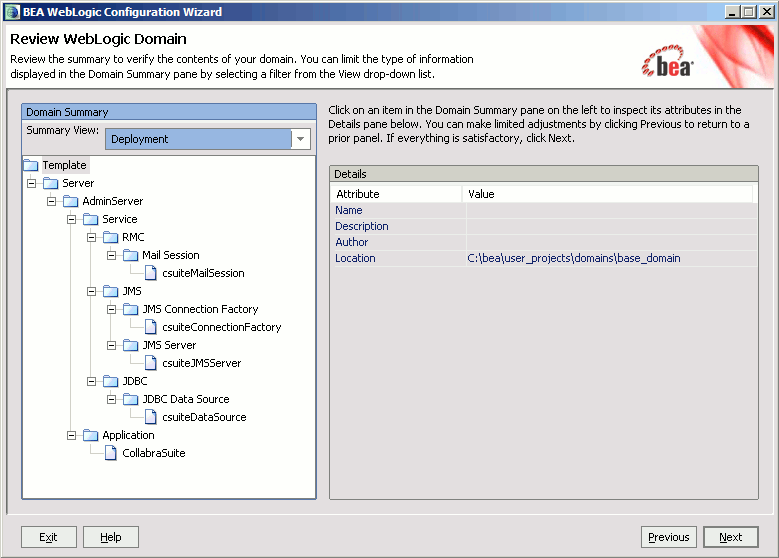
Review WebLogic Domain.
Click Next.
Figure 3-21 Review Domain
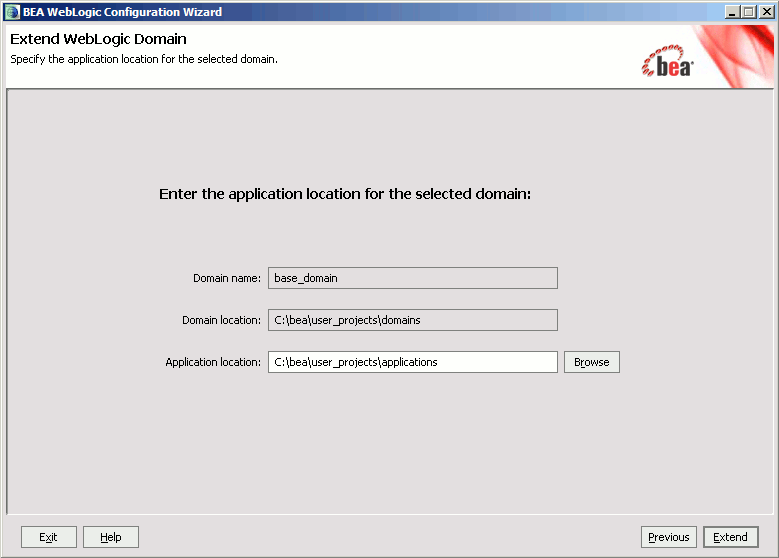
Extend WebLogic Domain.
Select the desired Application location. This is where the CollabraSuite.ear file will be installed.
Note:
If you want to place the EAR file under the applications directory in the domain you may have to create the directory first.
Click Extend.
Figure 3-22 Extend the Domain
A successful domain extension is displayed in the screen below.
Click Done to exit the Configuration Wizard.
Figure 3-23 Create Domain
Finish Extending the Domain
After extending a WebLogic 8.1 or 9 domain, complete the installation via the WebLogic console.
Start the WebLogic server
For Windows:
> cd %DOMAIN_HOME%
> startWebLogic.cmd
For Unix:
% cd $DOMAIN_HOME
% ./startWebLogic.sh
Note:
Startup will take some time because the CollabraSuite, BEA Edition JSPs are precompiled the first time the server is started after CollabraSuite, BEA Edition has been deployed.
Verify the following groups exist; creating the groups if they are not present:
CollabraSuiteAdministrators
CollabraSuiteUsers
CollabraSuiteRemote
Note:
If using an LDAP, create the groups in the LDAP and add users to the appropriate groups within the LDAP manually.
Add any existing WebLogic users to the appropriate CollabraSuite groups:
Users must belong to the CollabraSuiteUsers group in order to login to the CollabraSuite environment.
Note:
Users belonging to the `wlcs_customer' and `users' groups also have access to CollabraSuite.
Users belonging to the CollabraSuiteAdministrators group can create a new CollabraSuite campus and administer any existing campus.
Note:
Users belonging to the `Administrators' and `PortalSystemAdministrators' groups also belong to the CollabraSuiteAdministrators group.
Users must belong to the CollabraSuiteRemote group in order to initialize and interact using the connection between two remote campuses. This is the user listed on the Remote Campus Admin Details page.
Note:
Prior to the 4.2 release, the group names were CollabraSuiteGroup, CollabraSuiteAdmin, and CollabraSuiteRemoteAPI. These group names are still supported in later releases, though new installations will use the updated group names.
Increase the size of the Default Execute Queue if necessary. CollabraSuite, BEA Edition requires an available thread for every user logged in concurrently. Threads are also consumed by remote campus connections, depending on the settings in the Remote Campus Details page. The Default Execute Queue can be modified in the WebLogic Administration Console under Servers->ServerName->Configuration->General->Advanced Options-> Configure Execute Queues. Select the default execute queue and modify the Thread Count setting as appropriate.
Modify the mail settings.
Some CollabraSuite, BEA Edition components generate email and therefore require a Mail Session. The mail session is created by the template and can be edited from the WebLogic Administration Console under Services->Mail->csuiteMailSession. Important properties of the mail session include:
mail.host: SMTP mail server hostname; default=localhost
mail.user: The user name used to connect to the mail server; default=empty
mail.from: The return email address used when the sending user has not filled in their email address; default=collabraSuite@localhost
Advanced Mail options: CollabraSuite, BEA Edition contains advanced mail formatting options that can configure email headers and footers; a bcc recipient list to be used; and a standard from address to be used. In order to configure these advanced mail settings, the ejb-jar.xml file within the csuite-ebj.jar in CollabraSuite.ear must be updated and the jars repackaged. The individual options are documented within the ejb-jar.xml file.
Configure Virtual Content Repository (VCR) support if necessary:
Enable Library Services in the VCR to enable support for versioning documents. This can be modified via the Portal Administration console.
Modify the VCR data source (named portalDataSource by default) to Support Global Transactions using Logging Last Resource. This can be modified via the WebLogic Administration console under Services-> JDBC-> Data Sources-> portalDataSource-> Configuration-> Transaction.
Users need to have permission to write into the VCR. Adding the users to the Administrators group addresses this.
Verify the HTTP timeouts. CollabraSuite, BEA Edition requires an HTTP timeout of at least 30 seconds.
The WebLogic default of 10 minutes is well within the requirements for CollabraSuite, BEA Edition. If necessary, this setting can be modified from the WebLogic Administration Console under Servers->ServerName->Tuning->Stuck Thread Max Time.
This timeout also applies to any HTTP proxies between the client and WebLogic. The HTTP proxy timeout must be greater than or equal to WebLogic's timeout. Again, most defaults are much larger than 30 seconds, so these settings should not have to be modified to accomodate CollabraSuite, BEA Edition.
CollabraSuite, BEA Edition is licensed via the BEA license. License files must be obtained from BEA. An evaluation license is available on the CollabraSuite, BEA Edition download page. The existing BEA license should be updated via the BEA UpdateLicense tool (UpdateLicense "NEWLICENSEFILE")
Create the Collaborative Environment
Once the CollabraSuite, BEA Edition software has been successfully installed, all other documentation and administration capabilities are available via the deployed CollabraSuite, BEA Edition application. An list of all available documentation and links to the documents can be found deployed in the WebLogic server at http://host:port/csuite/docs
Create the initial collaborative environment by using the CollabraSuite, BEA Edition administration web application.
If necessary, create a CollabraSuite, BEA Edition administration user in WebLogic that belongs to the CollabraSuiteAdministrators group.
Bring up the CollabraSuite, BEA Edition administration web application at http://host:port/csuite/ria/admin and log in as an administrative user.
Create the desired campus, buildings, floors, and rooms.
Create the desired users
In a portal environment, create corresponding WebLogic users in the Portal Administration. Otherwise, create the WebLogic users in the WebLogic Administration Console. The WebLogic user name must match the CollabraSuite, BEA Edition user login ID. Alternatively, you can use the <setUserInfo> JSP tag inside a portlet to automatically create a CollabraSuite user that corresponds to the WebLogic user. See CollabraSuite.jspf in the sample portlets for an example of using the <setUserInfo> JSP tag.
Note:
Refer to the CollabraSuite, BEA Edition Administration Guide for more information on creating a collaborative environment.
Create the Portal
CollabraSuite can run inside either a WebLogic Portal or ALUI environment. If a portal already exists or is not needed, creating the portal may be skipped.
For details on creating a WebLogic Portal application, consult BEA's website on Getting Started with Portal Development. (http://download.oracle.com/docs/cd/E13218_01/wlp/docs81/startdev/index.html)
For details on creating an ALUI portal, consult BEA's ALUI Documentation (http://download.oracle.com/docs/cd/E13174_01/alui/index.html)
Extend the Portal
The following sections describe integrating CollabraSuite, BEA Edition into a portal environment. They can be skipped when portal integration is not required.
WebLogic 8.1 Portal
This section describes CollabraSuite, BEA Edition integration with WebLogic Portal 8.1.
Start BEA WebLogic Workshop.
Open an existing portal application or create a new one via File->New->Application...
Select an existing web project or create a new one via File->New->Project...
Right-click on the web project in the left-hand tree and select Install->CollabraSuite
Sample CollabraSuite, BEA Edition portlets are available in the Data Palette. Simply select a portal page and drag the portlets onto the page in the desired location.
CollabraSuite, BEA Edition provides a JSP tag library for creating custom CollabraSuite, BEA Edition portlets. The CollabraSuite, BEA Edition tags are available under the JSP Palette in WebLogic Workshop.
Edit the portlets/CollabraSuite/collabrasuite.jspf file as necessary:
Set the campusName variable to the correct campus name.
Uncomment the <setuserinfo> JSP tag to automatically create CollabraSuite, BEA Edition user accounts if desired.
Note:
This requires Auto Account Creation to be enabled on the campus. See the CollabraSuite, BEA Edition Administration Guide for details.
WebLogic 9.2 Portal
This section describes CollabraSuite, BEA Edition integration with WebLogic Portal 9.2.
Start BEA WebLogic Workshop.
Open an existing portal EAR project or create a new one via File->New->Portal EAR Project...
Select an existing portal WAR project or create a new one via File->New->Portal Web Project...
Create a new Portal by right clicking on the portal webproject and selecting New->Portal
Note:
There is a known issue in WebLogic 9.2 concerning the proper ordering of library modules. As a workaround, open the WebContent/WEB-INF/weblogic.xml file in the web project and re-order the library module references so that the first two library modules are: collabrasuite-portlets-web-lib and collabrasuite-web-lib in that order.
Sample CollabraSuite, BEA Edition portlets are available in the Data Palette. Simply select a portal page and drag them onto the page in the desired location.
CollabraSuite, BEA Edition provides a JSP tag library for creating custom CollabraSuite, BEA Edition portlets. The CollabraSuite, BEA Edition tags are available under the JSP Design Palette in WebLogic Workshop.
Edit the portlets/CollabraSuite/collabrasuite.jspf file as necessary:
Set the campusName variable to the correct campus name.
Uncomment the <setuserinfo> JSP tag to automatically create CollabraSuite, BEA Edition user accounts if desired.
Note:
This requires Auto Account Creation to be enabled on the campus. See the CollabraSuite, BEA Edition Administration Guide for details.
WebLogic 9.2 GroupSpace Portal
This section describes CollabraSuite, BEA Edition integration with WebLogic 9.2 GroupSpace portals. Please refer to the GroupSpace Guide (http://download.oracle.com/docs/cd/E13218_01/wlp/docs92/groupspace/index.html) for details on creating a GroupSpace portal.
When creating a domain, select the following products:
Workshop for WebLogic Platform
WebLogic Portal
WebLogic Portal GroupSpace Framework
CollabraSuite, BEA Edition
Start BEA WebLogic Workshop.
Open an existing portal EAR project or create a new one via File->New->Portal EAR Project...
In addition to the WebLogic Portal and WebLogic Portal Collaboration facets, select the CollabraSuite GroupSpace Library Support facet.
Select an existing portal WAR project or create a new one via File->New->Portal Web Project...
In addition to the WebLogic Portal and WebLogic Portal Collaboration facets, select the following:
CollabraSuite/CollabraSuite Taglibs
WebLogic Portal Collaboration/CollabraSuite GroupSpace Support
There is a known issue in WebLogic 9.2 concerning the proper ordering of library modules. As a workaround, open the WebContent/WEB-INF/weblogic.xml file in the web project and re-order the library module references so that the first three library modules are: collabrasuite-groupspace-web-lib, collabrasuite-portlets-web-lib and collabrasuite-web-lib in that order.
Note:
Once the CollabraSuite GroupSpace Support facet has been applied to a Web Project, that Web Project can only be used for GroupSpace portals. However, there can be multiple Web Projects deployed into a single domain, some of which support GroupSpace and some that do not.
Publish the EAR to the WebLogic server.
Open the portal administration console.
Create a community template based on the groupspace.ctmeta file.
Note:
There are other ways to create a community such as directly from a .community file. However, the only way currently supported is via a template based on the groupspace.ctmeta file.
Create an initial community based on the template created in the previous step.
AquaLogic User Interaction (ALUI) Portal
This section describes CollabraSuite, BEA Edition integration with BEA's ALUI product.
When using WebLogic 8.1, the domain must first be extended using the CollabraSuite, BEA Edition template as described above in the Extend the Domain section. The WebLogic Configuration Wizard must be run again to extend the domain with the CollabraSuite, BEA Edition for ALUI template.
When using WebLogic 9.2, both templates can be applied at the same time, either during domain creation, or later by extending the domain.
Update the CollabraSuite_ALUI_Portlets deployment descriptors.
In order to automatically create WebLogic users corresponding to ALUI users, the name of a WebLogic administrative user is contained in the weblogic.xml file of the csALUI web application. The default username is weblogic. If the weblogic user doesn't exist in the domain or it is not in the Administrators group, the weblogic.xml must be modified. Change the following XML in BEA_HOME\collabrasuite-XXX\ALUI\CollabraSuite_ALUI_Portlets.ear\csALUIWeb.war\WEB-INF\weblogic.xml to reflect the name of an administrative user in your domain:
By default, CollabraSuite, BEA Edition will create new users with the same user name that is used to log into ALUI, with a default homeroom of SampleCampus/SampleBuilding/SampleFloor/SampleRoom. If you would like to change any of these defaults, you need to modify the Servlet parameters in the CollabraSuite_ALUI_Portlets EAR. These are found in the web.xml file of the csALUI web application.
Note:
Remember to redeploy this EAR if you make any modifications to the deployment descriptors.
Import the sample CollabraSuite, BEA Edition portlets
If necessary, start up the server that is running the ALUI application.
Navigate to http://host:port/portal/server.pt
Log in as the Administrator. The default is 'Administrator' with no password.
Click on the Administration tab.
Under the Select Utility... tab, choose Migration - Import.
Click Browse... under File Path, and select the following file: <BEA_HOME>/collabrasuite-version/ALUI/QuickStart/csALUISample.pte
Click Load Package.
Click Finish in the upper-right-hand corner of the window, and then click OK to confirm the migration.
You now have a sample ALUI Experience Definition that contains all of the CollabraSuite, BEA Edition portlets, as well as a sample default page to log into that contains two CollabraSuite, BEA Edition portlets.
Modify Remote Server Properties. The migration in the previous step created a remote server object, which should point to the CollabraSuite_ALUI_Portlets application that was deployed by the extension template. To change the default of localhost as the server host and 7001 as the server port:
Make sure that the server running the ALUI application is running.
Log into the ALUI application as the Administrator.
Click on the Administration tab.
Click on the CollabraSuite Experience Definition link.
Click on the Remote Server link, then click on the CS Remote Server link.
Change the host and port in the Base URL text field.
Click Finish in the upper-right-hand corner of the window.
Log out of the ALUI application.
Modify CollabraSuite, BEA Edition Campus settings in the CollabraSuite, BEA Edition Administration tool.
Make sure that the server running CollabraSuite, BEA Edition is running.
Log into the CollabraSuite, BEA Edition admin tool using the CollabraSuite, BEA Edition admin account. The URL is http://host:port/csuite/ria/admin.
Make sure that the Auto-Account Creation checkbox is checked. If not, check this box and click Save.
Log out of the CollabraSuite, BEA Edition admin tool.
Configure ALUI timeout and authentication.
Verify the following values are set in the <PLUMTREE_INSTALL_DIR>/settings/portal/portalconfig.xml file