The CollabraSuite, BEA Edition Paging component enables users to collaborate using a lightweight instant email to both online and off-line users. The paging feature is also used to report document and folder changes to Document Subscribers.
Users can be notified via an additional page when recipients view their sent page by checking the "Return Receipt" box when composing a page. The return receipt page is indicated by the "Response" column in the page viewer.
Users can choose to have pages forwarded to their email account whenever they are off-line. This preference can be set in the User Information component.
View a Page
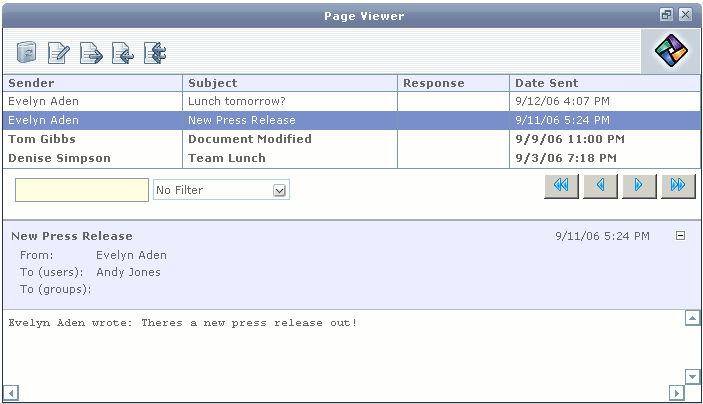
The Page Viewer component allows users to view received pages and information about each page, including the date sent and if there was a response. Users are able to forward or reply to pages, or create new pages from the Page Viewer window. Pages may be filtered by Sender, Subject, Response, or Date Sent.
To access the Page Viewer window:
Select the Page Viewer icon from the toolbar. The Page View window will display.
Figure 5-1 Page Viewer
To filter pages by search word or category:
Select a category from the pull-down list: Filter By Sender, Subject, Response, or Date Sent.
Type a search word in the contains text field.
The Page List will be filtered according to the sender, subject, response, or dates that match your query.
Sending a Page
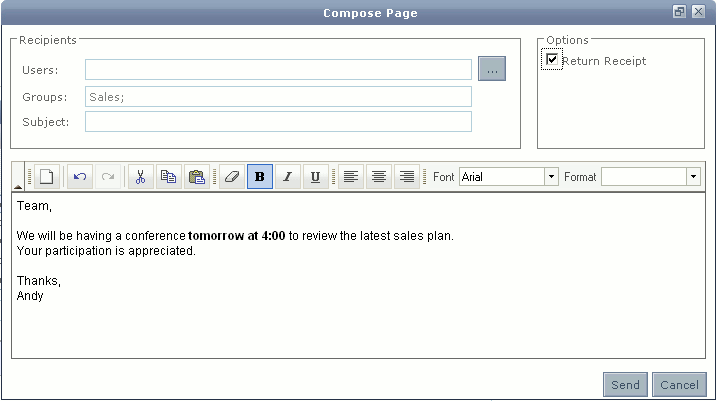
Users may send pages by using the Page Composer component. Pages may be sent to one user, several users, or groups in a home campus or any remote campuses to which the sender has access. The Page Composer component may be accessed through the toolbar, the Page Viewer window, or by right-clicking users to access the context menu.
To send a page:
Select the Send Page icon from the Page Viewer toolbar or a context menu. The Page Composer will display.
Figure 5-2 Compose Page
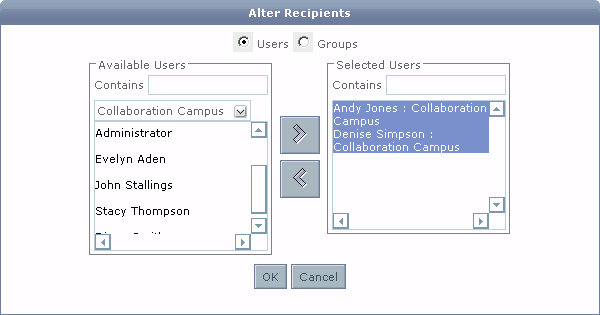
Click the Edit Recipients button to modify the recipients for the page. The Alter Recipients window will display.
Figure 5-3 Chooser Recipients
Highlight the users and groups you wish to page in the Available Users/Groups list.
Click the right arrow button to move the selected user or group to the Selected Users/Groups field.
Note:
Accessible remote campuses will be displayed in the campus drop down list of the Available Users/Groups section. Select the appropriate campus to select users or groups from each campus and continue until all desired users or groups are displayed in the Selected Users/Groups list.
Click OK to close the Alter Recipients window. The recipients will now show in the Recipients field.
Select the Return Receipt option to receive a notification when the recipient(s) select the page in the Page Viewer window.
If enabled, select the priority to be associated with the page. The default value is no priority.
Type the subject of the page in the Subject text field.
Type the message in the Message field.
Figure 5-4 Compose Page
Click the Send button to send the message to the intended recipients.
To reply to a page:
Select a page from the list of received pages.
Select the Reply icon . The Page Composer window will display with the sender listed as the recipient for the page and the text from the received page displayed.
Type an appropriate message and send the page.
To reply to the sender and all recipients of a page:
Select a page from the list of received pages.
Select the Reply to All icon . The Page Composer window will display with all of the users and groups listed in the recipients field and the text from the received page displayed.
Type an appropriate message and send the page.
To forward a page to another user or group:
Select a page from the list of received pages.
Select the Forward Page icon . The Page Composer window will display with the text from the received page displayed.
Select the user(s) or groups to forward the page to
Add an additional message if desired and send the page.


 from the Page Viewer toolbar or a context menu. The Page Composer will display.


 . The Page Composer window will display with the sender listed as the recipient for the page and the text from the received page displayed.
 . The Page Composer window will display with all of the users and groups listed in the recipients field and the text from the received page displayed.
 . The Page Composer window will display with the text from the received page displayed.