| Download Docs | Site Map | Glossary | |
|
|
|||
| bea.com | products | dev2dev | support | askBEA |
|
|
|
||||||||
| e-docs > Liquid Data for WebLogic > Building Queries and Data Views > Query Cookbook |
|
Building Queries and Data Views
|
Query Cookbook
This section provides examples of more complex BEA Liquid Data for WebLogicTM queries using some of the advanced features and tools offered in the Data View Builder. At this point, we assume that you are familiar with the Data View Builder user interface (described in Starting the Builder and Touring the GUI) and that you have an understanding of the basic concepts and tasks presented in Getting Started, Overview and Key Concepts, and Designing Queries.
The following use cases and examples are provided here to give you a jump-start for constructing real-world queries to solve common problems. Each use case includes a viewlet demo of building the solution using Data View Builder. Watching a viewlet takes 3 to 5 minutes—we suggest sitting back and enjoying with popcorn and your favorite soda pop.
Each use case has an example with a description of the problem and the steps to solve the problem. The examples use two databases:
In cases where the target schemas do not already exist in the Samples repository, they are provided in this documentation along with the examples. You can cut-and-paste the schema content into an .xsd file to construct your own target schemas. (You can also copy from the PDF version of this document which may give you a copy that formats better your text editor.)
Note: To find out what data are contained in any data source, create a new "test" project, open the source schema you are interested in, and map key source nodes to any appropriate target schema. (For example, map customer first and last names and customer ID from source to target schemas.) Then click on Test tab and choose Query—>Run Query. The result will return all customers in the data source queried.
As you work through the examples, remember to save any projects that you want to keep before creating new ones.
Example 1: Simple Joins
A join merges data from two data sources based on a certain relation.
The Problem
For each Wireless Customer ID, determine whether the customer has any Broadband orders. Assume that the Customer ID matches across databases.
The Solution
First, you want to find matching Broadband customers (who are also included in the Wireless database), then return Broadband Order IDs for the matching customers. Because Customer IDs in the Wireless database align with those in Broadband, we can find matching Broadband customers with a simple join of Wireless Customer IDs with the Customer IDs in the Broadband order information.
To create the solution, follow these steps:
View a Demo
Simple Joins Demo... If you are looking at this documentation online, you can click the "Demo" button to see a viewlet demo showing how to build the conditions and create the mappings described in this example. This demo previews the steps described in detail in the following sections. The demo assumes you already have the target schema in the server Repository.
Ex 1: Step 1. Verify the Target Schema is Saved in Repository
For this example, we will use a target schema called customerOrders.xsd. This schema is available in the Samples server repository. The path to the schemas folder in the Liquid Data server repository is:
<WL_HOME>liquiddata/samples/config/ld_samples/ldrepository/schemas/
Just in case you want to verify that you have the right schema file, the following code listing shows the XML for this schema.
Listing 6-1 XML Source for customerOrders.xsd Target Schema File
<?xml version = "1.0" encoding = "UTF-8"?>
<xsd:schema xmlns:xsd = "http://www.w3.org/2001/XMLSchema">
	<xsd:element name = "customers">
		<xsd:complexType>
			<xsd:sequence>
				<xsd:element ref = "customer" minOccurs = "0" maxOccurs = "unbounded"/>
			</xsd:sequence>
		</xsd:complexType>
	</xsd:element>
	<xsd:element name = "customer">
		<xsd:complexType>
			<xsd:sequence>
				<xsd:element ref = "first_name"/>
				<xsd:element ref = "last_name"/>
				<xsd:element ref = "orders" minOccurs = "0" maxOccurs = "unbounded"/>
			</xsd:sequence>
			<xsd:attribute name = "id" use = "optional" type = "xsd:string"/>
		</xsd:complexType>
	</xsd:element>
	<xsd:element name = "first_name" type = "xsd:string"/>
	<xsd:element name = "last_name" type = "xsd:string"/>
	<xsd:element name = "orders">
		<xsd:complexType>
			<xsd:sequence>
				<xsd:element ref = "order" minOccurs = "0" maxOccurs = "unbounded"/>
			</xsd:sequence>
		</xsd:complexType>
	</xsd:element>
	<xsd:element name = "order">
		<xsd:complexType>
			<xsd:attribute name = "id" use = "optional" type = "xsd:string"/>
			<xsd:attribute name = "date" use = "optional" type = "xsd:string"/>
			<xsd:attribute name = "amount" use = "optional" type = "xsd:string"/>
		</xsd:complexType>
	</xsd:element>
</xsd:schema>
Ex 1: Step 2. Open Source and Target Schemas
Ex 1: Step 3. Map Nodes from Source to Target Schema to Project the Output
Ex 1: Step 4. Create a Query Parameter for a Customer ID to be Provided at Query Runtime
Create a Query Parameter wireless_id variable for a Wireless Customer ID that you will supply at query execution time:
Ex 1: Step 5. Assign the Query Parameter to a Source Node
Drag and drop the wireless_id query parameter to [PB-WL]db/CUSTOMER/CUSTOMER_ID.
Ex 1: Step 6. Join the Wireless and Broadband Customer IDs
Drag and drop (join) [PB-WL]db/CUSTOMER/CUSTOMER_ID to [PB-BB]db/CUSTOMER_ORDER/CUSTOMER_ID.
Ex 1: Step 7. Set Optimization Hints
Note: For information on using optimization hints see Optimization Hints for Joins.
Ex 1: Step 8. View the XQuery and Run the Query to Test it
Listing 6-2 XQuery for Example 1: Simple Joins
{-- Generated by Data View Builder 1.0 --}<customers>
{
for $PB_WL.CUSTOMER_1 in document("PB-WL")/db/CUSTOMER
where ($#wireless_id of type xs:string eq $PB_WL.CUSTOMER_1/CUSTOMER_ID)
return
<customer id={$PB_WL.CUSTOMER_1/CUSTOMER_ID}>
<first_name>{ xf:data($PB_WL.CUSTOMER_1/FIRST_NAME) }</first_name>
<last_name>{ xf:data($PB_WL.CUSTOMER_1/LAST_NAME) }</last_name>
<orders>
{
for $PB_BB.CUSTOMER_ORDER_2 in document("PB-BB")/db/CUSTOMER_ORDER
where ($PB_WL.CUSTOMER_1/CUSTOMER_ID eq $PB_BB.CUSTOMER_ORDER_2/CUSTOMER_ID)
return
<order id={$PB_BB.CUSTOMER_ORDER_2/ORDER_ID} date={cast as xs:string($PB_BB.CUSTOMER_ORDER_2/ORDER_DATE)}></order>
}
</orders>
</customer>
}
</customers>
Ex. 1: Step 9. Verify the Result
Running this query with the wireless_id parameter set to CUSTOMER_3 produces the following XML query result.
Listing 6-3 Result for Example 1: Simple Joins
<customers>
  <customer id="CUSTOMER_3">
    <first_name>JOHN_3</first_name>
    <last_name>KAY_3</last_name>
    <orders>
      <order date="2002-03-06-08:00" id="ORDER_ID_3_0"/>
      <order date="2002-03-06-08:00" id="ORDER_ID_3_1"/>
      <order date="2002-03-06-08:00" id="ORDER_ID_3_2"/>
      <order date="2002-03-06-08:00" id="ORDER_ID_3_3"/>
    </orders>
  </customer>
</customers>
Example 2: Aggregates
Aggregate functions produce a single value from a set of input values. An example of an aggregate function in Data View Builder is the count function, which takes a list of values and returns the number of values in the list.
The Problem
Find the number of orders placed in the Broadband database for a given customer who is also in the Wireless database.
The Solution
This query relies on a data view called "AllOrders" which retrieves customers who are in the Broadband database and also in the Wireless database. For each of these customers, the customer ID and orders are retrieved. Then, we use the Aggregate function "count" to determine how many orders are associated with a given customer. At query runtime, a customer ID is submitted as a query parameter and the result returns the number of orders associated with the given customer ID.
To create the solution, follow these steps:
View a Demo
Aggregates Demo... If you are looking at this documentation online, you can click the "Demo" button to see a viewlet demo showing how to build the conditions and create the mappings described in this example. This demo previews the steps described in detail in the following sections. The demo assumes you already have the target schema in the server Repository and have created and configured the data view data source required for this example.
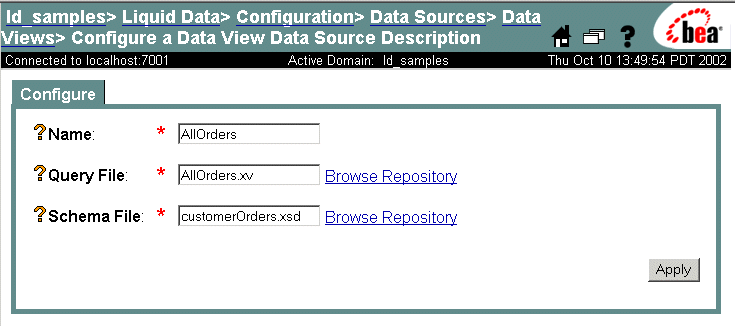
Ex 2: Step 1. Locate and Configure the "AllOrders" Data View
For this example, we will use a data view data source called AllOrders.xv. This data view is available in the Samples server repository. The path to the data_views folder in the Liquid Data server repository is:
<WL_HOME>liquiddata/samples/config/ld_samples/ldrepository/data_views/
Just in case you want to verify that you have the right data view file, the following code listing shows the XML for this data view.
Listing 6-4 XML Source for AllOrders.xv Data View File
<customers>
	{
	for $PB-BB.CUSTOMER_1 in document("PB-BB")/db/CUSTOMER
	for $PB-WL.CUSTOMER_2 in document("PB-WL")/db/CUSTOMER
	where ($PB-WL.CUSTOMER_2/CUSTOMER_ID  eq  {--! ppright !--} $PB-BB.CUSTOMER_1/CUSTOMER_ID)

	return
	<customer id={$PB-WL.CUSTOMER_2/CUSTOMER_ID}>
		<first_name>{ xf:data($PB-WL.CUSTOMER_2/FIRST_NAME) }</first_name>
		<last_name>{ xf:data($PB-WL.CUSTOMER_2/LAST_NAME) }</last_name>
		<orders>
			{
			for $PB-BB.CUSTOMER_ORDER_4 in document("PB-BB")/db/CUSTOMER_ORDER
			where ($PB-BB.CUSTOMER_1/CUSTOMER_ID  eq  {--! ppright !--} $PB-BB.CUSTOMER_ORDER_4/CUSTOMER_ID)
			return
			<order id={$PB-BB.CUSTOMER_ORDER_4/ORDER_ID} date={$PB-BB.CUSTOMER_ORDER_4/ORDER_DATE}></order>
			}
		</orders>
	</customer>
	}
</customers>
Use the WLS Administration Console to Configure the Data View Data Source
Ex 2: Step 2. Restart the Data View Builder and Find the New Data View
Ex 2: Step 3. Verify the Target Schema is Saved in the Repository
For this example, we will use a target schema called customerOrdersA.xsd. This schema is available in the Samples server repository. The path to the schemas folder in the Liquid Data server repository is:
<WL_HOME>liquiddata/samples/config/ld_samples/ldrepository/schemas/
Just in case you want to verify that you have the right schema file, the following code listing shows the XML for this schema.
Listing 6-5 XML Source for customerOrdersA.xsd Target Schema File
<?xml version = "1.0" encoding = "UTF-8"?>
<xsd:schema xmlns:xsd = "http://www.w3.org/2001/XMLSchema">
	<xsd:element name="customers">
		<xsd:complexType>
			<xsd:sequence>
				<xsd:element name="customer" minOccurs="0" maxOccurs="unbounded">
					<xsd:complexType>
						<xsd:sequence>
							<xsd:element name="first_name" type="xsd:string"/>
							<xsd:element name="last_name" type="xsd:string"/>
							<xsd:element name="orders" minOccurs="0" maxOccurs="unbounded">
								<xsd:complexType>
									<xsd:sequence>
										<xsd:element name="order" minOccurs="0" maxOccurs="unbounded">
											<xsd:complexType>
												<xsd:sequence>
												</xsd:sequence>
											<xsd:attribute name="id" type="xsd:string"/>
											<xsd:attribute name="date" type="xsd:string"/>
											<xsd:attribute name="amount" type="xsd:string"/>
											</xsd:complexType>
										</xsd:element>
									</xsd:sequence>
								</xsd:complexType>
							</xsd:element>
							<xsd:element name="amount" type="xsd:string"/>
						</xsd:sequence>
					<xsd:attribute name="id" type="xsd:string"/>
					</xsd:complexType>
				</xsd:element>
			</xsd:sequence>
		</xsd:complexType>
	</xsd:element>
</xsd:schema>
Ex 2: Step 4. Open the Data Sources and Target Schema
Ex 2: Step 5. Map Source Nodes to Target to Project the Output
Ex 2: Step 6. Create Two Query Parameters to be Provided at Query Runtime
Create two Query Parameter variables: first_name and last_name, that you can use to insert variable customer information when the query runs. Create both variables as type xs:string. Do this as follows:
Ex 2: Step 7. Assign the Query Parameters to Source Nodes
Assign the first_name and last_name Query Parameter variables to customer first name and last name nodes in the AllOrders data view as follows:
Ex 2: Step 8. Add the "count" Function
Add the count function and specify the input and output as follows:
Note: Create complex or aggregate functions only on the desktop by double-clicking as described in this step. Do not attempt to drag and drop them directly into the Conditions tab.
Ex 2: Step 9. Verify Mappings and Conditions
Your mappings should look like those shown in Figure 6-2.
Figure 6-2 Mappings for Example2: Aggregates
Your Conditions should like those shown in Figure 6-3. Figure 6-3 Conditions for Example 2: Aggregates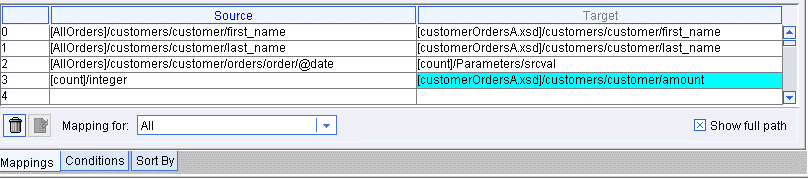
Ex 2: Step 10. View the XQuery and Run the Query to Test it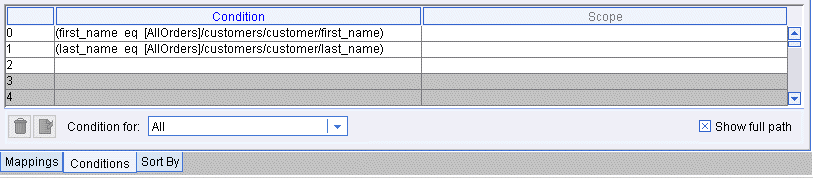
Listing 6-6 XQuery for Example 2: Aggregates
{-- Generated by Data View Builder 1.0 --}
<customers>
	{
	for $AllOrders.customer_1 in document("AllOrders")/customers/customer
	let $srcval_2 :=
	               for $AllOrders.order_3 in $AllOrders.customer_1/orders/order
	               where ($#first_name of type xs:string  eq  $AllOrders.customer_1/first_name)
	                 and ($#last_name of type xs:string  eq  $AllOrders.customer_1/last_name)
	               return
	               $AllOrders.order_3/@date
	let $count_4 := xf:count($srcval_2)
	where ($#first_name of type xs:string  eq  $AllOrders.customer_1/first_name)
	  and ($#last_name of type xs:string  eq  $AllOrders.customer_1/last_name)
	return
	<customer>
		<first_name>{ xf:data($AllOrders.customer_1/first_name) }</first_name>
		<last_name>{ xf:data($AllOrders.customer_1/last_name) }</last_name>
		<amount>{ $count_4 }</amount>
	</customer>
	}
</customers>
Ex 2: Step 11. Verify the Result
Running this query with last_name set to "KAY_1" and first_name set to "JOHN_1" produces the following XML query result.
Listing 6-7 Result for Example 2: Aggregates
<customers>
  <customer>
    <first_name>JOHN_1</first_name>
    <last_name>KAY_1</last_name>
    <amount>2</amount>
  </customer>
</customers>
Example 3: Date and Time Duration
Data View Builder supports a set of functions that operate on date and time. For more information on date and time functions see DateTime Functions in the "Functions Reference."
The Problem
Determine if a Broadband customer has any open orders in the Broadband database before a specified date.
The Solution
For each Broadband order that matches the given Customer ID, you need to set these conditions:
To create the solution, follow these steps:
View a Demo
Date and Time Duration Demo... If you are looking at this documentation online, you can click the "Demo" button to see a viewlet demo showing how to build the conditions and create the mappings described in this example. This demo previews the steps described in detail in the following sections. The demo assumes you already have the target schema in the server Repository.
Ex 3: Step 1. Verify the Target Schema is Saved in Repository
For this example, we will use a target schema called customerLineItems.xsd. This schema is available in the Samples server repository. The path to the schemas folder in the Liquid Data server repository is:
<WL_HOME>liquiddata/samples/config/ld_samples/ldrepository/schemas/
Just in case you want to verify that you have the right schema file, the following code listing shows the XML for this schema.
Listing 6-8 XML Source for customerLineItems.xsd Target Schema File
<?xml version = "1.0" encoding = "UTF-8"?>
<xsd:schema xmlns:xsd = "http://www.w3.org/2001/XMLSchema">
	<xsd:element name = "customers">
		<xsd:complexType>
			<xsd:sequence>
				<xsd:element ref = "customer" minOccurs = "0" maxOccurs = "unbounded"/>
			</xsd:sequence>
		</xsd:complexType>
	</xsd:element>
	<xsd:element name = "customer">
		<xsd:complexType>
			<xsd:sequence>
				<xsd:element ref = "first_name"/>
				<xsd:element ref = "last_name"/>
				<xsd:element ref = "orders" minOccurs = "0" maxOccurs = "unbounded"/>
			</xsd:sequence>
			<xsd:attribute name = "id" use = "required" type = "xsd:string"/>
		</xsd:complexType>
	</xsd:element>
	<xsd:element name = "first_name" type = "xsd:string"/>
	<xsd:element name = "last_name" type = "xsd:string"/>
	<xsd:element name = "orders">
		<xsd:complexType>
			<xsd:sequence>
				<xsd:element ref = "order" minOccurs = "0" maxOccurs = "unbounded"/>
			</xsd:sequence>
		</xsd:complexType>
	</xsd:element>
	<xsd:element name = "order">
		<xsd:complexType>
			<xsd:sequence>
				<xsd:element ref = "line_item" minOccurs = "0" maxOccurs = "unbounded"/>
			</xsd:sequence>
			<xsd:attribute name = "id" use = "required" type = "xsd:string"/>
			<xsd:attribute name = "date" use = "required" type = "xsd:string"/>
			<xsd:attribute name = "amount" use = "required" type = "xsd:string"/>
		</xsd:complexType>
	</xsd:element>
	<xsd:element name = "line_item">
		<xsd:complexType>
			<xsd:attribute name = "id" use = "required" type = "xsd:string"/>
			<xsd:attribute name = "product" use = "required" type = "xsd:string"/>
			<xsd:attribute name = "status" use = "required" type = "xsd:string"/>
			<xsd:attribute name = "expected_ship_date" use = "required" type = "xsd:string"/>
		</xsd:complexType>
	</xsd:element>
</xsd:schema>
Ex 3: Step 2. Open Source and Target Schemas
Ex 3: Step 3. Map Source to Target Nodes to Project the Output
Project the output values as follows.
At this point, the following mappings should be displayed on the Mappings tab. (Getting the mappings in the same order as shown is not as important as verifying that the relationships between source and target nodes are the same. The @ symbols indicate attributes.)
Ex 3: Step 4. Create Joins Join customer with corresponding line-item data. This requires two joins, one to find the customer's Order IDs, and another that uses the Order IDs and finds the corresponding line-item information:
Ex 3: Step 5. Create Two Query Parameters for Customer ID and Date to be Provided at Query Runtime
Create two Query Parameter variables: customer_id and date1, that you can use to insert as variable values when the query runs. Create both variables as type xs:string. Do this as follows:
Ex 3: Step 6. Set a Condition Using the Customer ID
Ex 3: Step 7. Set a Condition to Determine if Order Ship Date is Earlier or Equal to a Date Submitted at Query Runtime
([PB-BB]/db/CUSTOMER_ORDER_LINE_ITEM/EXPECTED_SHIP_DATE le xfext:date-from-string-with-format(pattern,srcval))
yyyy-MM-dd
([PB-BB]/db/CUSTOMER_ORDER_LINE_ITEM/EXPECTED_SHIP_DATE le xfext:date-from-string-with-format("yyyy-MM-dd",date1))Ex 3: Step 8. Set a Condition to Include Only "Open" Orders in the Result
Set the second condition to an Open Order status.
Ex 3: Step 9. View the XQuery and Run the Query to Test it
Listing 6-9 XQuery for Example 3: Date and Time Duration
{-- Generated by Data View Builder 1.0 --}<customers>
{
for $PB-BB.CUSTOMER_1 in document("PB-BB")/db/CUSTOMER
where ($#customer_id of type xs:string eq $PB-BB.CUSTOMER_1/CUSTOMER_ID)
return
<customer>
<first_name>{ xf:data($PB-BB.CUSTOMER_1/FIRST_NAME) }</first_name>
<last_name>{ xf:data($PB-BB.CUSTOMER_1/LAST_NAME) }</last_name>
<orders>
<order>
{
for $PB-BB.CUSTOMER_ORDER_2 in document("PB-BB")/db/CUSTOMER_ORDER
for $PB-BB.CUSTOMER_ORDER_LINE_ITEM_3 in document("PB-BB")/db/CUSTOMER_ORDER_LINE_ITEM
where ($PB-BB.CUSTOMER_ORDER_2/ORDER_ID eq $PB-BB.CUSTOMER_ORDER_LINE_ITEM_3/ORDER_ID)
and ($PB-BB.CUSTOMER_ORDER_LINE_ITEM_3/EXPECTED_SHIP_DATE le xfext:date-from-string-with-format("yyyy-MM-dd",$#date1 of type xs:string))
and ($PB-BB.CUSTOMER_ORDER_LINE_ITEM_3/STATUS eq "OPEN")
and ($PB-BB.CUSTOMER_1/CUSTOMER_ID eq $PB-BB.CUSTOMER_ORDER_2/CUSTOMER_ID)
return
<line_item id={$PB-BB.CUSTOMER_ORDER_LINE_ITEM_3/LINE_ID} product={$PB-BB.CUSTOMER_ORDER_LINE_ITEM_3/PRODUCT_NAME} status={$PB-BB.CUSTOMER_ORDER_LINE_ITEM_3/STATUS} expected_ship_date={$PB-BB.CUSTOMER_ORDER_LINE_ITEM_3/EXPECTED_SHIP_DATE}>
</line_item>
}
</order>
</orders>
</customer>
}
</customers>
Ex 3: Step 9. Verify the Result
Running this query with customer_id set to "CUSTOMER_1" and date1 set to "2002-08-01" produces the following XML query result.
Listing 6-10 Result for Example 3: Date and Time Duration
<customers>
  <customer>
    <first_name>JOHN_B_1</first_name>
    <last_name>KAY_1</last_name>
    <orders>
      <order>
        <line_item expected_ship_date="2002-03-06-08:00" id="LINE_ID_1" product="RBBC01" status="OPEN"/>
        <line_item expected_ship_date="2002-03-06-08:00" id="LINE_ID_3" product="BN16" status="OPEN"/>
        <line_item expected_ship_date="2002-03-06-08:00" id="LINE_ID_5" product="CS100" status="OPEN"/>
      </order>
    </orders>
  </customer>
</customers>
Example 4: Union
A union query retrieves results from two or more sources, but unlike a Join query there are no conditions across sources. A union query is equivalent to concatenating two or more subordinate queries, and pooling the query results into the same output. There are two important rules for a union query.
The Problem
For any Broadband Customer ID, list any Broadband and Wireless orders. Assume the Customer IDs match across databases.
The Solution
This query requests a union of Broadband orders and Wireless orders. Remember that a union retrieves data from multiple sources, such as the Broadband and Wireless databases, but there are no conditions for the query. If you specify any condition, such as matching order dates, then you are creating a join query. In this example, you need a target schema that contains a repeatable list of Customer IDs, and within that list, a repeatable list of Broadband orders, and a repeatable list of Wireless orders.
To create the solution, follow these steps:
View a Demo
Union Demo... If you are looking at this documentation online, you can click the "Demo" button to see a viewlet demo showing how to build the conditions and create the mappings described in this example. This demo previews the steps described in detail in the following sections. The demo assumes you already have the target schema in the server Repository.

Ex 4: Step 1. Verify the Target Schema is Saved in Repository
For this example, we will use a target schema called unionOrders.xsd. This schema is available in the Samples server repository. The path to the schemas folder in the Liquid Data server repository is:
<WL_HOME>liquiddata/samples/config/ld_samples/ldrepository/schemas/
Just in case you want to verify that you have the right schema file, the following code listing shows the XML for this schema.
Listing 6-11 XML Source for unionOrders.xsd Target Schema File
<?xml version = "1.0" encoding = "UTF-8"?>
<xsd:schema xmlns:xsd = "http://www.w3.org/2000/10/XMLSchema">
	<xsd:element name="customers">
		<xsd:complexType>
			<xsd:sequence>
				<xsd:element name="customer" minOccurs="0" maxOccurs="unbounded">
					<xsd:complexType>
						<xsd:sequence>
							<xsd:element name="first_name" type="xsd:string"/>
							<xsd:element name="last_name" type="xsd:string"/>
							<xsd:element name="state" type="xsd:string"/>
							<xsd:element name="orders_bb" minOccurs="0" maxOccurs="unbounded">
								<xsd:complexType>
									<xsd:sequence>
										<xsd:element name="order" minOccurs="0" maxOccurs="unbounded">
											<xsd:complexType>
												<xsd:sequence>
													<xsd:element name="date" type="xsd:string"/>
													<xsd:element name="amount" type="xsd:decimal"/>
												</xsd:sequence>
											</xsd:complexType>
										</xsd:element>

									</xsd:sequence>
								</xsd:complexType>
							</xsd:element>
							<xsd:element name="orders_wl" minOccurs="0" maxOccurs="unbounded">
								<xsd:complexType>
									<xsd:sequence>
										<xsd:element name="order" minOccurs="0" maxOccurs="unbounded">
											<xsd:complexType>
												<xsd:sequence>
													<xsd:element name="date" type="xsd:string"/>
													<xsd:element name="amount" type="xsd:decimal"/>
												</xsd:sequence>
											</xsd:complexType>
										</xsd:element>

									</xsd:sequence>
								</xsd:complexType>
							</xsd:element>

						</xsd:sequence>
					</xsd:complexType>
				</xsd:element>
			</xsd:sequence>
		</xsd:complexType>
	</xsd:element>
</xsd:schema>
Ex 4: Step 2. Open Source and Target Schemas
Ex 4: Step 3. Create a Query Parameter for a Customer ID
Create a Query Parameter variable, customer_id, that you can use to insert as a variable for a Broadband customer ID value when the query runs. To create this parameter, do the following:
Ex 4: Step 4. Assign Parameters, Define Source Relationships, and Project the Output
Ex 4: Step 5. View the XQuery and Run the Query to Test it
Listing 6-12 XQuery for Example 4: Union
{-- Generated by Data View Builder 1.0 --}<customers>
{
for $PB-BB.CUSTOMER_1 in document("PB-BB")/db/CUSTOMER
where ($#customer_id of type xs:string eq $PB-BB.CUSTOMER_1/CUSTOMER_ID)
return
<customer>
<first_name>{ xf:data($PB-BB.CUSTOMER_1/FIRST_NAME) }</first_name>
<last_name>{ xf:data($PB-BB.CUSTOMER_1/LAST_NAME) }</last_name>
<state>{ xf:data($PB-BB.CUSTOMER_1/STATE) }</state>
<orders_bb>
{
for $PB-BB.CUSTOMER_ORDER_2 in document("PB-BB")/db/CUSTOMER_ORDER
where ($PB-BB.CUSTOMER_1/CUSTOMER_ID eq $PB-BB.CUSTOMER_ORDER_2/CUSTOMER_ID)
return
<order>
<date>{ xf:data($PB-BB.CUSTOMER_ORDER_2/ORDER_DATE) }</date>
<amount>{ xf:data($PB-BB.CUSTOMER_ORDER_2/TOTAL_ORDER_AMOUNT) }</amount>
</order>
}
</orders_bb>
{
for $PB-WL.CUSTOMER_3 in document("PB-WL")/db/CUSTOMER
for $PB-WL.CUSTOMER_ORDER_4 in document("PB-WL")/db/CUSTOMER_ORDER
where ($PB-WL.CUSTOMER_3/CUSTOMER_ID eq $PB-WL.CUSTOMER_ORDER_4/CUSTOMER_ID)
and ($#customer_id of type xs:string eq $PB-WL.CUSTOMER_3/CUSTOMER_ID)
return
<orders_wl>
<order>
<date>{ xf:data($PB-WL.CUSTOMER_ORDER_4/ORDER_DATE) }</date>
<amount>{ xf:data($PB-WL.CUSTOMER_ORDER_4/TOTAL_ORDER_AMOUNT)
}</amount>
</order>
</orders_wl>
}
</customer>
}
</customers>
Ex 4: Step 6. Verify the Result
Querying these data sources as described in this example produces an XML query result similar to that shown in the following code listing where CUSTOMER_4 was used as the query parameter value for customer_id.
Listing 6-13 Result for Example 4: Union
<customers>
  <customer>
    <first_name>JOHN_B_4</first_name>
    <last_name>KAY_4</last_name>
    <state>NV</state>
    <orders_bb>
      <order>
        <date>2002-03-06-08:00</date>
        <amount>1000</amount>
      </order>
      <order>
        <date>2002-03-06-08:00</date>
        <amount>1500</amount>
      </order>
      <order>
        <date>2002-03-06-08:00</date>
        <amount>2000</amount>
      </order>
      <order>
        <date>2002-03-06-08:00</date>
        <amount>2500</amount>
      </order>
      <order>
        <date>2002-03-06-08:00</date>
        <amount>3000</amount>
      </order>
    </orders_bb>
    <orders_wl>
      <order>
        <date>2002-03-06-08:00</date>
        <amount>1000</amount>
      </order>
      <order>
        <date>2002-03-06-08:00</date>
        <amount>2000</amount>
      </order>
      <order>
        <date>2002-03-06-08:00</date>
        <amount>4000</amount>
      </order>
      <order>
        <date>2002-03-06-08:00</date>
        <amount>5000</amount>
      </order>
      <order>
        <date>2002-03-06-08:00</date>
        <amount>10000</amount>
      </order>
    </orders_wl>
  </customer>
</customers>
Example 5: Minus
A minus relationship (A minus B) returns all instances of some named value that are in A but not in B. There is no explicit minus operation in the XQuery language or Data View Builder; however, a simple counting technique can be used. For example: for each instance of the named value in A, count all matching instances in B; if the count is zero, then return the instance from A.
The Problem
Find all customers that are Broadband customers, but not Wireless customers. Assume that Customer IDs match across databases.
The Solution
If a customer has only a Broadband account, then a join across the Broadband and Wireless databases on that Customer ID produces an empty result. We can take advantage of that fact by counting the number of instances produced by the join. If the number is zero, then the Customer ID represents a Broadband-only customer.
To create the solution, follow these steps:
View a Demo
Minus Demo... If you are looking at this documentation online, you can click the "Demo" button to see a viewlet demo showing how to build the conditions and create the mappings described in this example. This demo previews the steps described in detail in the following sections. The demo assumes you already have the target schema in the server Repository.
Ex 5: Step 1. Verify the Target Schema is Saved in Repository
For this example, we will use a target schema called minus.xsd. This schema is available in the Samples server repository. The path to the schemas folder in the Liquid Data server repository is:
<WL_HOME>liquiddata/samples/config/ld_samples/ldrepository/schemas/
Just in case you want to verify that you have the right schema file, the following code listing shows the XML for this schema.
Listing 6-14 XML Source for minus.xsd Target Schema File
<?xml version = "1.0" encoding = "UTF-8"?>
<xsd:schema xmlns:xsd = "http://www.w3.org/2001/XMLSchema">
	<xsd:element name="results">
		<xsd:complexType>
			<xsd:sequence>
				<xsd:element name="CUSTOMER" minOccurs="1" maxOccurs="unbounded">
					<xsd:complexType>
						<xsd:sequence>
							<xsd:element name="FIRST_NAME" type="xsd:string"/>
							<xsd:element name="LAST_NAME" type="xsd:string"/>
						</xsd:sequence>
					</xsd:complexType>
				</xsd:element>
			</xsd:sequence>
		</xsd:complexType>
	</xsd:element>
</xsd:schema>
Ex 5: Step 2. Open Source and Target Schemas
Ex 5: Step 3. Find Broadband and Wireless Customers with the Same Customer ID
Ex 5: Step 4. Count the Equalities
Ex 5: Step 5. Set a Condition that Specifies the Output of "count" is Zero
Ex 5: Step 6. View the XQuery and Run the Query to Test it
Listing 6-15 XQuery for Example 5: Minus
{-- Generated by Data View Builder 1.0 --}<results>
{
for $PB-BB.CUSTOMER_1 in document("PB-BB")/db/CUSTOMER
let $srcval_2 :=
for $PB-WL.CUSTOMER_3 in document("PB-WL")/db/CUSTOMER
let $eq_7 := $PB-BB.CUSTOMER_1/CUSTOMER_ID eq $PB-WL.CUSTOMER_3/CUSTOMER_ID
return
$eq_7
let $count_8 := xf:count($srcval_2)
where ($count_8 eq 0)
return
<CUSTOMER>
<FIRST_NAME>{ xf:data($PB-BB.CUSTOMER_1/FIRST_NAME) }</FIRST_NAME>
<LAST_NAME>{ xf:data($PB-BB.CUSTOMER_1/LAST_NAME) }</LAST_NAME>
</CUSTOMER>
}
</results>
Ex 5: Step 7. Verify the Result
When you run this query on the sample data sources as described here, the result will be empty because the Broadband and Wireless data sources contain the same customer IDs.

|

|

|