
| Download Docs | Site Map | Glossary | |
|
|
|||
| bea.com | products | dev2dev | support | askBEA |
 |
 |
|
|||||||
| e-docs > Liquid Data for WebLogic > Building Queries and Data Views > Testing Queries |
|
Building Queries and Data Views
|
Testing Queries
This topic describes how to test BEA Liquid Data for WebLogicTM queries. The following sections are included here:
Switching to the Test View
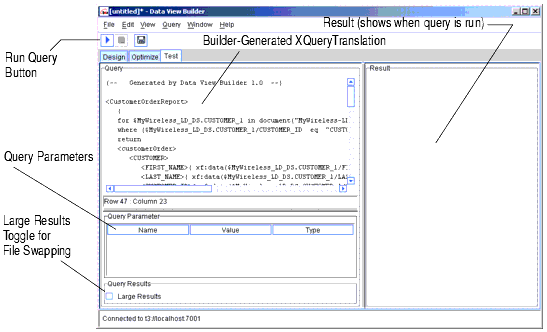
The Data View Builder provides a "Test" view where you can view the generated XQuery language interpretation of the query elements you developed on the Design and Optimize tabs, and run the query against your data sources to verify the result.
From this view, you can provide different parameters to the query before you run it.
To switch to the Test View click the Test tab.
Figure 5-1 Test Tab
The query you developed on the Design and Optimize tabs is shown in XQuery language in the "Query" window on the upper left panel on the Test tab.
Using Query Parameters
You can use the Query Parameters panel to add variable values to a query each time you run it. The list of variables depends on the number of variables you defined as Query Parameters on the Design tab and which ones appear as one or more function parameters. (For details on defining query parameters, see Query Parameters: Defining, which includes a list of supported data types for query parameters in Table 2-2.)
Figure 5-2 Query Parameters Settings on Test Tab
Double-click into a cell in the Values column to type a value. Figure 5-3 Entering Values for Query Parameters
For some examples of using query parameters see the following example queries in the Query Cookbook. 
Specifying Large Results for File Swapping
Note: The "Large Results" option is a space/performance trade-off. You can expect a query to run more slowly when the this option is set to on. Before using this option, please increase heap size first. For other alternatives, see Performance Tuning in Deploying Liquid Data.
For a query that you know will produce a large result set, you can select "Large Results" in the Query Results panel on the Test tab. (An X next to Large Results indicates that the feature is on.) If the Large Results option is selected for a query, then Liquid Data uses swap files to temporarily store intermediate results on disk in order to prevent an out-of-memory error when the query is run.
You can explicitly specify a directory to use for file swapping on the Liquid Data Administration Console. For more information about this, see Configuring Liquid Data Server Settings in the Liquid Data Administration Guide.
Running the Query
When you are ready to run the query, click the Run Query button on the toolbar in the upper left.
Figure 5-4 Click the Run Query Button to Run the Query
The query is run against your data sources and the result is displayed in the Results panel in XML format.
Stopping a Running Query
You can stop a running query before it has finished processing by clicking the Stop Query Execution button in the toolbar.
Figure 5-5 Click the "Stop Query Execution Button" to Stop a Running Query
Viewing the Query Result
When you run a query, the result is displayed in the Results window on the Test tab in XML format.
Figure 5-6 Query Result
From the Test tab, you can save a query by choosing File—>Save Query from the menus or by clicking on the Save Query button on the toolbar.
You can save the query to a file on a local folder or other location on the network, or you can save the query to the Liquid Data server Repository in the stored_queries folder as described in the following section.
Note: Query files must be saved with a .xq extension. If you do not specify an extension, the Data View Builder automatically appends the .xq extension to the filename when the query file is saved.
Saving a Query to the Repository as a "Stored Query"
If the query is saved into the stored_queries folder in the Liquid Data server Repository, it becomes a stored query in Liquid Data. There is a performance benefit to using stored queries in Liquid Data in that the query plan is automatically cached in Liquid Data and you have the option to configure caching on the query result as well. For more information about using stored queries, see Stored Queries in Overview and Key Concepts.
To create a stored query do the following:
Naming Conventions for Stored Queries
(For information on how to generate a Web service from a stored query, see Generating and Publishing Web Services in the Liquid Data Administration Guide.)

|

|

|