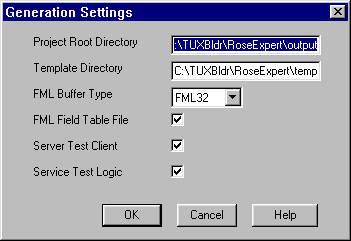
Generation Settings

You get this window when you choose Tools->BEA TUXEDO Builder->
Settings->Generate
from the Rational Rose menu bar. From here you can specify settings that determine how the Rose Expert will generate the framework classes based on the control classes in your application model. (To actually start the generate process, you need to choose the "Generate Classes" option from the Builder menu.)

Figure 7-1 Generation Settings


Fields

Table 7-1 explains the fields on this window.

Table 7-1 Generation Settings

Field Description

Project Root Directory

Specifies the file generation directory path. Enter the full path name of directory where you want the files generated by the Rose Expert to be located. (The default is MyLocalDrive:\TUXBldr\RoseExpert\output\)

You must type a directory that already exists-the Rose Expert will not create a new directory for you. If the Project Root Directory provided here does not exist, you will get a warning message when you click OK on this window.

Template Directory

Indicates the location of the template files. This path is set during installation to the default MyLocalDrive:\TUXBldr\RoseExpert\templates\. Generally, you will not have to change this path.

If you do change this path, you must type a directory that already exists-the Rose Expert will not create a new directory for you. If the Template Directory provided here does not exist, you will get a warning message when you click OK on this window.

FML Buffer Type

Specifies whether to use FML or FML32 buffer type when generating classes. Choose one from the drop-down list.

FML Field Table File

If this box is checked, the Rose Expert also will generate an FML field table file for each component.

Server Test Client

If this box is checked, the Rose Expert also will generate a test client for each server (task). The test client allows you to exercise a generated server through a simple command-line interface.

Service Test Logic

If this box is checked, the Rose Expert also will generate simple test logic into each operation of each control class.


Buttons

When you have filled in the fields, click OK to save your changes and close the window. (Or click Cancel to close the window without saving your changes.)

Note: If the Project Root Directory or the Template Directory that you provided does not exist, you get a warning message when you click OK.
 

See Also

Specifying Generation Settings, Generating Classes