The Rose Expert generate function generates BEA TUXEDO compatible code for the control classes in your application model. (Control classes are classes of the stereotype "Control.")
In order to generate classes, you must have at least one component package in the current Rational Rose model. If there are no component packages in the model, you get an alert message when you choose the Generate Classes menu option.
Figure 3-9 Generate Warning

If you get this warning, go back to the model and create a component package.
For more information on creating component packages, refer to topic Create Component Packages and a Component Diagram in the section Using Rational Rose to Model a TUXEDO Application.
The generate process produces C++ source, make files, and some other optional files for the classes and task modules in the selected component package.
Generated files include:
The Rose Expert outputs all generated code to the project root directory according to the directory structure described in Generated Files Directory Structure.
To generate BEA TUXEDO compatible files based on the Control classes in your application model:
How to Generate Code from Model Classes
ApplicationName.mdl) and contains at least one component
package.
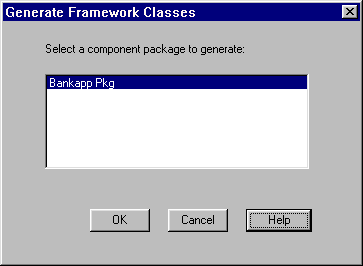
This brings up the first Generate Framework Classes window as shown in Figure 3-10.
Figure 3-10 Generate Framework Classes - Select Package

The Rose Expert runs an automatic model validation to check all BEA TUXEDO related information in control classes, structure classes, and task modules in the selected component package for consistency and validity.
At this point, the Rose Expert also checks to ensure all relavant Rose Expert settings are valid as follows:
For more information on specifying Rose Expert settings, refer to the section Specifying Application Settings.
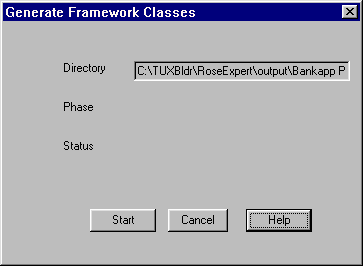
When the model validation is complete, the following window is displayed.
Figure 3-11 Generate Framework Classes

The window remains open to show the progress of the generate process. Table 3-4 explains the read-only fields on this window.
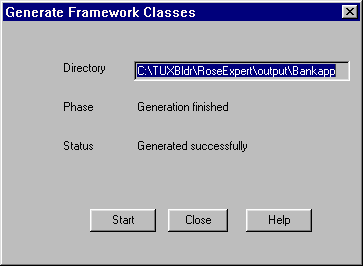
When the generate process is finished, the window confirms the success of the generate and the Cancel button changes to a Close button as shown in Figure 3-12.
Figure 3-12 Generate Process Complete

If you have set options to generate a "server test client" and "service test logic," you can test your new server.
For information on testing, refer to Testing Default Service Implementations.
For information on setting default options to generate a server test client and service test logic, refer to Specifying Generation Settings.
The Rose Expert places its generated class header and source files, make files, FML field table files and model export files in a predetermined directory structure. This structure is rooted at the Project Root Directory, which you specify in the Generation Settings window. (For more information on specifying generate settings, refer to the section Specifying Generation Settings.)
The remaining part of the directory tree is driven by the model contents. Listing 3-1 shows the generic generated files directory structure.
Listing 3-1 Generated Files Directory Structure
\Q-----<Projectoot>
        \Q-----gservers.lst
 |      \Q-----<ComponentPackage1>
 |       |      \Q-----<ComponentPackage1>.fml
 |       |      \Q-----<ComponentPackage1>.mak
 |       |      \Q-----<ComponentPackage1>_tst.cpp
 |       |      \Q-----<Task1>.h
 |       |      \Q-----<Task1>Srv.h
 |       |      \Q-----<Task1>Srv.cpp
 |       |      \Q-----<Task1_Control1>.h
 |       |      \Q-----<Task1_Control1>.cpp
 |       |      \Q-----<Control1>.h
 |       |      \Q-----<Control1>.cpp
 |       |      \Q-----<Control1>Impl.h
 |       |      \Q-----<Control1>Impl.cpp
 |       |      \Q-----<Control1>Skel.cpp
 |       |      \Q-----BEATuxBldr.h
 |       |      \Q-----BEATuxBldr.cpp
 |      \Q-----<ComponentPackage2>
Of the files shown Listing 3-1 above, the Task_Control.h, Task_Control.cpp, ComponentPackage.fml, Control.h and Control.cpp files can be moved to the client platform so that clients can request services defined in this server.
As an example, Listing 3-2 shows the generated source tree for a model with a component package called Bankapp, a task called Bank, and a control class called Teller.
Listing 3-2 Example: Generated Source Tree for Bankapp
\Q-----<ProjectRooT>
        \Q-----gservers.lst
 |      \Q-----Bankapp
 |       |      \Q-----Bankapp.fml
 |       |      \Q-----Bankapp.mak
 |       |      \Q-----Bankapp_tst.cpp
 |       |      \Q-----Bank.h
 |       |      \Q-----BankSrv.h
 |       |      \Q-----BankSrv.cpp
 |       |      \Q-----Bank_Teller.h
 |       |      \Q-----Bank_Teller.cpp
 |       |      \Q-----Teller.h
 |       |      \Q-----Teller.cpp
 |       |      \Q-----TellerImpl.h
 |       |      \Q-----TellerImpl.cpp
 |       |      \Q-----TellerSkel.cpp
 |       |      \Q-----BEATuxBldr.h
 |        |      \Q-----BEATuxBldr.cpp
In this example, the TellerImpl.cpp file has the signatures of all the member functions.
If you choose not to generate service test logic, the body of a member function will be left blank-in this case, the server application developer needs to provide this code.