

|
|
|
|
|
|
WebLogic Commerce Servers Quick Start
This topic includes the following sections:
About the example applications
This release includes two example applications that use BEA WebLogic Portal: a "Portal-in-a-Box" example for a fictional "Acme Corporation," and My BuyBeans.com, an e-commerce example in the Portal framework.
Internet portals are a key part of many eCommerce applications. They provide an entry point to the Internet as well as value-added services such as searching and application integration. Portals can be divided into two major categories:
Examples of MegaPortals include Netcenter and Yahoo! These provide windows onto information on the Internet and typify Business-to-Consumer (B2C) Web applications that can be personalized.
Enterprise portals use general-purpose applications in addition to applications specific to the enterprise or industry. These are Business-to-Business (B2B) web applications, and in many cases share B2C functionality.
BEA WebLogic Portal allows you to quickly assemble both Business-to-Consumer and Business-to-Business portals that require personalized application content on the Internet.
The second example application, My BuyBeans.com, takes the B2C portal model a step further and implements portlets as chunks of e-business functionality.
Portal-in-a-Box (Acme)
Figure 3-1 Portal-in-a-Box (Acme)
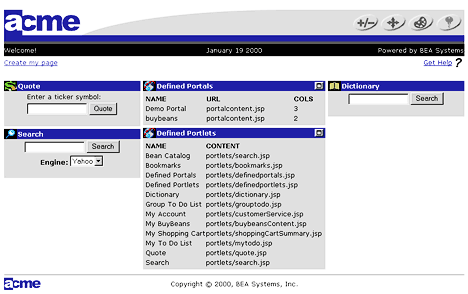
The Portal-in-a-Box, Acme Corporation, is designed to be a full reference implementation. It is the developer's best starting point for understanding the complete functionality provided with the product.
In Acme, the portlets are not necessarily aware of each other's data or state. Each is a window on a discrete interaction or data store.
Use Acme to learn how to create and modify portlets, configure personalization for users, groups, and the entire portal, and configure the portal itself. Also use it to understand the complete set of user and portal administration tools.
My BuyBeans.com
Figure 3-2 My BuyBeans.com example portal
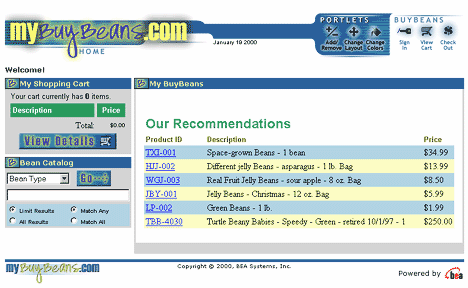
In My BuyBeans.com, the portal header and footer are different, and the portlet defaults have been customized to create a different a look and feel. In addition, the portlet contents operate as an integrated e-commerce application, aware of each other and updating each other.
However, unlike the reference implementation Acme, My BuyBeans.com does not implement every module and option the product offers.
Use My BuyBeans to learn how to implement WebLogic Components in the Portal framework.
Using the Start Menu (NT)
Notes: For all of the following activities, ensure the WebLogic server under WebLogic Commerce Servers > Examples is running.
All of the following examples assume that you installed under the default Programs Menu name WebLogic Application Solutions.
Running the My BuyBeans Example Demo
To begin using WebLogic Commerce Servers, you may read the documentation, or start the WebLogic Server and the My BuyBeans example portal. To run the example:
Figure 3-3 Start Menu Program Entries

Launching My BuyBeans Administration
Select WebLogic Commerce Servers > Examples > My BuyBeans Application Admin Tool from the Programs Start menu.
Launching WebLogic Portal Administration Tool
Select WebLogic Commerce Servers > Examples > Portal Administration Tool from the Programs Start menu.
The default administration log-on is as follows:
|
User Name |
system |
|
Password |
weblogic |
Note: This Portal Admin log-in is not to be confused with the administration log-in for WebLogic Server.
Launching the Portal-in-a-Box (Acme)
Select WebLogic Commerce Servers > Examples > Portal Example (Acme) from the Programs Start menu (NT).
In Solaris, after running StartPortal.sh , open http://[ServerName]:7601/exampleportal in your Web browser.
Using the WebLogic AC Documentation
The HTML documentation will launch automatically into your default browser after successful installation. To launch it when you need it, select WebLogic Commerce Servers > Documentation from the Programs Start menu.
Note: The same documentation is available on-line at e-docs.beasys.com, and customers may always access the latest Release Notes from the on-line documentation repository.
Running the My BuyBeans.com Demo on Oracle 8.0.5
This section outlines the steps necessary to run the My BuyBeans.com demo on an Oracle platform. The default deployment set is Cloudscape.
This section supplements the general instructions for Oracle deployments found in the documentation for WebLogic Application Components under the heading "Deployment Sets Overview" in the topic Deploying WebLogic Components Using Bean-Managed Persistence.
Note: In the following section, WEBLOGICAC_HOME is the place where you installed the WebLogic Commerce Servers server. (i.e. C:\WeblogicAC )
REM -------------- CLOUDSCAPE -------------------------
REM SET DEPLOYMENT_SET=%WEBLOGICAC_HOME%\deploy\weblogic\cloudscape
REM SET DB_CLASSPATH=%WEBLOGIC_HOME%\eval\cloudscape\lib\cloudscape.jar;%WEBLOGIC_HOME%\eval\cloudscape\lib\tools.jar;%WEBLOGIC_HOME%\eval\cloudscape\lib\client.jar
REM -------------- ORACLE 805 -------------------------
SET DEPLOYMENT_SET=%WEBLOGICAC_HOME%\deploy\weblogic\oracle805
SET DB_CLASSPATH=%ORACLE_DRIVER_PATH%\classes111.zip
Note: For the variable %ORACLE_DRIVER_PATH% to work, check that you have specified the path to your Oracle installation in your System Environment variables control panel.
Note: Make sure you specify the username/password correctly when you create the connection pool in the properties file.
java.naming.provider.url=t3://localhost:7601/
itemloader -url http://localhost:7601 -tabdelimitedfile WEBLOGICAC_HOME/deploy/weblogic/oracle805/misc/BuyBeans.txt
This will insert the buybeans data into the Oracle database.
shippingmethodloader -url http://localhost:7601 -commadelimitedfile WEBLOGICAC_HOME/deploy/weblogic/oracle805/misc/shippingmethods.txt
This will insert the shippingmethod prices into the Oracle database.
Populating the Database with the Demo Defaults
|
Portlet |
Bean Catalog |
|---|---|
|
Content URL |
portlets/search.jsp |
|
Minimizable |
true |
|
Icon URL |
portlets/images/buybeansportleticon.gif |
|
Portlet |
My Account |
|---|---|
|
Content URL |
portlets/customerService.jsp |
|
Minimizable |
true |
|
Icon URL |
portlets/images/buybeansportleticon.gif |
|
Editable |
true |
|
Edit URL |
updateAccountInformation.jsp |
|
Login Required |
true |
|
Portlet |
My Shopping Cart |
|---|---|
|
Content URL |
portlets/shoppingCartSummary.jsp |
|
Minimizable |
true |
|
Icon URL |
portlets/images/buybeansportleticon.gif |
|
Portlet |
My BuyBeans |
|---|---|
|
Content URL |
portlets/buybeansContent.jsp |
|
Minimizable |
true |
|
Icon URL |
portlets/images/buybeansportleticon.gif |
|
Definition |
|
|
|
|
Header URL |
buybeansheader.jsp |
|
|
Content URL |
portalcontent.jsp |
|
|
Footer URL |
buybeansfooter.jsp |
|
|
Columns |
2 |
|
Associated Portlets (visible portlets) |
|
|
|
|
Bean Catalog |
My BuyBeans |
|
|
My Account |
My Shopping Cart |
|
Layout |
Column 1 |
Column 2 |
|
|
My Shopping Cart |
My BuyBeans |
|
|
My Account |
|
|
|
Bean Catalog |
|
|
Colors |
Custom Color Scheme |
|
|
|
Title Bar |
#336699 |
|
|
Banner |
#336699 |
|
|
Body (Portlet) |
#CCCCCC |
|
|
Portlet Title Color |
#FFFF99 |
|
|
Portal Background Color |
White |

|
|
|
Copyright © 2000 BEA Systems, Inc. All rights reserved.
|