

|
|
|
|
|
|
Developing Logic Plug-Ins
The following sections describe how to develop logic plug-ins in WebLogic Collaborate:
For sample applications that demonstrate the use of logic plug-ins, see the MessageCounter and CheckAccount logic plug-in samples, which are described in Using Logic Plug-Ins for Billing in BEA WebLogic Collaborate Getting Started.
About Logic Plug-Ins
The following sections describe logic plug-ins and related concepts:
What Are Logic Plug-Ins?
Logic plug-ins are individual components that perform specialized processing of business messages that pass through the c-hub. A logic plug-in is a custom service that a c-hub provider or trading partner can develop and install on a c-hub to provide additional value for c-hub management and for trading partners who use that c-hub.
Logic plug-ins insert rules and business logic at strategic locations along the path that business messages travel as they make their way through the c-hub. Logic plug-ins are Java classes that are invoked when a c-space is started. At run time, logic plug-ins can intercept, process, and output business messages. When a business message passes through the location where a logic plug-in is configured, the logic plug-in processes the business message. Logic plug-in execution occurs on the c-hub and is transparent to c-enabler users.
Each logic plug-in is associated with a business protocol. A logic plug-in processes only the messages that are exchanged using that protocol. For example, if a particular plug-in is associated with the XOCP protocol, then it will process only XOCP business messages.
Logic Plug-In Architecture
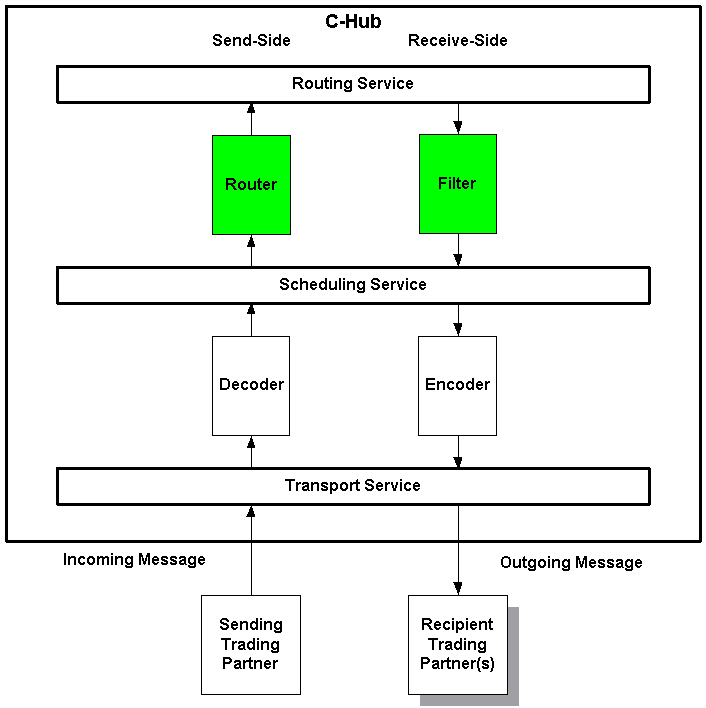
Logic plug-ins can be installed at two processing locations in the c-hub: in the router and in the filter, which are shown in the following figure.
Figure 4-1 Logic Plug-In Locations in the C-Hub: Router and Filter
Logic Plug-In Processing Tasks
WebLogic Collaborate-provided XOCP router and XOCP filter plug-ins, as well as RosettaNet plug-ins, are directly involved in the processing of message recipients based on Xpath expressions in the repository. However, custom logic plug-ins can perform a wide range of services that are entirely unrelated to routing or filtering, as well as performing routing and filtering operations. For example, a custom logic plug-in might track the number of messages sent from each trading partner for billing purposes.
Logic plug-ins perform the types of tasks described in the following table.
Chains
Both the router and filter modules can have multiple plug-ins that will be executed when a business message passes through that part of the c-hub. Multiple logic plug-ins that share the same protocol are sequenced as a logic plug-in chain.
In a chain, the logic plug-ins are processed sequentially at run time. After one plug-in has finished executing, the next sequential plug-in in the chain will normally be activated. Each successive plug-in can access any changes made previously to the shared message information as the business message passes throughout the c-hub.
Note: The position of a logic plug-in in a chain is configured in the repository using the C-Hub Administration Console, as described in Working with Logic Plug-ins in the BEA WebLogic Collaborate C-Hub Administration Guide.
The following figure shows an example of a chain of XOCP logic plug-ins in the router location in the c-hub.
Figure 4-2 Sample XOCP Router Chain
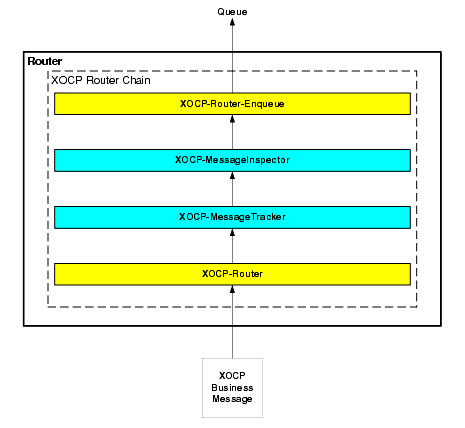
Note that even when custom logic plug-ins do not provide routing or filtering capability, they must still be part of an XOCP or RosettaNet router or filter chain. In this example, the chain contains four logic plug-ins that are processed in the order described in the following table.
In this example, only XOCP business messages will trigger the logic plug-ins in the XOCP router chain. Non-XOCP business messages (such as RosettaNet messages) are processed separately by the router chain associated with the protocol/c-space defined by the URL that received the business message.
Business Messages and Message Envelopes
A business message is the basic unit of communication exchanged between trading partners in a conversation. The business message contains the list of message recipients. A business message is represented in the C-Hub API by the com.bea.b2b.protocol.messaging.Message interface. In addition, the following classes implement this interface and represent protocol-specific business messages:
When a business message enters the c-hub, the c-hub creates a message envelope that acts as a container for the business message as it travels through the c-hub. Message envelopes are instances of the com.bea.b2b.protocol.messaging.MessageEnvelope class.
The message envelope is used for routing purposes and is analogous to a paper envelope for a letter: the message envelope contains the business message plus addressing information, such as the identity of the sender (return address) and one recipient of the business message (destination address), as shown in the following figure.
Figure 4-3 Message Envelope Containing an XOCP Business Message

Message envelopes also contain other information about the business message. For detailed information about the MessageEnvelope class, see the Javadoc on the WebLogic Collaborate documentation CD or in the classdocs subdirectory of your WebLogic Collaborate installation.
For XOCP business messages, after the system XOCP router processes an XOCP business message and finalizes the list of intended message recipients, the c-hub validates the recipients and creates a separate message envelope (and a logical copy of the XOCP business message) for each recipient in the recipient list. These message envelopes are then forwarded to the XOCP filter for processing. For more information, see Information Flow for Message Envelopes.
System and Custom Logic Plug-Ins
WebLogic Collaborate provides the following logic plug-ins to provide standard services for processing business messages.
In addition to using the system logic plug-ins, c-space owners and trading partners can develop their own custom logic plug-ins to provide specialized services on the c-hub. Each logic plug-in is a Java class that implements the Logic Plug-In API, as described in Programming Steps for Logic Plug-Ins.
Logic Plug-In API
WebLogic Collaborate provides a Logic Plug-In API that allows WebLogic Collaborate applications to:
The following table lists the components of the Logic Plug-in API. For more information, see the WebLogic Collaborate Javadoc.
Rules and Guidelines for Logic Plug-Ins
Logic plug-ins should conform to the following rules and guidelines:
Creating and Adding Logic Plug-Ins
Implementing a custom logic plug-in requires a combination of development and administrative tasks. The following steps describe those procedures:
Programming Steps for Logic Plug-Ins
This section describes the programming steps that you must perform in the logic plug-in code. Although each logic plug-in processes business messages in its own way, all logic plug-ins must perform certain tasks.
To implement a logic plug-in, complete the following steps:
This section uses code fragments from the SentMsgCounter.java file in the MessageCounter sample application. The SentMsgCounter class is a logic plug-in that:
The CheckAccount.java file in the CheckAccount sample application is another example of a logic plug-in. For more information about the MessageCounter and CheckAccount sample applications, see Using Logic Plug-Ins for Billing in BEA WebLogic Collaborate Getting Started.
Step 1: Import the Necessary Packages
At a minimum, a logic plug-in needs to import the following packages:
The following listing from the SentMsgCounter.java file shows importing the necessary packages.
Listing 4-1 Importing the Necessary Packages
import java.util.Hashtable;
import com.bea.b2b.protocol.*;
import com.bea.b2b.protocol.messaging.*;
import com.bea.eci.logging.*;
import javax.naming.*;
import javax.sql.DataSource;

// This package is needed to access the DB pool
import java.sql.*;
Step 2: Implement the PlugIn Interface
A logic plug-in needs to implement the com.bea.b2b.protocol.PlugIn interface, as shown in the following listing.
Listing 4-2 Implementing the PlugIn Interface
public class SentMsgCounter implements PlugIn
{ ...
}
Step 3: Specify the Exception Processing Model
A PlugInException is thrown if:
The exception processing model specified in a logic plug-in determines what happens if an exception is thrown. Logic plug-ins must implement the exceptionProcessingModel method and specify one of the return values described in the following table.
If a business message is rejected, what happens next depends on the business protocol as well as the specified Quality of Service associated with the message. For example, the sending c-enabler application might be notified that message delivery failed and it might then attempt to send the business message again.
The following listing shows how the SentMsgCounter plug-in implements the exceptionProcessingModel method.
Listing 4-3 Specifying the Exception Processing Model
public int exceptionProcessingModel()
{
  return EXCEPTION_CONTINUE;
}
Step 4: Implement the Process Method
To process a business message, a logic plug-in must implement the process method, which accepts the message envelope of the business message as its only parameter. In the following listing, the SentMsgCounter class begins its implementation of the process method by defining the variables that it will later use to store message properties.
Listing 4-4 Implementing the Process Method
  public void process(MessageEnvelope mEnv) throws PlugInException
{

    String sender, conversation ;
    String tRecipient;
    Connection conn = null;
    Statement stmt = null;
    Message bMsg = null;
    ...
}
Note: When processing a business message, a logic plug-in is allowed to modify only the message envelope, not the business message.
Step 5: Get the Business Message from the Message Envelope
If a logic plug-in needs to inspect the contents of a business message, it must call the getMessage method on the MessageEnvelope instance, which retrieves the business message as a Message object.
In the following listing, the SentMsgCounter class gets the business message from the message envelope by calling the getMessage method.
Listing 4-5 Retrieving the Business Message from the Message Envelope
    if((bMsg = mEnv.getMessage())== null)
    {
        new Throwable("bMsg is NULL").printStackTrace();
    }
Step 6: Validate the Business Message
Optionally, a logic plug-in can determine whether a message is a valid business message that should be processed, or a system message that should be ignored by the logic plug-in. To check a business message, the logic plug-in can call the isBusinessMessage method on the Message instance. In the following listing, the SentMsgCounter class uses the isBusinessMessage method to ensure that the message is a business message before processing it.
Listing 4-6 Validating the Business Message
    if (bMsg.isBusinessMessage())
    {
    ...
    }
Step 7: Get Business Message Properties
Optionally, a logic plug-in can retrieve certain properties of the business message by calling methods on the MessageEnvelope or Message instance. In the following listing, the SentMsgCounter class gets the name of the conversation definition associated with the conversation in which this message was sent, the name of the sender of the business message, and the name of the recipient trading partner.
Listing 4-7 Retrieving Business Message Properties
       conversation= bMsg.getConversationType().getName();
       sender = mEnv.getSender();
       tRecipient = mEnv.getRecipient();
Step 8: Process the Business Message as Needed
After a logic plug-in has obtained the necessary information from the business message, it processes this information as needed. For example, the SentMsgCounter plug-in updates the billing database with the message statistics it has collected.
Administrative Tasks
An administrator adds the logic plug-in definition to the repository by performing the following tasks from the Logic Plug-Ins tab of the C-Hub Administration Console:
For more information about administrative tasks, see Working with Logic Plug-Ins and Using the C-Hub Administration Console in the BEA WebLogic Collaborate C-Hub Administration Guide.

|

|

|
|
|
|
Copyright © 2001 BEA Systems, Inc. All rights reserved.
|