

|
|
|
|
|
|
Working with Logic Plug-Ins
The following sections provide key concepts and procedures for configuring and working with logic plug-ins on the C-Hub Administration Console:
For more information on logic plug-ins, see Developing Logic Plug-Ins in the BEA WebLogic Collaborate Developer Guide.
What Are Logic Plug-Ins?
The message flow through the c-hub begins with an incoming message from a c-enabler, proceeds to the routing service, and ends with the c-hub sending an outgoing message. This flow is usually described from the perspective of the c-enabler client, rather than the c-hub. In this context, the incoming message flow through the router is considered to be part of send-side routing (because the message is sent by the c-enabler to the c-hub). The outgoing message sent by the c-hub is considered to be available for receive-side filtering (because it is received by the c-enabler from the c-hub).
WebLogic Collaborate provides a router and a filter for each business protocol that it supports. Each router and each filter consists of a chain of logic plug-ins. You can add your own logic plug-ins to the routers and filters. The plug-in code must conform to BEA guidelines and interfaces. These logic plug-ins (components in filters and routers) allow you as a c-hub owner to provide additional processing (rules) for the information passing through the c-hub.
However, you are not limited to using the plug-ins strictly for filtering and routing tasks. As a c-hub owner, you can customize the "filter" and "router" plug-ins for many purposes other than filtering and routing, such as sampling, validating, auditing, billing, and so on. The following table shows some simple examples of the kinds of additional processing rules you might want to implement and perform on data flowing through the c-hub.
Table 12-1 Examples of Using Router and Filter Logic Plug-Ins on the C-Hub for Various Types of Additional Processing
For more information on what logic plug-ins are and how to construct and use them, see Developing Logic Plug-Ins in the BEA WebLogic Collaborate Developer Guide.
Setting Up a Logic Plug-In
Setting up a new logic plug-in definition on the c-hub consists of the following tasks:
Step 1. Name Plug-In and Provide Parameters.
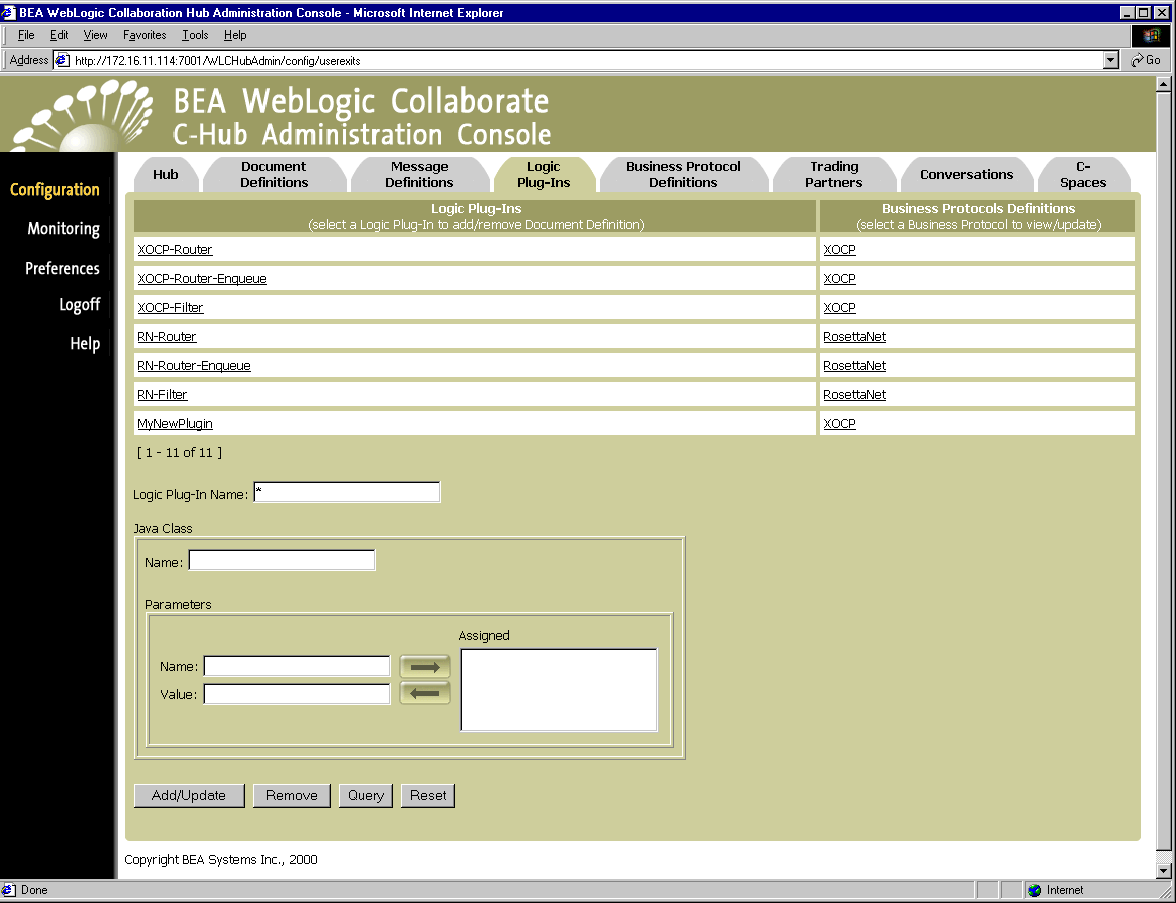
Figure 12-1 Logic Plug-Ins Configuration
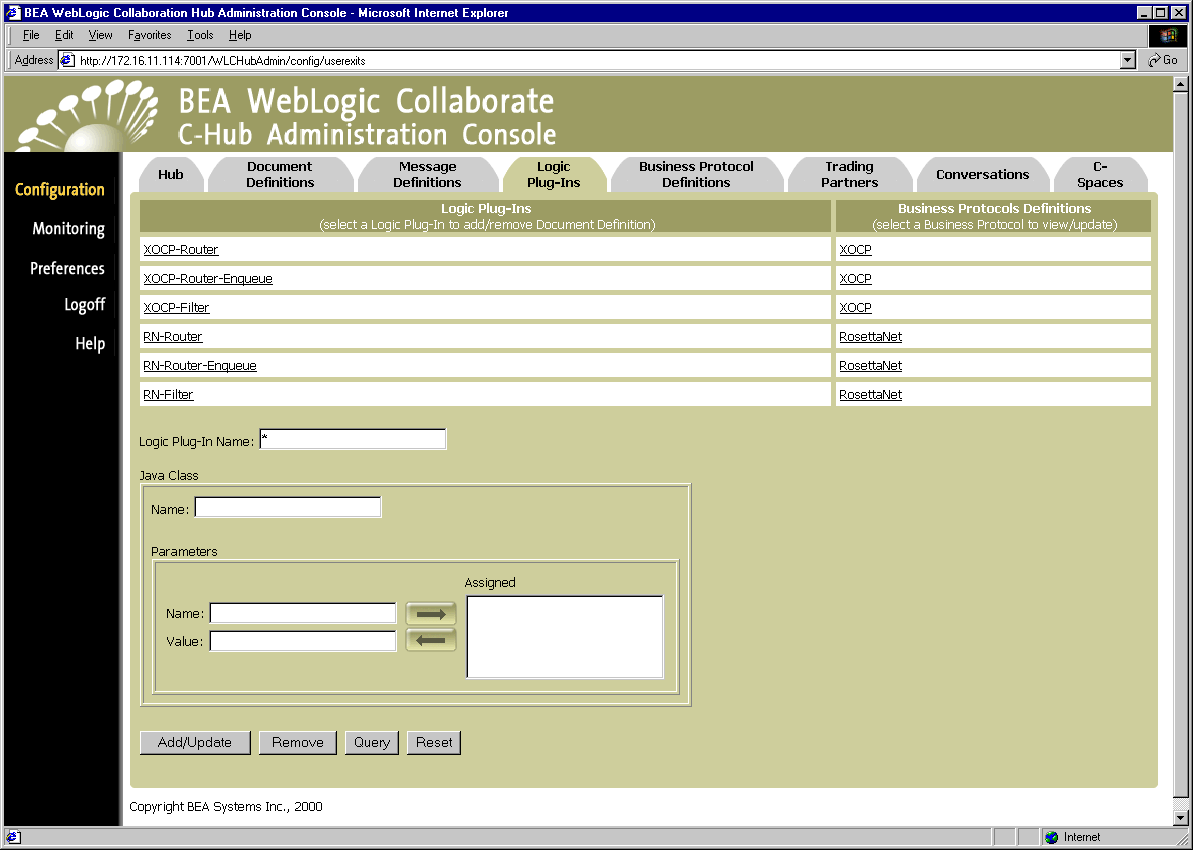
The Logic Plug-Ins list shows the logic plug-ins currently defined and available for use. The Business Protocols Definitions list shows the protocol assigned for each plug-in.
Note: If a logic plug-in has a parameter name of bea.hidden and a value of true, then it will not show up on the Logic Plug-Ins screen list unless you have checked Show hidden logic plug-ins in the Preferences screen. (For more information on the "hidden logic plug-ins" setting, see Setting Preferences.)
(You can also click Reset to discard your current changes and start again.)
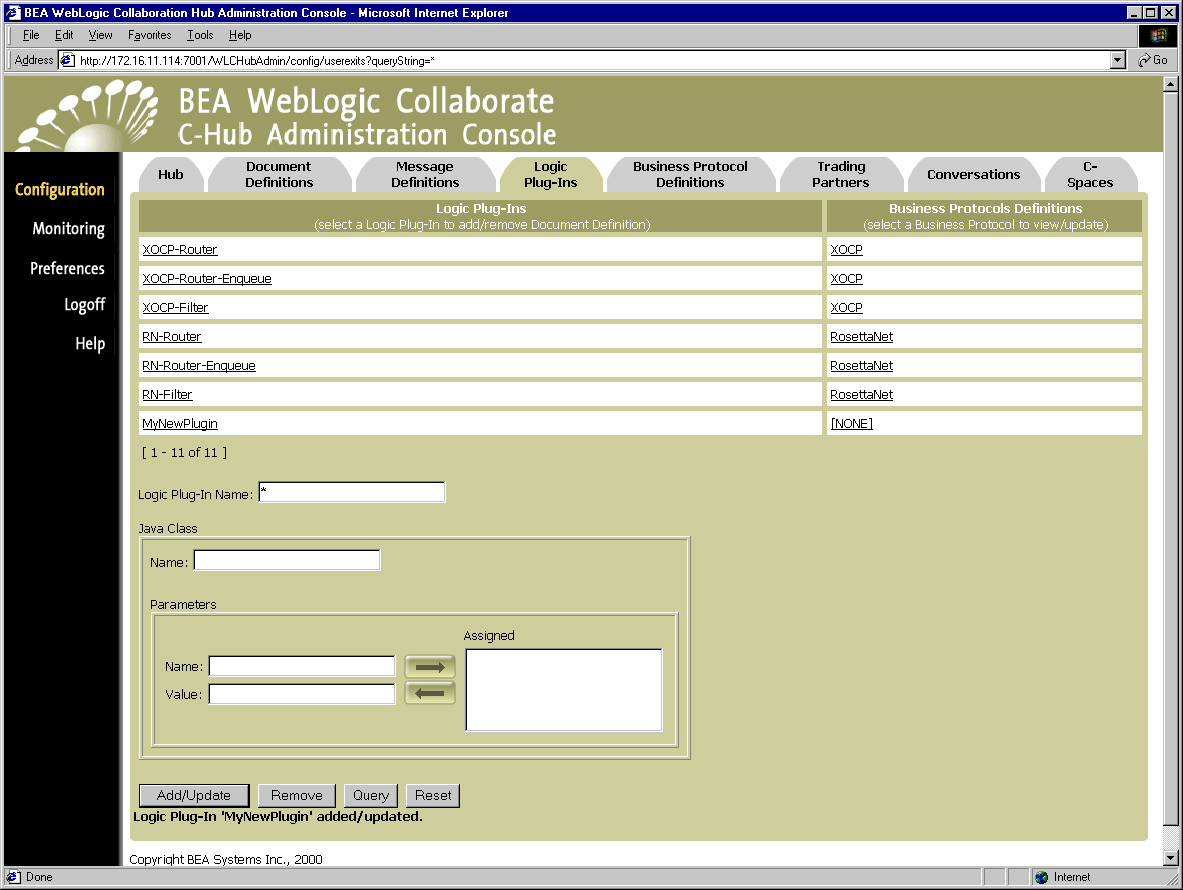
Initially, your new logic plug-in will not be assigned to a business protocol, so [NONE] will show up under Business Protocols list for that logic plug-in.
Figure 12-2 New Logic Plug-In Added
Step 2. Assign the Logic Plug-In to a Business Protocol Definition.
You can create new "flavors" of an existing business protocol based on the particulars of your enterprise, but this is not a task that can be handled in the C-Hub Administration Console.
You will probably be accessing the Business Protocol Definitions tab in the C-Hub Administration Console primarily for the purpose of assigning logic plug-ins (components in filters and routers) to an existing protocol like XOCP.
For information on developing logic plug-ins to use in routers and filters, see Developing Logic Plug-Ins in the BEA WebLogic Collaborate Developer Guide. For more information on using XOCP filters and routers, see Routing and Filtering XOCP Business Messages.
To assign a logic plug-in to a business protocol:
This brings up the main Business Protocol Definitions Screen.
Figure 12-3 Business Protocol Definitions Screen
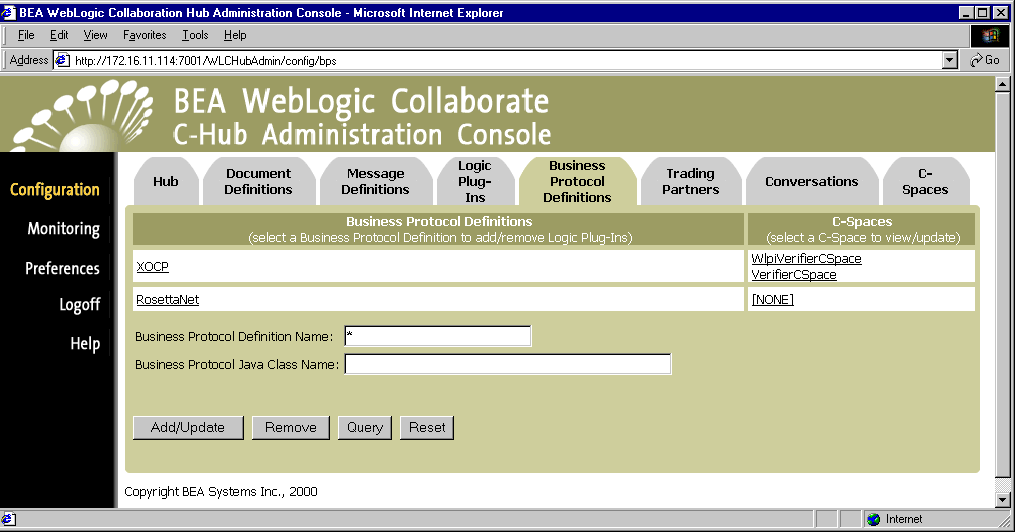
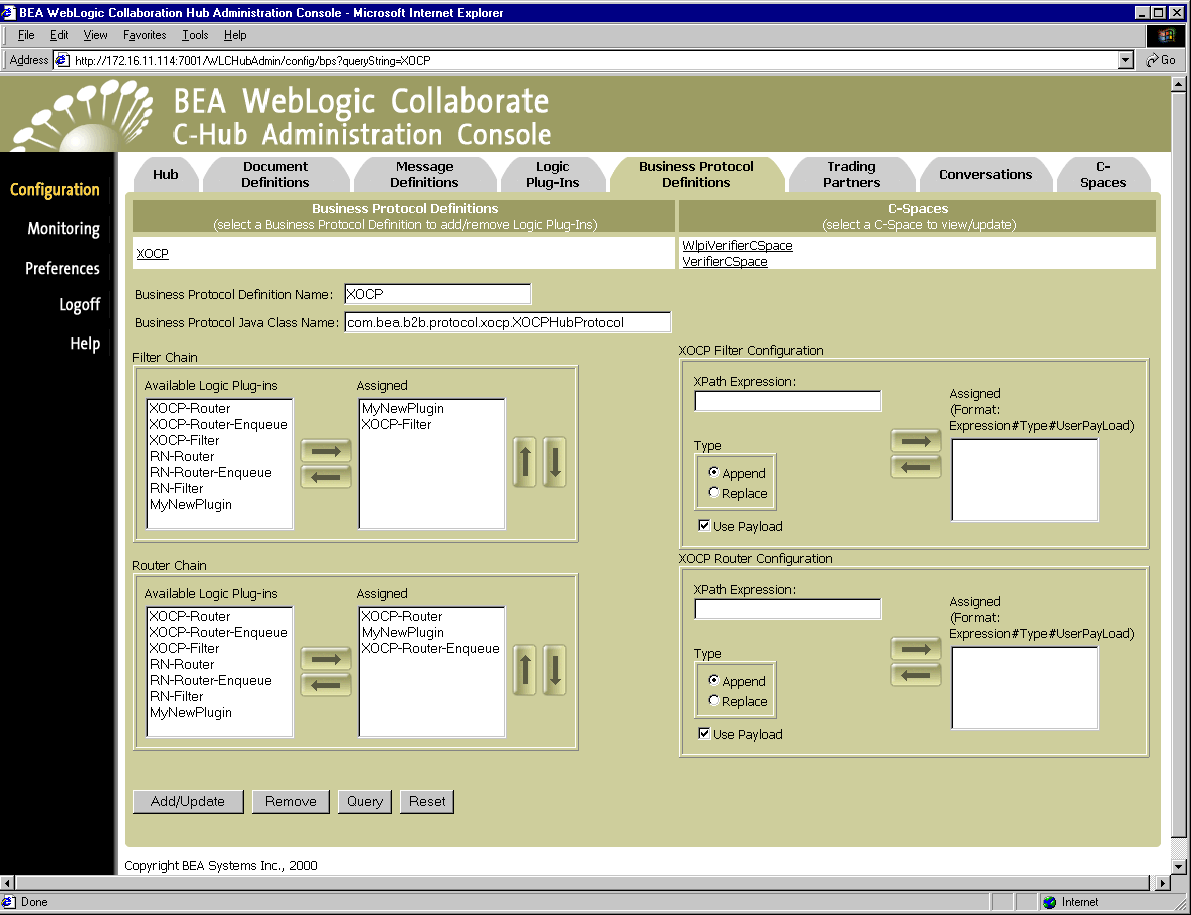
Figure 12-4 Assign Logic Plug-Ins to a Business Protocol Definition
Note: If a logic plug-in has a parameter name of bea.hidden and a value of true, then it will not show up on Available Logic Plug-ins lists in the Filter and Router Chain lists unless you have checked Show hidden logic plug-ins on the Preferences screen.
Note: XOCP filters and routers can be used only for XOCP business protocol definitions. Likewise, RosettaNet filters and routers can be used only for RosettaNet business protocol definitions.
Note: If you define an XPath expression in the XOCP Filter Configuration group, this XPath expression will be added to the XOCP filter logic plug-in. Similarly, if you define an XPath expression in the XOCP Router Configuration group, this XPath expression will be added to the XOCP router logic plug-in.
When you have defined the XPath expression you want to use and set the type and payload filtering options, click on the right arrow button to move the XPath expression into the Assigned list. (You can use the left arrow button to remove an expression from the Assigned list.)
These fields and options work the same way for both XOCP Filter Configuration and XOCP Router Configuration.
Note: When you use the Business Protocol Definitions tab to create an XPath expression, you are defining a c-hub XPath expression. C-hub XPath expressions are applied to all XOCP business messages flowing through the c-hub. (In contrast, you can also define XPath expressions for a particular trading partner which are applied only to XOCP business messages sent or received by a particular trading partner.)
The plug-in assignments are processed, and you are returned to the main Business Protocol Definitions screen. A status message is displayed indicating that the business protocol assignment has been made to the appropriate logic plug-in.
If you now click the Logic Plug-Ins tab to display the main Logic Plug-Ins configuration screen, you should see your new plug-in assigned to the appropriate business protocol.
Figure 12-5 New Logic Plug-In Added to Plug-Ins List with Protocol Assignment
For more information on business protocols, see Working with Business Protocol Definitions.
Viewing Logic Plug-Ins on a C-Hub
To view logic plug-ins on a c-hub:
Figure 12-6 Viewing Logic Plug-Ins
The Logic Plug-Ins configuration screen shows a table of logic plug-ins currently defined in the c-hub (except those configured as bea.hidden) and the business protocols associated with each plug-in.
Using the Query Feature to Find Logic Plug-Ins
Notice the * in the Logic Plug-In Name field. This is a special wildcard character used for queries. In the above screen, the table shows all the logic plug-ins on the c-hub (except those configured as bea.hidden). You can type text strings in the Logic Plug-In Name field and do queries on them to refine the table display. For instance, to display just logic plug-ins that start with "XOCP", you can input XOCP* in the Logic Plug-In Name field and click Query. (The query is case-sensitive.) To display information just for XOCP-Router, you can enter XOCP-Router in the Logic Plug-In Name field and click Query, or just click on the XOCP-Router name in the Logic Plug-Ins list.
Modifying an Existing Logic Plug-In
You can modify any or all of the existing logic plug-ins set up on a c-hub.
From the main Logic Plug-Ins configuration tab, click on a logic plug-in name under Logic Plug-Ins to display the configuration for that plug-in. (As an example, the following figure shows the configuration screen for a logic plug-in named "XOCP-Router".)
Figure 12-7 Configuration for an Individual Logic Plug-In
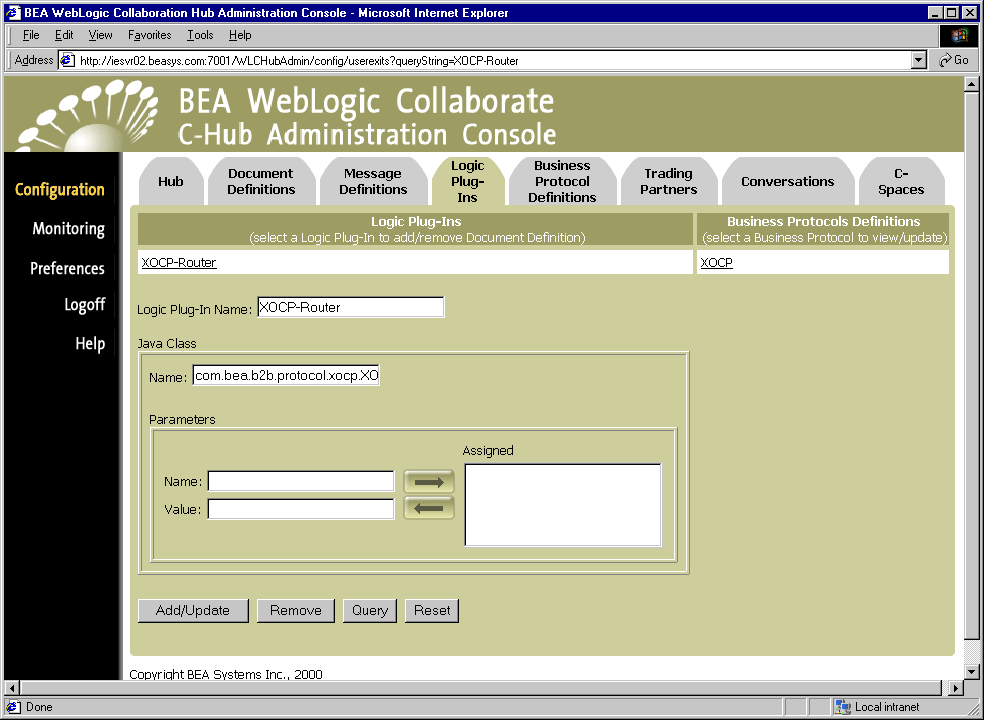
You can modify the configuration for the selected plug-in from this screen. Simply redefine the name, parameters, or other attributes as needed, then click Add/Update to save the changes. (For details on the fields, see Table 12-2.)
Removing a Logic Plug-In
Warning: Do not remove the BEA-provided logic plug-ins for XOCP or RosettaNet. Removal of these plug-ins will disable the WebLogic Collaborate c-hub. You can add and remove your own, customized logic plug-ins as needed.
To remove a customized logic plug-in:
or
Click on the logic plug-in you want to remove to display the configuration details for that logic plug-in. On this screen, click Remove.
A confirmation dialog is displayed. Click OK to remove the specified logic plug-in in. You are returned to the main Logic Plug-Ins configuration screen.
Note: If the object you remove references or is referenced by other objects (for example, if a business protocol is using a logic plug-in you are about to remove), those references will be removed. If the object you remove contains other objects, those objects will be removed. See Table 8-2 for details on relationships and dependencies that can exist among configured c-hub objects.

|

|

|
|
|
|
Copyright © 2001 BEA Systems, Inc. All rights reserved.
|