

|

|
|
|
|
Implement
This section contains the following topics:
Prerequisites for Implementing
Step 1. Open the copy of the WLCS Rational Rose model.
Step 2. Export the model using the WLCS Rational Rose Plug-In.
Step 3. Create a new SmartGenerator project.
Step 4. Configure the project.
Step 5. Generate EJB implementations of the BeanieHat and BeanieHatPricePolicy Components.
Step 6. Implement custom business logic in the BeanieHatPricePolicy Component
Step 7. Implement presentation logic for the new BeanieHat Component.
Overview of Implementation
Having finished using Rational Rose to model two new components that will serve as the basis for the MyBuyBeans site modifications, you are now prepared to implement your solution. You assemble your team and plan your next steps.
Because you are a knowledgeable WebLogic Commerce Server developer, you know that the implementation process involves exporting the Rational Rose model using the BEA Rational Rose Plugin, generating Enterprise Java Bean (EJB) implementations of your WebLogic Commerce Server using the WLCS Smart Generator, and then adding any necessary custom business logic to the EJBs. You also realize that presentation logic for the new BeanieHat Component must be developed.
Prerequisites for Implementing
In order to fully understand this section of the tour, it is recommended that you have a general understanding of BEA Smart Generator application, HTML, and the Java programming language. You must also have successfully completed all steps of the Design section of the tour.
Directions for Implementing
Step 1. Open the copy of the WLCS Rational Rose model.
Step 2. Export the model using the WLCS Rational Rose Plug-In.
Step 3. Create a new SmartGenerator project.
Start -> Programs -> WebLogic Commerce Server -> Smart Generator
Note: This assumes that the WebLogic Components installation directory is D:\opt\WebLogicCommerce:

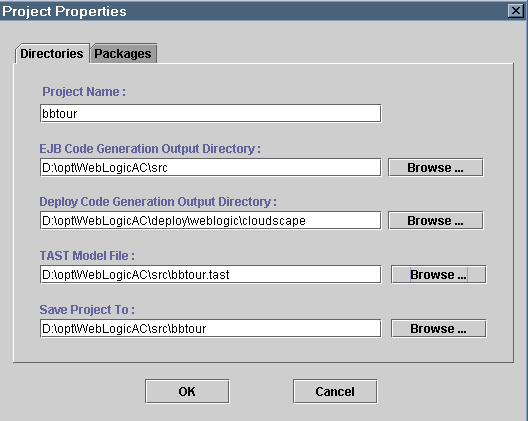
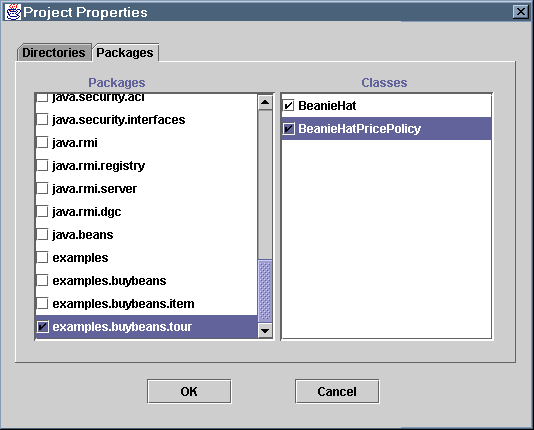
Step 4. Configure the project.

Step 5. Generate EJB implementations of the BeanieHat and BeanieHatPricePolicy Components.
Step 6. Implement custom business logic in the BeanieHatPricePolicy Component
return null;
// Policy: Price = base price + $2.00*propellers
// Use values object for speed! This way we don't need to
// make a heavy remote + database call every time.

try
{
  // Get Value Object BeanieHatValue
  BeanieHatValue bhv = ((BeanieHat) item).getBeanieHatByValue();


  // Get item's base price
  theory.smart.axiom.units.Price p = bhv.price;


  // Calculate the price of the beanie hat
  double newValue = p.getValue() + 2.00*bhv.propellers;


  // Return a new price. Do NOT re-set the item's price.
  // That should always be the base price

  theory.smart.axiom.units.Price newPrice = theory.smart.axiom.units.PriceHome.create();
  newPrice.setValue(newValue);

  return newPrice;
}

catch (ClassCastException ce)
{

  // If we are here then the caller did not pass us a BeanieHat

  throw new java.rmi.RemoteException("BeanieHatPricePolicy: item is not a BeanieHat");
}
Step 7. Implement presentation logic for the new BeanieHat Component.
<%@ page import="examples.buybeans.item.*" %>
<%@ page import="examples.buybeans.tour.*" %>
<%-- COFFEE BEAN SPECIFIC PRODUCT INFORMATION --%>
<%-- BEANIEHAT SPECIFIC PRODUCT INFORMATION     --%>
<%
   if (myItemValue instanceof BeanieHatValue)
   {
   %>
  <tr>
    <td>
      <table width="95%" border="0" cellpadding="3" bgcolor="#FFFFFF" align="center">
       <tr bgcolor="#339966">
          <td> <font face="Arial, Helvetica, sans-serif" size="2" color="#FFFFFF"><b>Color:
            <%= ((BeanieHatValue) myItemValue).color %></b></font>
          </td>
          <td> <font face="Arial, Helvetica, sans-serif" size="2" color="#FFFFFF"><b>Propellers:
            <%= ((BeanieHatValue) myItemValue).propellers %></b></font>
          </td>
        </tr>
        <tr bgcolor="#CCCCCC">
          <td colspan=3> <font face="Arial, Helvetica, sans-serif" size="2" color="#000000">Each propeller raises the base price of a beanie hat by $2.00.</font> </td>
        </tr>
      </table>
    </td>
  </tr>
<%
   }
%>

|

|

|
|
|
|
Copyright © 2000 BEA Systems, Inc. All rights reserved.
|