|
|
|
|
|
|
Connecting the BEA E-Business Control Center to a Server
After starting the BEA E-Business Control Center, the first thing you need to do is connect to a server. While you must connect the E-Business Control Center to a server each time you use it, establishing new connections is simple and you can reuse connections after you create them.
This topic includes the following sections:
Gathering Connection Information
Before you can connect to a server, you will need to obtain the following information from your organization's Commerce Business Engineer (CBE) or other technical resource:
Warning: The server you connect to should ideally be a development or staging server, since the changes you make in the E-Business Control Center will affect the Web site running on this machine. Be sure you connect to a machine that is approved by your organization's technical staff.
Once you have gathered this information, you are ready to establish a connection using the Server Connection window.
Opening the Server Connection Window
When you start the E-Business Control Center, the Server Connection window automatically appears. If at any time you need to reopen the Server Connection window, simply select Connect from the BEA E-Business Control Center File menu.
Tip: You can also click the Connect To Server icon ( ) shown on the Explorer toolbar to open the Server Connection window.
If you have never established a connection to a server before, the Server Connection window opens with the New Connection tab selected, as shown in Figure 2-1.
Figure 2-1 Server Connection Window, New Connection Tab
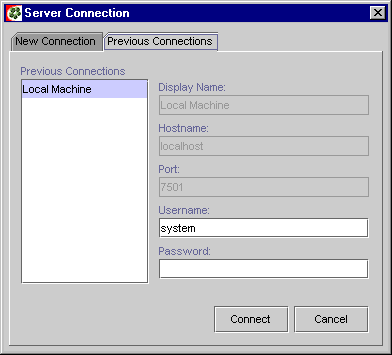
Note: If the New Connection tab is not selected, click the New Connection tab to select it. If you have previously established connections to one or more servers, the Server Connection window opens with the Previous Connections tab selected, as shown in Figure 2-2. Figure 2-2 Server Connection Window, Previous Connections Tab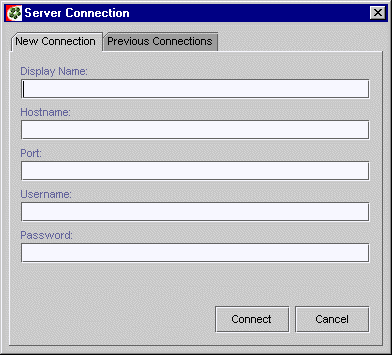
Establishing a New Connection
To establish a new connection to a server, be sure the Server Connection window is open and that the New Connection tab is selected. Then, follow these steps:
Note: The Display Name field is not required; it is for convenience purposes only. If you do not specify a name, the URL will be used.
Notes: If the connection is successful, the Connected To: message shown above the Explorer window changes from None to the name you specified in the Display Name field. The next time the Server Connection window appears, the Previous Connections tab will already be selected for you.
If you receive an error while trying to establish a connection, double check your connection information. If you entered this information correctly, contact your CBE to make sure the server is running. If the problem persists, work with your CBE to identify the nature of the problem.
Using Existing Connections
If you have already established a connection to a server, you can use the display name you previously provided to quickly reconnect to that same machine. To re-establish a connection to a server, be sure the Server Connection window is open and that the Previous Connections tab is selected. Then, follow these steps:
Notes: If the connection is successful, the Connected To: message shown above the Explorer window changes from None to the Display Name.
If you change your mind about re-establishing the connection, click Cancel to close the Server Connection window or click the New Connection tab to establish a new connection.
If you receive an error while trying to establish a connection, double check your connection information. If you entered this information correctly, contact your Commerce Business Engineer (CBE) to make sure the server is running. If the problem persists, work with your CBE to identify the nature of the problem.

|

|

|
|
|
|
Copyright © 2001 BEA Systems, Inc. All rights reserved.
|