

|
|
|
|
|
|
Working with Content Selectors
A content selector is one of several mechanisms that WebLogic Personalization Server provides for retrieving documents from a content management system. A document is a graphic, a segment of HTML or plain text, or a file that must be viewed with a plug-in. (We recommend that you store most of your Web site's dynamic documents in a content management system because it offers an effective way to store and manage information.)
Using content selectors, a Business Analyst (BA) can specify conditions under which WebLogic Personalization Server retrieves one or more documents. For example, a BA can use a content selector to encapsulate the following conditions: between May 1 and May 10, if a Gold Customer views this page, find and retrieve any documents that describe sailing along the Maine coast.
A BA uses the BEA E-Business Control Center to define the conditions that activate a content selector and to define the query the content selector uses to find and retrieve documents. Then, a Commerce Business Engineer (CBE) creates content selector JSP tags and a set of other JSP tags that display the content the content selector retrieves in JSPs.
This topic includes the following sections:
For a comparison of content retrieval methods available with WebLogic Personalization Server, refer to Methods for Retrieving and Displaying Documents.
What Are Content Selectors?
Content selectors specify conditions under which they query the content management system for documents. They consist of the following elements:
BAs create and modify the set of conditions in the E-Business Control Center.
BAs create and modify the query in the E-Business Control Center.
To extend the availability of the data in the array, CBEs can add attributes to the content selector JSP tag that cause WebLogic Personalization Server to store the array in a cache. Then, CBEs specify whether the scope of the cache applies to the application, session, page, or request.
To display the documents that are in the array (or the cache), a CBE must use the <es:forEachInArray> tag. Depending on the scope of the cache, a <es:forEachInArray> can access a content-selector cache that WebLogic Personalization Server created for another page and for another user.
Using Content-Selector Tags and Associated JSP Tags
To use the content selector features on a given JSP, a CBE must add calls to the content selector JSP tag and a set of associated tags.
This section contains the following subsections:
Attributes of the <pz:contentSelector> Tag
While BAs use the E-Business Control Center to configure the dynamic properties of a content selector, a CBE uses attributes of the content selector tag to do the following:
For a complete list and description of all content-selector attributes, refer to <pz:contentSelector> in the Personalization Server JSP Tag Library Reference chapter of this guide.
Identify the Content Selector Definition
The content selector definition that a BA creates in the E-Business Control Center determines the conditions that activate a content selector and the query that the active content selector runs.
To refer to this definition, you use the rule attribute:
<pz:contentSelector rule= { definition-name | scriptlet } >
You can use a scriptlet to determine the value of the rule attribute based on additional criteria. For example, you use a content selector in a heading JSP (heading.inc), which is included in other JSPs. A BA creates different content selectors for each page that includes heading.inc.
The CBE uses a scriptlet in heading.inc to provide a value based on the page that currently displays the included JSP file. For example,
<%
   String banner = (String)pageContext.getAttribute("bannerPh");
   banner = (banner == null) ? "cs_top_generic" : banner;
%>
<!-- ------------------------------------------------------------- -->
<table width="100%" border="0" cellspacing="0" cellpadding="0" height="108">
  <tr><td rowspan="2" width="147" height="108">
  <pz:contentSelector rule="<%= banner %>" ... />
</td>
Identify the JNDI Home for the Content Management System
The content selector tag must use the contentHome attribute to specify the JNDI home of the content management system. If you use the reference content management system or a third-party integration, you can use a scriptlet to refer to the default content home. Because the scriptlet uses the ContentHelper class, you must first use the following tag to import the class into the JSP:
<%@ page import="com.beasys.commerce.content.ContentHelper"%>
Then, when you use the content selector tag, specify the contentHome as follows:
<pz:contentSelector
contentHome="<%=ContentHelper.DEF_DOCUMENT_MANAGER_HOME %>"
... />
If you create your own content management system, you must specify the JNDI home for your system instead of using the ContentHelper scriptlet. In addition, if your content management system provides a JNDI home, you can specify that one instead of using the ContentHelper scriptlet.
Define the Array That Contains Query Results
You can use the following attributes to configure the array that contains the results of the content-selector query:
For example, <pz:contentSelector id="docs" .../> places documents in an array named docs.
For example, <pz:contentSelector max="10" .../> causes the content selector to stop retrieving documents when the array contains 10 documents.
This attribute is optional and defaults to -1, which means no maximum.
This attribute is optional. If you do not specify this attribute, the content selector returns the query results in the order that the content management system returns them.
For example, <pz:contentSelector sortBy="creationDate" .../> places the documents that were created first at the beginning of the array.
The tag
<pz:contentSelector sortBy="creationDate ASC, title DESC" .../>
places older documents at the beginning of the array. If any documents were created on the same day, it sorts those documents counter-alphabetically by title.
Create and Configure the Cache to Improve Performance
To extend accessibility to the array, and to improve performance, you can optionally use content-selector attributes to create and configure a cache that contains the array contents. Without the cache, you can access the content-selector array only from the current JSP page, and only for the customer request that created it. In addition, each time a customer requests a JSP that contains the content selector tag, the content selector must run the query, potentially slowing the overall performance of WebLogic Personalization Server. To cache the contents of the array, define the following attributes:
To deactivate the cache, set the attribute to false or do not include it. For example, the following statements are equivalent:
<pz:contentSelector cache=false .../> or
<pz:contentSelector .../>
For example, you create the following tag:
<pz:contentSelector cache=true cacheTimeout="300000" .../>
A customer requests the page that contains this content selector tag. The user leaves the page but, 2 minutes (120000 milliseconds) later, requests it again. The content selector evaluates its conditions, but because only 120000 milliseconds have expired since the content selector created the cache, it does not re-run the query. Instead, it displays the documents in the cache.
Associated Tags That Support Content Selectors
The following JSP tags support content-selector functions:
For example, if you create a content selector that runs a query for all customers in the Gold Customer customer segment, the content selector must access the customer profile to determine if it matches the customer segment.
Even if a content selector does not currently use the customer profile for its conditions, we recommend that you include the <um:getProfile> tag; its affect on performance is minimal and with the tag, a BA can add customer-profile conditions to the content selector without requiring a CBE to modify JSPs.
The tag must be located closer to the beginning of the JSP than the content selector tag.
You can also use attributes of the <pz:contentSelector> tag, such as sortBy, to work with the attributes of documents in the array. For more information, refer to Attributes of the <pz:contentSelector> Tag.
Common Uses of Content-Selector Tags and Associated Tags
The combination of content selector definitions, tag attributes, and associated JSP tags creates a powerful set of tools for matching documents to customers in specific contexts. The following tasks are the most common uses of content selectors and associated tags:
To Retrieve and Display Text-Type Documents
Note: This section assumes that the content selector query that the BA created in E-Business Control Center includes a filter to retrieve only text documents.
<%@ page import="com.beasys.commerce.content.ContentHelper"%> <%@ taglib uri="es.tld" prefix="es" %>
<%@ taglib uri="pz.tld" prefix="pz" %>
<%@ taglib uri="um.tld" prefix="um" %>
<um:getProfile>
If the JSP already uses this tag for some other purpose, it probably includes other attributes. Make sure that the tag is closer to the beginning of the JSP than the <pz:contentSelector> tag, which you create in the next step.
<pz:contentSelector rule="SpringSailing"
contentHome="<%=ContentHelper.DEF_DOCUMENT_MANAGER_HOME %>"
id="textDocs"/>
<es:forEachInArray array="<%=textDocs%>" id="aTextDoc" type="com.beasys.commerce.axiom.content.Content">
<% "<P>" + aTextDoc + "</P>" %>
</es:forEachInArray>
Note: The above tags assume that the content selector query that the BA created in the E-Business Control Center includes a filter to retrieve only text documents. To verify the content type before you display it, you can surround the <% "<P>" + aTextDoc + "</P>" %> scriptlet with another scriptlet. For example:
<% if (aTextDoc .getMimeType().contains("text"))
{
<% "<P>" + aTextDoc + "</P>" %>
}
%>
WebLogic Personalization Server deploys the modifications. If you specified a page-check rate for your Web application, WebLogic Personalization Server waits for the page-check interval to expire before deploying any changes. For more information on setting the page-check interval, refer to the Performance Tuning Guide.
To Retrieve and Display Image-Type Documents
<%@ page import="com.beasys.commerce.content.ContentHelper"%> <%@ taglib uri="es.tld" prefix="es" %>
<%@ taglib uri="pz.tld" prefix="pz" %>
<%@ taglib uri="um.tld" prefix="um" %>
<%@ taglib uri="cm.tld" prefix="cm" %>
<um:getProfile>
If the JSP already uses this tag for some other purpose, it probably includes other attributes. Make sure that the tag is closer to the beginning of the JSP than the <pz:contentSelector> tag, which you create in the next step.
<pz:contentSelector rule="SpringSailing"
contentHome="<%=ContentHelper.DEF_DOCUMENT_MANAGER_HOME %>"
id="ImageDocs"/>
<es:forEachInArray array="<%=ImageDocs%>" id="anImageDoc" type="com.beasys.commerce.axiom.content.Content">
<img src="<cm:printProperty id="anImageDoc" rule="docID"
encode="URL">" >
</es:forEachInArray>
Note: The above tags assume that the content selector query that the BA created in E-Business Control Center includes a filter to retrieve only image documents. To verify the content type before you display it, you can surround the <img> tag with a scriptlet. For example:
<% if (anImageDoc .getMimeType().contains("image"))
{
<img src="<cm:printProperty id="anImageDoc" rule="docID"
encode="URL">" >
}
%>
WebLogic Personalization Server deploys the modifications. If you specified a page-check rate for your Web application, WebLogic Personalization Server waits for the page-check interval to expire before deploying any changes. For more information on setting the page-check interval, refer to the Performance Tuning Guide.
To Retrieve and Display a List of Documents
<%@ page import="com.beasys.commerce.content.ContentHelper"%> <%@ taglib uri="es.tld" prefix="es" %>
<%@ taglib uri="pz.tld" prefix="pz" %>
<%@ taglib uri="um.tld" prefix="um" %>
<um:getProfile>
If the JSP already uses this tag for some other purpose, it probably includes other attributes. Make sure that the tag is closer to the beginning of the JSP than the <pz:contentSelector> tag, which you create in the next step.
<pz:contentSelector rule="SpringSailing" <pz:contentSelector rule="SpringSailing"
contentHome="<%=ContentHelper.DEF_DOCUMENT_MANAGER_HOME %>"
id="docs"/>
<ul>
<es:forEachInArray array="<%=docs%>" id="aDoc"
type="com.beasys.commerce.axiom.content.Content">
<li>The document title is: <cm:printProperty id="aDoc"
rule="Title" encode="html" />
</es:forEachInArray>
</ul>
WebLogic Personalization Server deploys the modifications. If you specified a page-check rate for your Web application, WebLogic Personalization Server waits for the page-check interval to expire before deploying any changes. For more information on setting the page-check interval, refer to the Performance Tuning Guide.
To Access a Content-Selector Cache on a Different JSP
<pz:contentSelector rule="SpringSailing"
contentHome="<%=ContentHelper.DEF_DOCUMENT_MANAGER_HOME %>"
id="docs"
useCache=true cacheID="SpringSailingDocs" cacheTimeout="120000"
cacheScope="application" />
These attributes create a cache that WebLogic Personalization Server maintains for 2 minutes (120000 milliseconds) and that can be accessed using the name SpringSailingDocs by any user from any page in the Web application. For more information about possible values for cacheScope, refer to Create and Configure the Cache to Improve Performance.
<%@ taglib uri="es.tld" prefix="es" %>
<ul>
<es:forEachInArray array="<%=SpringSailingDocs%>" id="aDoc"
type="com.beasys.commerce.axiom.content.Content">
<li>The document title is: <cm:printProperty id="aDoc"
rule="Title" encode="html" />
</es:forEachInArray>
</ul>
How Content Selectors Select Documents
When a user requests a JSP that contains a content selector tag, the following process occurs:
Note: For information about the Advisor, see Creating Personalized Applications with the Advisor.
For information about the Rules Engine, see Introducing the Rules Manager.
Note that you must use other tags to display the documents that are in the array.
Figure 1-4 How Content Selectors Select Documents
For more information about using this tag, refer to Using Content-Selector Tags and Associated JSP Tags.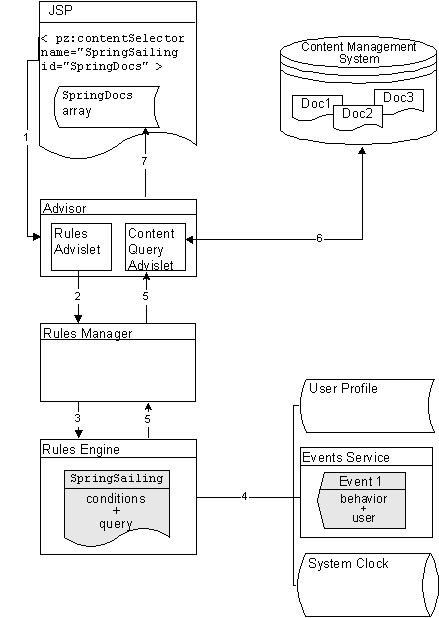

|

|

|
|
|
|
Copyright © 2001 BEA Systems, Inc. All rights reserved.
|