

|
|
|
|
|
|
Sample Applications, Administration Tools, and Security
Out-of-the-box, the Campaign Manager for WebLogic, WebLogic Commerce Server, and WebLogic Personalization Server products include sample applications that provide you with a starting point for building your own e-commerce applications, and tools that allow you to effectively administer and manage those applications.
As such, these sample applications and administration tools must occasionally implement J2EE security measures. For example, because the JavaServer Page (JSP) templates included in the WebLogic Commerce Server simulate a real-world storefront (including a check out process), some of the templates must be protected. Similarly, not everyone in an organization should have the ability to make modifications to your critical e-business applications. Thus, security measures are also required and implemented in the included administration tools.
While the inner workings of security in these applications has been addressed in previous topics, this topic describes how a customer's user experience might be affected by security in the sample applications (that is, the WebLogic Commerce Server sample storefront application and the WebLogic Personalization Server example portal application). It also provides details about credit card security measures, and describes how the security implemented in the administration tools may affect administrative users.
This topic includes the following sections:
Security in the Sample Storefront Application
The WebLogic Commerce Server sample storefront application includes a set of JavaServer Page (JSP) templates that provide a model for your home page, search and browse pages, shopping cart pages, and many other pages that are commonly used on e-commerce sites. Web content developers can use the JSP templates and add customized HTML tags to match your organization's branding requirements, design preferences, navigation options, and the content of your catalog. In summary, the JSP templates are a great starting point for building your own e-commerce Web application!
Notes: You can view the sample storefront application by first starting the WebLogic Commerce Server and then selecting Start —>Programs —> BEA WebLogic E-Business Platform —> BEA WebLogic Commerce Server 3.5 —> WLCS Templates (on Windows systems).
The default username/password combination for the wlcs templates is democustomer and password.
The files for the sample storefront application are located in $WL_COMMERCE_HOME/WebLogicCommerce3.5/config/wlcsDomain/
applications/wlcsApp/wlcs directory, where $WL_COMMERCE_HOME is the directory in which you installed the product.
Because some e-commerce Web pages display or allow registered customers to modify personal information (such as billing information or demographic data), the included JSP templates that serve these purposes must be protected. This section describes which JSP templates are protected, how users can access the templates, and the techniques used to implement these security measures.
Protected JavaServer Page (JSP) Templates
Unless a Web page contains or requests sensitive customer information, there is no reason to prevent any user from viewing that page. For example, a potential customer who visits your e-commerce site for the first time should be able to browse through your product catalog with ease. Typical browsing interactions (excluding campaigns) should not require this user to register or log into your Web site.
With this concept in mind, the WebLogic Commerce Server sample storefront application allows anonymous users to move through the JSP templates freely, until they request a page that is protected (that is, contains or requests sensitive information). Protected pages are those located below the commerce/order and commerce/user directories. This section describes how these JSP templates are protected, and includes the following subsections:
main.jsp Template Versions
The main.jsp template is the default home page for the wlcs sample storefront application, and can be accessed by anonymous users. Anonymous users can browse the store or perform other activities (search, view cart, and so on) using the hyperlinks presented on the main.jsp template. Essentially, anonymous users can access all of the product catalog JSP templates, which are described in detail in the "Product Catalog JSP Templates" chapter of the Building a Product Catalog documentation. (In this documentation you will also find a detailed explanation of the main.jsp template.)
Although a Log In link is provided on the main.jsp template, users are not immediately required to log in. Only when an anonymous user attempts to access a protected Web page are they prompted for a username and password. Customers who chose to log in prior to accessing protected pages and are already authenticated are not prompted again unless they log out or their session times out.
If a user has successfully logged in, that user is considered a registered customer, welcomed with a personalized greeting, and presented with additional links on the secured version of the main.jsp template (secureMain.jsp).
Form-based Authentication and Access to Protected Pages
If an anonymous user attempts to load a protected page or explicitly indicates their intent to log in (by clicking the Log In link on the main.jsp template), the wlcs application invokes form-based authentication techniques to present the login.jsp template to the user. The top portion of this template provides form fields for the user to enter and submit a previously created username and password combination.
Note: Form-based authentication lets developers customize the authentication user interface presented by an HTTP browser. In other words, you can specify the .html form or .jsp file that prompts for the username and password.
When the user submits their username and password to gain access to their account, the j_security_check servlet passes this information to the WebLogic Server for verification. The security mechanism in WebLogic Server verifies that the user is part of the wlcs_customer group and that the correct password is supplied.
If the supplied username/password combination is valid and the user arrived at the login.jsp template on their way to a protected page, the user is logged in and automatically directed to the protected JSP they were attempting to access. If the username/password combination was validated after explicitly requesting the login.jsp from the main.jsp template, the secured version of the main.jsp template (secureMain.jsp) is simply loaded. In either case, if the supplied username/password combination is deemed invalid, the badlogin.jsp template is displayed. The badlogin.jsp template is essentially the same as the login.jsp template, but includes an appropriate error message.
Notes: The login.jsp and badlogin.jsp templates are described in detail in the "Customer Registration and Login Services" chapter of the Registering Customers and Managing Customer Services documentation.
While you are viewing the WebLogic Commerce Server sample storefront application, your browser may display information related to the demonstration certificate in a pop-up window. If you use the wlcs sample application as a basis for your own, be sure to purchase and install a real server license from a certificate authority. For more information about server certificates, see "Managing Security" in the BEA WebLogic Server Administration Guide.
Session Inactivity
If an authenticated user does not interact with the templates for a period of 15 minutes, the session will be deemed inactive. If the user then returns to the templates and attempts to access a protected page, the sessiontimeout.jsp template will be displayed. This page informs the user that because of the inactivity, they have automatically been logged out of the system and will need to log in again. This automatic logout prevents unauthorized individuals from accessing a logged-in user's account information if the user were to leave their machine for a certain period of time.
Note: The session timeout interval can be customized to something other than the default value of 15 minutes. If you wish to modify this value, see Session Timeout.
SSL and Declarative Transport
Lastly, the Webflow and Pipeline mechanisms that direct the presentation and business logic associated with the JSP templates make use of SSL and declarative transport mechanisms. Links that invoke protected JSP files, as well as certain input processors and Pipelines, need to be accessed via the HTTPS protocol. There are a number of these links already defined in the wlcs application. For more information on these topics, see Links Using HTTPS.
Secured JSP templates that rely on SSL also require a setting that indicates the transport guarantee. This guarantee can be CONFIDENTIAL or INTEGRAL. A CONFIDENTIAL setting prevents other entities from observing the contents of the transmission, while an INTEGRAL setting prevents the data from being changed while transmitting between the client and server. For more information on these settings, see Secure JavaServer Pages (JSPs).
Credit Card Security Service
All credit card information your customers provide is considered sensitive and is encrypted for security purposes. This information is decrypted only when absolutely necessary during specfic payment processing activities (such as authorization). On the order confirmation JSP template (confirmorder.jsp), for example, only the last 4 digits of a customer's credit card are displayed.
This section provides detailed information about the credit card security service, including:
Encryption/Decryption Implementation
The WebLogic Commerce Server product's encryption mechanism relies on libraries from the WebLogic Server platform and is based upon RSA's public key infrastructure. A public key is used to encrypt a customer's credit card information, while a private key is used to decrypt it when required.
The public key is stored in the database for use by the EncryptCreditCardPC Pipeline component, while the private key is itself encrypted using a password you supply, and stored in the database. When invoked from the Webflow, the EncryptCreditCardPC Pipeline component reads the customer-provided credit card information from the Pipeline session, encrypts it using the public key, and then places it back into the Pipeline session. This encrypted data is subsequently persisted to the database. Decryption is accomplished using a back-end component and the private key. Again, decryption is initiated only in stages of the ordering process where this data is absolutely necessary.
Notes: For more information about RSA security standards, see http://www.rsasecurity.com/. For more technical information about the Credit Card Security Service, please contact your BEA representative.
Customizable Security Settings
Although the WebLogic Commerce Server product specifies default settings for the Credit Card Security Service, you can customize them. The security settings reside in the weblogiccommerce.properties file (located in the $WL_COMMERCE_HOME directory, where $WL_COMMERCE_HOME is the directory in which you installed WebLogic Commerce Server). These security settings are shown in Listing 4-1.
Listing 4-1 Security Settings in weblogiccommerce.properties
###################################################
# Properties required for the Security Service
###################################################
# Security services are turned on by setting this property to true.
# Commenting out the property or setting it to false will disable
# security.
is.encryption.enabled=true
# The name of the security table and column names for the public
# and private keys can be specified using the properties below.
security.table.name=WLCS_SECURITY
security.backup.table=WLCS_SECURITY_BACKUP
public.key.column.name=PUBLIC_KEY
private.key.column.name=PRIVATE_KEY
# The key bit size desired
# Key bit length and length of data that can be encrypted are related # as follows:
# KEY BIT LENGTH(bits)           DATA LENGTH (bytes)
#	512				53
#	1024				117
#	2048 (MAX LENGTH)				245
key.bit.size=1024
# WARNING! Remember that setting this property will start up the
# server without prompting for a password. The password will be read # from this property which makes the encryption vulnerable to an
# inside attack.
private.key.password=WLCS
First, the is.encryption.enabled property enables encryption mechanisms. Please note that a value of false (or no value at all) will disable encryption mechanisms. BEA has assigned this property a default value of true.
Next is a series of properties that allow you to specify the names of the security tables (primary and backup) and the columns in which the public and private keys will be stored. BEA has assigned default values to these properties, but you can modify them based on your database.
Following the properties related to the database, the key.bit.size property allows you to specify the encryption key length. By default, WebLogic Commerce Server ships with a 1024-bit key size, although you may want to modify the encryption strength by changing the key size. Table 4-1 illustrates the possible key bit values.
|
Length (Bits) |
Data Length (Bytes) |
|---|---|
|
512 |
53 |
|
1024 |
117 |
|
2048 |
245 |
Note: The higher the key size, the stronger the encryption and more secure the data. However, keep in mind that there is a trade-off in increasing the size of the key—your data may be more secure, but it may take longer to encrypt the data.
Lastly, the private.key.password property allows you to specify, in the weblogiccommerce.properties file, the password used to encrypt the private key. Please note that BEA does not recommend use of this property. Rather, the private key should be supplied by an administrator during server startup. For more information about supplying the private key, see Methods for Supplying the Private Key Encryption Password.
Note: If not used, the private.key.password property should be commented out with a # symbol. BEA has assigned this property a default value of WLCS, but this is for demonstration purposes only.
Methods for Supplying the Private Key Encryption Password
As previously mentioned, the private key used to encrypt customer credit cards is itself encrypted with a password before being stored in the database. There are three methods by which you can supply this password:
Specifying the Password in weblogiccommerce.properties (Default)
The first method for specifying the private key encryption password is to specify the password as a value for a property in the weblogiccommerce.properties file.
Note: BEA does not recommend this method because by providing the password in a simple text file, you leave yourself vulnerable to security attacks. Anyone who gains access to this file can read the password you use to encrypt the private key, and thus gain access to it.
To use this method, follow these steps:
Specifying the Password at Server Startup Using the Console
The second method for specifying the private key encryption password is for an administrator to specify the password at server startup using the server console.
To use this method, follow these steps:
Specifying the Password After Server Startup Using a Secure Web Form
The third method for specifying the private key encryption password allows an administrator to enter the password on a secure Web form, so the password is stored in memory on your system instead of in a text file.
To use this method, follow these steps:
Figure 4-1 security_getPassword.html
On submission, this page will invoke the EncryptionServlet and KeyGeneratorServlet registered in the web.xml file (located in the $WL_COMMERCE_HOME/config/wlcsDomain/applications/wlcsApp/tools/Web-inf directory, where $WL_COMMERCE_HOME is the directory in which you installed the product).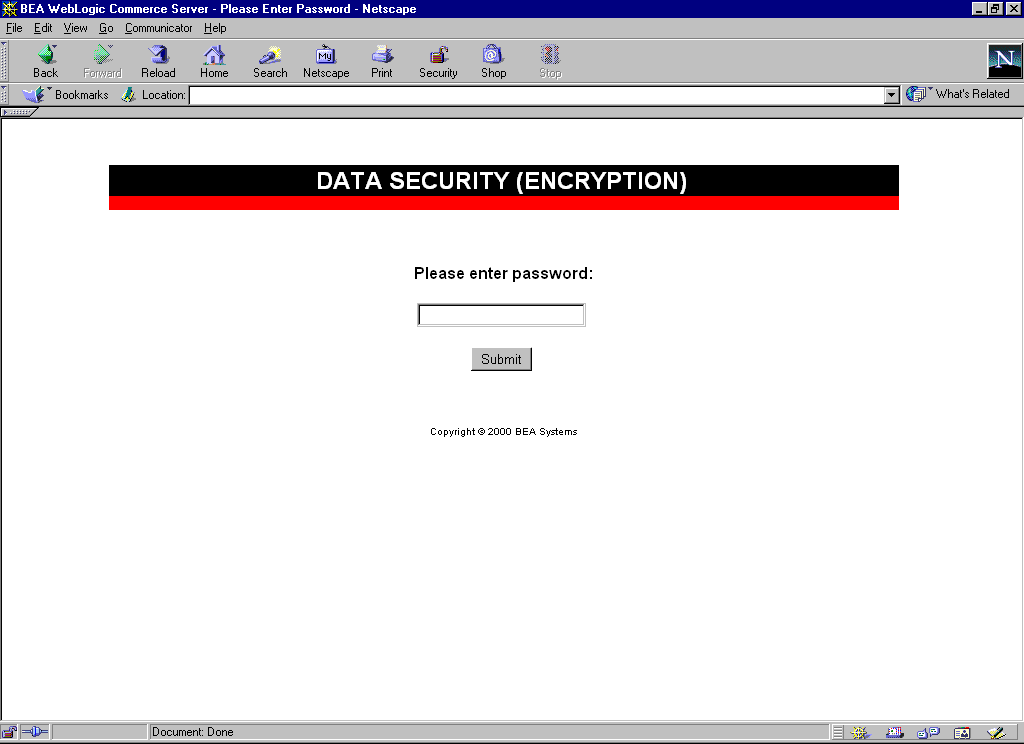
Important Notes About Supplying Your Password
You must supply the password for all nodes in a cluster. Should one node in the cluster fail, other machines that know the private key encryption password can be used for failover.
The first time you enter the password, you will be asked to confirm whether or not you want to generate new keys. If this is indeed the first time you are entering the password, you do want to generate new keys. However, be sure to select a password that is memorable. All credit cards accepted by your site will be encrypted using this password, and cannot be decrypted if you forget your password.
If you are asked to confirm whether or not you want to generate new keys and you are using the same password, then the keys cannot be found in the database. If no data was encrypted using the old keys, you can regenerate the keys. However, if data has already been encrypted using the old keys, this data will be lost because it cannot be read using the new keys. If you have data encrypted with the old keys, you should stop the server, check the database, and verify the properties in the weblogiccommerce.properties file to ensure that the system is set up properly.
During server startup, any orders placed before the password is entered will be persisted with a payment transaction in the RETRY state. After supplying the password, administrators should use the Payment Management Administration Tool to reauthorize the transaction. For more information about using the Payment Management Administration Tool, see "Using the Order and Payment Management Pages" in the Managing Purchases and Processing Orders documentation.
What if I Want to Change My Password?
Because all the credit cards that have been encrypted use the private key encryption password, it is not recommended that you change this password. However, there may be the rare occasion (for example, if the password has been compromised) when you need to change the password. Changing the password means changing the public and private key pair. Therefore, you must follow this process when changing the password:
Note: Changing the password is especially difficult if you have a lot of encrypted data. Again, this process is not recommended and should not be done unless absolutely required.
Security in the Example Portal Application
The WebLogic Personalization Server example portal application includes a set of JavaServer Page (JSP) templates that provide a model for your customers' portal pages. Internet portals are a key part of many e-commerce applications; they provide an entry point to the Internet as well as value-added services such as searching and application integration. Within portal pages are a number of portlets, or highly focused channels of information. A portal can contain many of these information channels. For example, an online retail portal could provide a variety of interactive merchandise portlets, each presenting a different specialty category such as mystery books, classical music CDs, and baseball memorabilia. Among other things, portal technology allows customers to select and arrange the portlets that appear within their portals, allowing for truly personalized information display.
Web content developers can use the JSP templates and add customized HTML tags to match your organization's branding requirements, design preferences, navigation options, and the default content of your portal. Like the WebLogic Commerce Server (storefront) JSP templates, the WebLogic Personalization Server (portal) JSP templates are a great starting point for building your own portal Web application!
Notes: You can view the example portal application by first starting the WebLogic Commerce Server and then selecting Start —>Programs —> BEA WebLogic E-Business Platform —> BEA WebLogic Commerce Server 3.5 —> Example Portal (on Windows systems).
The default username/password combination for the exampleportal templates is acme and acme.
The files for the example portal application are located in $WL_COMMERCE_HOME/WebLogicCommerce3.5/config/wlcsDomain/
applications/wlcsApp/exampleportal directory, where $WL_COMMERCE_HOME is the directory in which you installed the product.
Because some portal Web pages display customized content or allow registered users to modify personal information (such as preferences or username and password), the included JSP templates that serve these purposes must be protected. This section describes which JSP templates are protected, how users can access the templates, and the techniques used to implement these security measures.
The portal.jsp Template
The portal.jsp template is the default home page for the exampleportal application; it initially allows all anonymous users to access it. The portal anonymous users are presented with is a default portal. In other words, it contains the portlets, color schemes, organization, content, and so on that are defined for the default portal, and is not currently customized to the user's own preferences.
Because the information contained within a portal page is generated based on the preferences of an individual user, however, the WebLogic Personalization Server example portal application requires that users be authenticated in order to fully use the application.
The portal.jsp template does not automatically prompt the user for a username and password using basic or form-based authentication techniques; it requires the user to initiate the login process by clicking the appropriate link/button. Although not fully declarative, the portal.jsp template is login-aware. Therefore, the portal.jsp template behaves differently for anonymous and authenticated users. Once the portal user has successfully logged in, that user is considered a registered user, welcomed with a personalized greeting, and presented with additional links on the personalized version of the portal.jsp template.
Logging Into the Portal
The example portal application contains a number of JSPs that handle user login and delegate authentication activities to the WebLogic Server.
When a user clicks the Sign In link available from the portal.jsp template, the following occurs:
This JavaServer Page is protected by a security constraint defined in the example portal Web application's web.xml deployment descriptor. This constraint causes form-based authentication (via the login.jsp template) to be invoked prior to this page being executed.
The form displayed when a portal user needs to enter their username and password is the login.jsp template. The login.jsp template is written in a non-portal specific manner so it can be reused as is when copying the example portal directory to create a new portal.
The loginRequest JSP, which wraps both the _userlogin.jsp and login.jsp pages, is invoked by the servlet container to delegate form-based authentication activities to the WebLogic Server (via the j_security_check servlet). The loginRequest JSP is also configured using the Web application's web.xml deployment descriptor.
Following authentication, control is passed back to the _userlogin JSP, which defined the JSP template where the user should be directed once user authentication has completed successfully by the j_security_check servlet (that is, loginSuccess.jsp). If the portal user is a member of multiple groups, this page allows the user to select a group. Otherwise, it simply forwards the user to the portal.jsp template.
A Prerequisite for Logging In
An important point to note about the portal user login process is that in order for a portal user to arrive at the login page ( _userlogin.jsp), the user must be a member of the AcmeUsers group. This is because of the definitions in the exampleportal application's web.xml deployment descriptor. However, by coming to the portal.jsp template, the portal user is automatically considered a member of the AcmeUsers group.
Security in the Administration Tools
In addition to the sample storefront and portal applications, the Campaign Manager for WebLogic, WebLogic Commerce Server, and WebLogic Personalization Server also include some tools that members of your organization will use to administer your e-commerce Web site. Presently, these tools are available in two forms: the Administration JSP application (accessed via a Web browser) and the stand-alone E-Business Control Center graphical user interface (GUI) application.
Because both of these tools allow only authorized individuals in your organization to make modifications to your e-commerce Web site, the administration tools also require some security protections. The security implemented in both types of administration tools are discussed in the following sections:
The Administration JSPs
The purpose of the JSP-based Administration Tool is to provide administrative users of the Campaign Manager for WebLogic, WebLogic Commerce Server, and WebLogic Personalization Server with the ability to manage various aspects of an e-commerce Web application. The Administration Tool includes JSPs for User, Property Set, Portal, Content, Webflow/Pipeline, Catalog, Order, and Payment Management. Thus, access to these Administration JSPs must be granted only to authorized users.
Notes: You can view the Administration JSPs by first starting the WebLogic Commerce Server and then selecting Start —>Programs —> BEA WebLogic E-Business Platform —> BEA WebLogic Commerce Server 3.5 —> Administration Tools (on Windows systems).
The WebLogic Commerce Server defines an Administrator username for you, with a password of password (lowercase characters).
The files for the Administration Tools application are located in $WL_COMMERCE_HOME/WebLogicCommerce3.5/config/wlcsDomain/
applications/wlcsApp/tools directory, where $WL_COMMERCE_HOME is the directory in which you installed the product.
When users attempt to access the JSP-based Administration Tool, the application invokes basic authentication techniques to present a login screen to the user, as shown in Figure 4-2.
Figure 4-2 Administration Login Screen
Note: With basic authentication, the WebLogic Server instructs the Web client to prompt for a username and password, which the server then uses to authenticate a principal. When the user submits their username and password to gain access to their account, the j_security_check servlet passes this information to the WebLogic Server for verification. The security mechanism in WebLogic Server verifies that the user is part of the admin group and that the correct password is supplied. If the user has supplied a valid username and password combination, WebLogic Server authenticates the user and grants access to the Administration JSPs. Presently, users who have been successfully authenticated by the WebLogic Server have permission to use all the features available in the Administration JSP tools. In other words, authenticated users are "superusers;" the application permits them to make all possible modifications, and there are no restrictions based on the user's organizational role. The E-Business Control Center The E-Business Control Center is an application that is packaged with the Campaign Manager for WebLogic, WebLogic Commerce Server, and WebLogic Personalization Server, and is designed to simplify the tasks that are necessary to create and maintain a truly personalized Web site. To meet this objective, the E-Business Control Center guides both business and technical users through a variety of tasks, ensuring that people in these diverse roles can focus on the aspects of e-business management that are relevant to them. The E-Business Control Center is similar to the Administration JSPs in that it allows certain, privileged users to affect the content and behavior of a Web site. However, the similarities end there. First, the E-Business Control Center is a stand-alone application that is started like the Campaign Manager for WebLogic, WebLogic Commerce Server, and WebLogic Personalization Server applications (that is, the E-Business Control Center is not started within a Web browser). Second, the E-Business Control Center is built using Java Swing components and the NetBeans IDE, rather than JavaServer Pages. As such, the appearance of the interface can be better customized and the amount of native (non-Java) code used in the application can be minimized. Note: To learn more about Java Swing components or the NetBeans IDE, see the Java Tutorial "Getting Started with Swing" or the NetBeans Web site at http://www.netbeans.org, respectively. To make modifications to a Web site using the E-Business Control Center, a user must connect to a server by providing some connection information, including a username and password combination. One of the E-Business Control Center's Server Connection windows is shown in Figure 4-3. Figure 4-3 Server Connection Window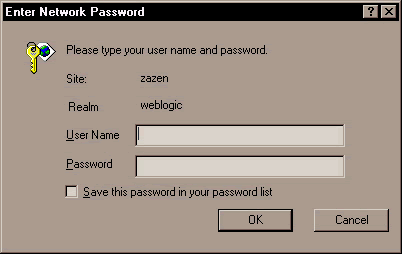
Note: For more information about the Server Connection window and the information required to connect, see "Connecting the E-Business Control Center to a Server" in the Using the E-Business Control Center documentation. When a user enters their information into the Server Connection window, the E-Business Control Center uses WebLogic Server realm authentication to create a JDNI context, which it then uses to look up Enterprise JavaBeans (EJBs) on the server side. For more information about WebLogic Server security realms and authentication, see "Security Realms" and other, related topics in the "Security Fundamentals" section of the Programming WebLogic Security documentation. Presently, users who have been successfully authenticated by the WebLogic Server have permission to use all the features available in the E-Business Control Center. In other words, authenticated users are "superusers;" the application permits them to make all possible modifications, and there are no restrictions based on the user's organizational role. Note: The features available to authenticated users of the E-Business Control Center depend on the version of the application present in your organization. Versions of the E-Business Control Center are determined by product license. For more information on application versions, see "What Does the E-Business Control Center Provide" in the Introduction of the Using the E-Business Control Center documentation.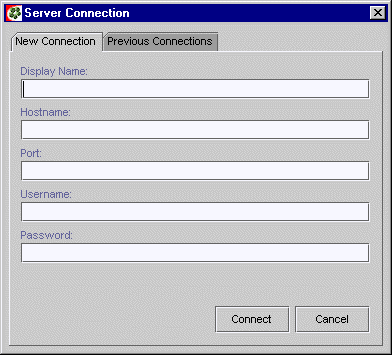

|

|
|
|
|
Copyright ©
2001 BEA Systems, Inc. All rights reserved.
|